
The Edge+ in this guide is treated as the Motorola Edge+ (2023), a recent Motorola Android phone with eSIM support on compatible unlocked models and regions. On current Motorola Android builds, the relevant setup path is usually Settings > Network & internet > SIMs, though exact wording can vary slightly by software version or carrier firmware.
An iRoamly travel eSIM is useful when you want mobile data abroad without swapping your physical SIM. Install it while you still have a stable internet connection, then choose it for travel data when you arrive.
This guide covers both ways to install the iRoamly eSIM on Edge+: scanning the QR code and entering the details manually. The QR method is fastest, while manual entry helps when another device is not available to display the QR code or the camera cannot scan it.
Before You Set Up Your iRoamly eSIM
Connect your Edge+ to stable Wi-Fi before starting. eSIM download needs internet access.
Confirm your Edge+ is unlocked and that your exact region/carrier variant supports eSIM.
Keep your iRoamly QR code or manual details ready. Manual setup usually needs the SM-DP+ Address, Activation Code, and sometimes an optional confirmation code.
Sign in to the Google account used on the phone if your Android build asks for account verification during setup.
Install the eSIM 1-2 days before travel if your plan allows it, but check the plan details first. iRoamly plan validity starts from activation, and the exact activation trigger can vary by plan.
Do not delete the iRoamly eSIM after installing unless iRoamly support tells you to. Many eSIM profiles cannot be reinstalled after deletion.
Check the plan details for voice and SMS. iRoamly travel eSIM plans may be data-only, and calls or texts are not included unless the specific plan says so.
Method 1: Install eSIM by Scanning a QR Code
1. Open Settings on your Edge+, then tap Network & internet.
You should see Android network settings with options for internet, SIMs, hotspot, VPN, and related controls.
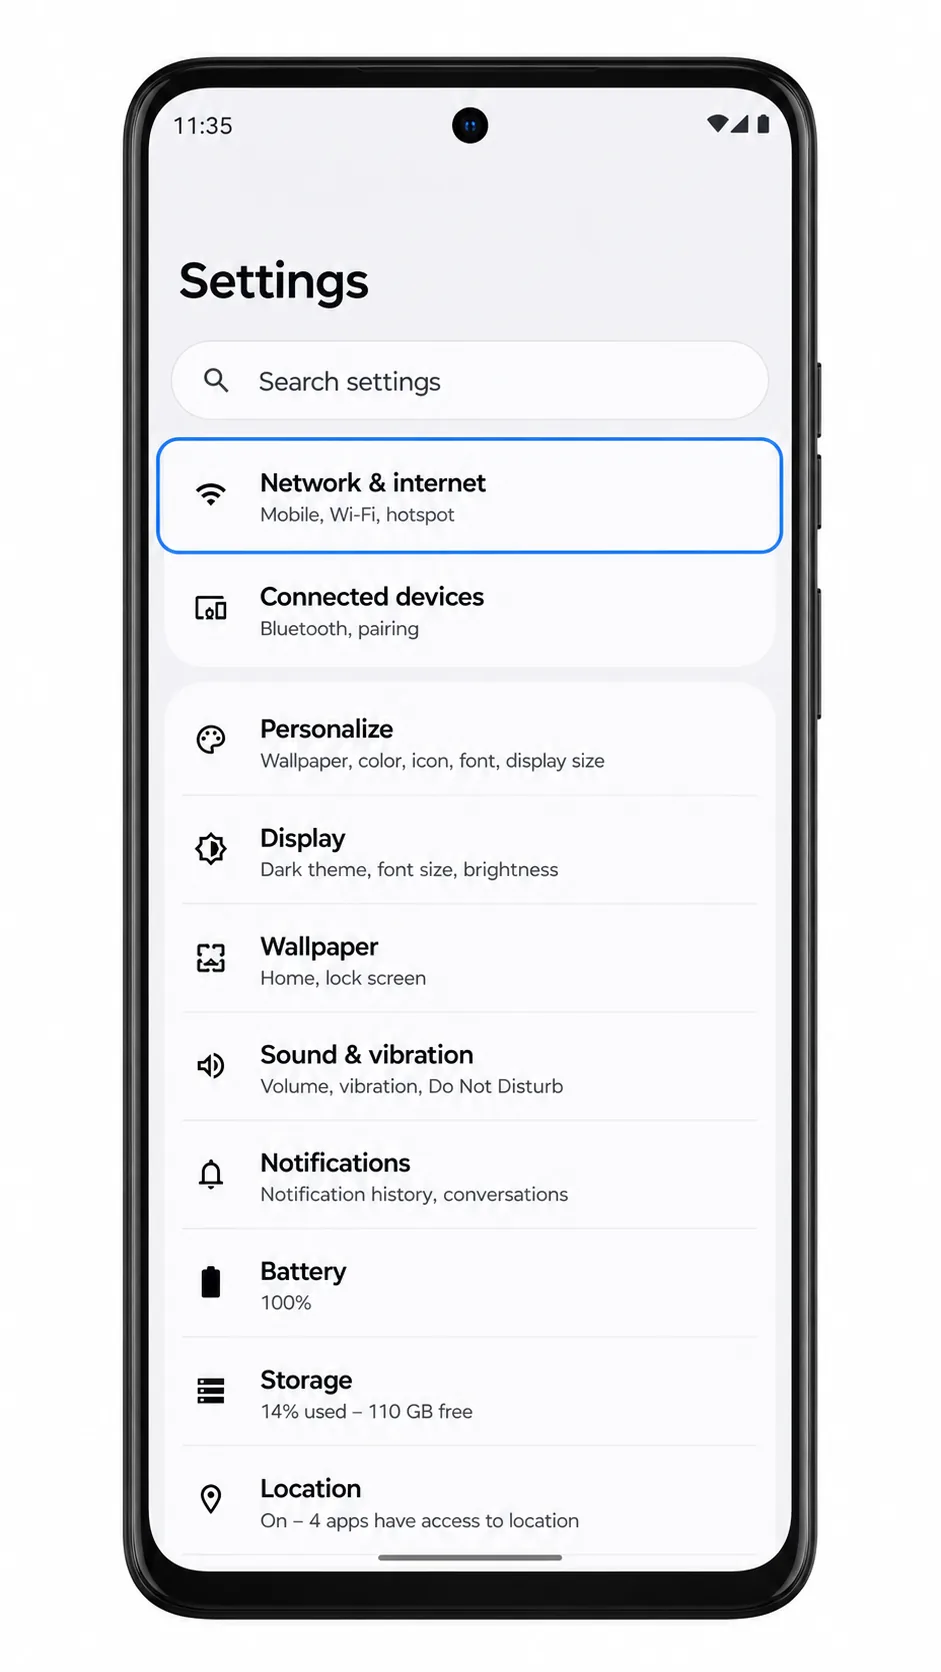
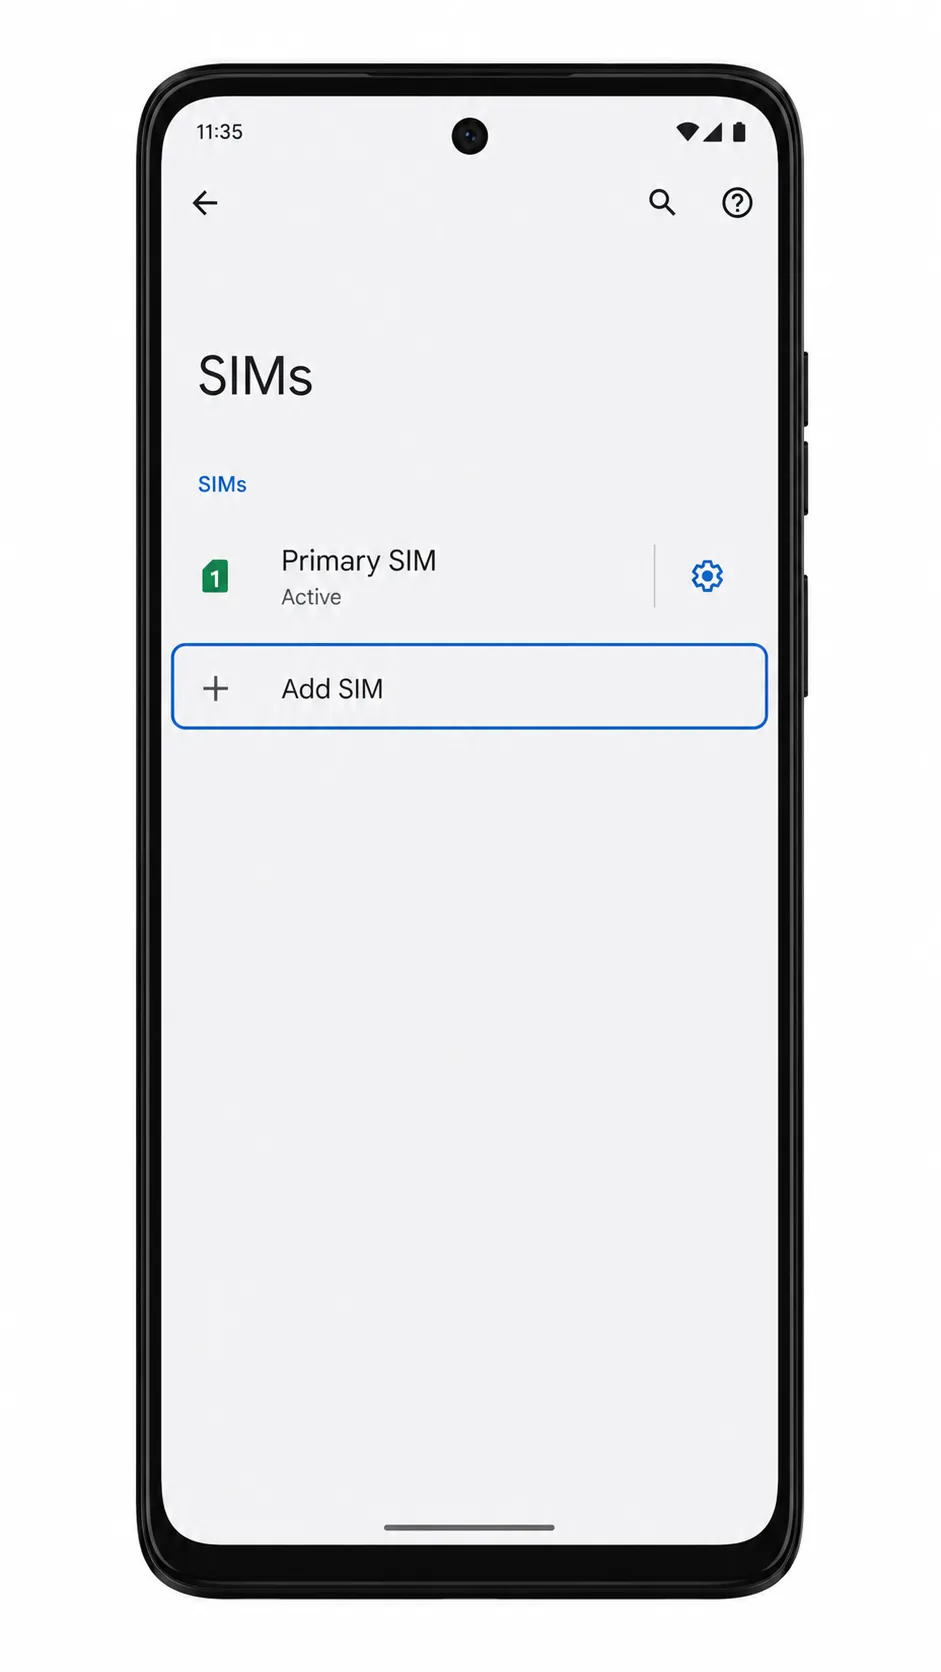
2. Tap SIMs.
The phone should open the SIM management screen where your physical SIM and eSIM options are managed.

3. Tap Add SIM, then choose Download a SIM if Android asks how you want to add the new SIM.
Your Edge+ should start the Android eSIM setup flow. Some builds may show Add eSIM instead of Add SIM.
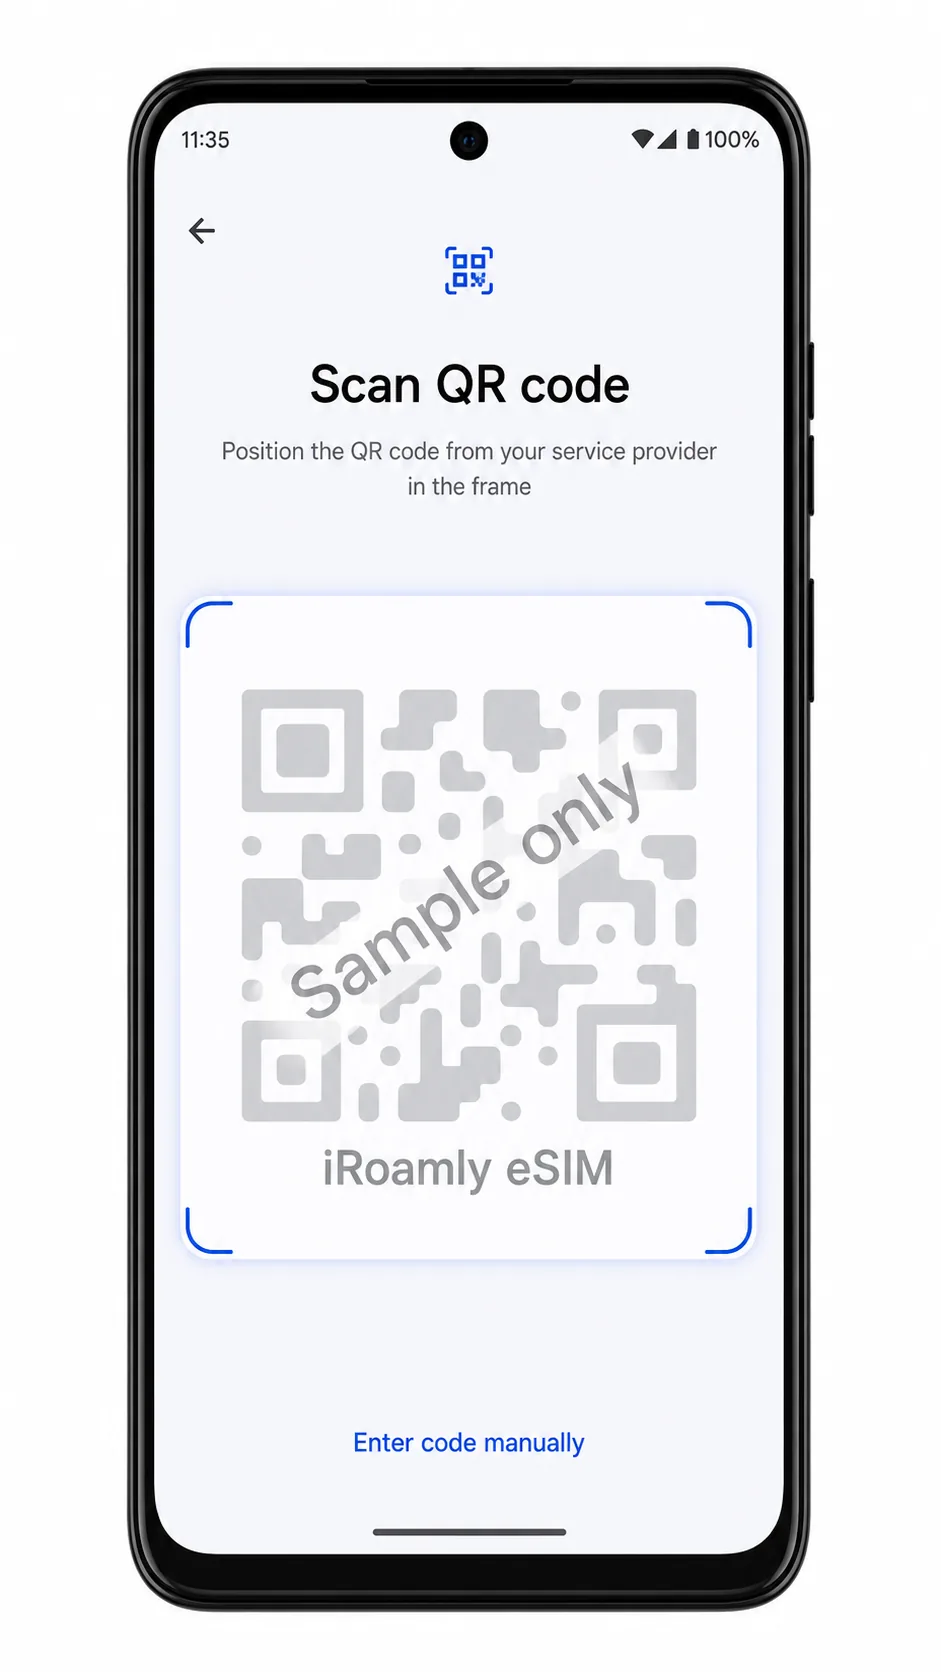
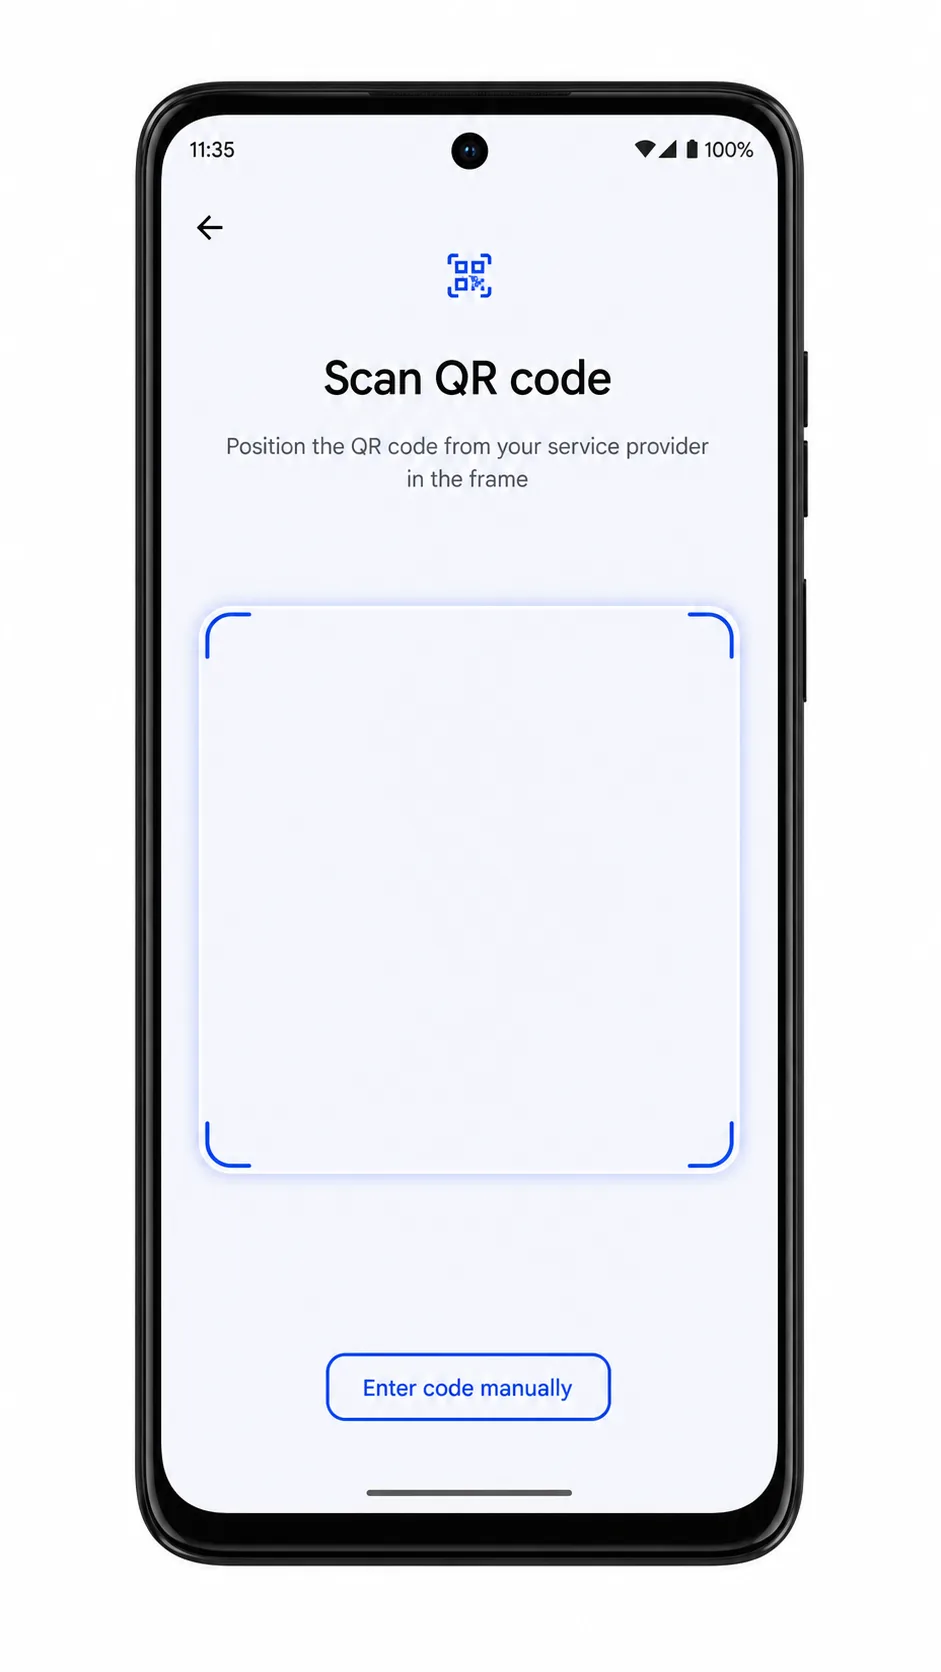
4. Choose Scan QR code if the scanner does not open automatically, then scan the iRoamly QR code from your purchase email or iRoamly account.
Keep the QR code steady and avoid scanning a screenshot that has been compressed or cropped. The phone should recognize the eSIM profile and prepare it for download.
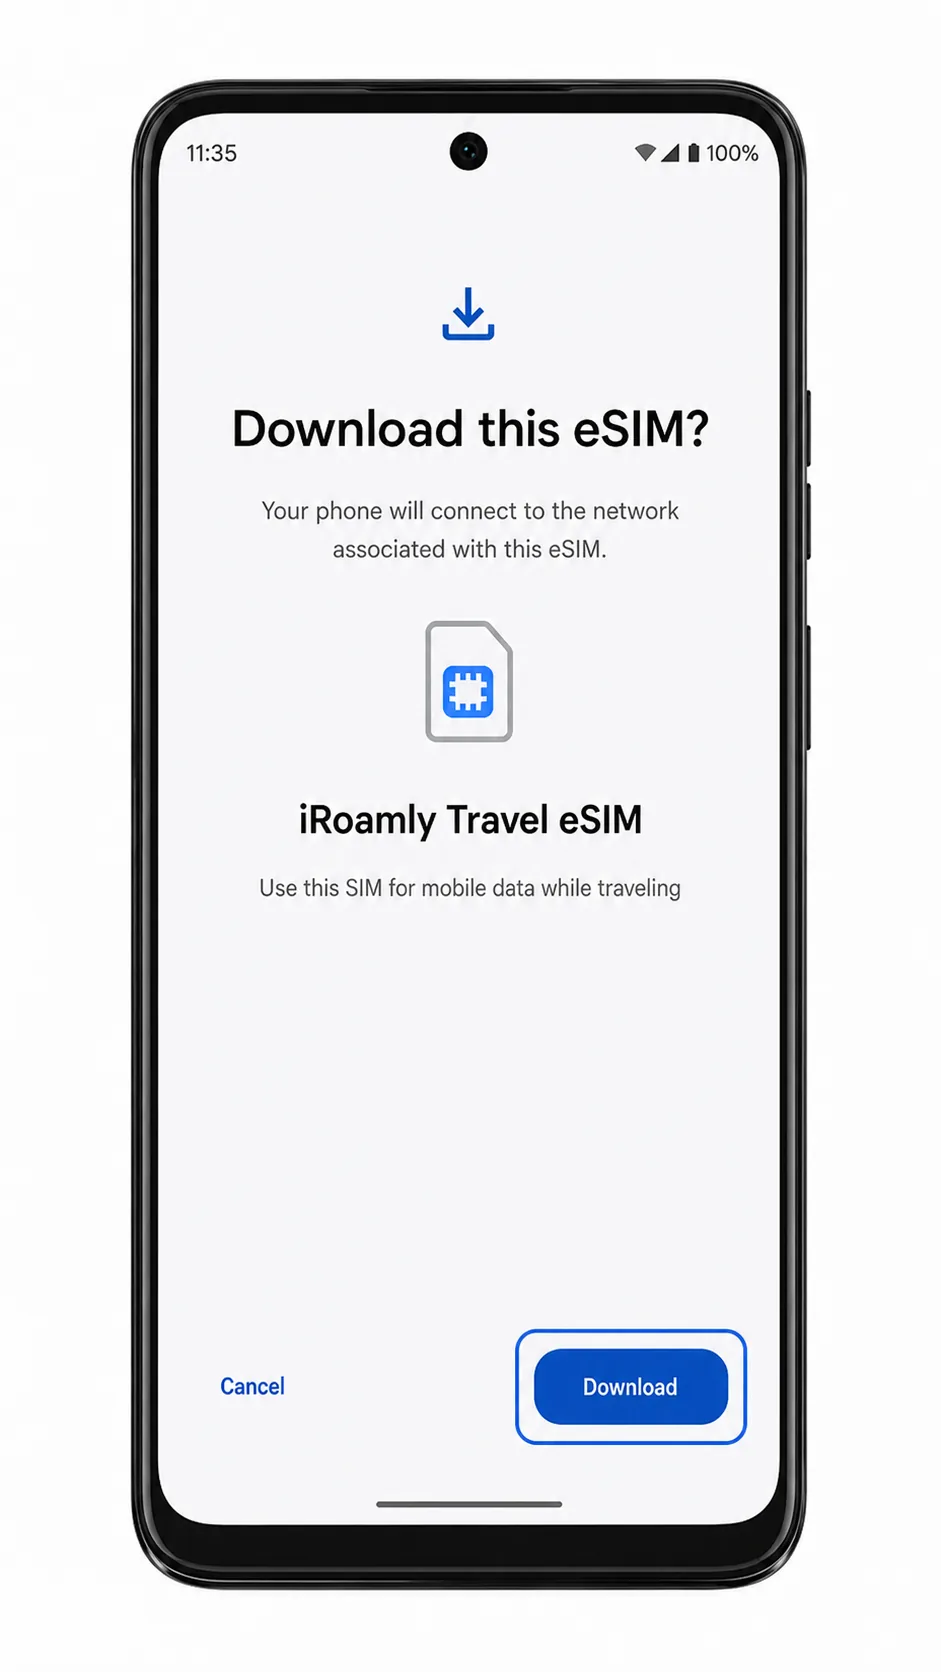
5. Tap Download when Android asks you to download the iRoamly eSIM.
Wait on this screen until the phone finishes adding the eSIM profile. Do not close Settings or restart the phone during the download.
Method 2: Install eSIM Manually
1. Open Settings on your Edge+, then tap Network & internet.
This starts from the same Motorola Android settings path as the QR method.
2. Tap SIMs.
You should see the page where Android lists installed SIM profiles and lets you add another eSIM.
3. Tap Add SIM, then choose Download a SIM if Android asks how you want to add the new SIM.
The eSIM setup flow should open. If your software shows Add eSIM, tap that label instead.
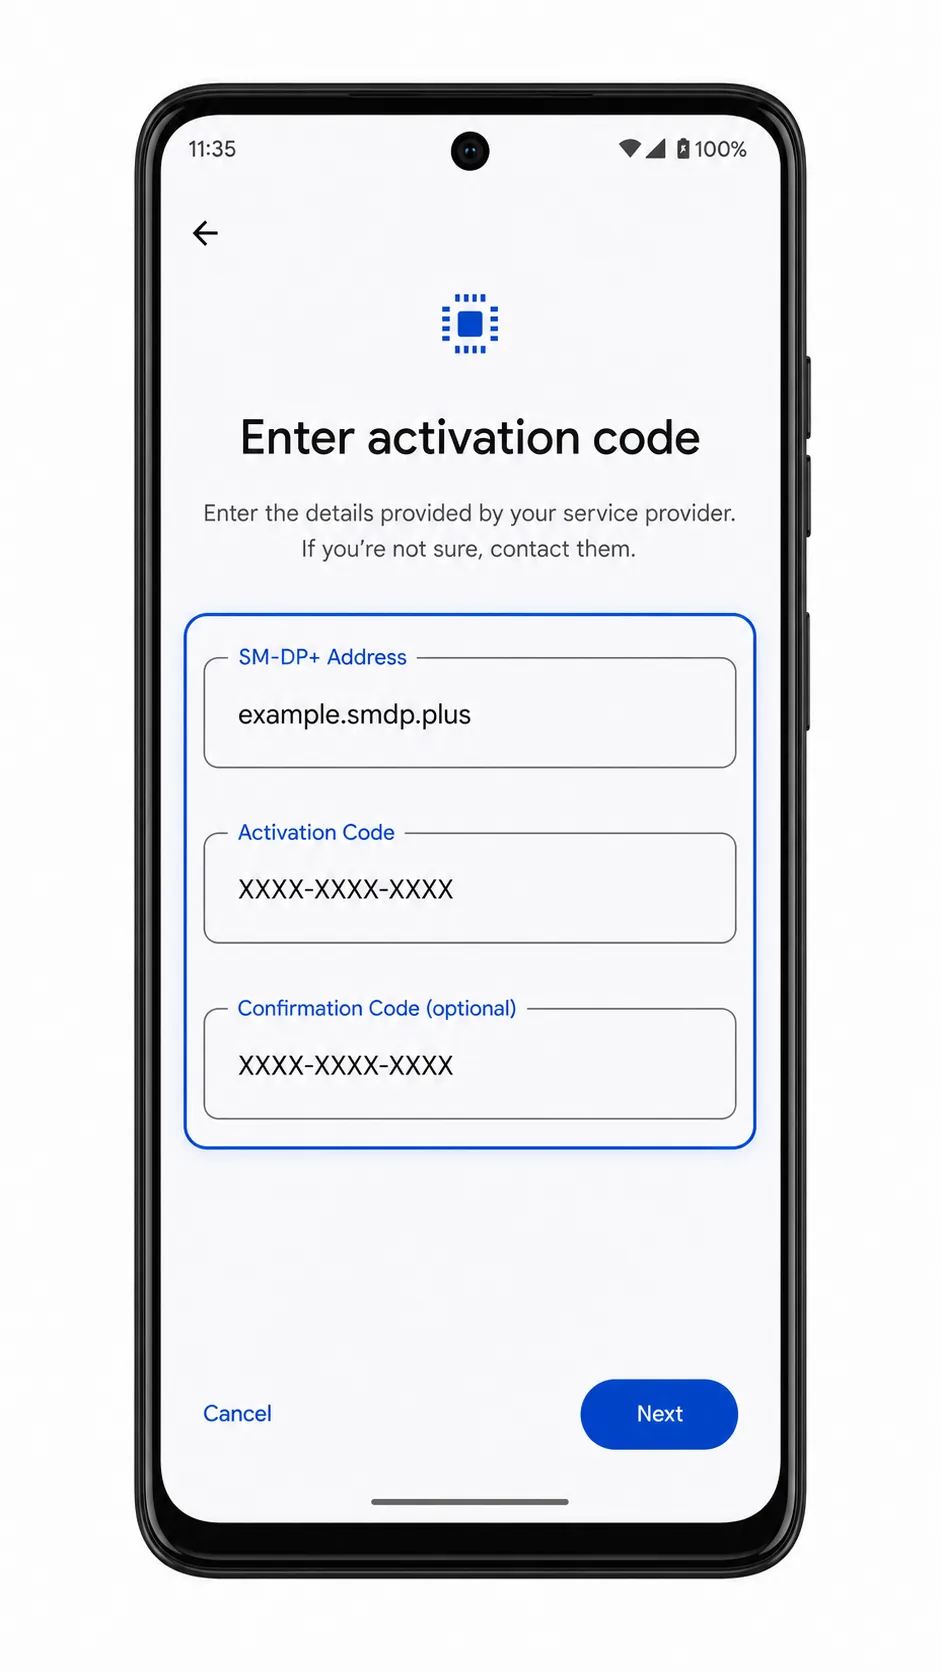
4. On the QR-code screen, tap Enter details manually.
Use this option when you cannot scan the iRoamly QR code or when iRoamly gives you manual activation details.
5. Enter the iRoamly SM-DP+ Address and Activation Code, add the Confirmation Code only if iRoamly provides one, then tap Continue.
Copy the manual details exactly. Extra spaces, missing characters, or using the wrong field can cause activation to fail.
6. Tap Download when Android confirms the iRoamly eSIM profile.
Keep the phone connected to Wi-Fi until the download completes.
How to Confirm Your iRoamly eSIM Is Installed
1. Go to Settings > Network & internet > SIMs, then look for an eSIM profile named iRoamly or a similar travel eSIM label.
The eSIM should appear alongside your primary SIM. If Android lets you rename the line, use a clear label such as iRoamly Travel.
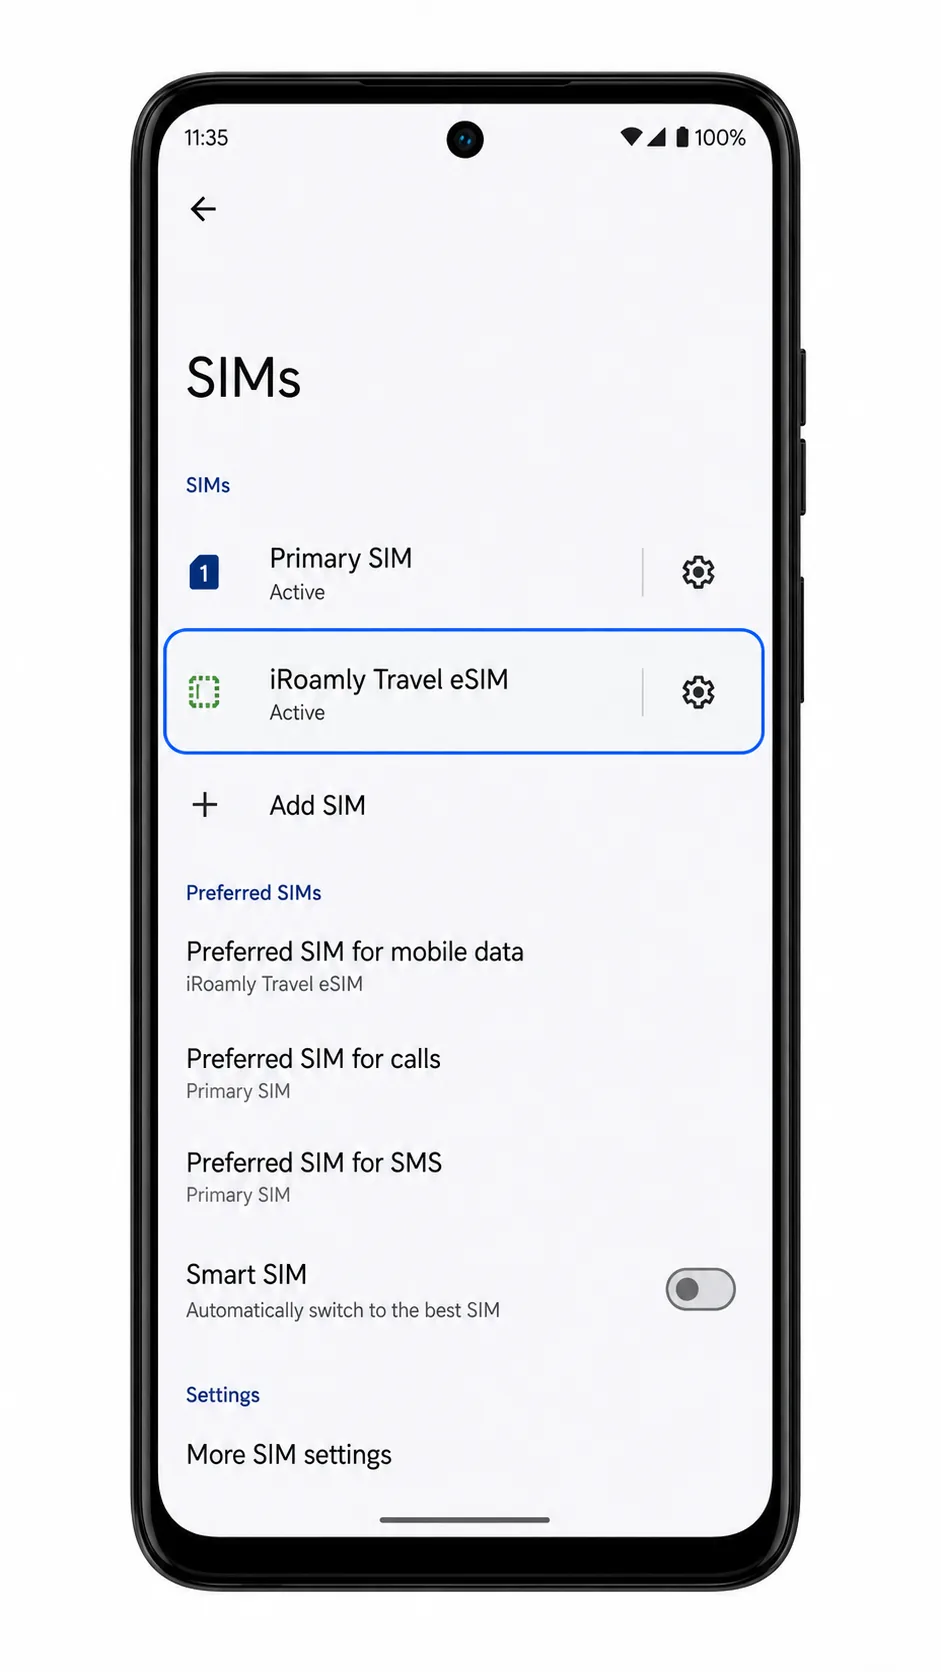
2. Tap the iRoamly eSIM profile and make sure the line is turned on.
If the eSIM is installed but off, Android may not use it for mobile data when you travel.
3. If your plan includes SMS or voice service, test those only after the plan is active and connected to a supported network.
Many iRoamly travel eSIM plans are data-only, so do not treat missing calls or texts as a setup failure unless your specific plan includes them.
Configure eSIM for Mobile Data
1. Open Settings > Network & internet > SIMs, then tap the Mobile data or preferred data SIM setting.
This controls which SIM your Edge+ uses for internet access.
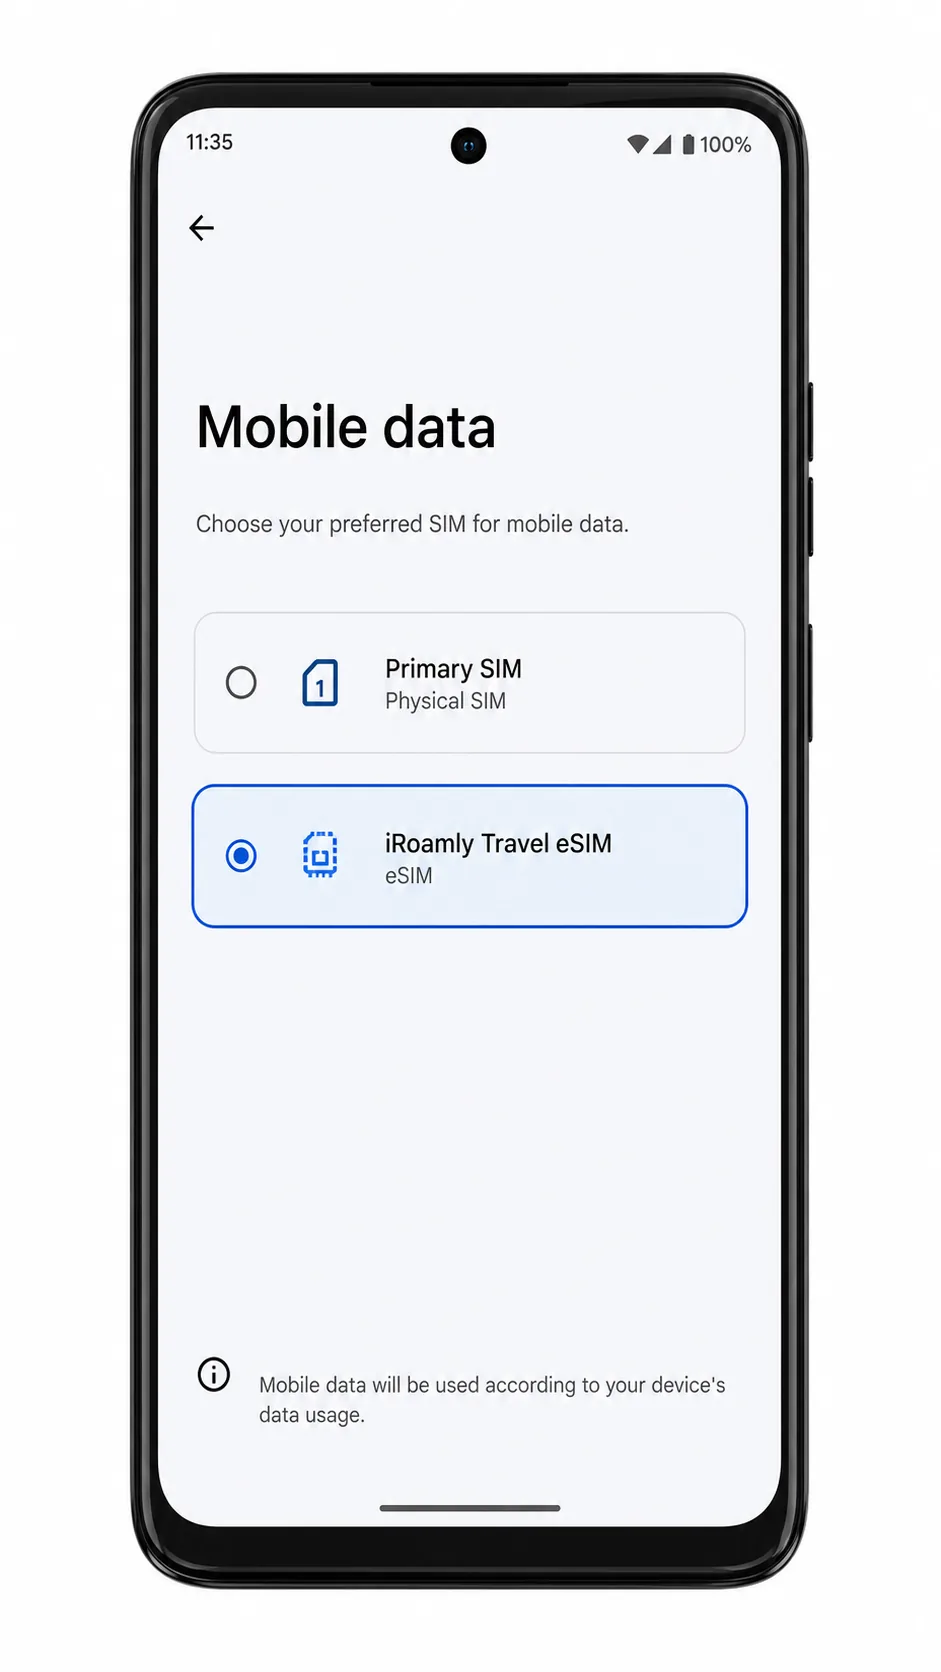
2. Select iRoamly as the mobile data SIM.
After selection, the Mobile data row should show iRoamly or the label you assigned to the travel eSIM.
3. Open the iRoamly eSIM profile and turn on Data roaming if your iRoamly plan or destination instructions require it.
Travel eSIM data often needs roaming enabled because the plan connects through partner networks outside your home country.
4. Turn off automatic mobile data switching if your Android build offers it and you want to avoid using your primary SIM by mistake.
This helps prevent accidental home-carrier roaming charges while you are abroad.
Troubleshooting
If Add SIM, Download a SIM, or Add eSIM is missing, confirm that your Edge+ model, region, and carrier firmware support eSIM. Also install any available Android system updates and restart the phone.
If the QR code does not scan, increase screen brightness on the device showing the code, clean the camera lens, and make sure the full code is visible. Use manual entry if scanning still fails.
If Android says the QR code was already used, do not delete the eSIM and retry repeatedly. Contact iRoamly support because many eSIM QR codes can be installed only once.
If activation fails during manual setup, check the SM-DP+ Address, Activation Code, and optional confirmation code for typos. Copy each value from iRoamly exactly.
If the eSIM installs but has no signal, wait until you are in the plan's supported destination, restart the Edge+, and confirm the iRoamly line is turned on.
If mobile data does not work, set Mobile data to iRoamly, enable Data roaming when required, turn Airplane mode on and off, and test in an area with strong coverage.
If your primary SIM keeps taking data, review the preferred SIM settings and disable automatic data switching if your Android build provides that option.
Conclusion
After successfully installing and configuring your iRoamly eSIM on the Motorola Edge+, your device is ready to use flexible mobile connectivity at any time. Whether you complete the setup before departure or activate it upon arrival, the entire process is handled directly within the phone’s system without any physical SIM handling or hardware changes.
It is recommended to complete the installation while connected to a stable Wi-Fi network and confirm that the eSIM is properly activated in the SIM management settings. Before traveling, set the iRoamly eSIM as your preferred mobile data line to ensure immediate connectivity upon arrival. Once configured, you can manage and switch between SIM profiles directly from your device settings, making network control simple and efficient.