
The Moto G (2024) can be used for travel data with an iRoamly eSIM when your specific region, carrier firmware, and service plan support eSIM. Motorola notes that eSIM availability can vary by country, region, carrier, and retailer, so check that your phone shows an eSIM setup option before you travel.
On Motorola's near-stock Android 14 interface, the usual path is Settings > Network & internet > SIMs > Add SIM. Some carrier versions may use slightly different labels, but the key screen should still be the SIM settings area where Android lets you download a SIM instead of inserting a physical card.
This guide covers both iRoamly installation methods: scanning the QR code and entering the SM-DP+ Address, Activation Code, and optional Confirmation Code manually. The QR code path is quickest, while manual entry helps when the QR code is on the same phone or the camera cannot scan it.
Before You Set Up Your iRoamly eSIM
Connect the Moto G (2024) to stable Wi-Fi before starting.
Make sure the phone is unlocked and that your exact Moto G (2024) variant supports eSIM.
Keep your iRoamly QR code or manual eSIM details open on another device, printed page, or accessible account page.
Install the eSIM 1 to 2 days before travel when possible, but check your iRoamly plan details first. iRoamly eSIM validity starts from activation, and the exact activation trigger can vary by plan or destination.
Do not delete the iRoamly eSIM after installation unless iRoamly support tells you to. Many travel eSIM profiles cannot be reinstalled after removal.
iRoamly plans may be data-only. Voice calls and SMS availability varies by plan, so check the specific plan details before relying on calls or texts.
Method 1: Install eSIM by Scanning a QR Code
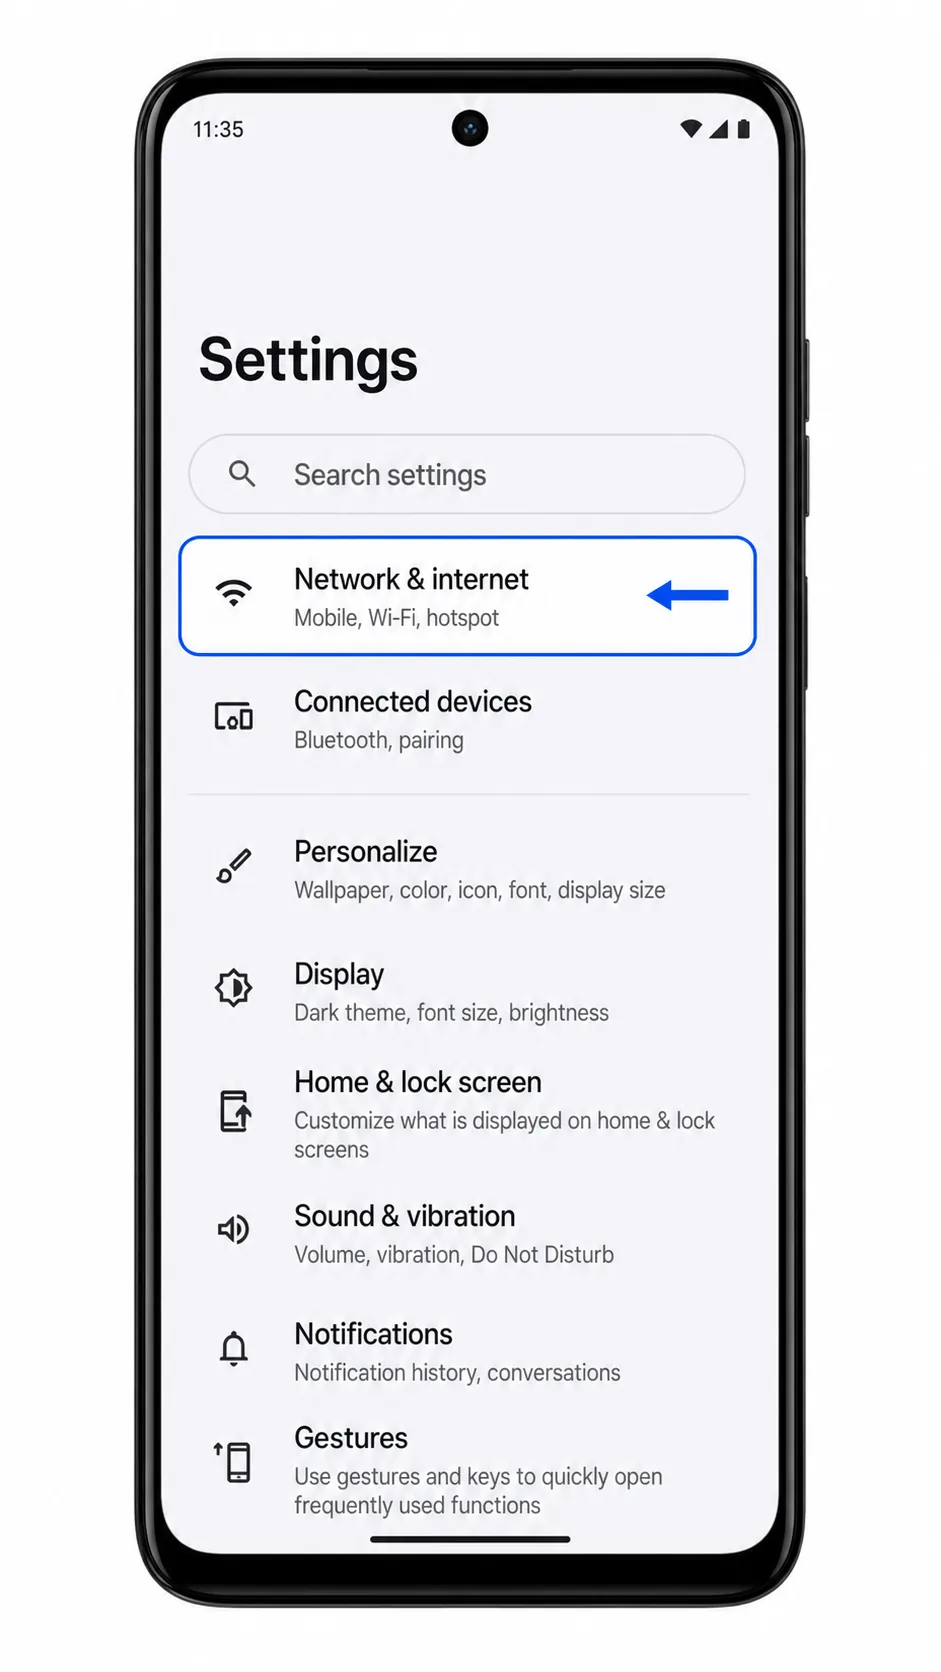
Open Settings on your Moto G (2024), then tap Network & internet.
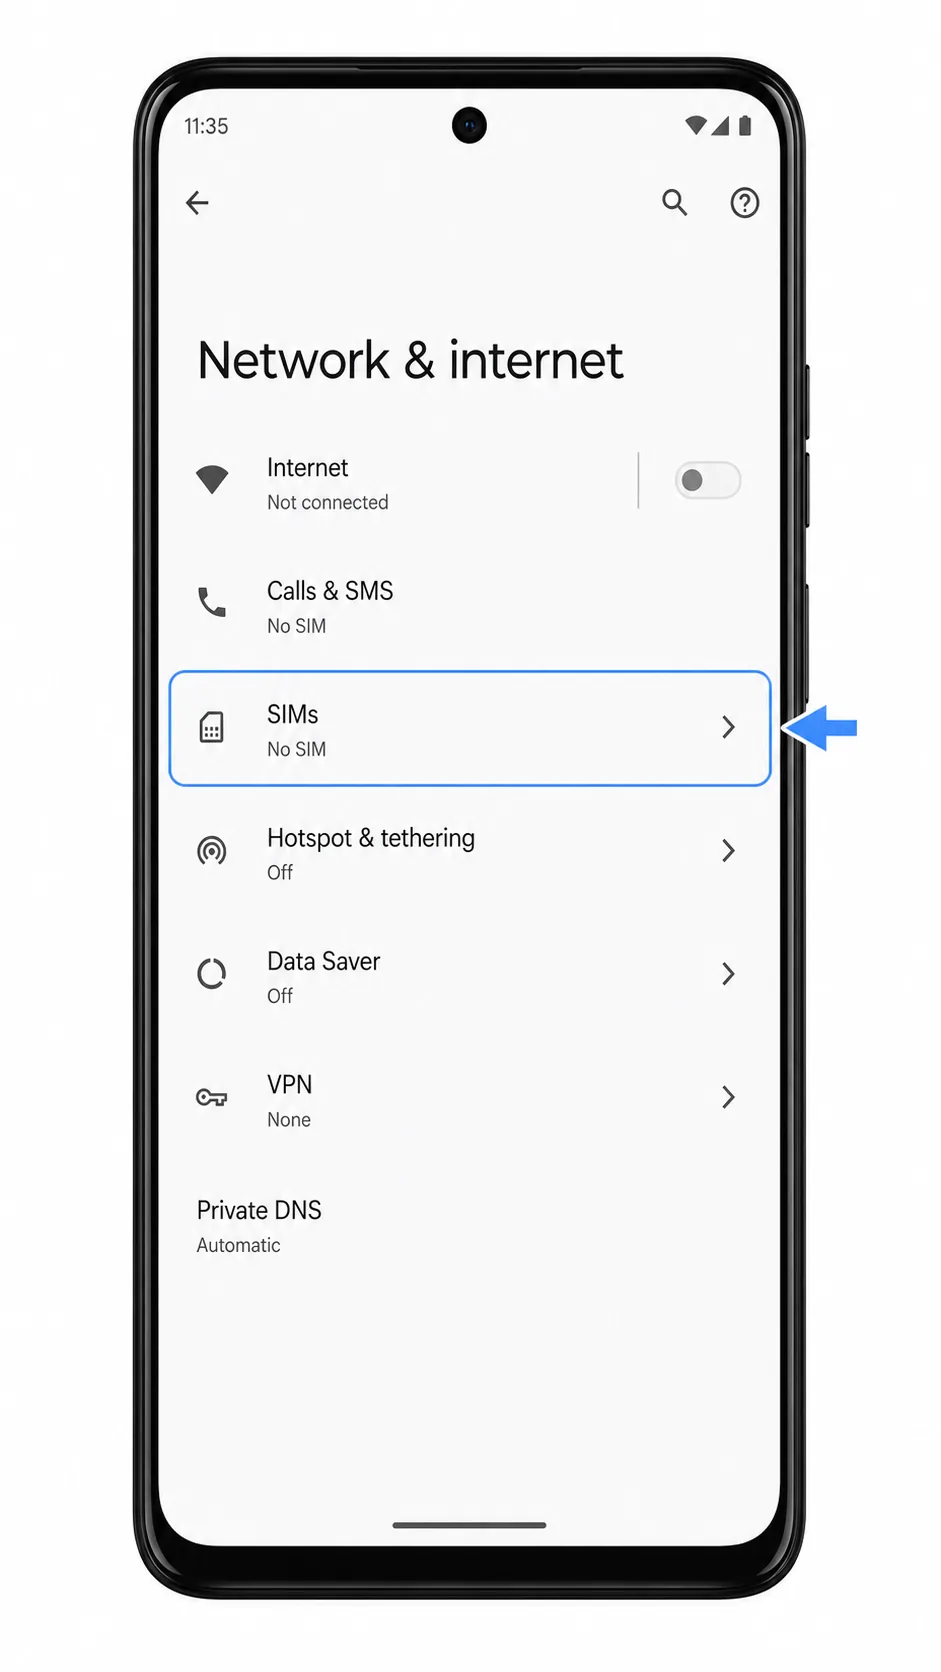
On the Network & internet screen, tap SIMs.
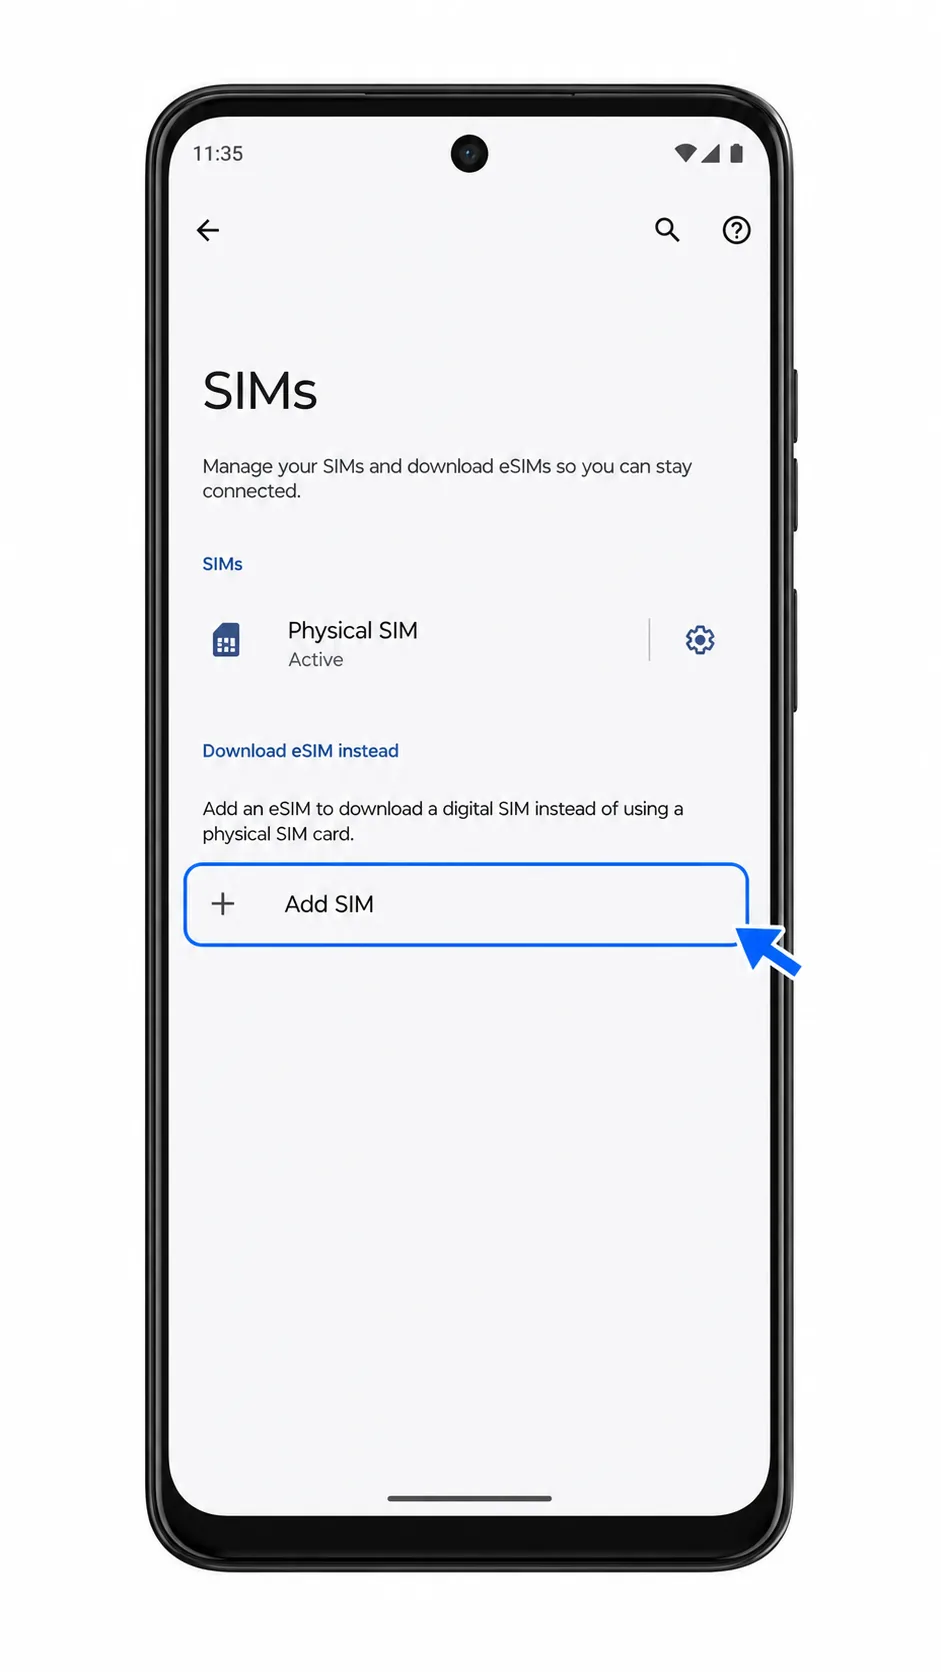
On the SIMs screen, tap Add SIM. If you do not see Add SIM or an eSIM download option, your Moto G (2024) variant or carrier firmware may not support eSIM.
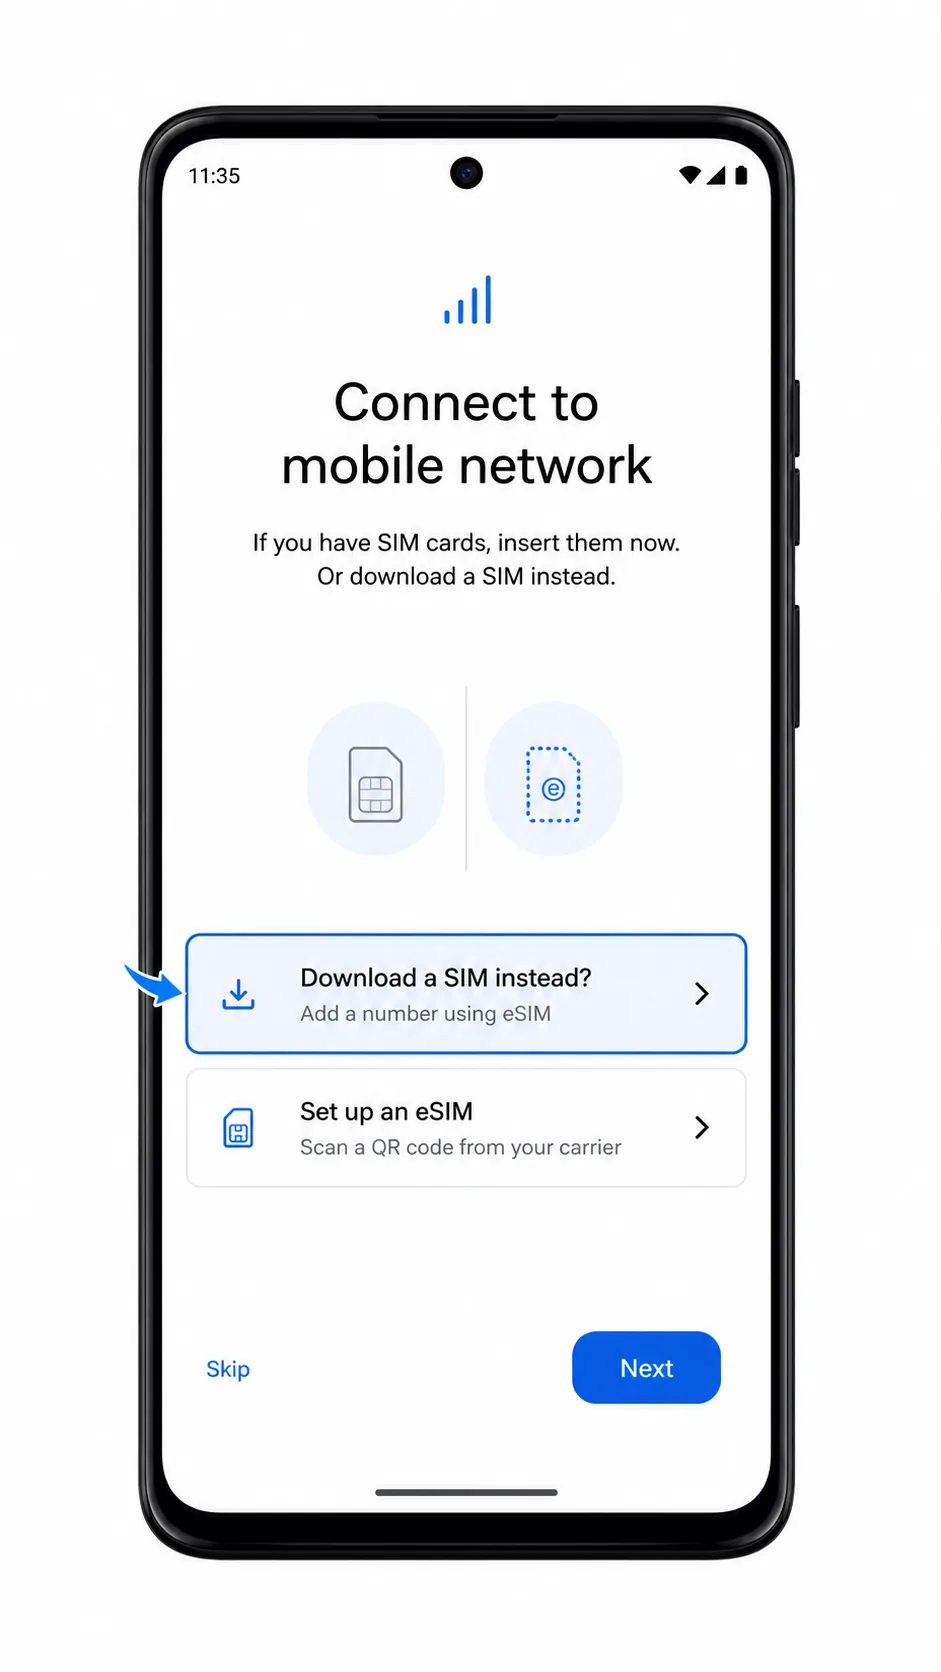
Choose Download a SIM instead? or the equivalent eSIM setup option, then continue to the QR scanner.
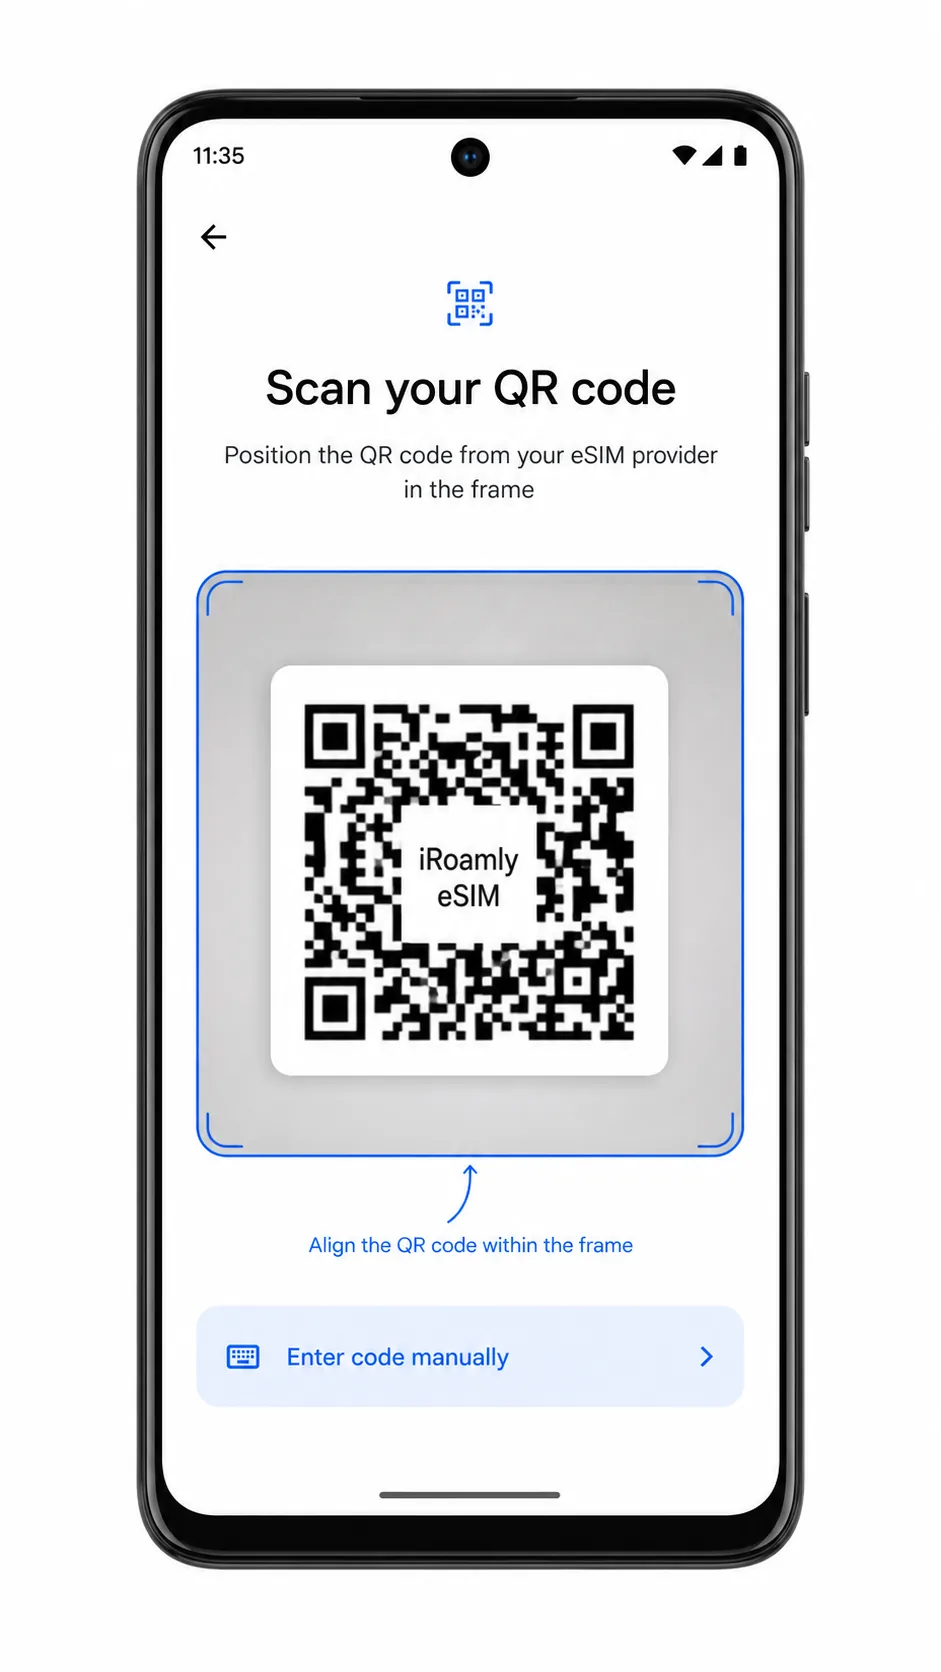
Point the QR scanner at the iRoamly eSIM QR code. Keep the code inside the frame until the phone recognizes it, then tap Download or Continue when Android asks to add the eSIM.
Wait for the eSIM download to finish, then keep the new iRoamly line turned on when Android returns to the SIMs screen.
Method 2: Install eSIM Manually
Open Settings on your Moto G (2024), then tap Network & internet.
Tap SIMs to open the SIM management screen.
Tap Add SIM. This starts Android's mobile network setup flow.
Select Download a SIM instead? or the equivalent eSIM setup option, then proceed to the QR code screen.
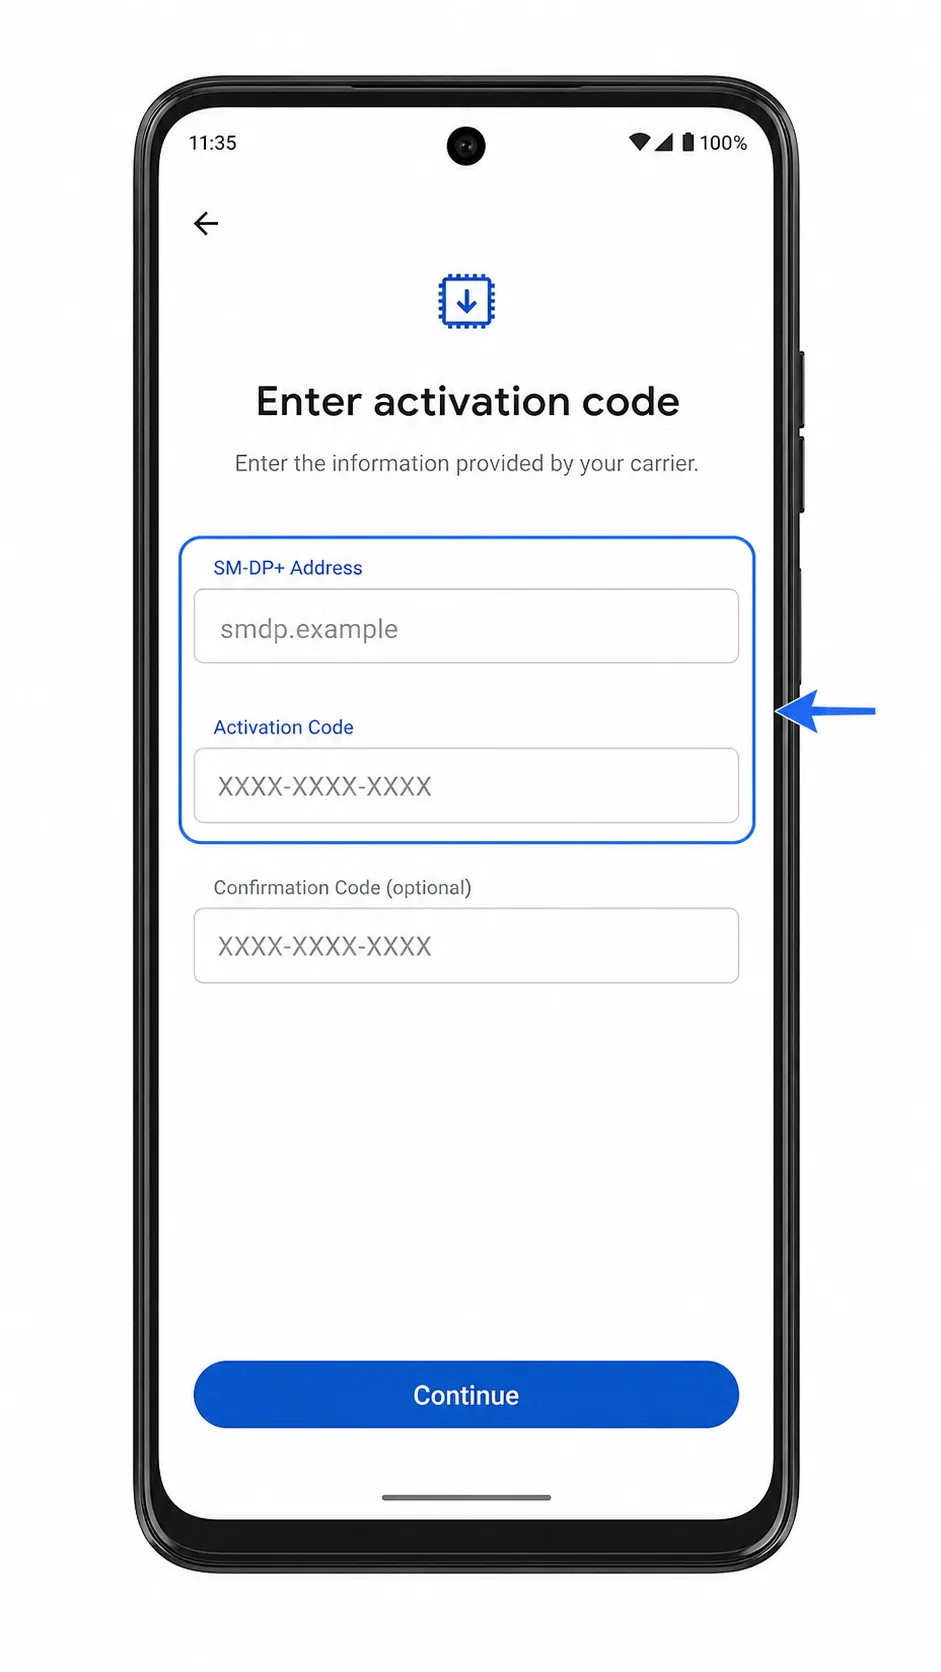
On the QR scanner screen, tap Enter code manually or Enter activation code.
Enter the iRoamly SM-DP+ Address and Activation Code exactly as shown in your iRoamly order details. If iRoamly gives you a Confirmation Code, enter it in the optional Confirmation Code field, then tap Continue.
Review the eSIM download prompt, tap Download or Continue, and wait until Android finishes adding the iRoamly eSIM.
How to Confirm Your iRoamly eSIM Is Installed
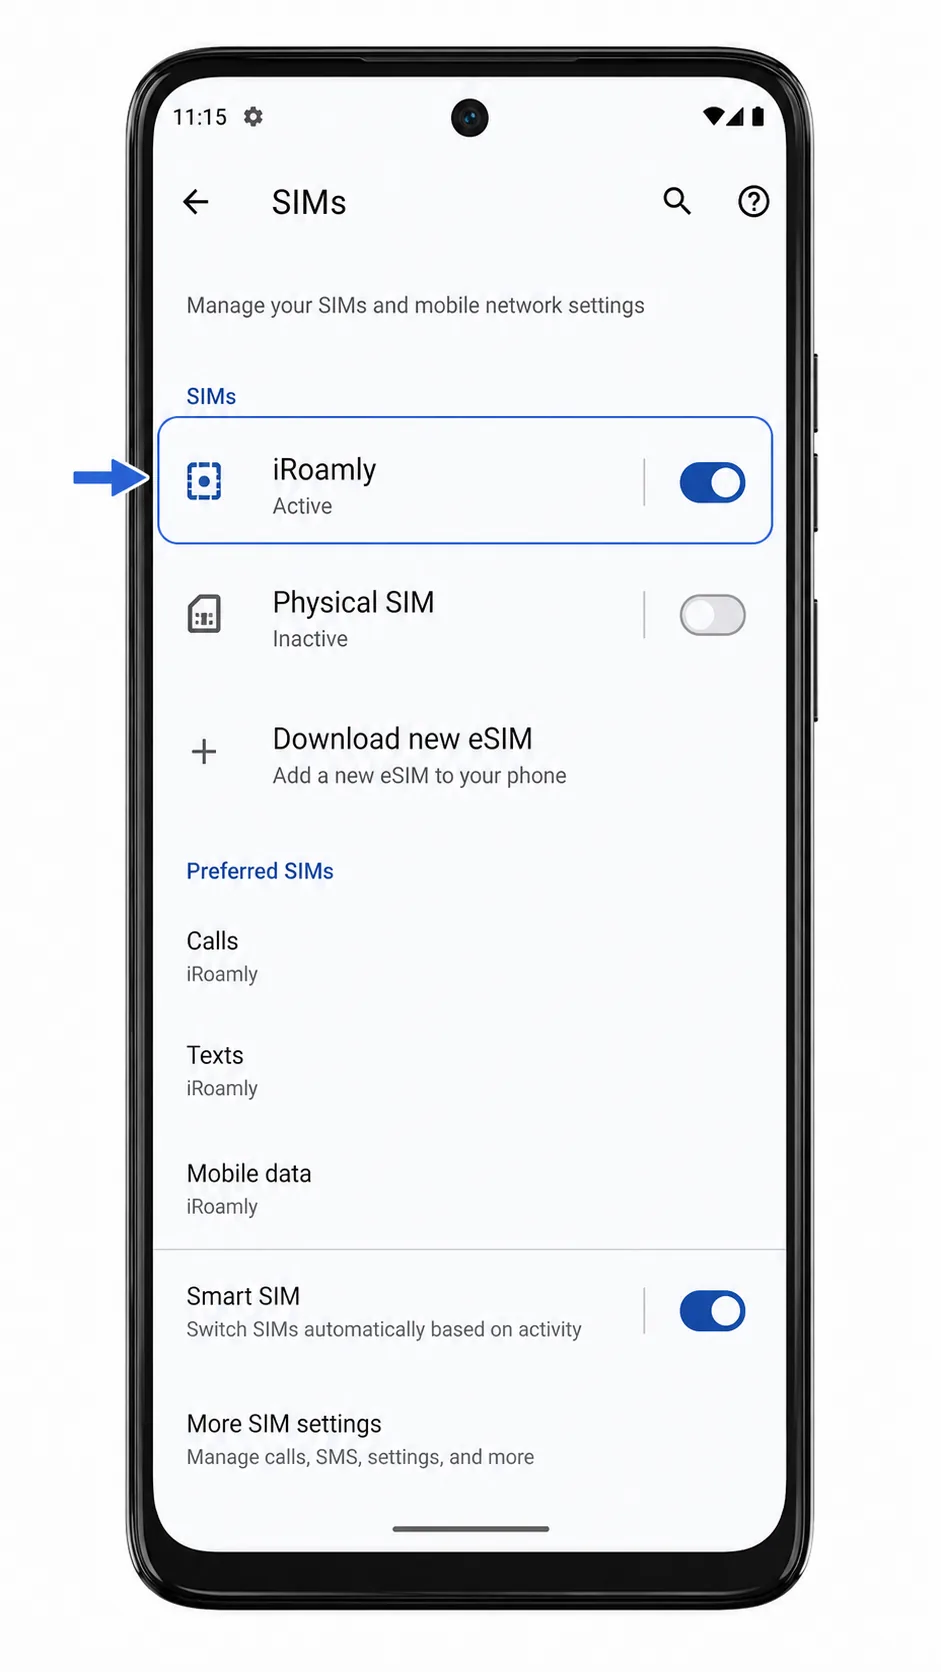
Go to Settings > Network & internet > SIMs and look for an iRoamly or travel eSIM profile in the SIM list.
Tap the iRoamly eSIM and confirm that Use SIM is turned on. If your plan includes only data, do not expect regular voice or SMS controls to work unless your iRoamly plan specifically includes them.
Configure eSIM for Mobile Data
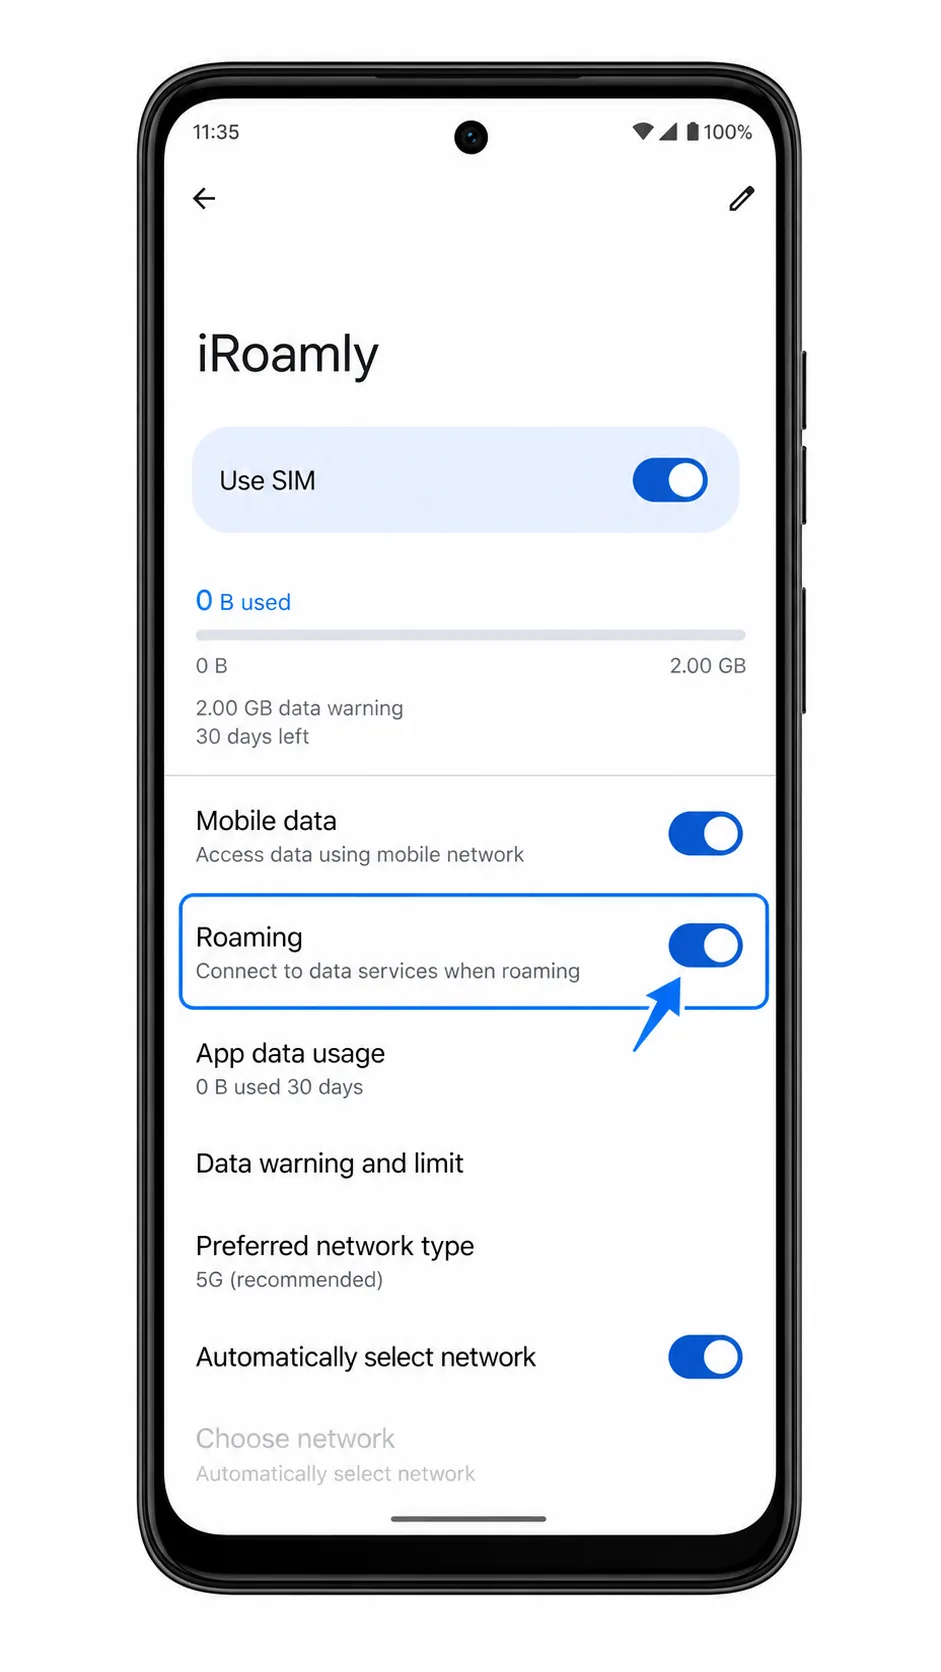
Open Settings > Network & internet > SIMs, tap the iRoamly eSIM, and turn on Use SIM.
Turn on Mobile data for the iRoamly eSIM, then enable Roaming if your iRoamly plan or destination instructions require it.
If Android asks which SIM should use mobile data, choose the iRoamly eSIM while traveling. Turn off automatic switching to your primary SIM if you want to avoid accidental roaming charges on your home line.
Troubleshooting
Add SIM is missing: Confirm that your exact Moto G (2024) region, carrier version, and plan support eSIM. Some variants may only show physical SIM options.
QR code does not scan: Increase screen brightness on the device showing the QR code, clean the camera lens, and keep the full QR code inside the scanner frame.
QR code already used: Do not delete and retry repeatedly. Contact iRoamly support because many eSIM QR codes can only be installed once.
Manual details fail: Recheck the SM-DP+ Address and Activation Code. Avoid extra spaces, missing hyphens, or confusing similar characters.
eSIM is stuck activating: Keep Wi-Fi connected and wait a few minutes. Some travel eSIMs finish activation only when the phone reaches a supported destination network.
No data after installation: Turn on the iRoamly eSIM, select it for mobile data, enable data roaming if required, and restart the phone.
Calls or SMS do not work: Check your iRoamly plan details. Many travel eSIM plans are data-only.
Conclusion
After setting up your iRoamly eSIM on the Moto G (2024), you'll be ready to access mobile data without the hassle of purchasing or swapping physical SIM cards during your trip. Before you leave, verify that the eSIM is active, selected for mobile data, and configured according to your destination's requirements.
Once you arrive, your device should connect to a supported network automatically, allowing you to stay online for navigation, messaging, and everyday travel needs. If any connection issues occur, a quick review of your eSIM and network settings will usually get you back online in minutes.