
The Moto G86 runs Motorola's near-stock Android interface, so the eSIM setup path uses familiar Android labels such as Network & internet, SIMs, and Add SIM. This guide assumes a Moto G86 on Motorola My UX based on Android 15; labels may vary slightly by software version, region, or carrier firmware.
For travelers, installing an iRoamly travel eSIM before departure can make it easier to get mobile data after arrival without replacing the physical SIM in the phone. The Moto G86 screen and Settings layout work well for either scanning a QR code or entering the eSIM details manually.
This guide covers both setup methods, how to confirm that the iRoamly eSIM was added, and how to choose it for mobile data. Use the QR method when you can view the QR code on another screen, and use manual entry when scanning is not practical.
Before You Set Up Your iRoamly eSIM
Connect the Moto G86 to stable Wi-Fi before starting. The phone needs internet access to download the eSIM profile.
Make sure your Moto G86 model, region, and carrier firmware support eSIM. If Add SIM or eSIM setup is missing, the feature may not be available on that variant.
Keep your iRoamly QR code or manual setup details ready. Manual setup normally needs the SM-DP+ address, Activation code, and sometimes an optional confirmation code.
Use a charged phone and avoid switching off Wi-Fi during the download.
Do not delete the iRoamly eSIM after installation unless iRoamly support tells you to. Many travel eSIM profiles cannot be reinstalled after deletion.
Install the eSIM 1-2 days before travel when possible, but check your plan details first. iRoamly plan validity starts from activation; for many travel data plans, activation may occur when the eSIM connects to a supported destination network.
Check the plan page for service details. Some iRoamly eSIM plans are data-only, and voice calls or SMS may not be included.
Method 1: Install eSIM by Scanning a QR Code
1. Open Settings on the Moto G86, then tap Network & internet. You should see the Android network settings page.

2. Tap SIMs. The phone should open the SIM management page where physical SIM and eSIM options are managed.
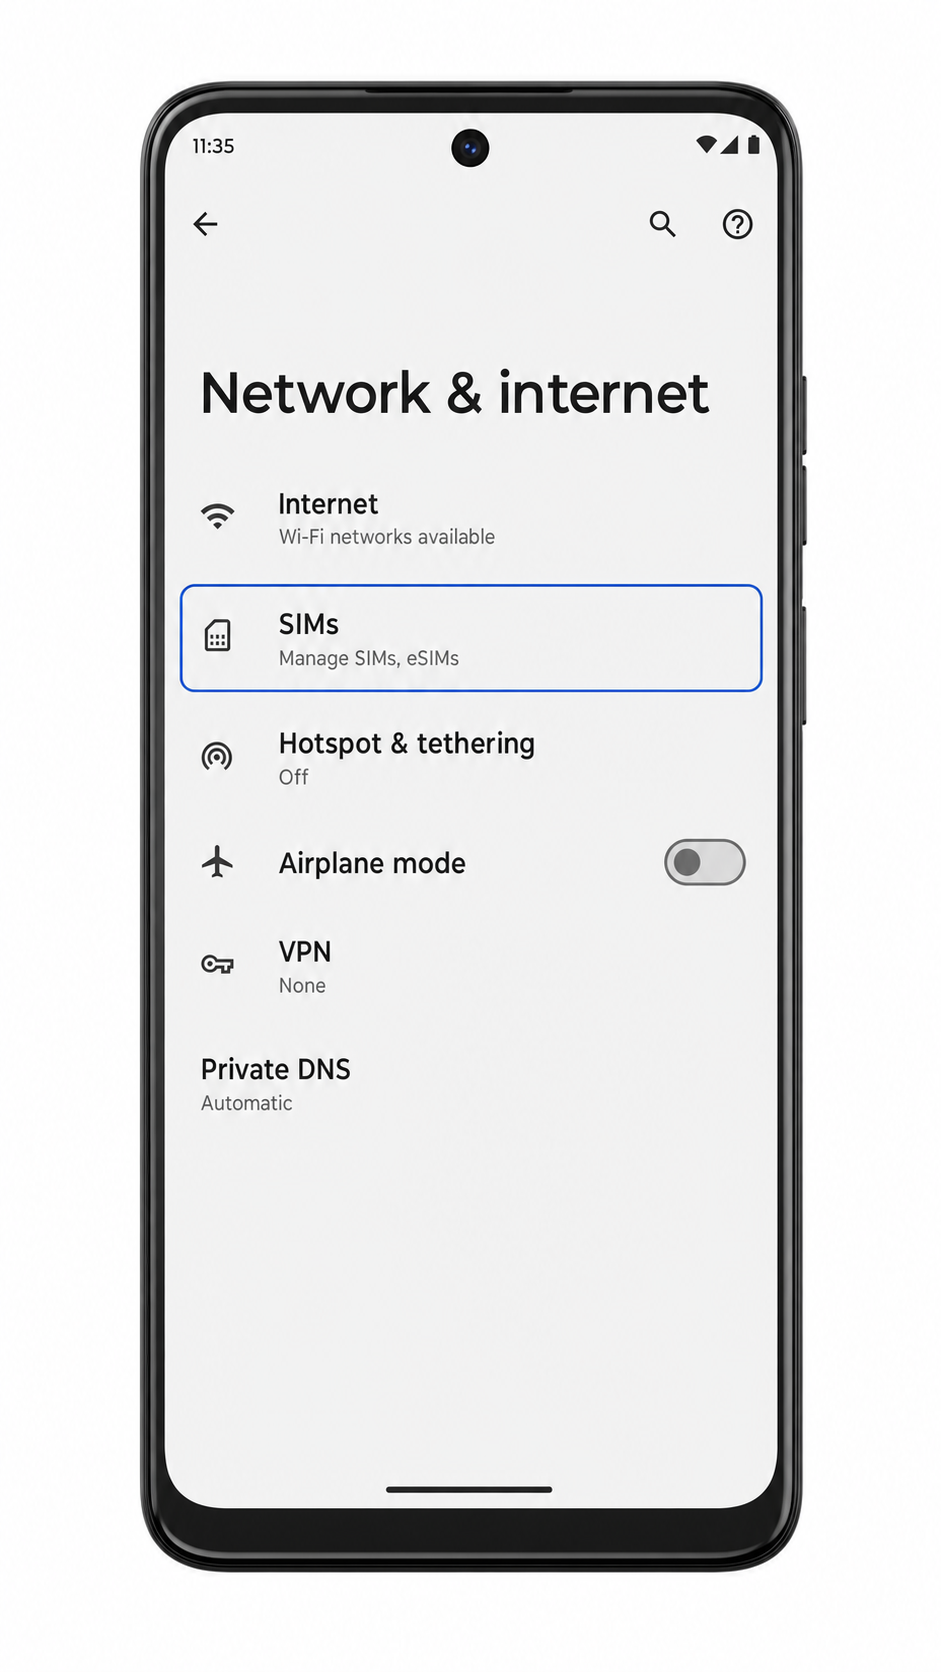
3. Tap Add SIM. If the phone asks whether to use a physical SIM or eSIM, choose the eSIM setup option.

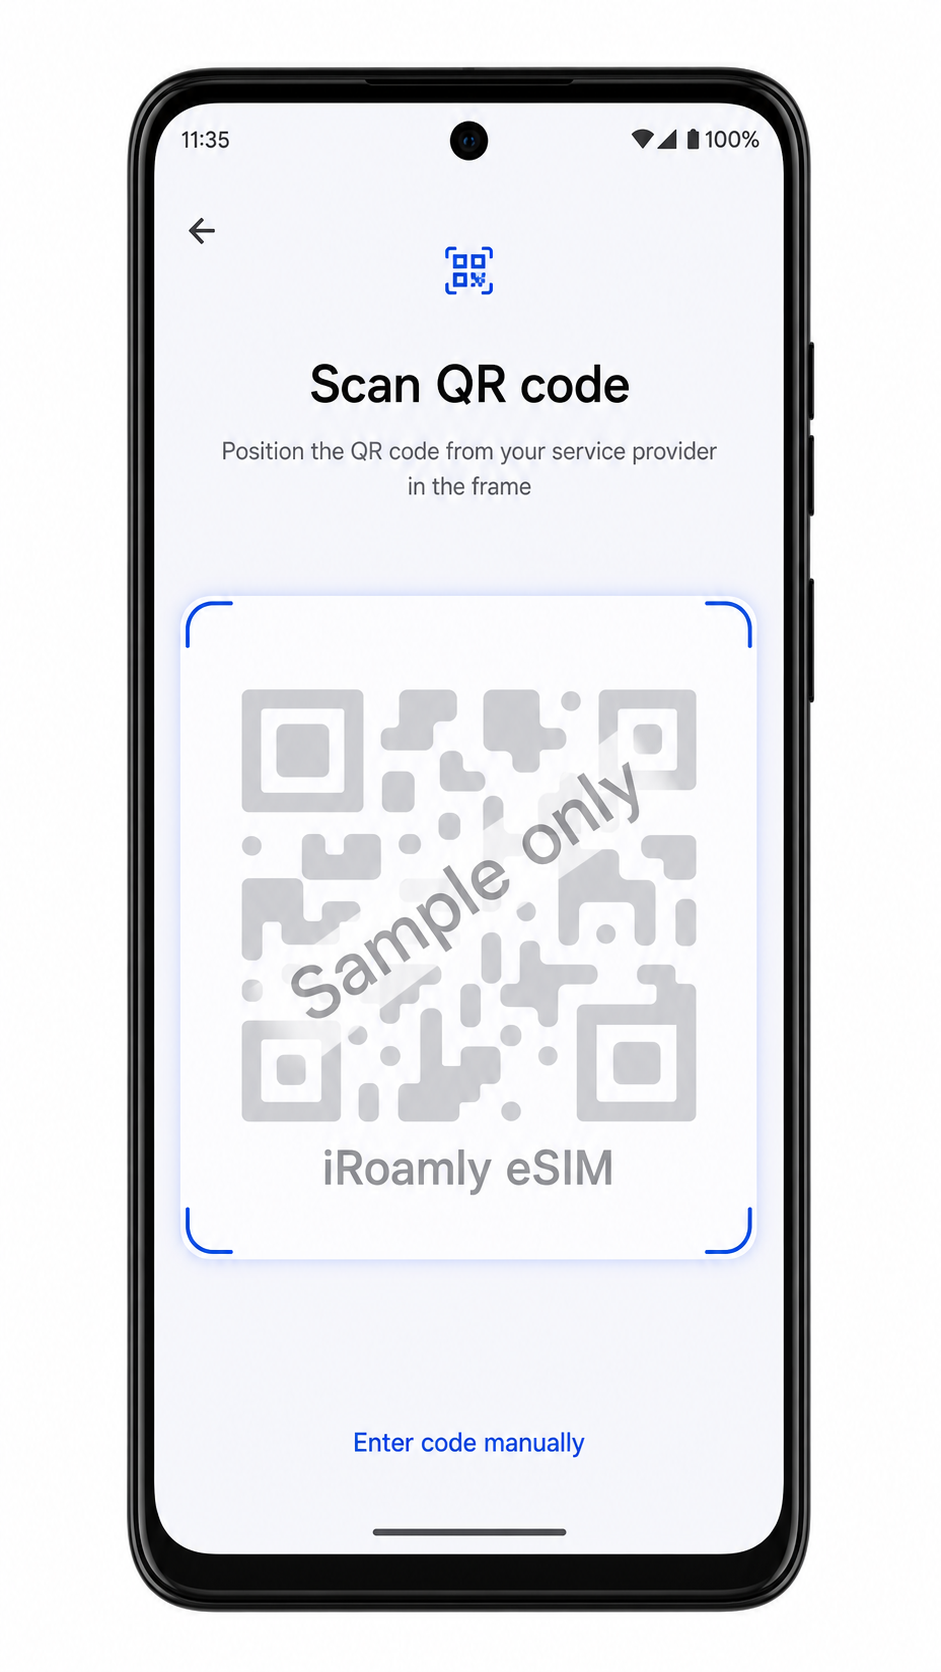
4. On the Set up an eSIM screen, scan the QR code from your iRoamly order page or email. Keep the QR code on another screen or printed page so the Moto G86 camera can read it.
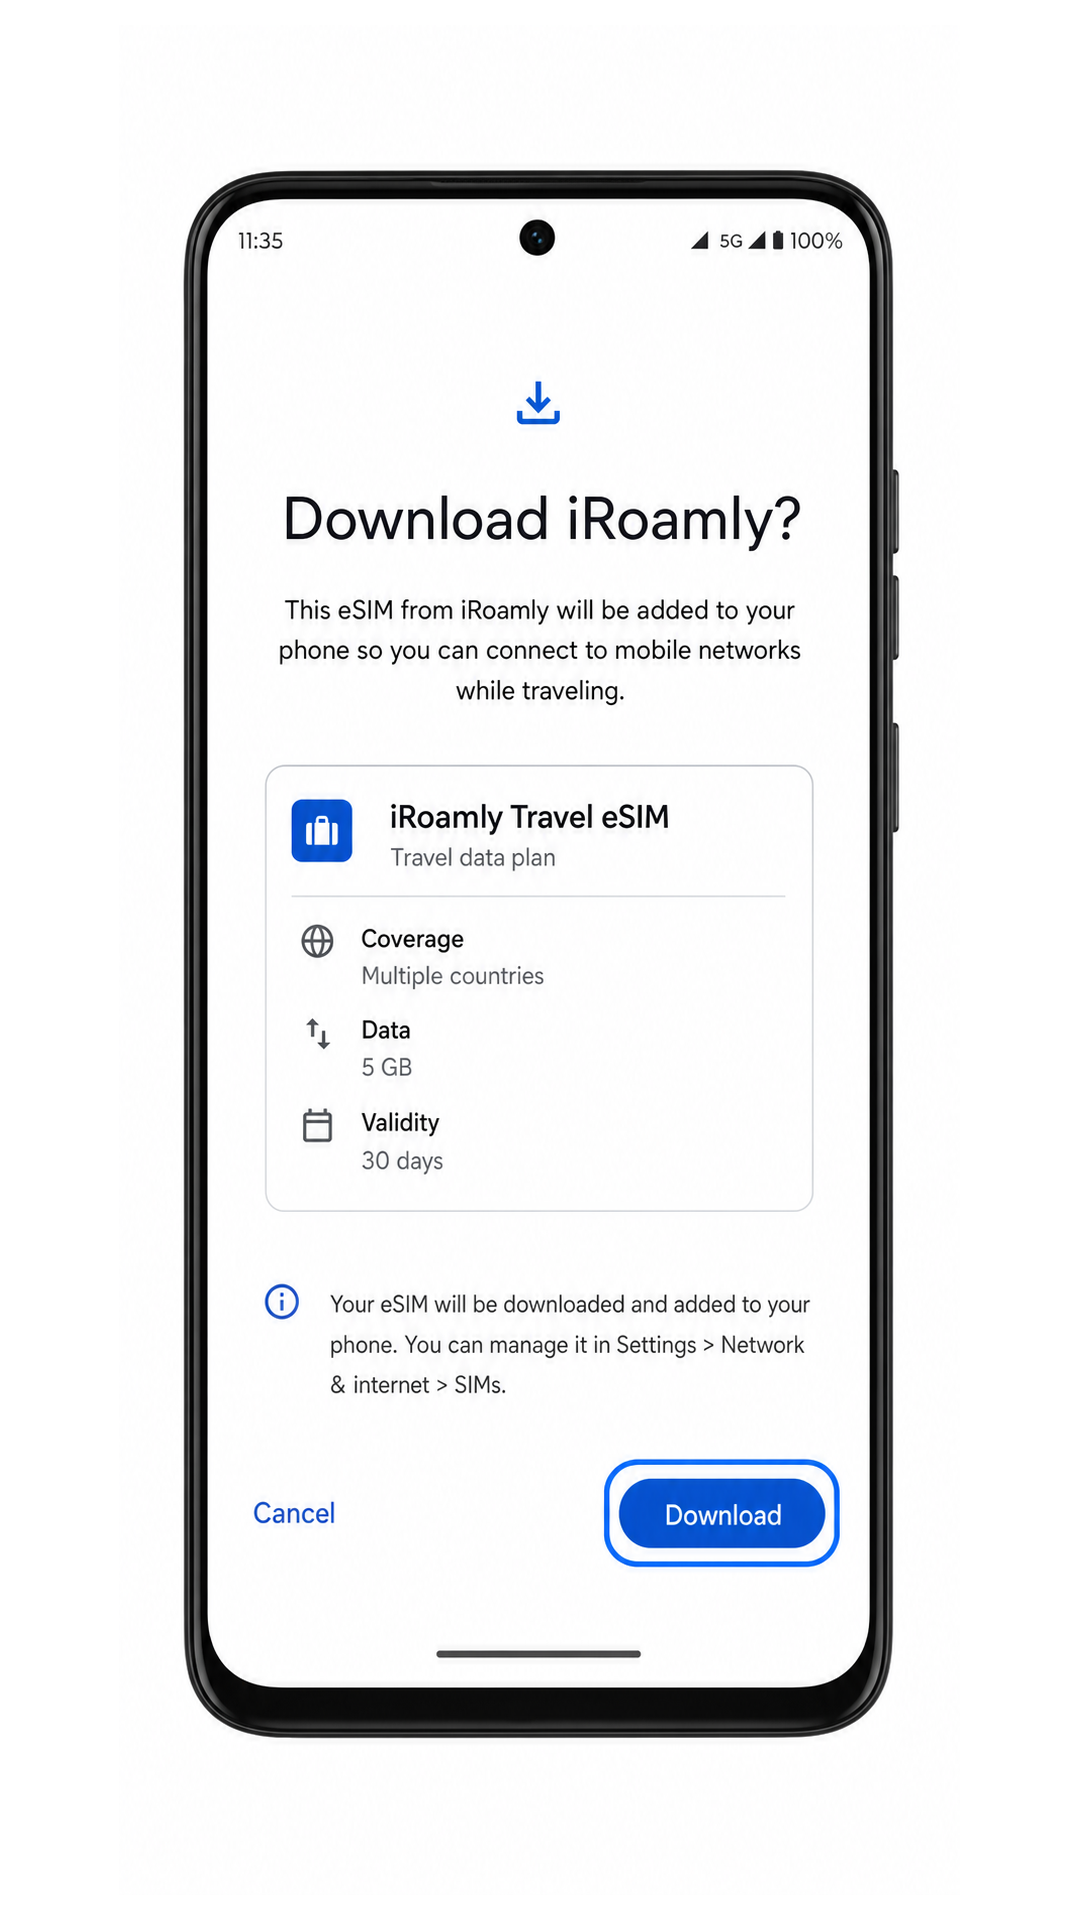
5. Review the eSIM download prompt, then tap Download. Keep Wi-Fi connected while the Moto G86 downloads and adds the iRoamly eSIM profile.
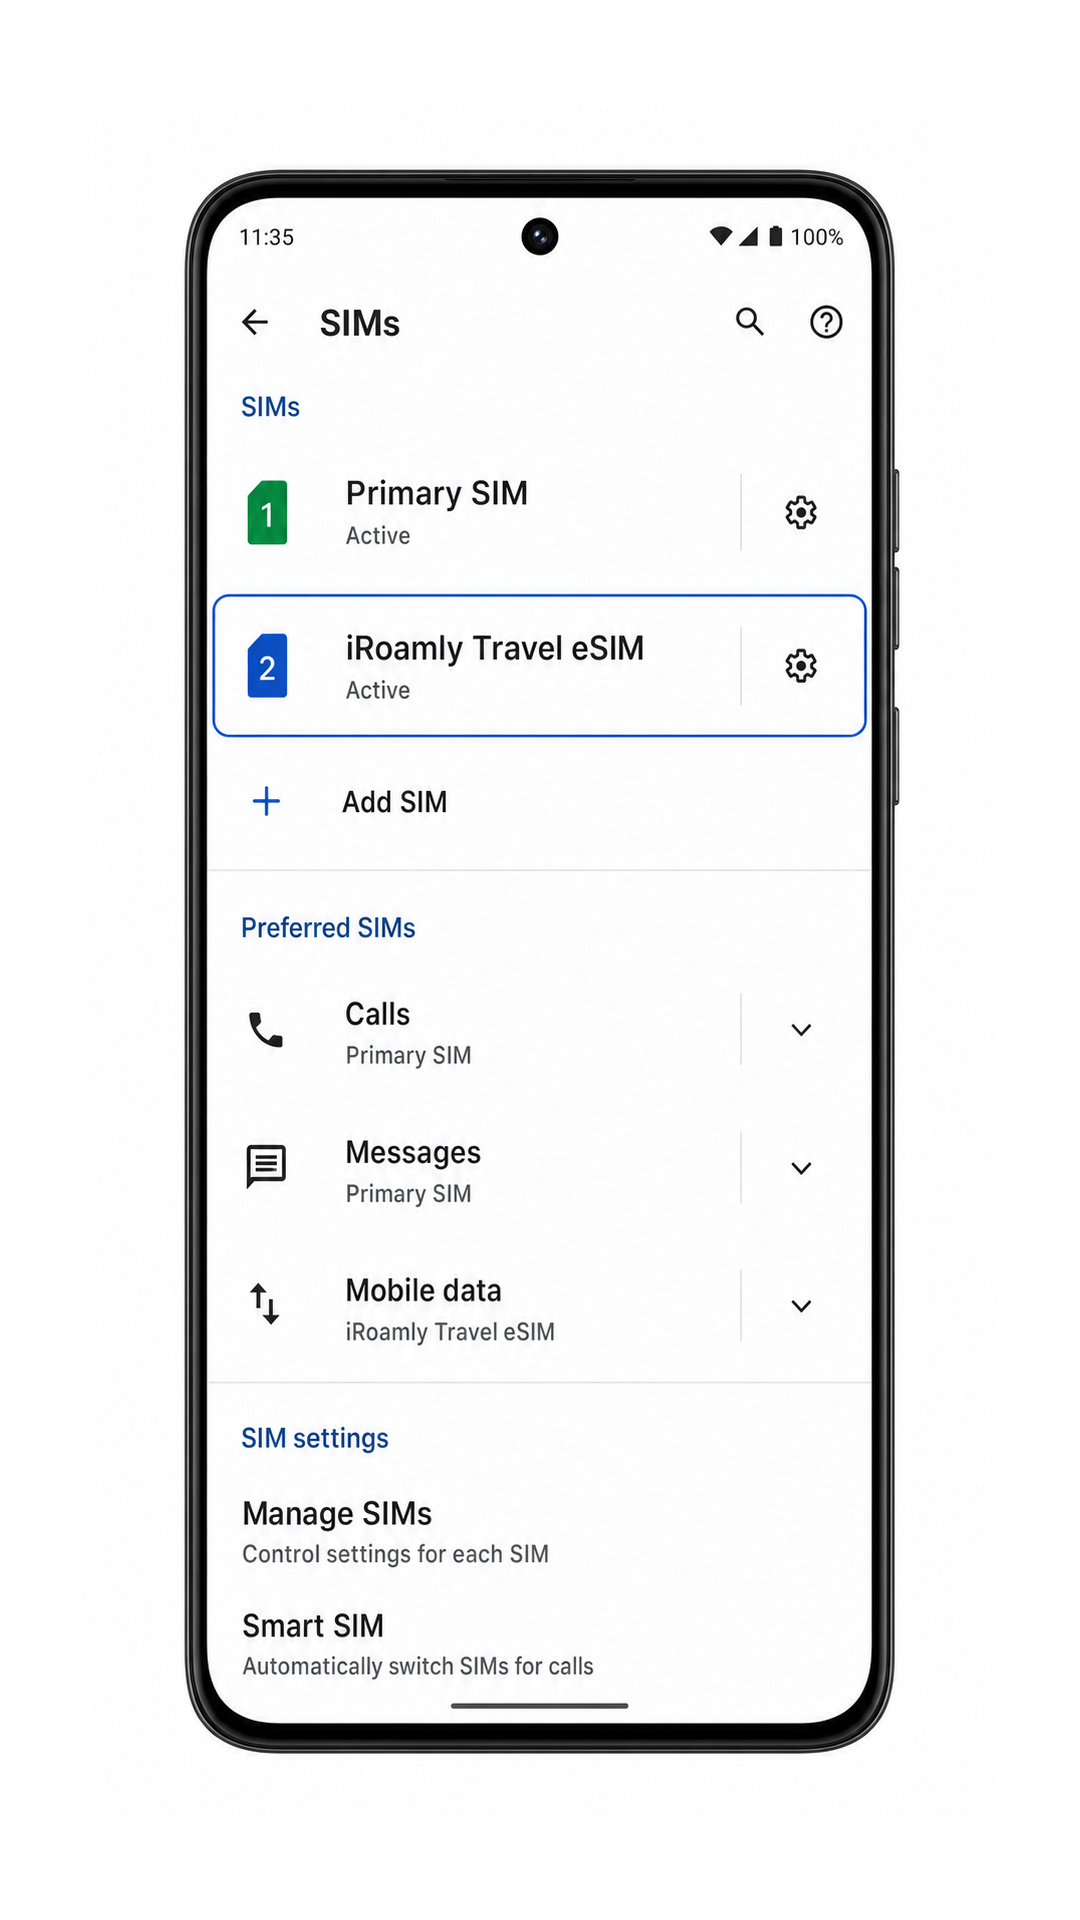
6. Wait for the setup to finish, then return to Settings > Network & internet > SIMs. The iRoamly eSIM should appear as a new SIM profile.
Method 2: Install eSIM Manually
1. Open Settings on the Moto G86, then tap Network & internet. This starts from the same Android settings path as QR setup.
2. Tap SIMs. The Moto G86 should show the SIM management page.
3. Tap Add SIM, then choose the eSIM setup option if the phone asks. The next screen should offer QR setup.
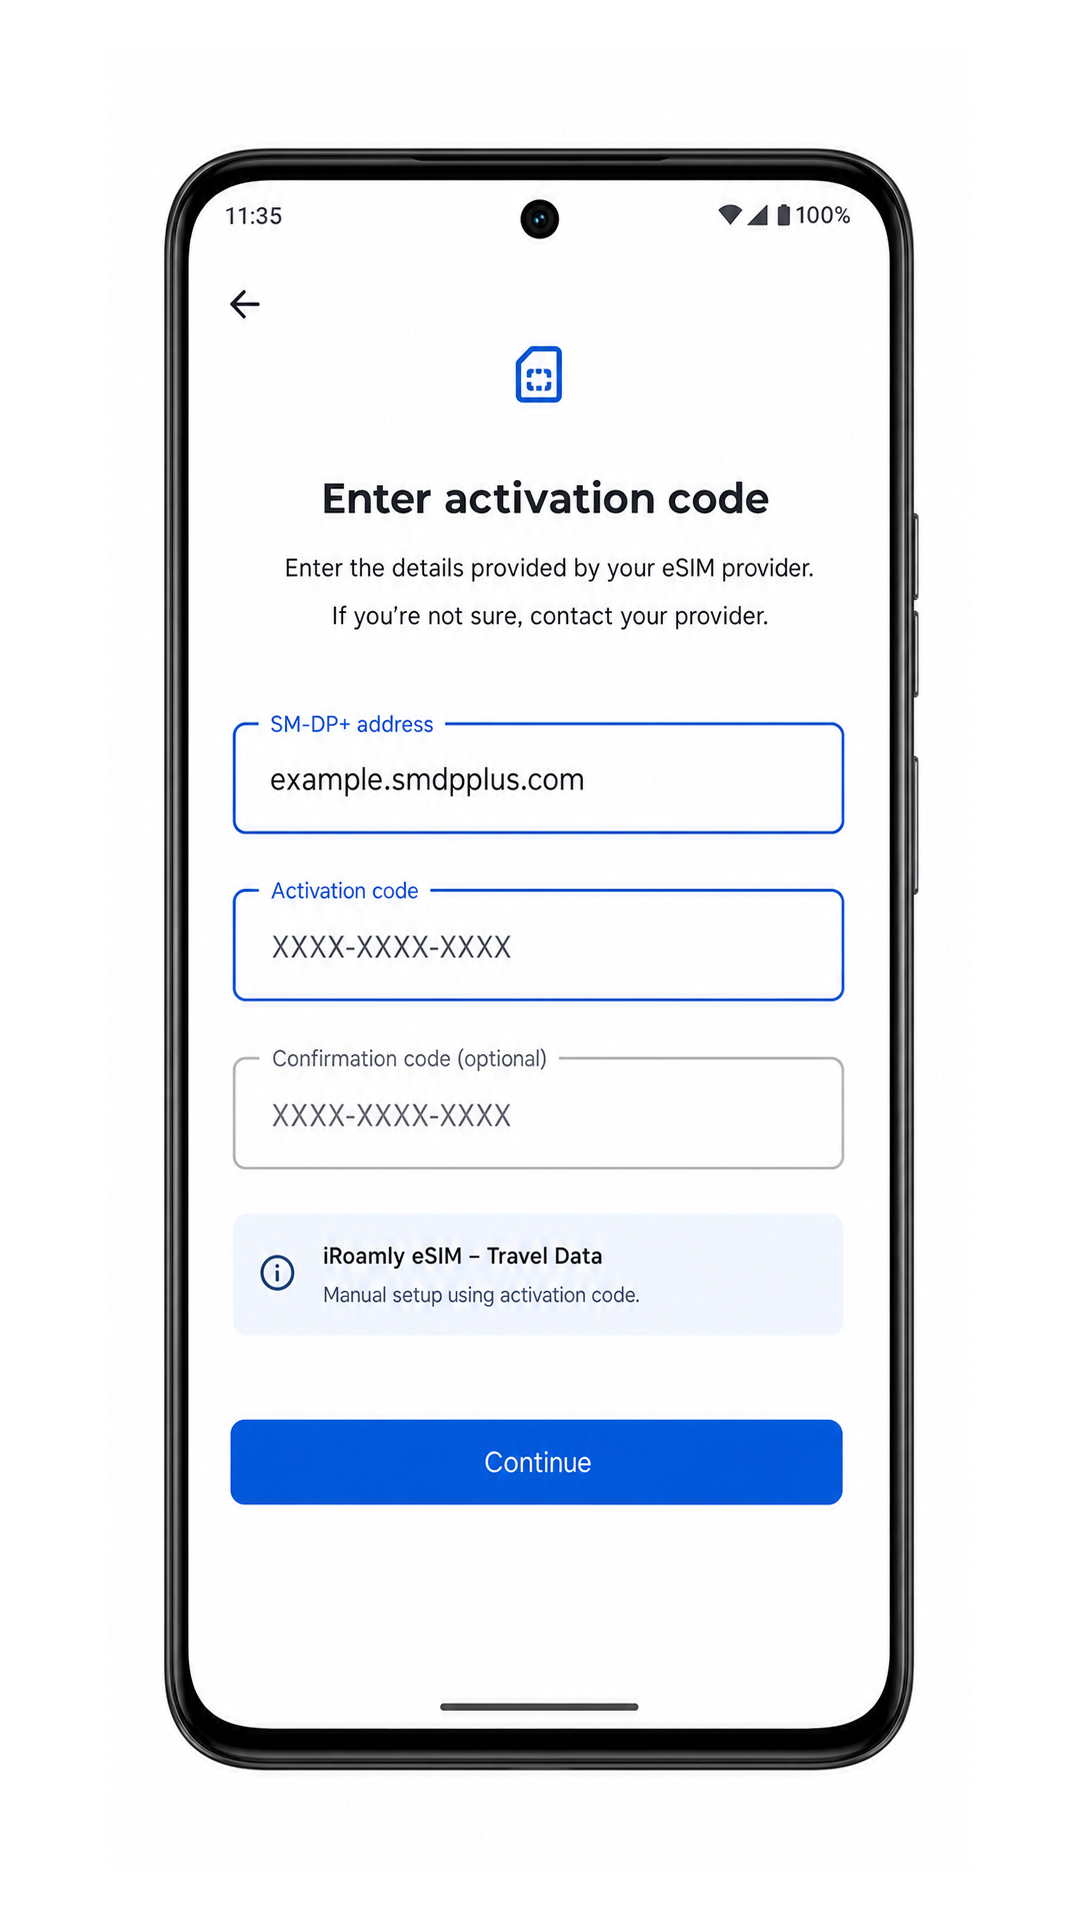
4. On the Set up an eSIM screen, tap Enter activation code instead. This opens the manual eSIM entry form.
5. Enter the iRoamly SM-DP+ address and Activation code exactly as provided. If iRoamly gives a confirmation code, enter it in Confirmation code (optional); otherwise leave that field blank, then tap Continue.
6. Review the download prompt, then tap Download. Keep the phone online until Android finishes adding the iRoamly eSIM.
7. Return to Settings > Network & internet > SIMs and check that iRoamly Travel eSIM appears in the SIM list.
How to Confirm Your iRoamly eSIM Is Installed
1. Go to Settings > Network & internet > SIMs. Look for iRoamly Travel eSIM in the list and confirm it is not shown as removed or failed.
2. Tap iRoamly Travel eSIM and check that Use SIM is turned on. If the eSIM is not needed until arrival, you can leave it installed and turn it on when you are ready to use the travel plan.

3. If your iRoamly plan includes only data, do not use SMS or calling as the success test. Instead, confirm that the eSIM is listed, enabled, and available for mobile data.
Configure eSIM for Mobile Data
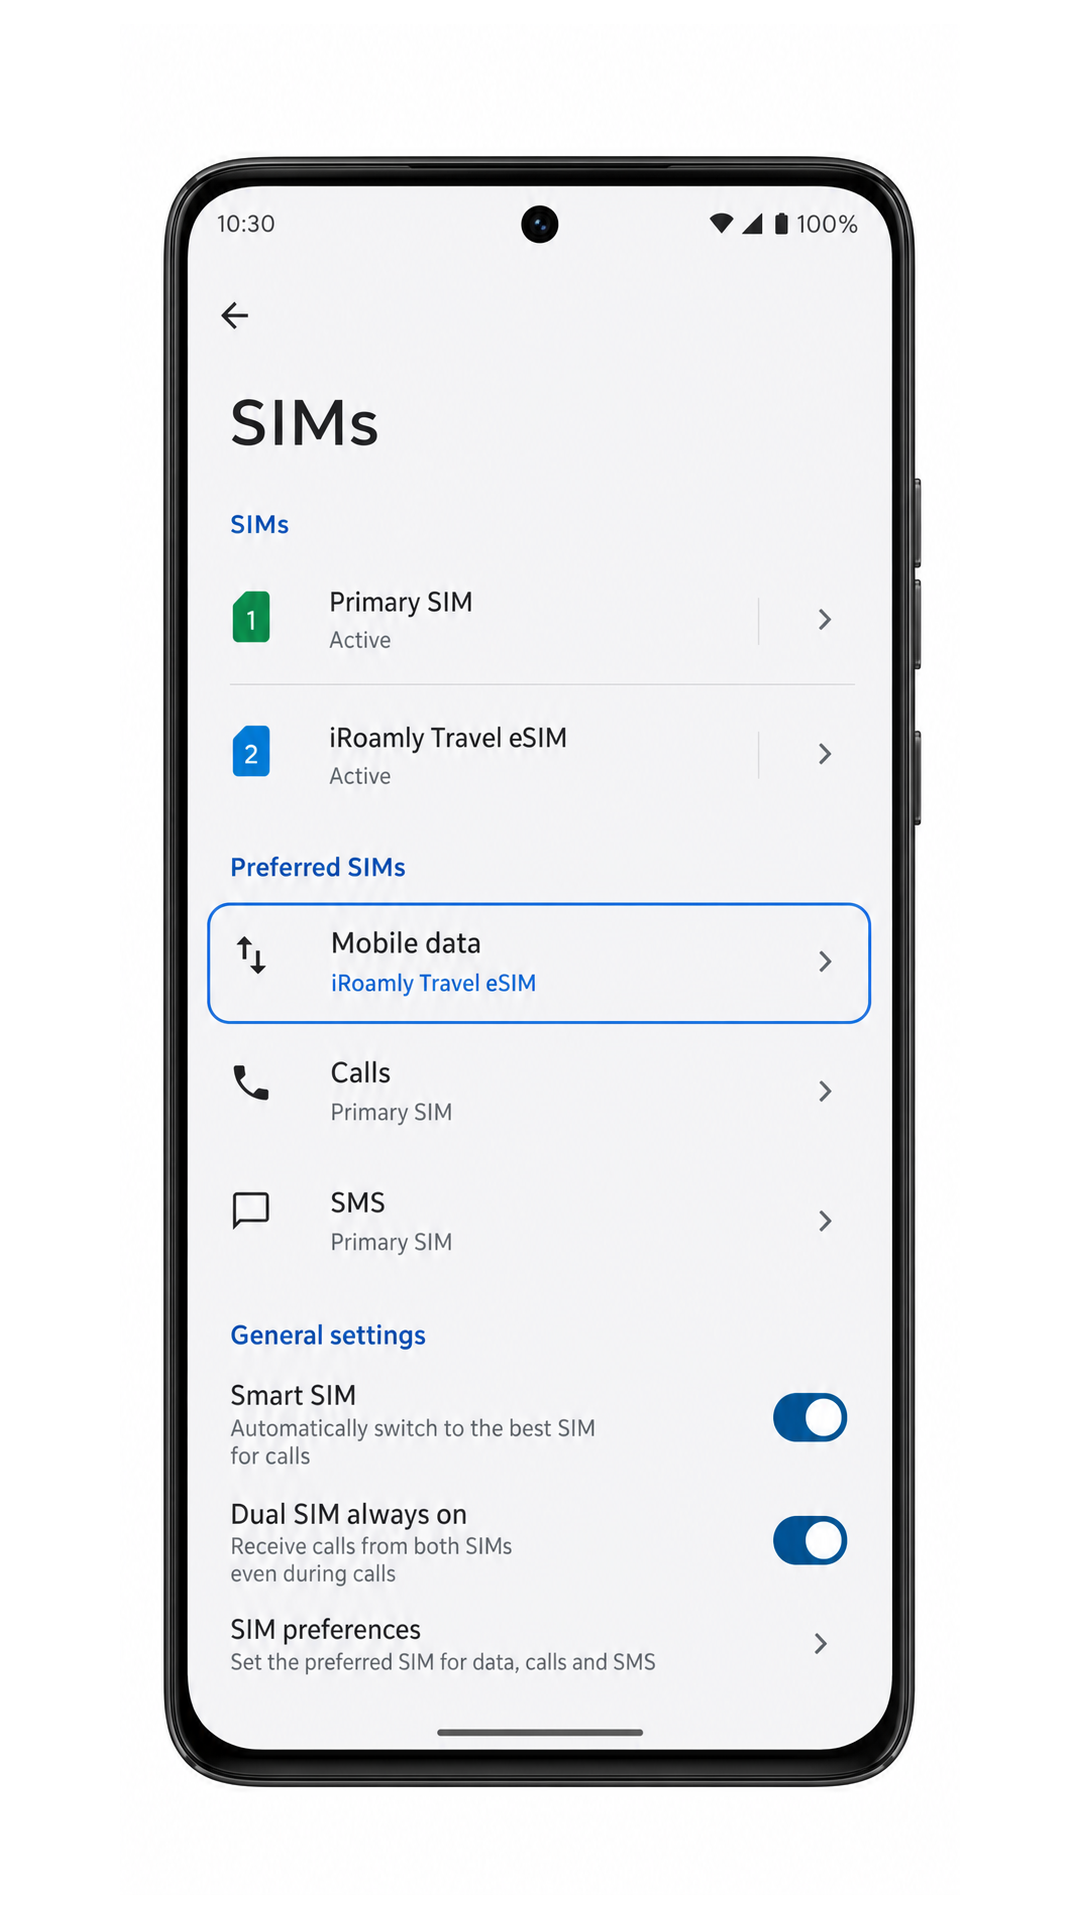
1. Open Settings > Network & internet > SIMs, then tap the Mobile data row under Preferred SIMs. Choose iRoamly Travel eSIM for mobile data.
2. Tap iRoamly Travel eSIM, turn on Use SIM, and enable Data roaming if your iRoamly plan or destination requires roaming for data service.
3. Keep calls and SMS on your primary SIM unless your specific iRoamly plan states that voice or messaging is included. Then test mobile data by opening a web page after you reach the supported destination network.
Troubleshooting
If Add SIM is missing, update the Moto G86 software, restart the phone, and check whether your regional model and carrier firmware support eSIM.
If the QR code will not scan, increase screen brightness on the device showing the QR code, clean the Moto G86 camera lens, and try again on stable Wi-Fi.
If the QR code says it has already been used, do not delete the eSIM or keep retrying. Contact iRoamly support because many eSIM QR codes are single-use.
If manual entry fails, check every character in the SM-DP+ address and Activation code. Avoid extra spaces before or after the code.
If the eSIM downloads but does not connect, confirm that Use SIM is on, Mobile data is set to iRoamly Travel eSIM, and Data roaming is enabled when required.
If activation remains pending before travel, wait until the phone is in a supported destination network. Some travel eSIMs activate only after connecting to the local partner network.
If mobile data still does not work after arrival, restart the Moto G86, recheck APN or network settings only if iRoamly provides specific instructions, and make sure your plan has data remaining.
Conclusion
For the Moto G86, scanning the iRoamly QR code is usually the quickest setup path because Android takes you from Network & internet to SIMs, Add SIM, and the Set up an eSIM scanner with only a few taps. Manual entry is the right backup when the QR code is on the same phone or will not scan, as long as you copy the SM-DP+ address and Activation code exactly.
After installation, the useful check is not whether calls or SMS work, because iRoamly plan features vary. Confirm that iRoamly Travel eSIM appears under SIMs, choose it for Mobile data, and turn on Data roaming when the destination plan requires it so the Moto G86 is ready for travel data.