
Motorola Edge 60 Fusion supports eSIM on compatible regional models, and iRoamly lists the Edge 60 Fusion among supported Motorola devices. If your carrier firmware or market variant removes eSIM support, the Add SIM or Set up an eSIM option may not appear.
This guide assumes Motorola Edge 60 Fusion running Android 15 with Motorola's near-stock Hello UI. The verified setup path is Settings > Network & internet > SIMs > Add SIM, with menu names that may vary slightly by software version or region.
Use the QR code method when the iRoamly QR code is available on another screen or printed page. Use manual entry when the QR code cannot be scanned, when you are setting up from the same phone, or when iRoamly gives you activation details instead of a scannable code.
Stay Connected Abroad with iRoamly
iRoamly is a travel eSIM service that provides mobile data plans for destinations around the world. Travelers can choose from available local, regional, and global options, with data allowances, validity periods, and plan types varying by destination.
Once installed on a compatible phone, the data line can support travel needs such as maps, messaging, translations, ride-hailing, bookings, and travel updates.
On a compatible Motorola Edge 60 Fusion, an iRoamly eSIM can be installed digitally and selected for mobile data during a trip. The guide below keeps the QR-code and manual setup methods in order so you can add the profile, confirm it in Android settings, and use it when your plan is ready.
Before You Set Up Your iRoamly eSIM
Heading to Japan or the United States? Installing your travel eSIM before departure can leave less to configure after arrival, while keeping your regular SIM available on a compatible dual-SIM phone.
Connect the Motorola Edge 60 Fusion to stable Wi-Fi before starting.
Make sure your phone is unlocked and that your exact regional model supports eSIM.
Keep your iRoamly QR code, SM-DP+ address, and activation code available.
Install the iRoamly eSIM 1-2 days before travel when possible, but check the specific plan details first. iRoamly eSIM validity starts from activation, and some plans may activate when installed or when first connecting to a supported network.
Do not delete an installed eSIM profile casually. Many travel eSIM profiles cannot be reinstalled after removal unless support reissues them.
iRoamly travel eSIM plans may be data-only. Voice calls and SMS availability vary by plan, so check the plan page before relying on calling or texting.
Method 1: Install eSIM by Scanning a QR Code
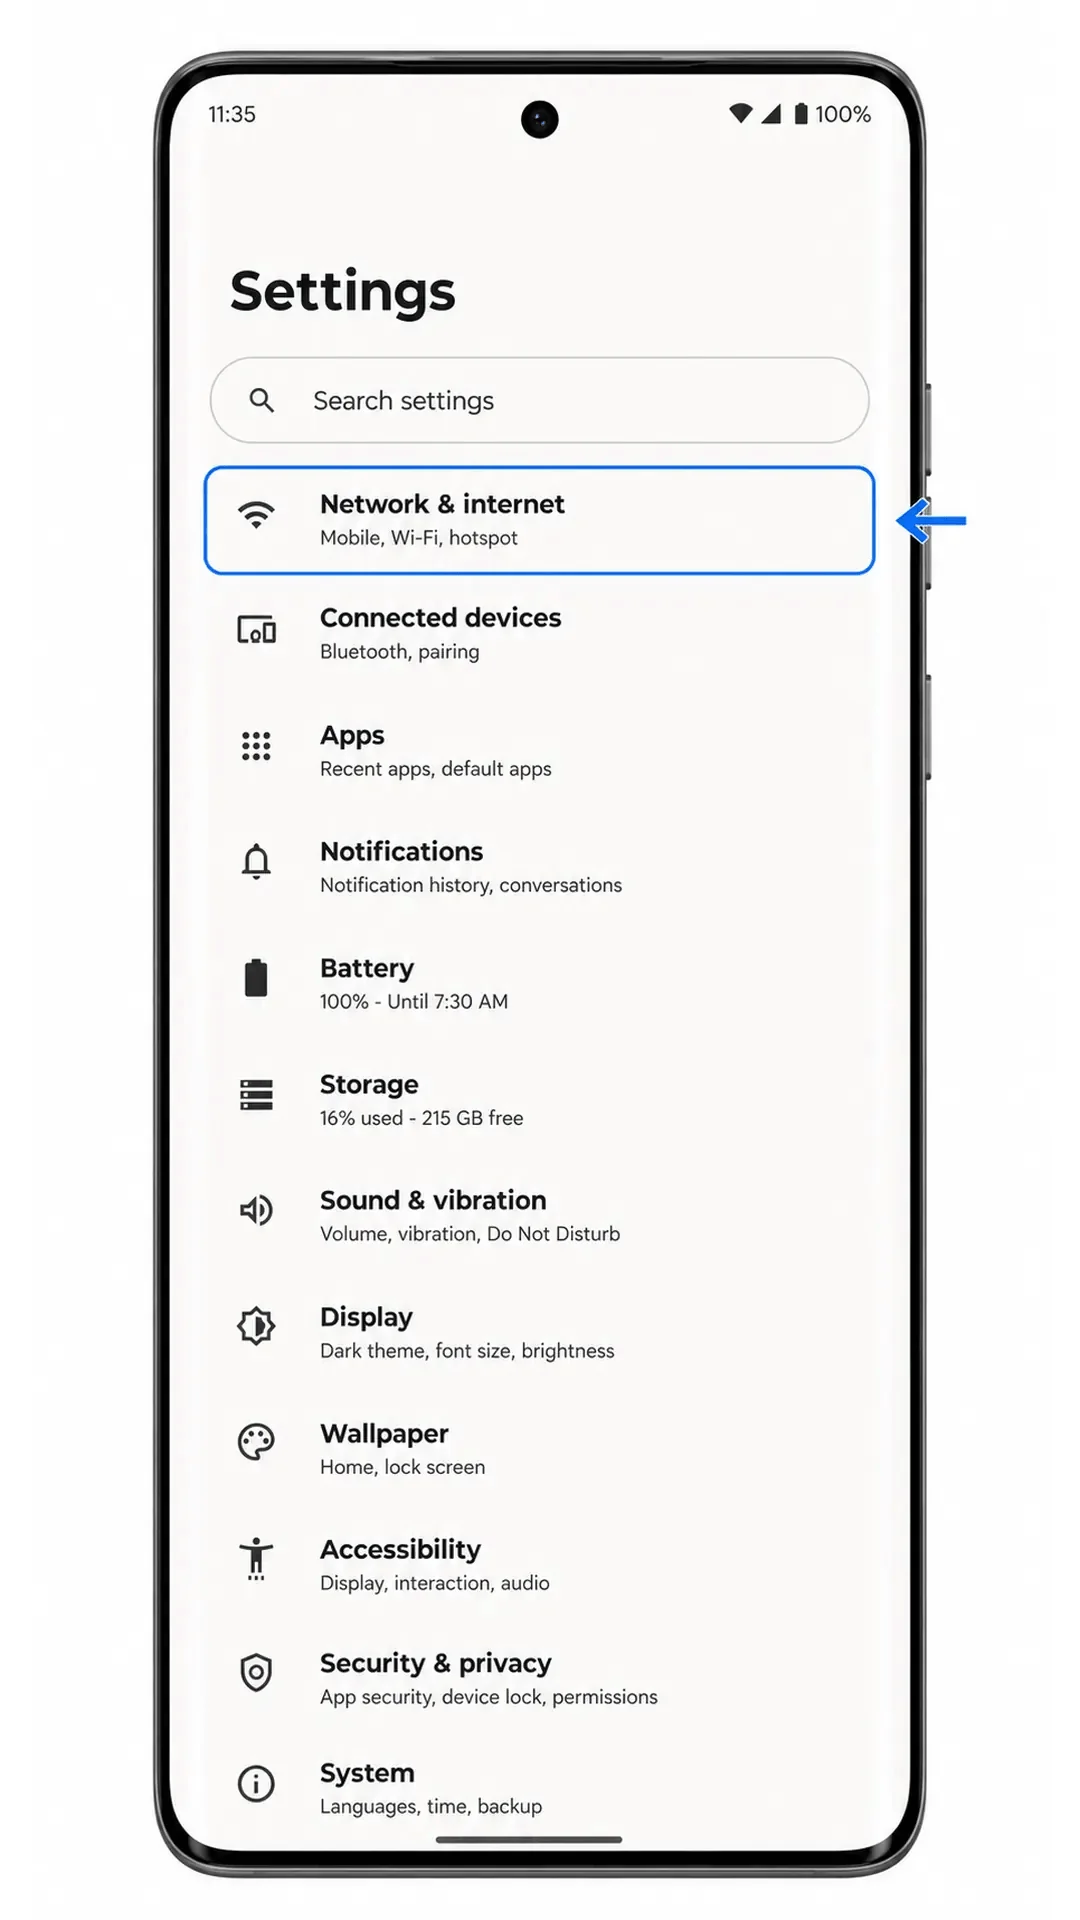
Open Settings, then tap Network & internet. You should see the Android network page with mobile network and SIM options.
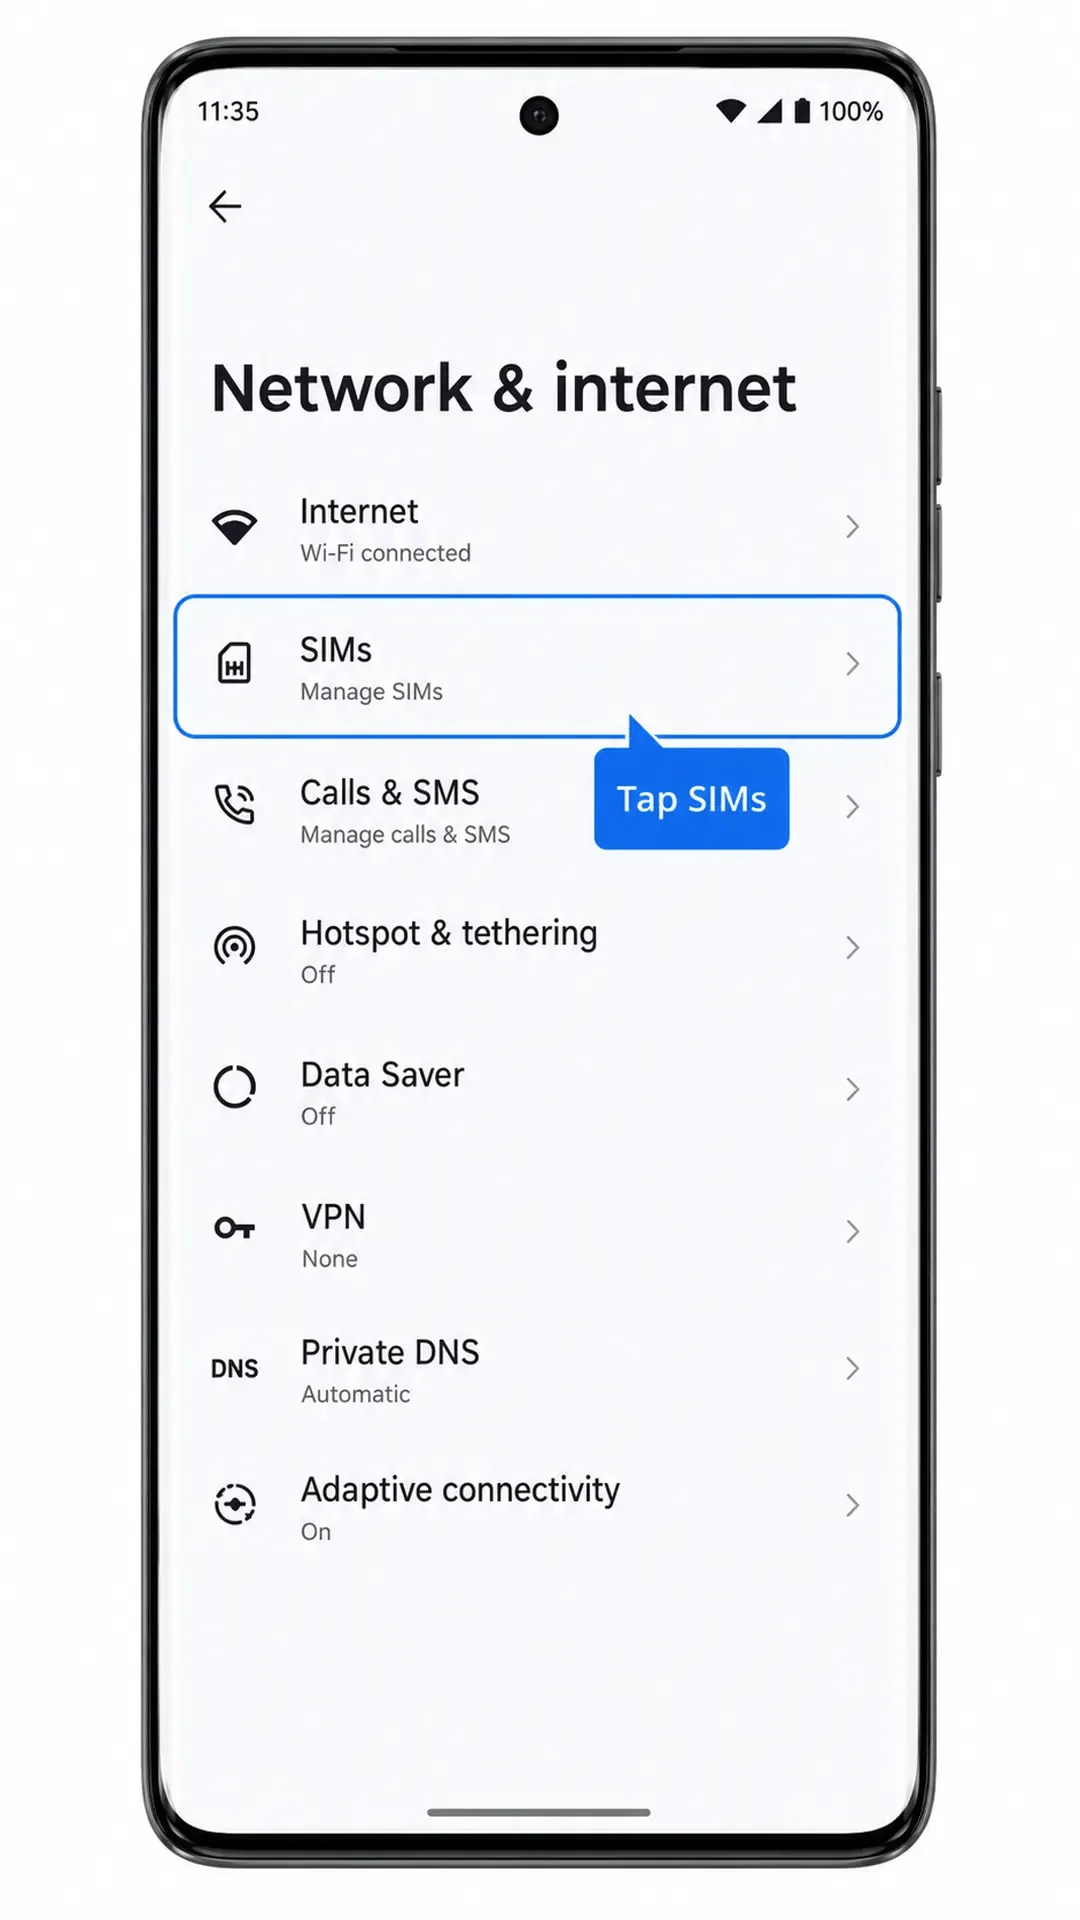
Tap SIMs. The phone should open the SIM management page where your physical SIM and available SIM actions are shown.
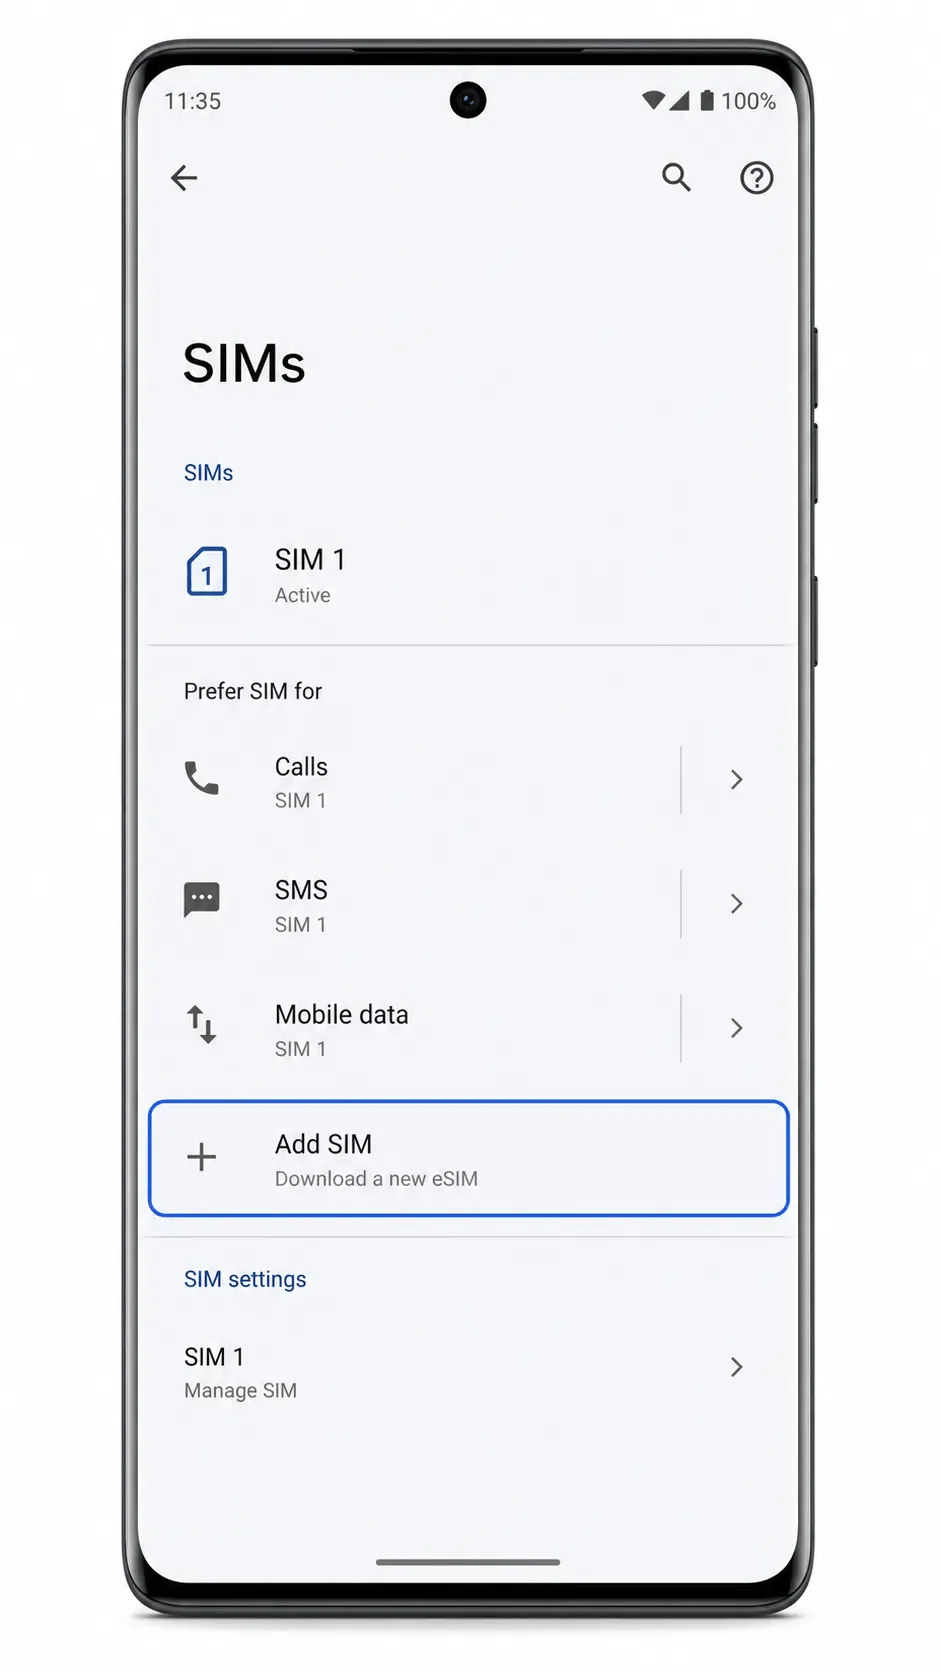
Tap Add SIM. Android should start the flow for adding another mobile plan or eSIM.
Tap Set up an eSIM. The phone should prepare the camera-based eSIM setup screen.
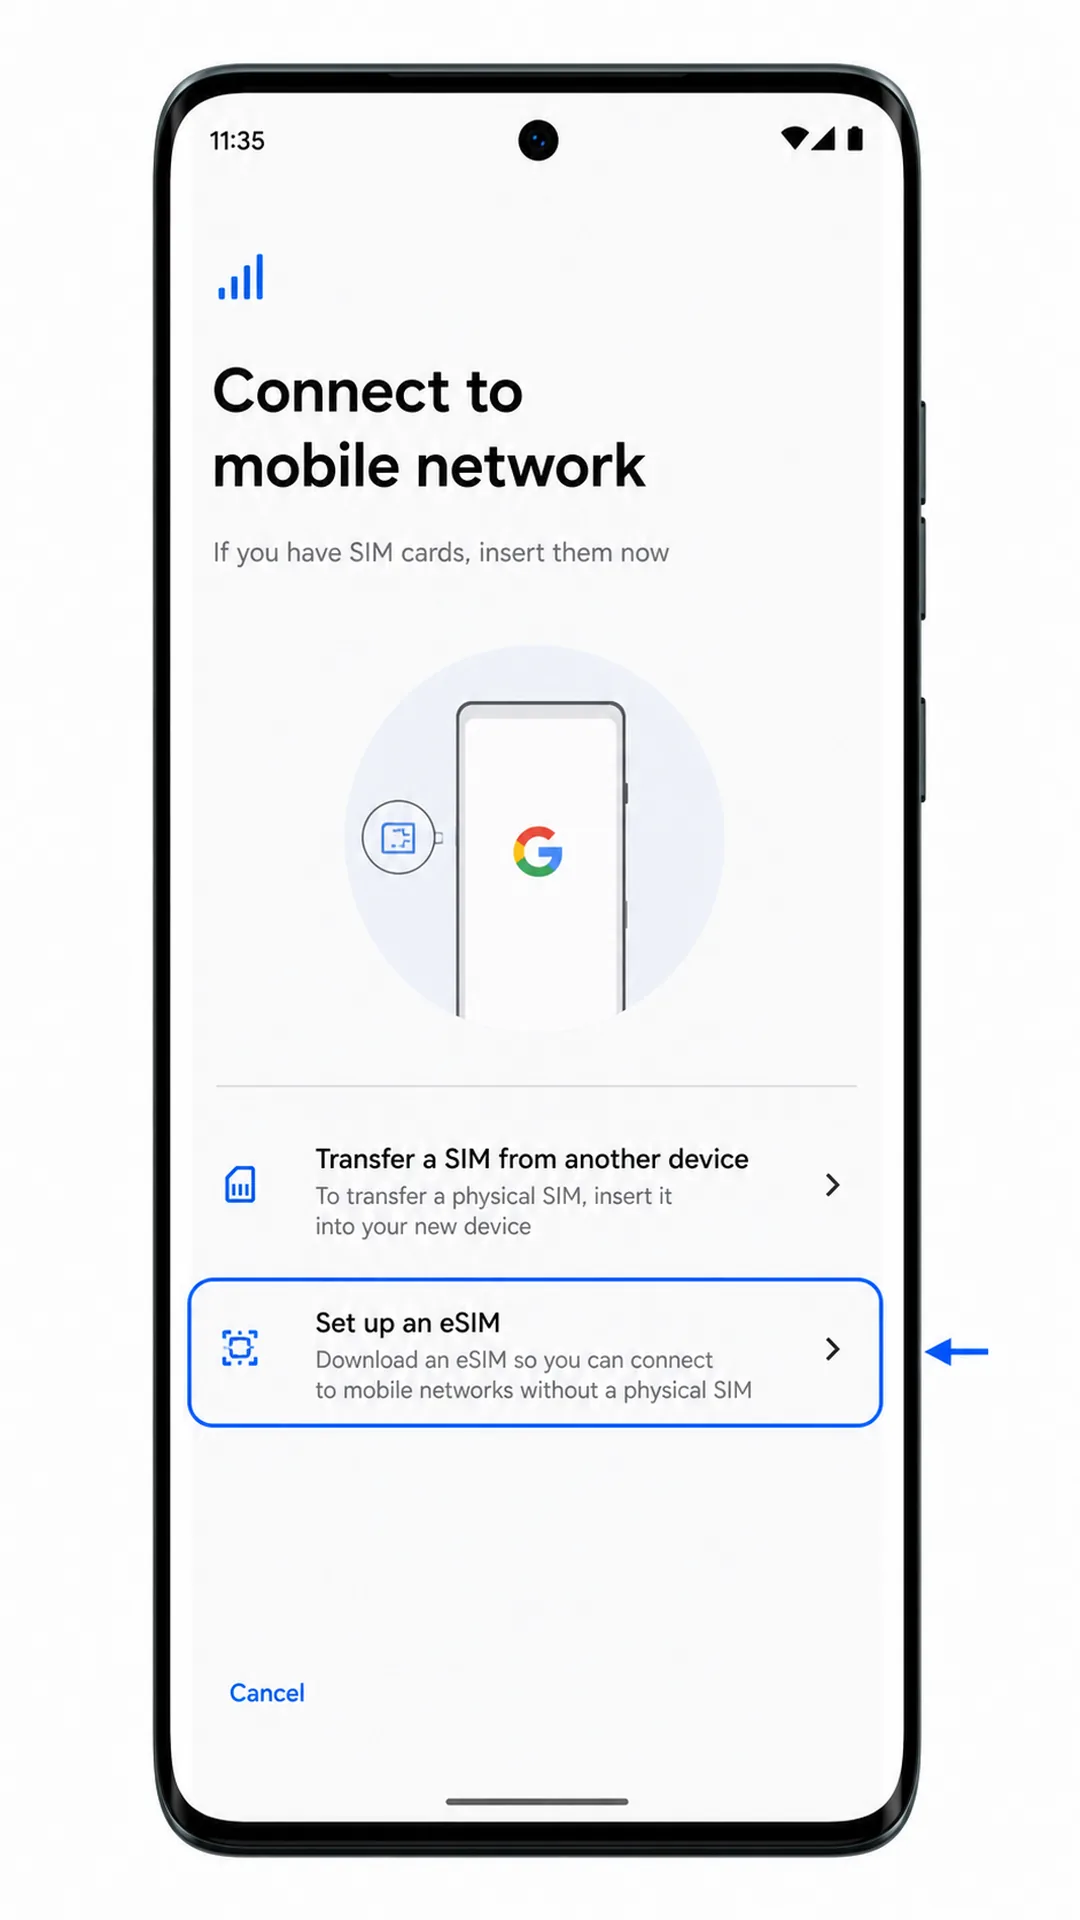
Point the camera at your iRoamly QR code and keep the code inside the scanner frame. The phone should recognize the eSIM profile and move to the download confirmation screen.
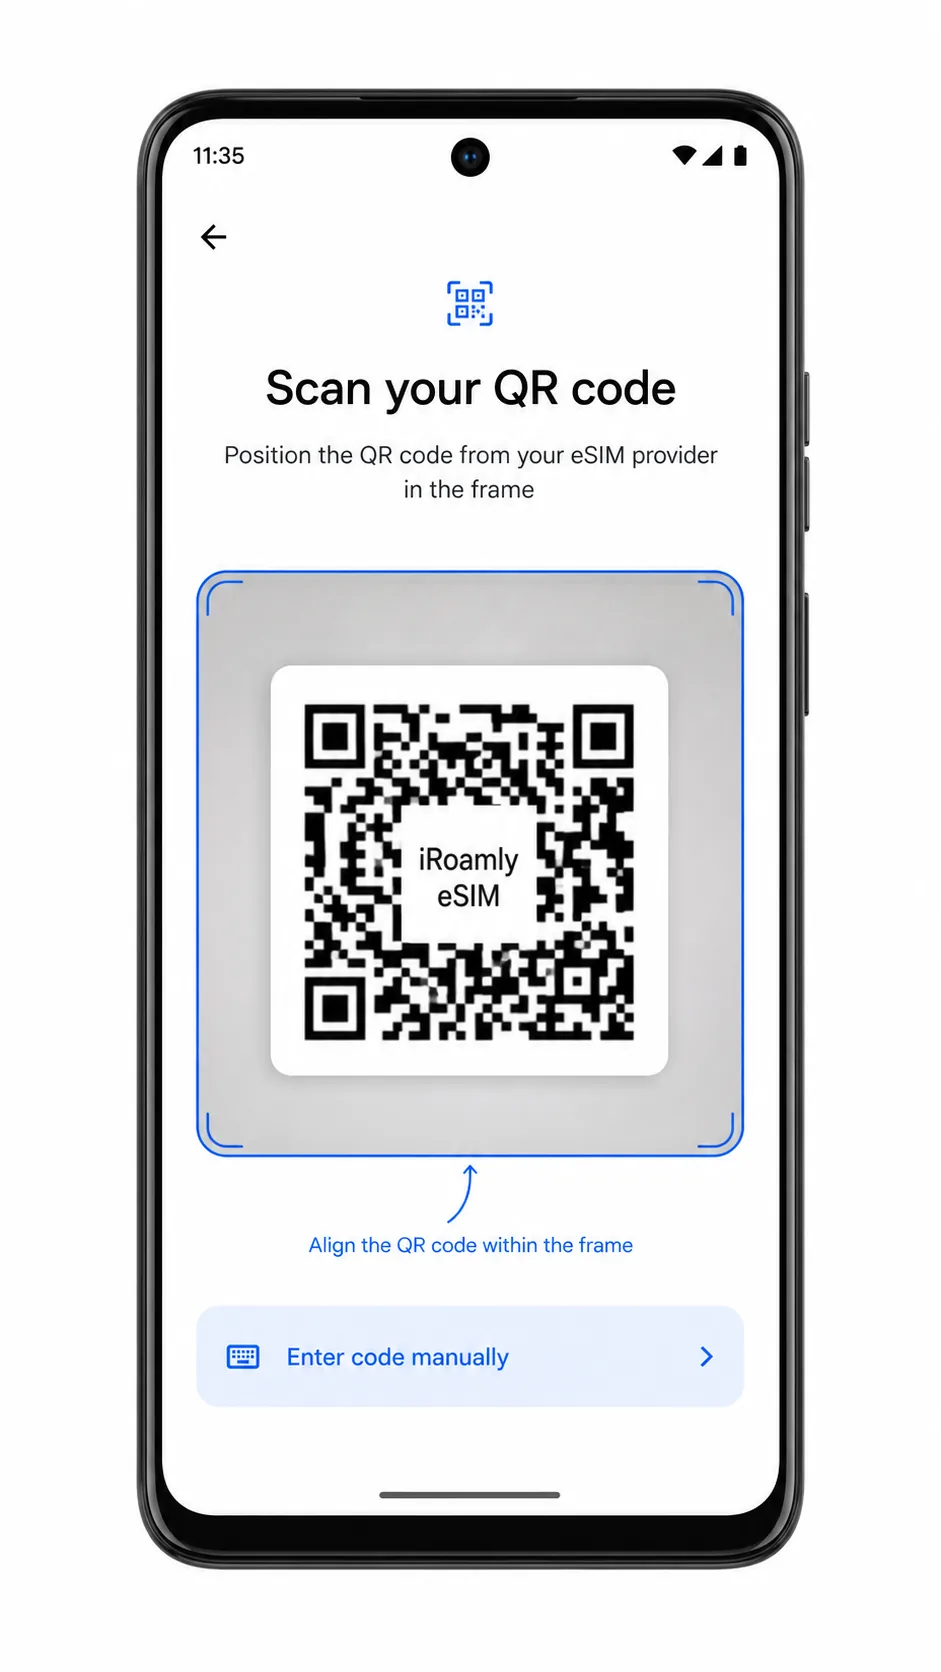
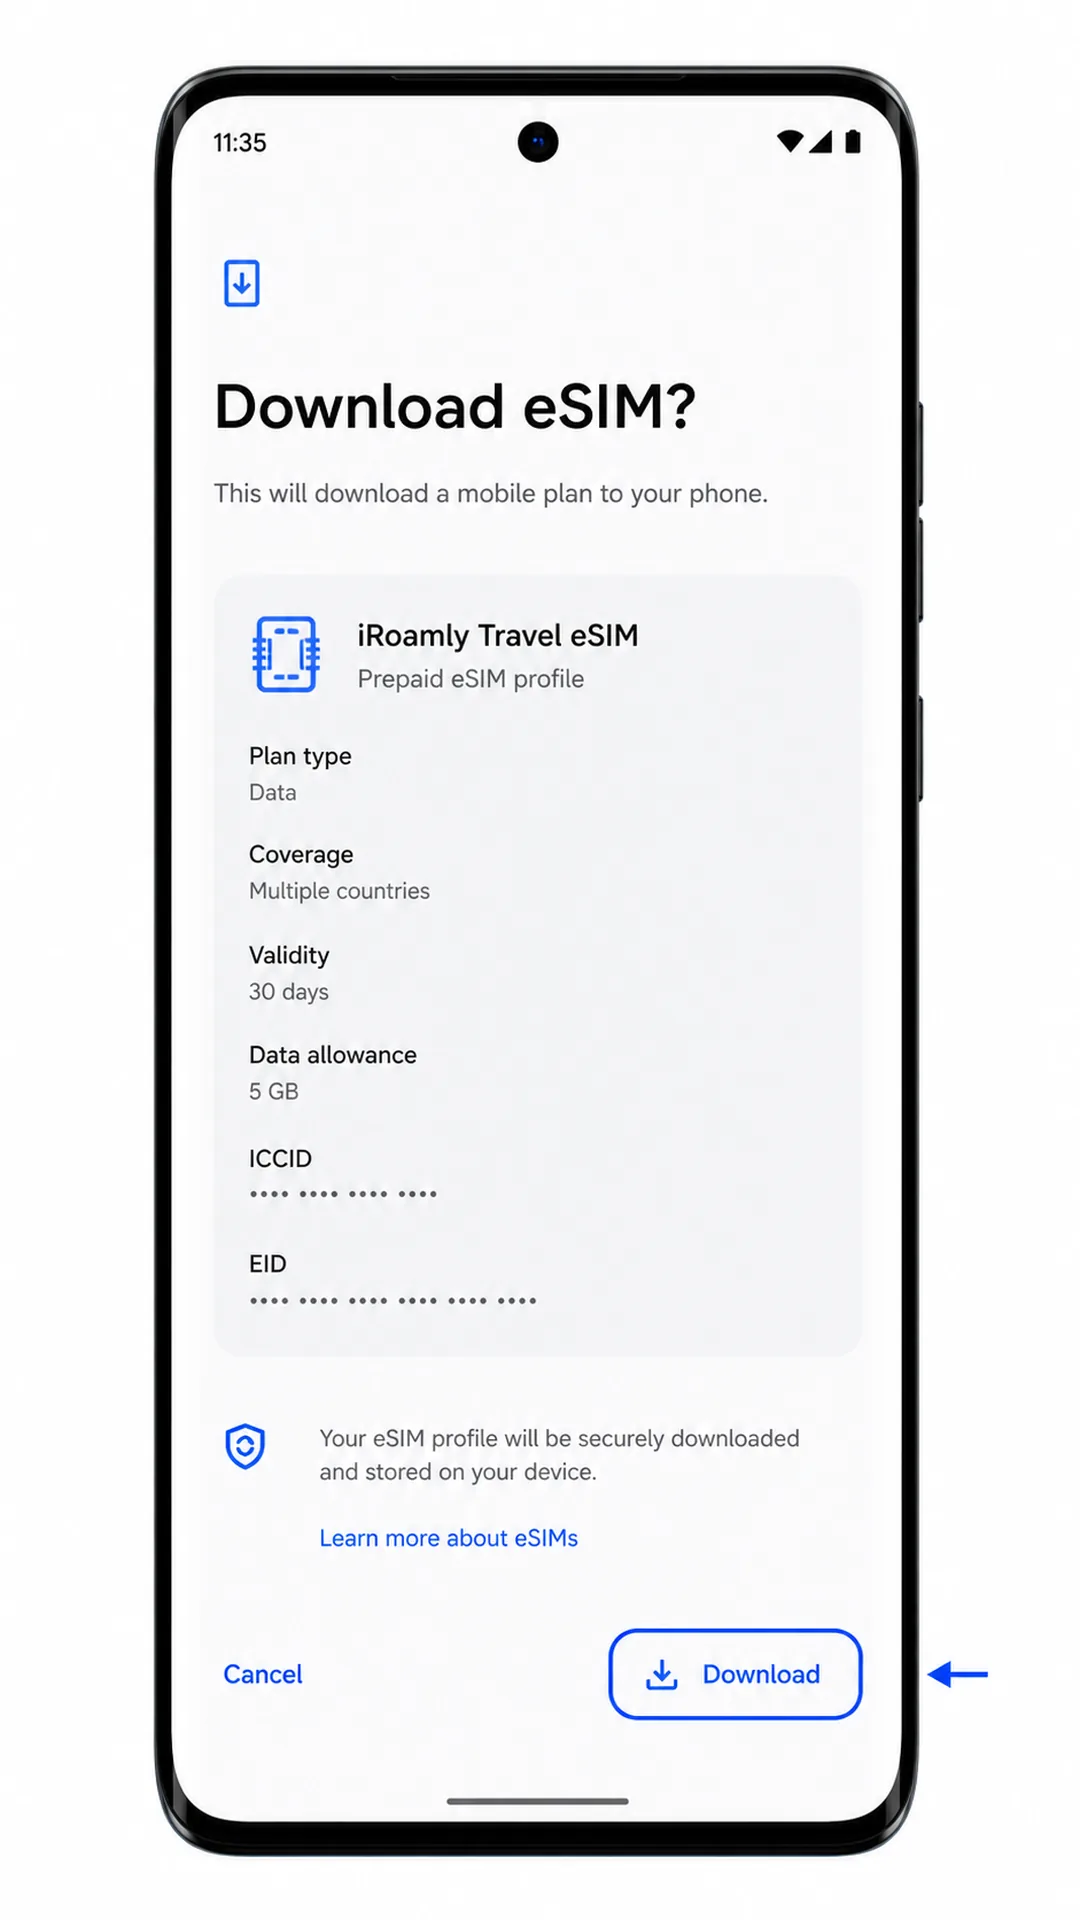
Review the detected iRoamly eSIM, then tap Download or Activate. Keep Wi-Fi connected until Android finishes adding the profile.
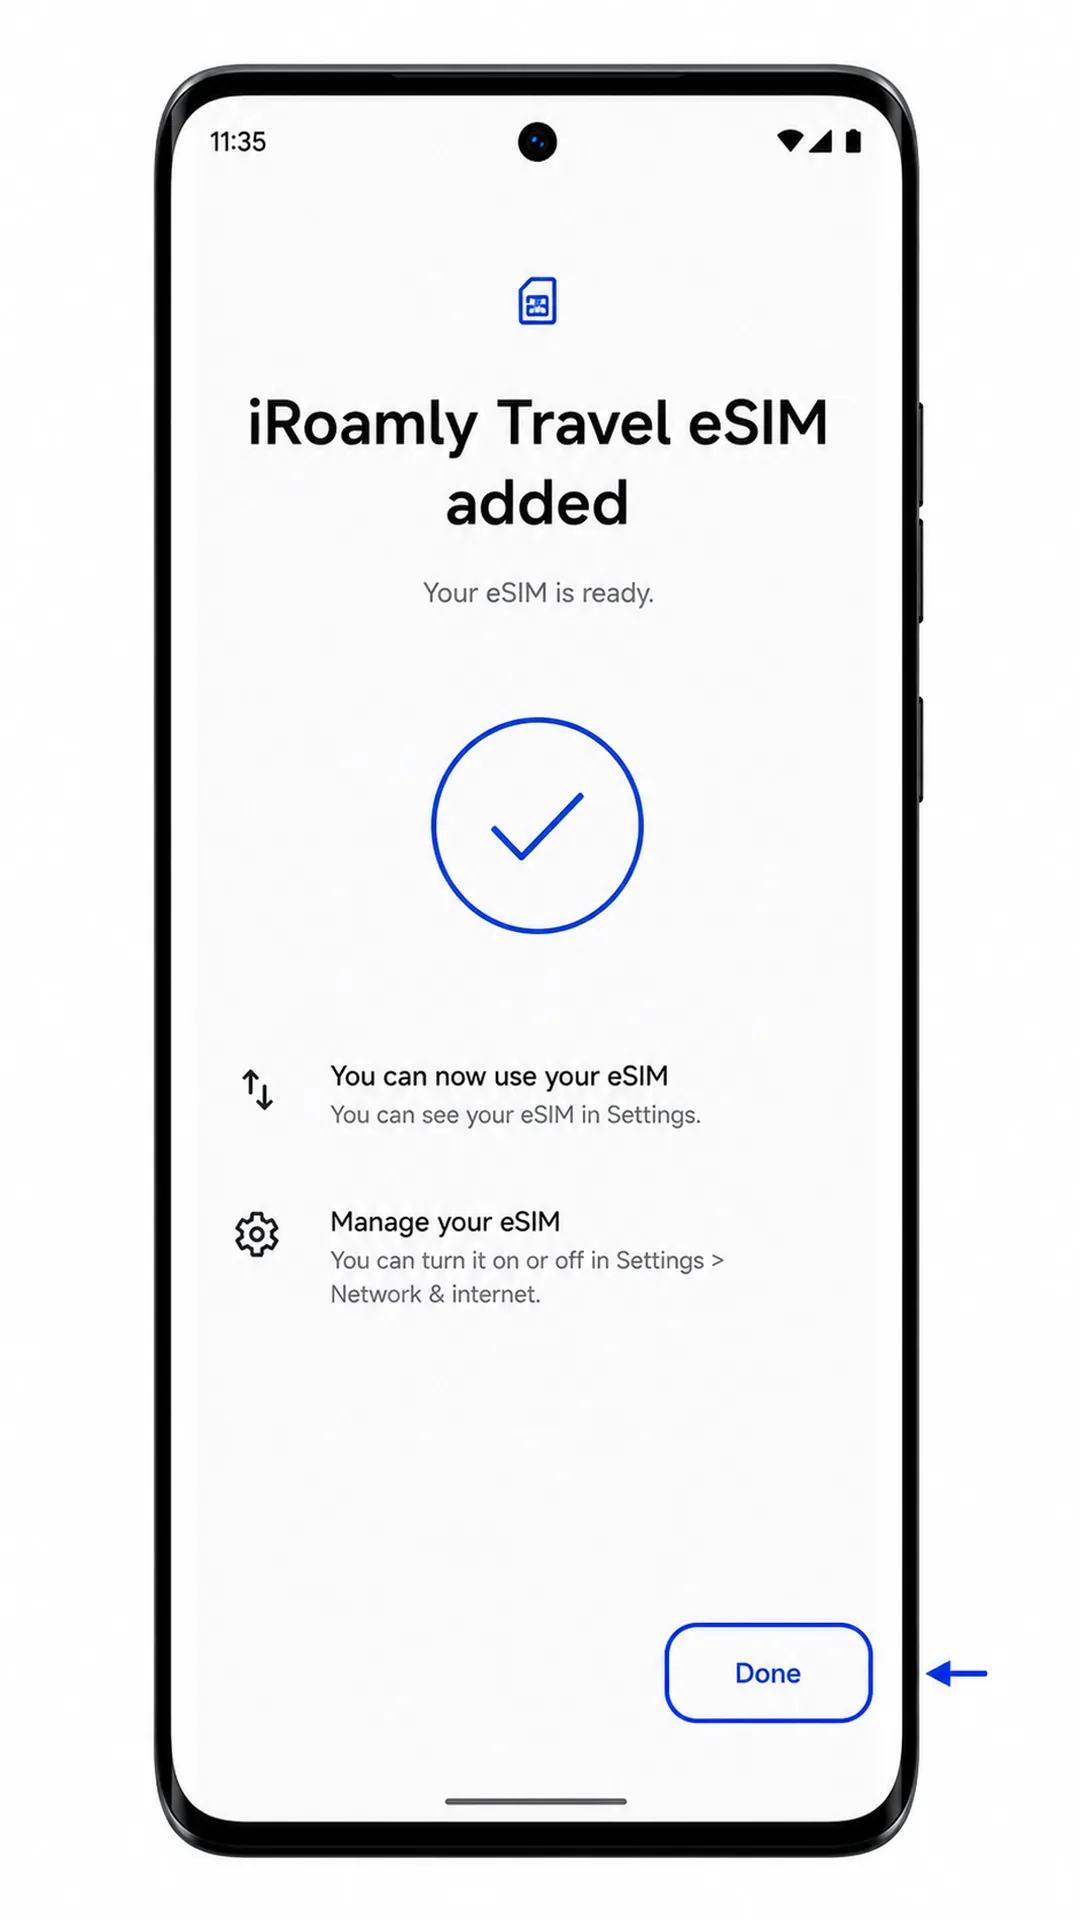
When the phone says the eSIM has been added, tap Done. The iRoamly eSIM should now appear in the SIMs page.
Method 2: Install eSIM Manually
Open Settings, then tap Network & internet. This starts the same Android path used for QR setup.
Tap SIMs. You should see the SIM management page for the active SIMs on the phone.
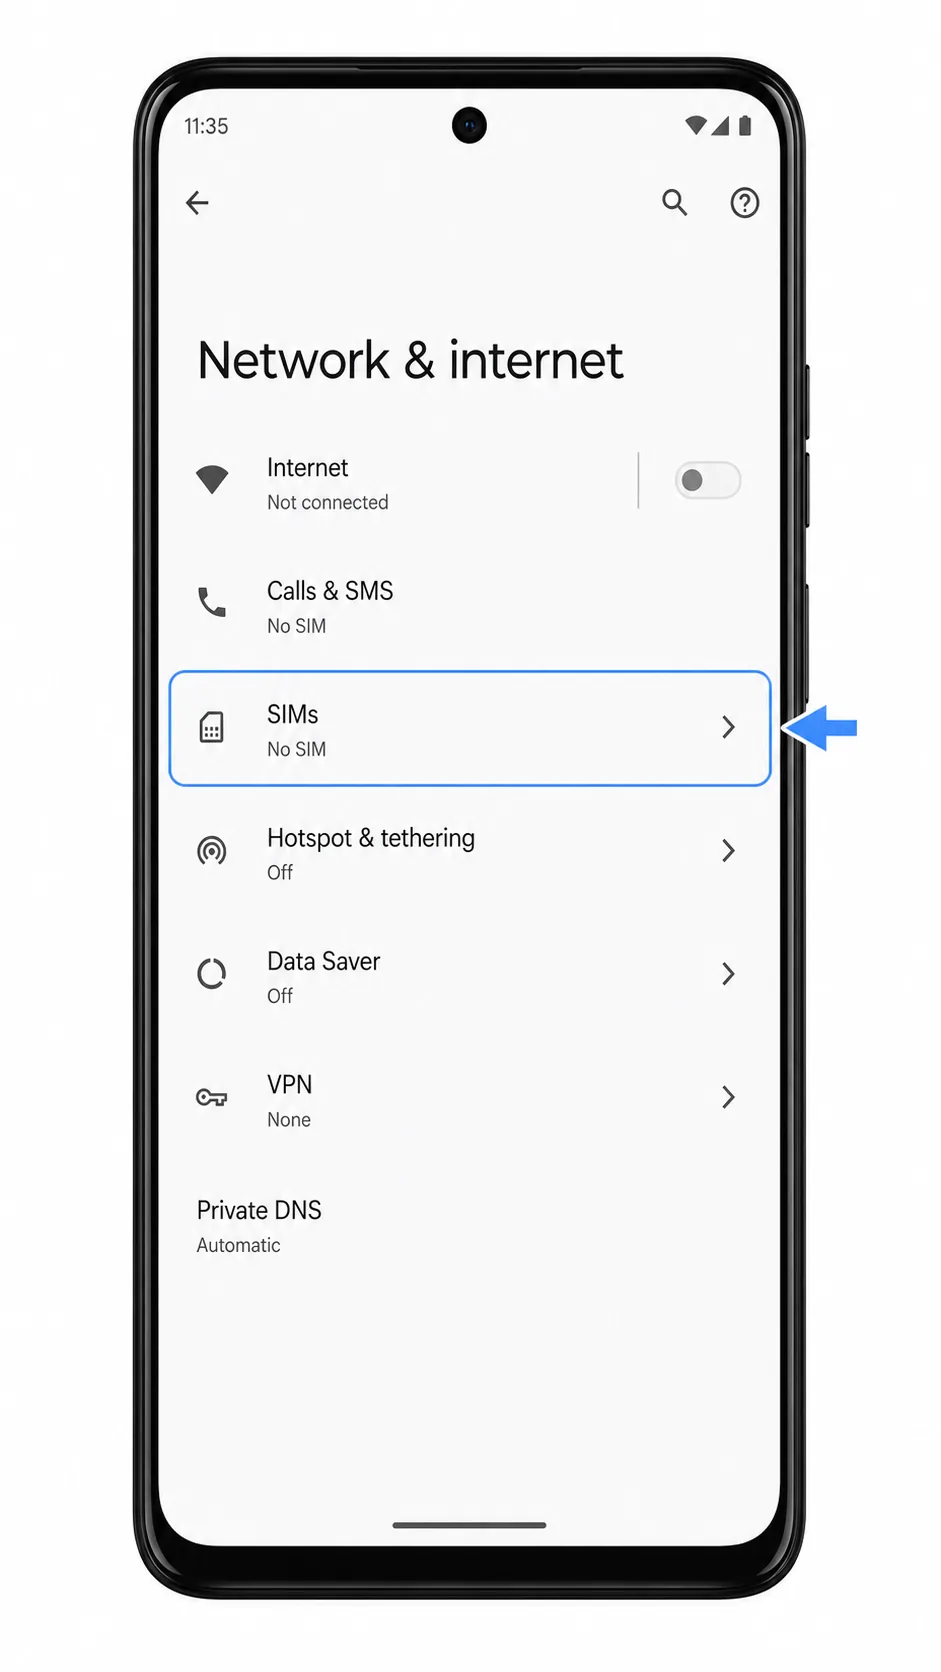
Tap Add SIM. Android should open the add-SIM setup flow.
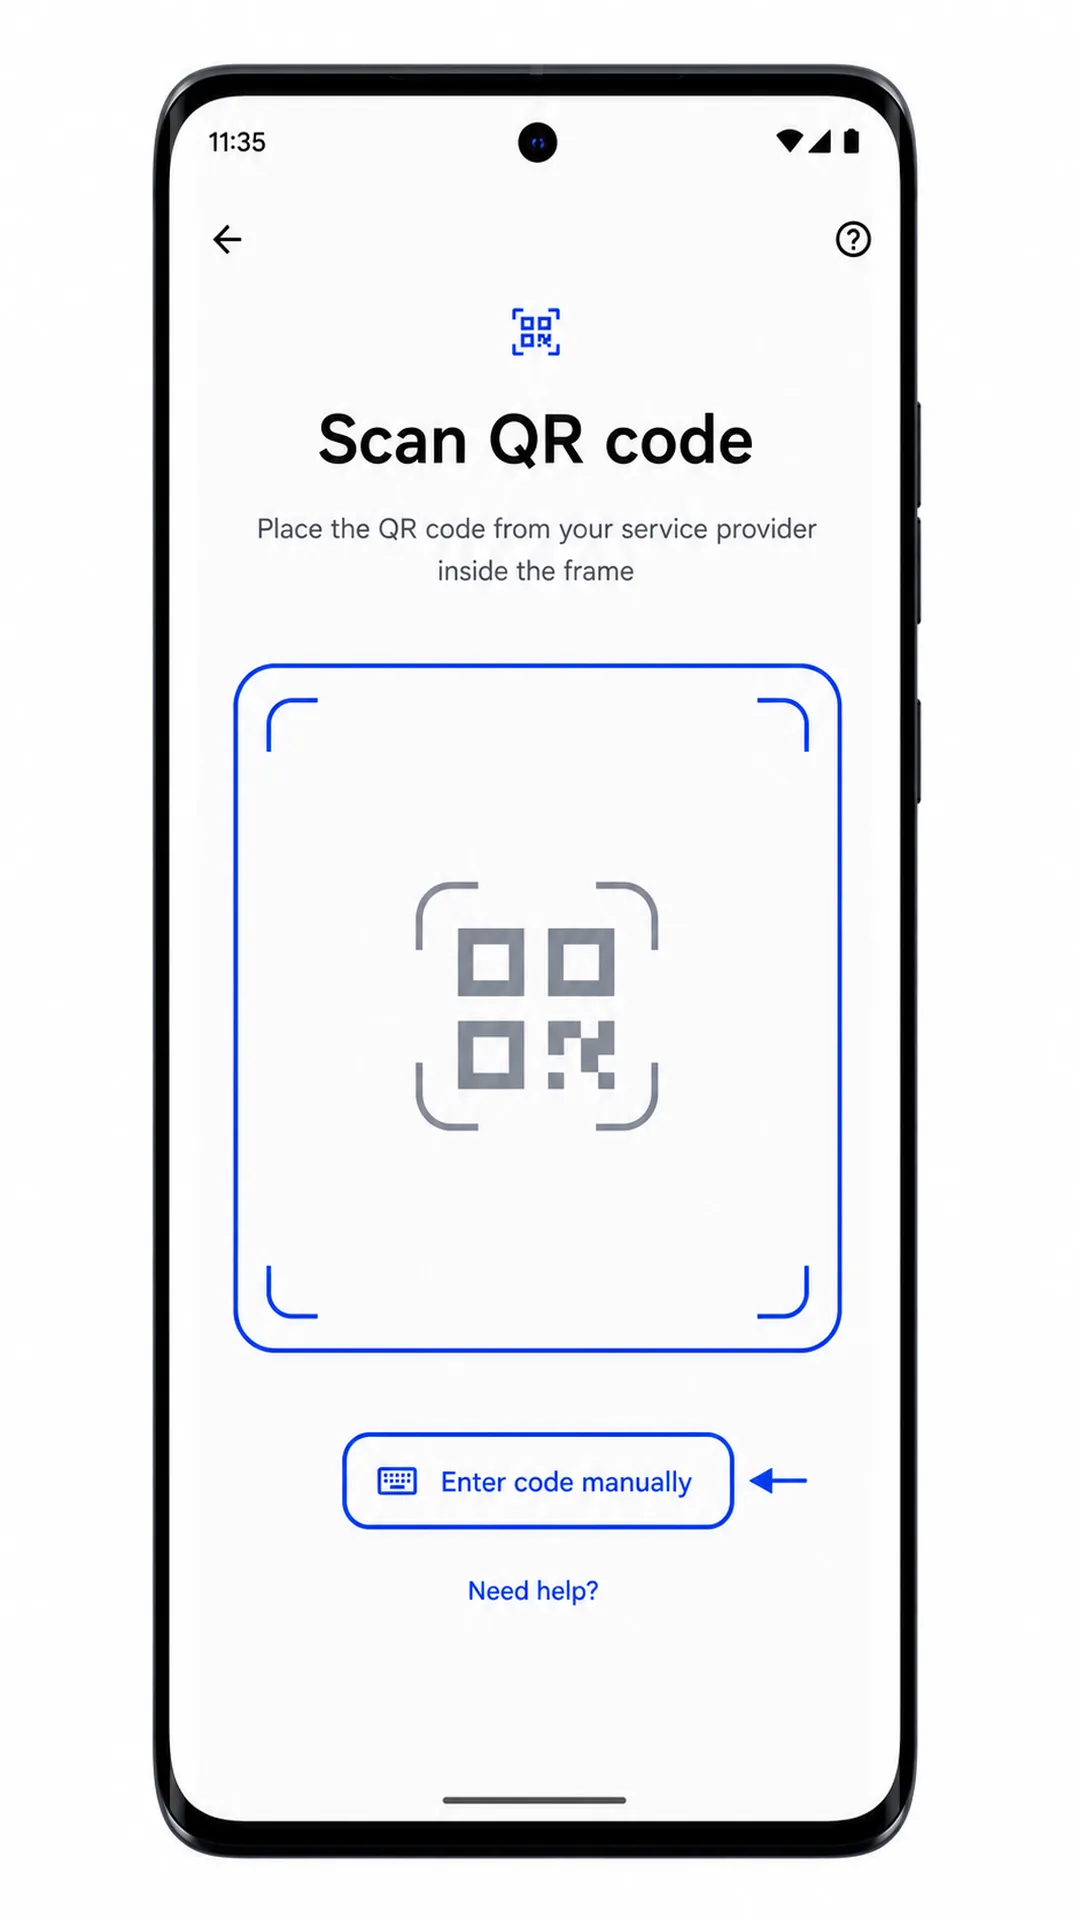
Tap Set up an eSIM. The phone should show the QR scanning screen.
On the QR scanning screen, tap Need help? or Enter code manually, depending on your software build. Android should open a manual activation-code screen.
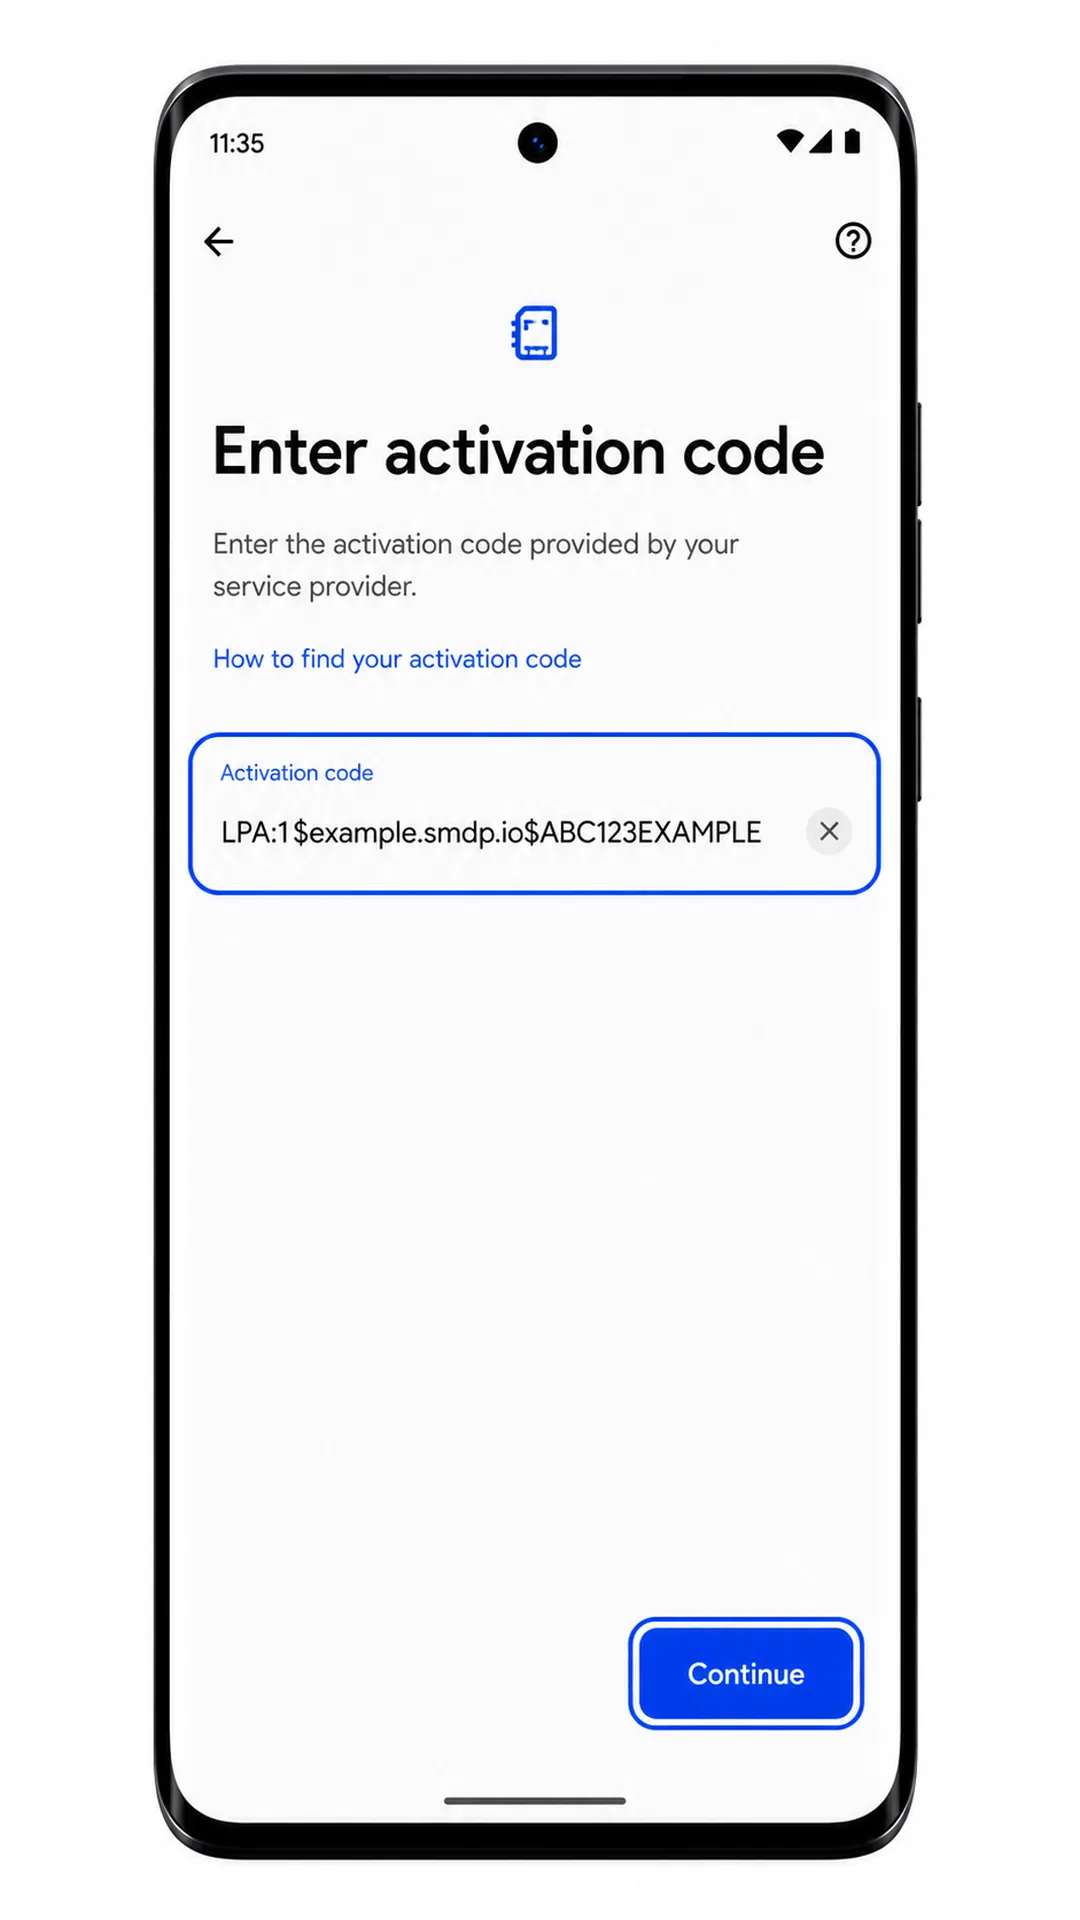
Enter the iRoamly activation details in the Activation code field. If iRoamly provides one full activation code, paste it exactly. If iRoamly provides separate SM-DP+ Address and Activation Code values, enter them in the Android format LPA:1$SM-DP+ Address$Activation Code, using your real details from iRoamly.
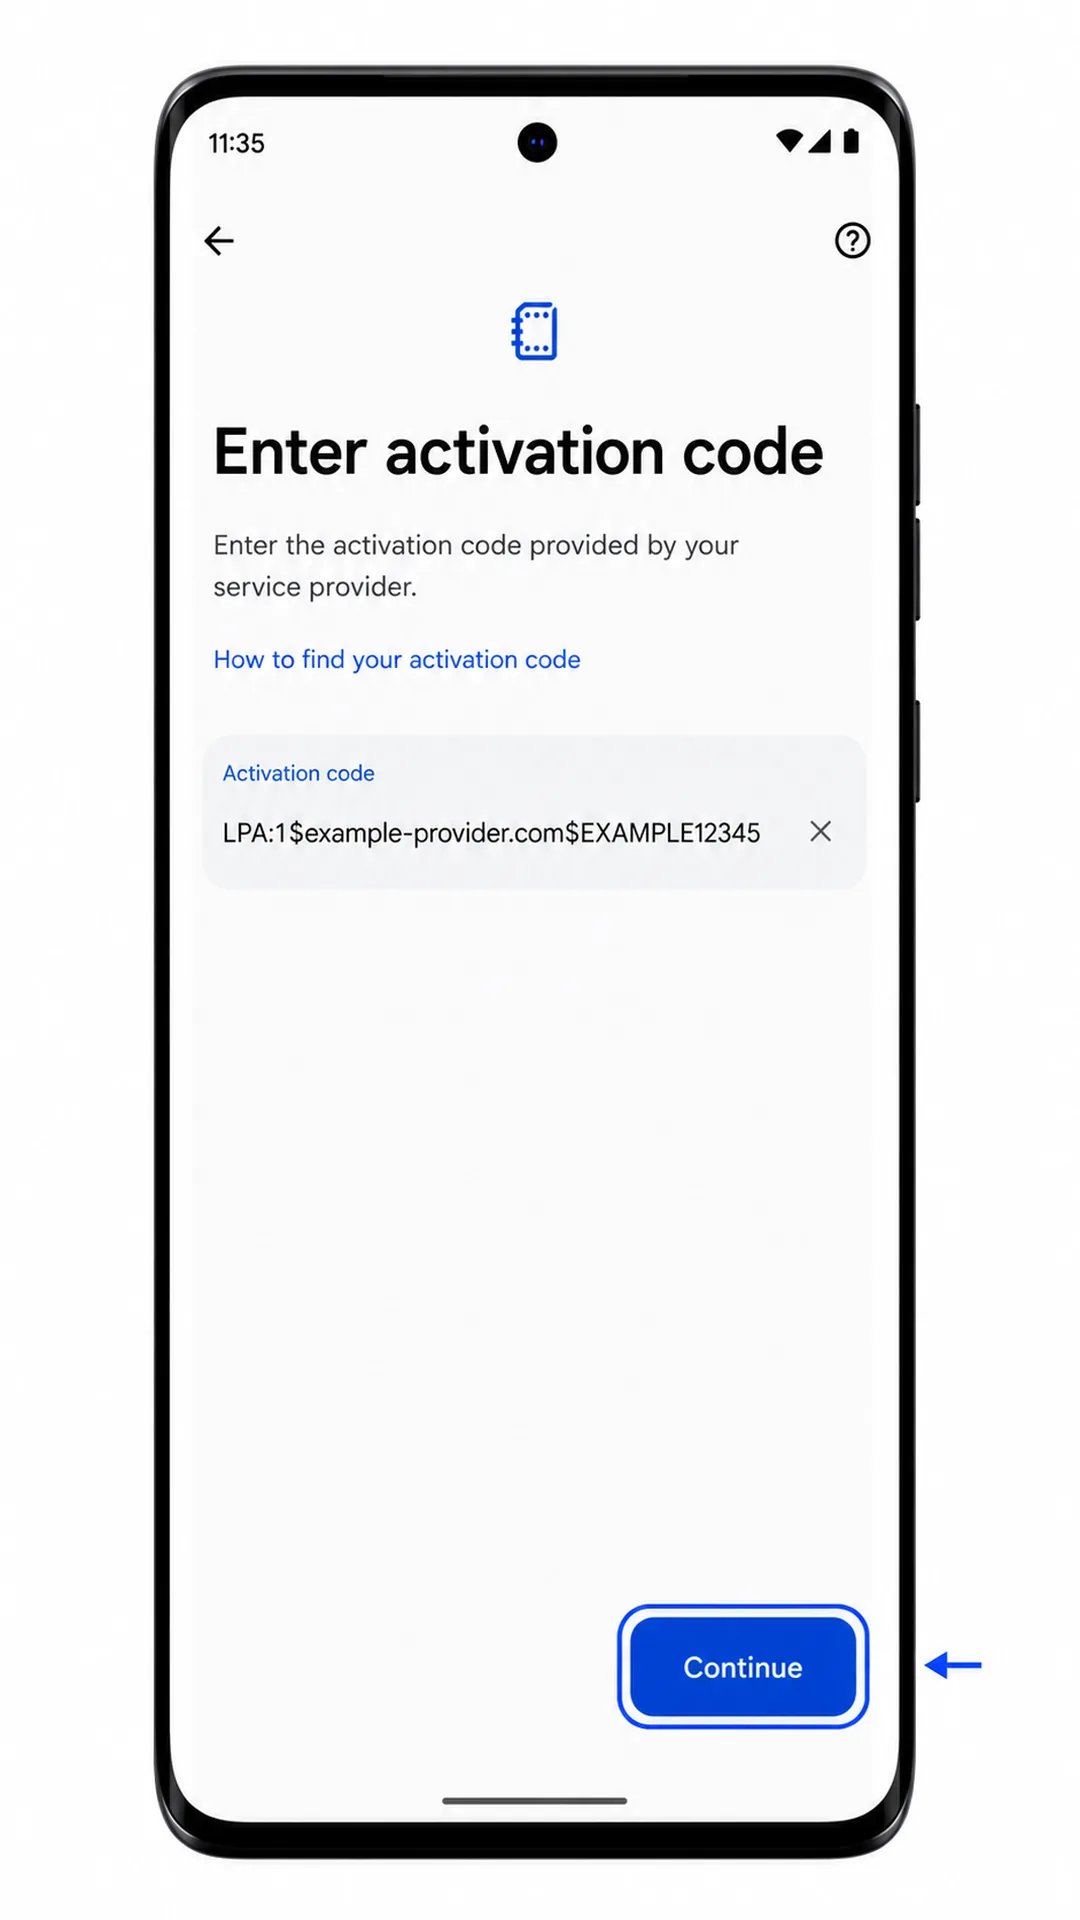
Tap Continue. The phone should check the activation code over Wi-Fi and show the iRoamly eSIM profile if the details are correct.
Tap Download or Activate, then wait for the profile to finish installing. Do not leave Wi-Fi or close Settings during this step.
Tap Done after Android confirms the eSIM was added. The profile should return to the SIMs list.
How to Confirm Your iRoamly eSIM Is Installed
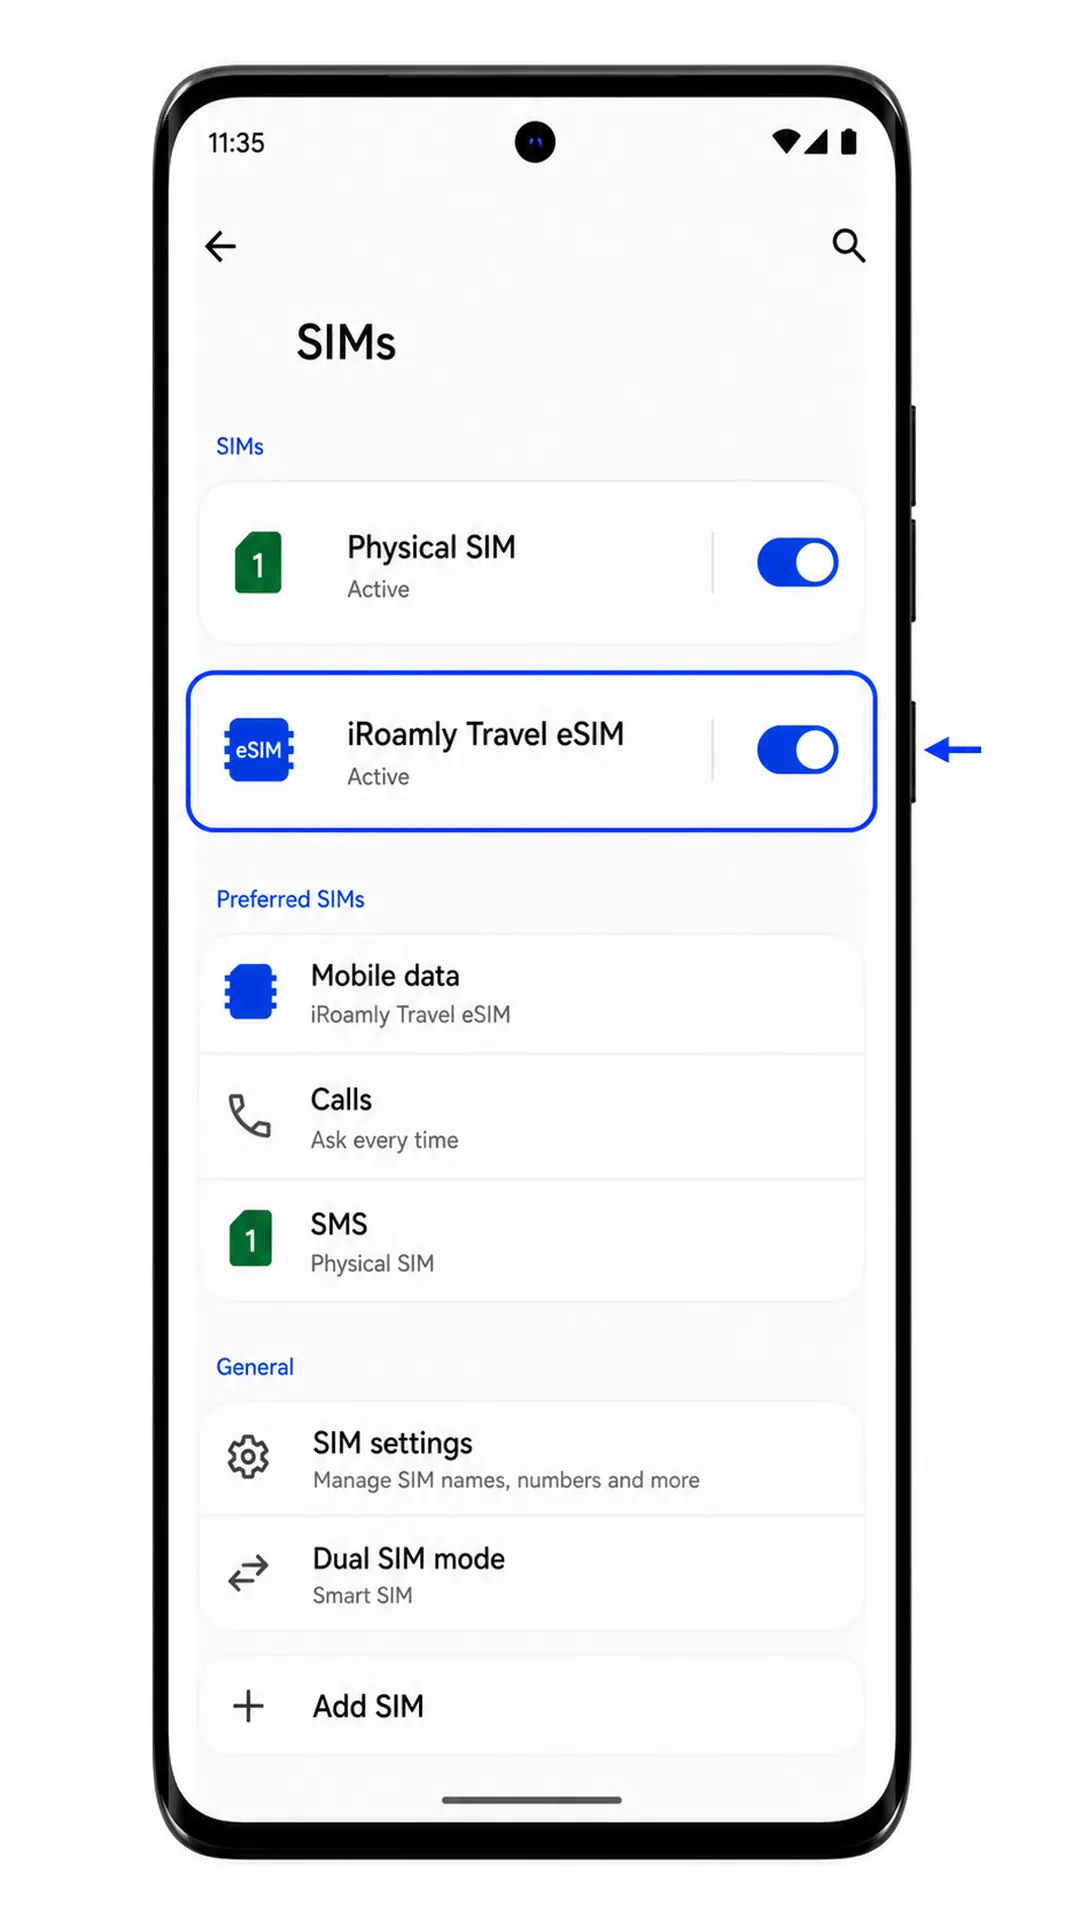
Open Settings > Network & internet > SIMs. Look for a new eSIM profile, which may appear as iRoamly, Travel, or a carrier profile name supplied by the destination network.
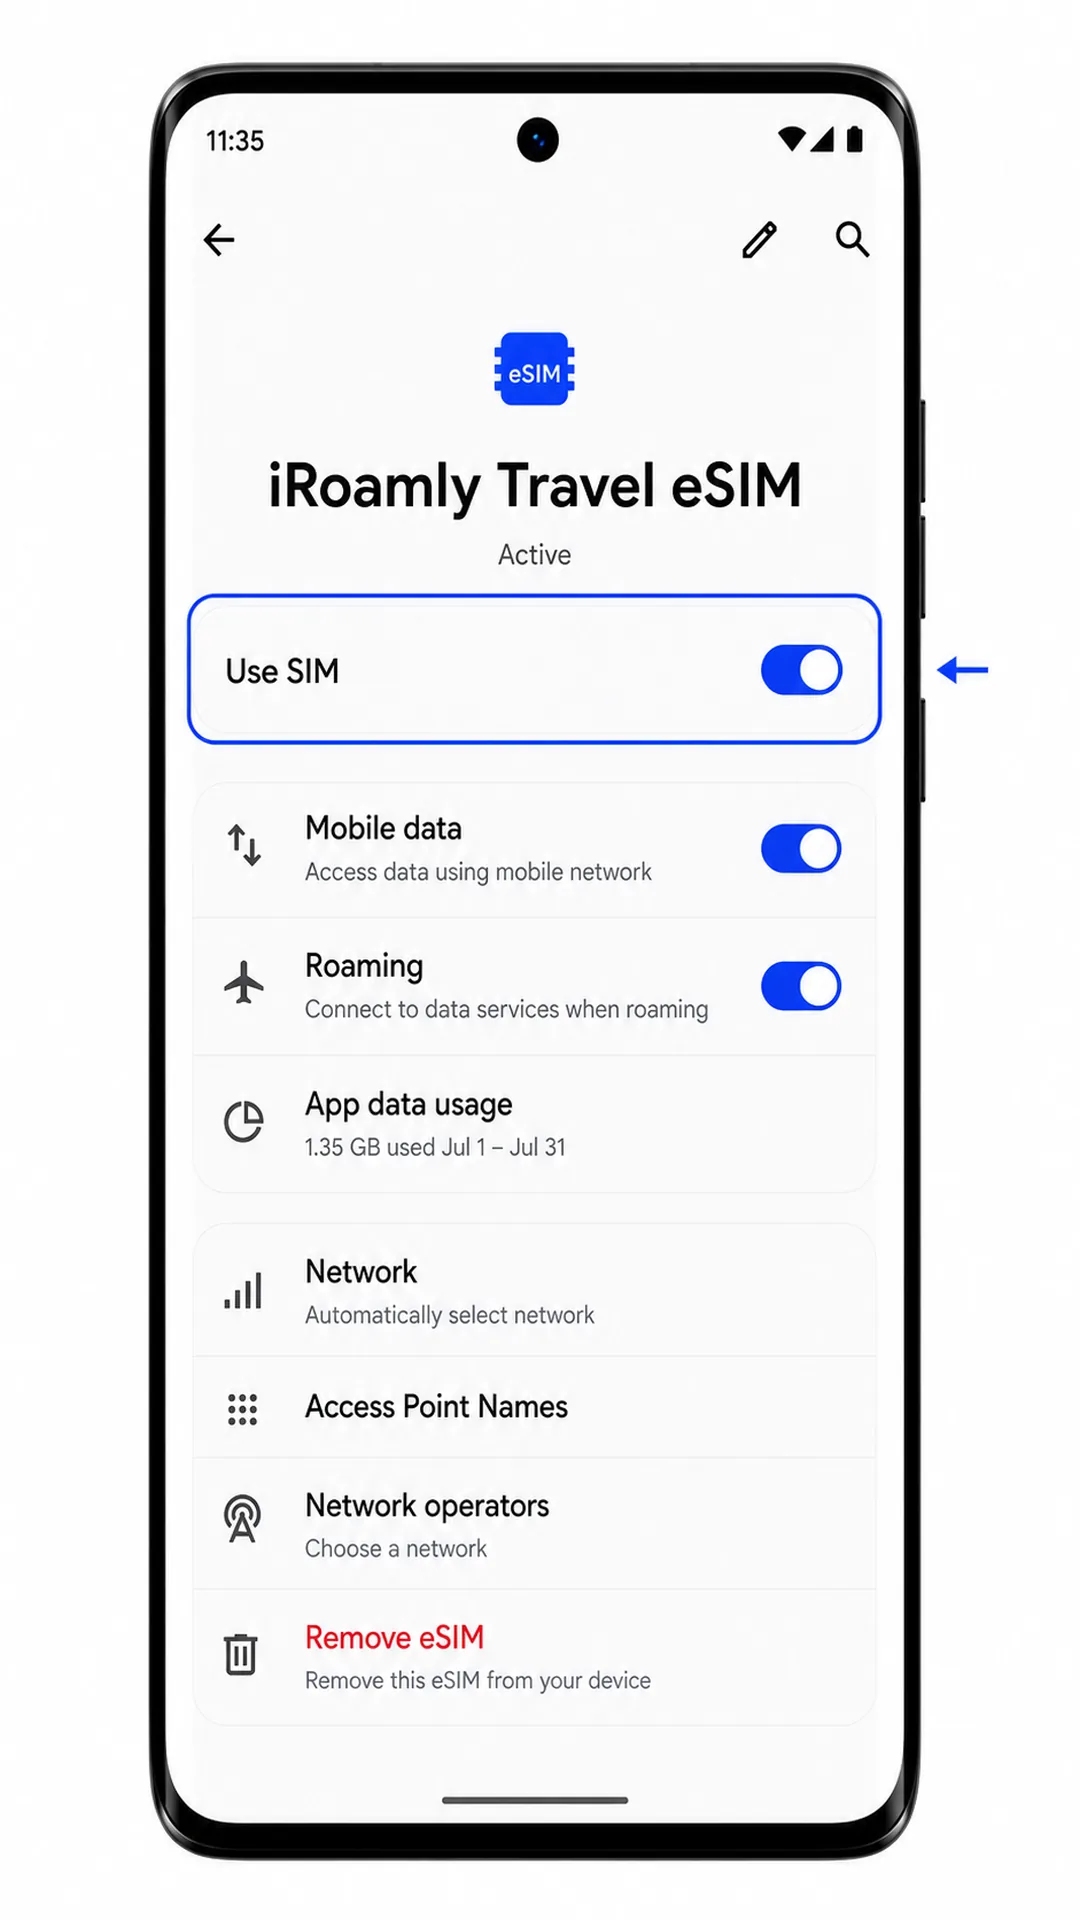
Tap the new iRoamly eSIM profile. The profile page should show that the SIM is present and can be switched on.
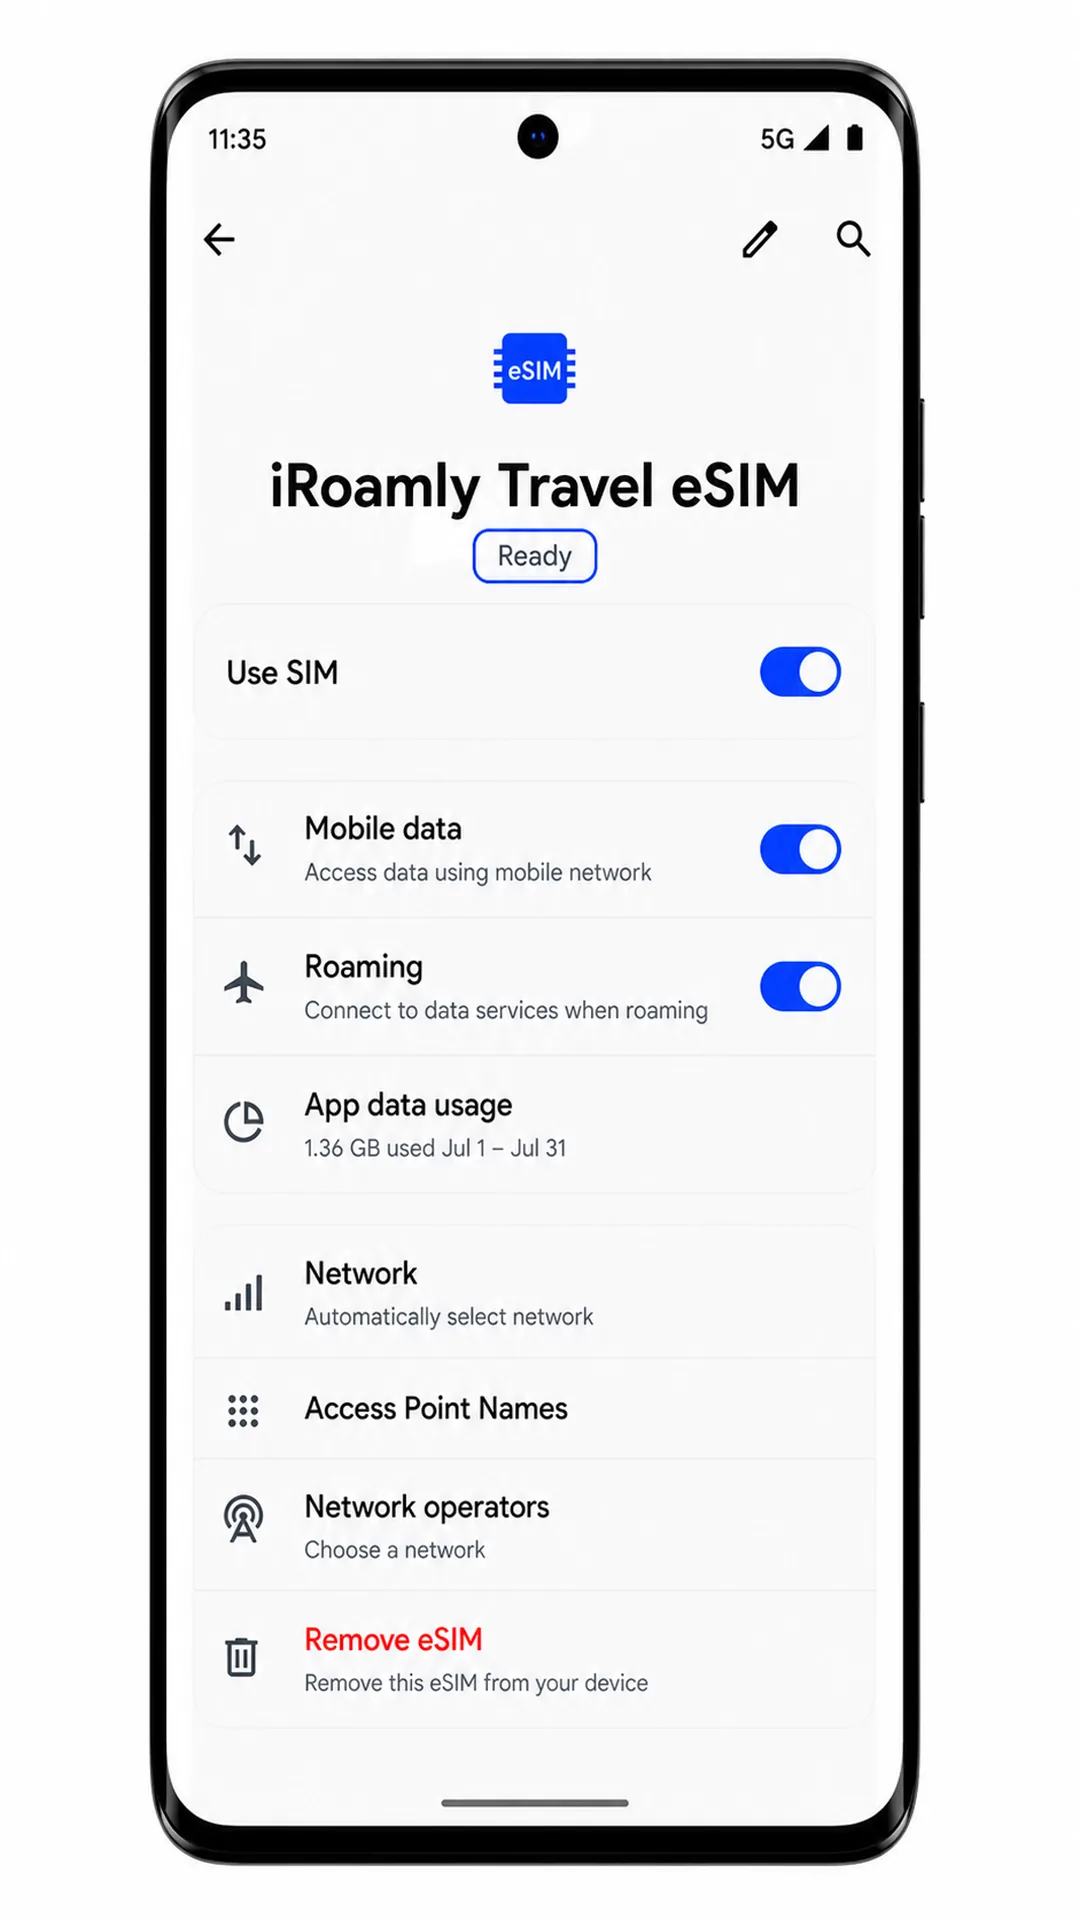
Check the status bar after arrival or after connecting to a supported destination network. If your iRoamly plan supports only data, test with a webpage or app instead of expecting SMS or calls.
Configure eSIM for Mobile Data
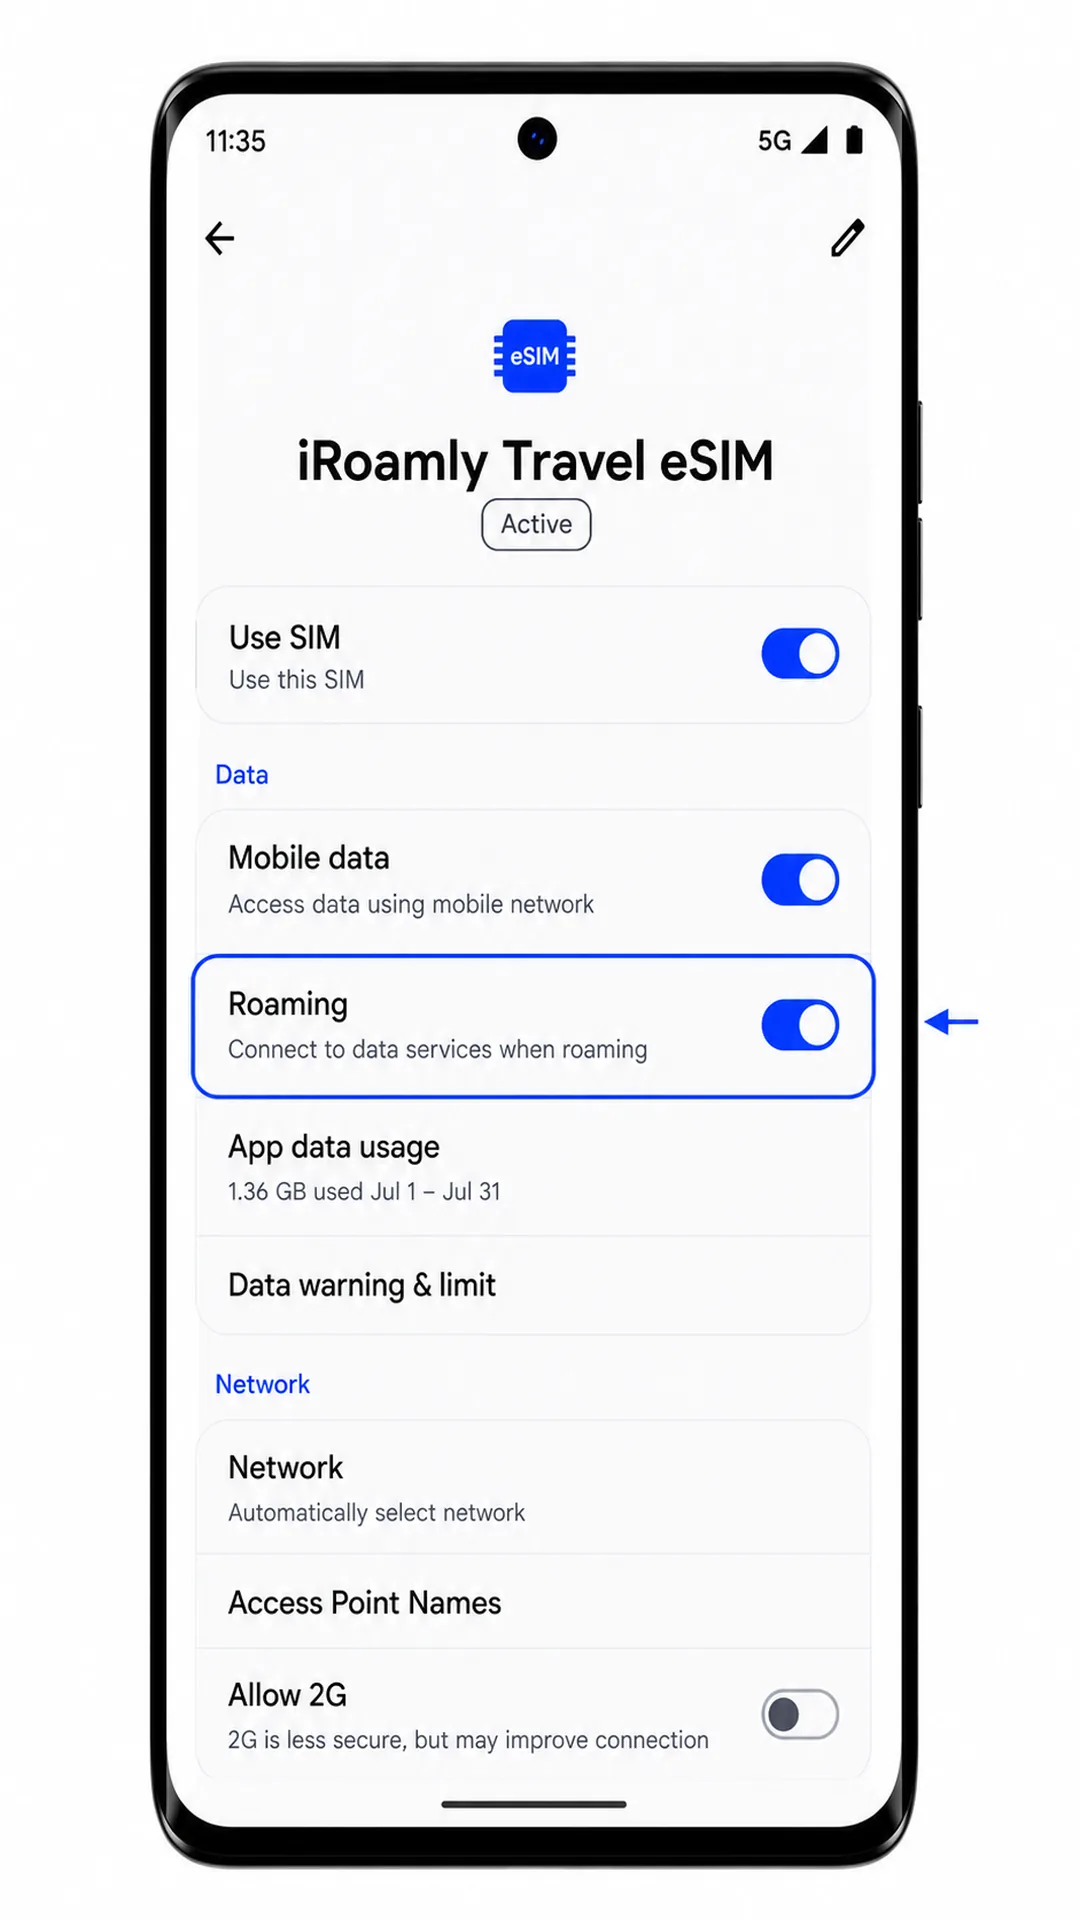
Open Settings > Network & internet > SIMs, then tap the iRoamly eSIM profile. The profile settings should show data and roaming options.
Turn on Use SIM for the iRoamly eSIM if it is off. The phone should enable the travel eSIM line.
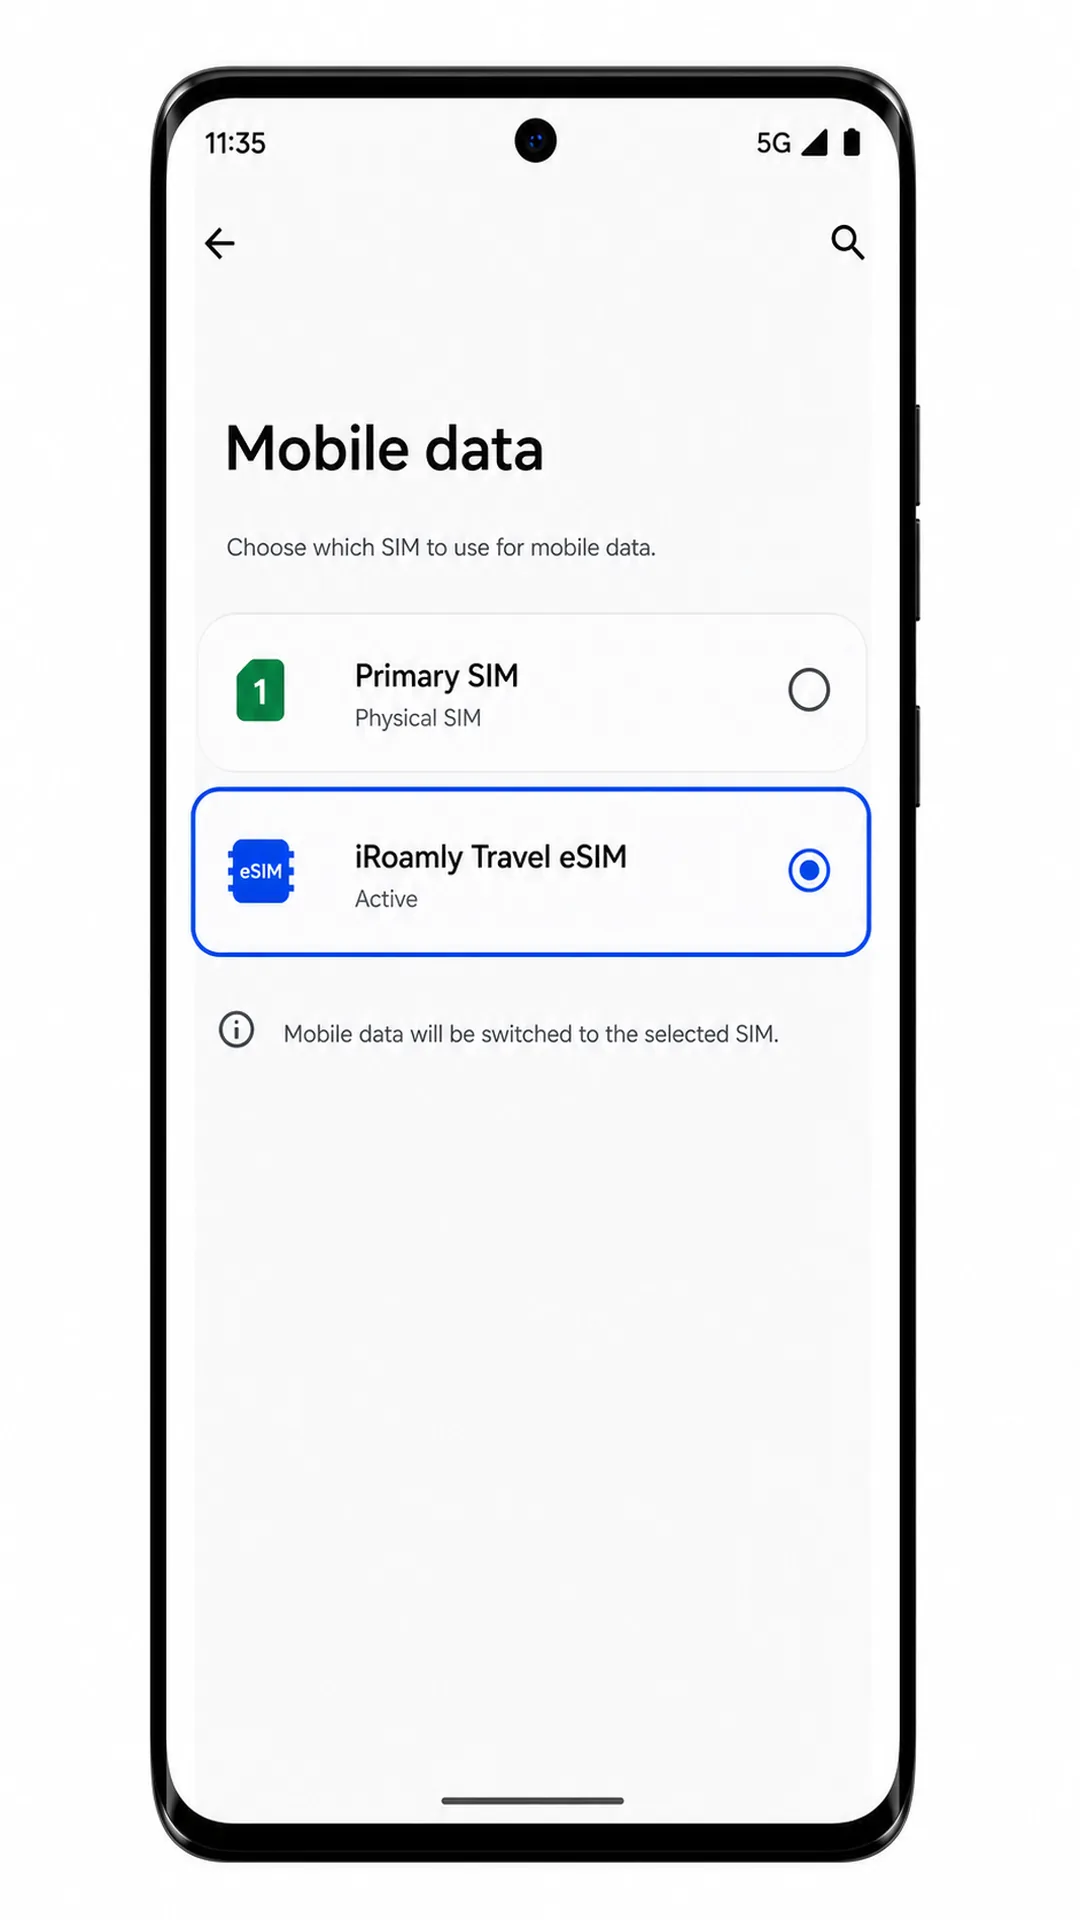
Tap Mobile data or Data preference, then choose the iRoamly eSIM for mobile data. This keeps travel data on the iRoamly plan instead of your primary SIM.
Turn on Roaming for the iRoamly eSIM when your destination plan requires it. Leave roaming off for your primary SIM if you want to avoid carrier roaming charges.
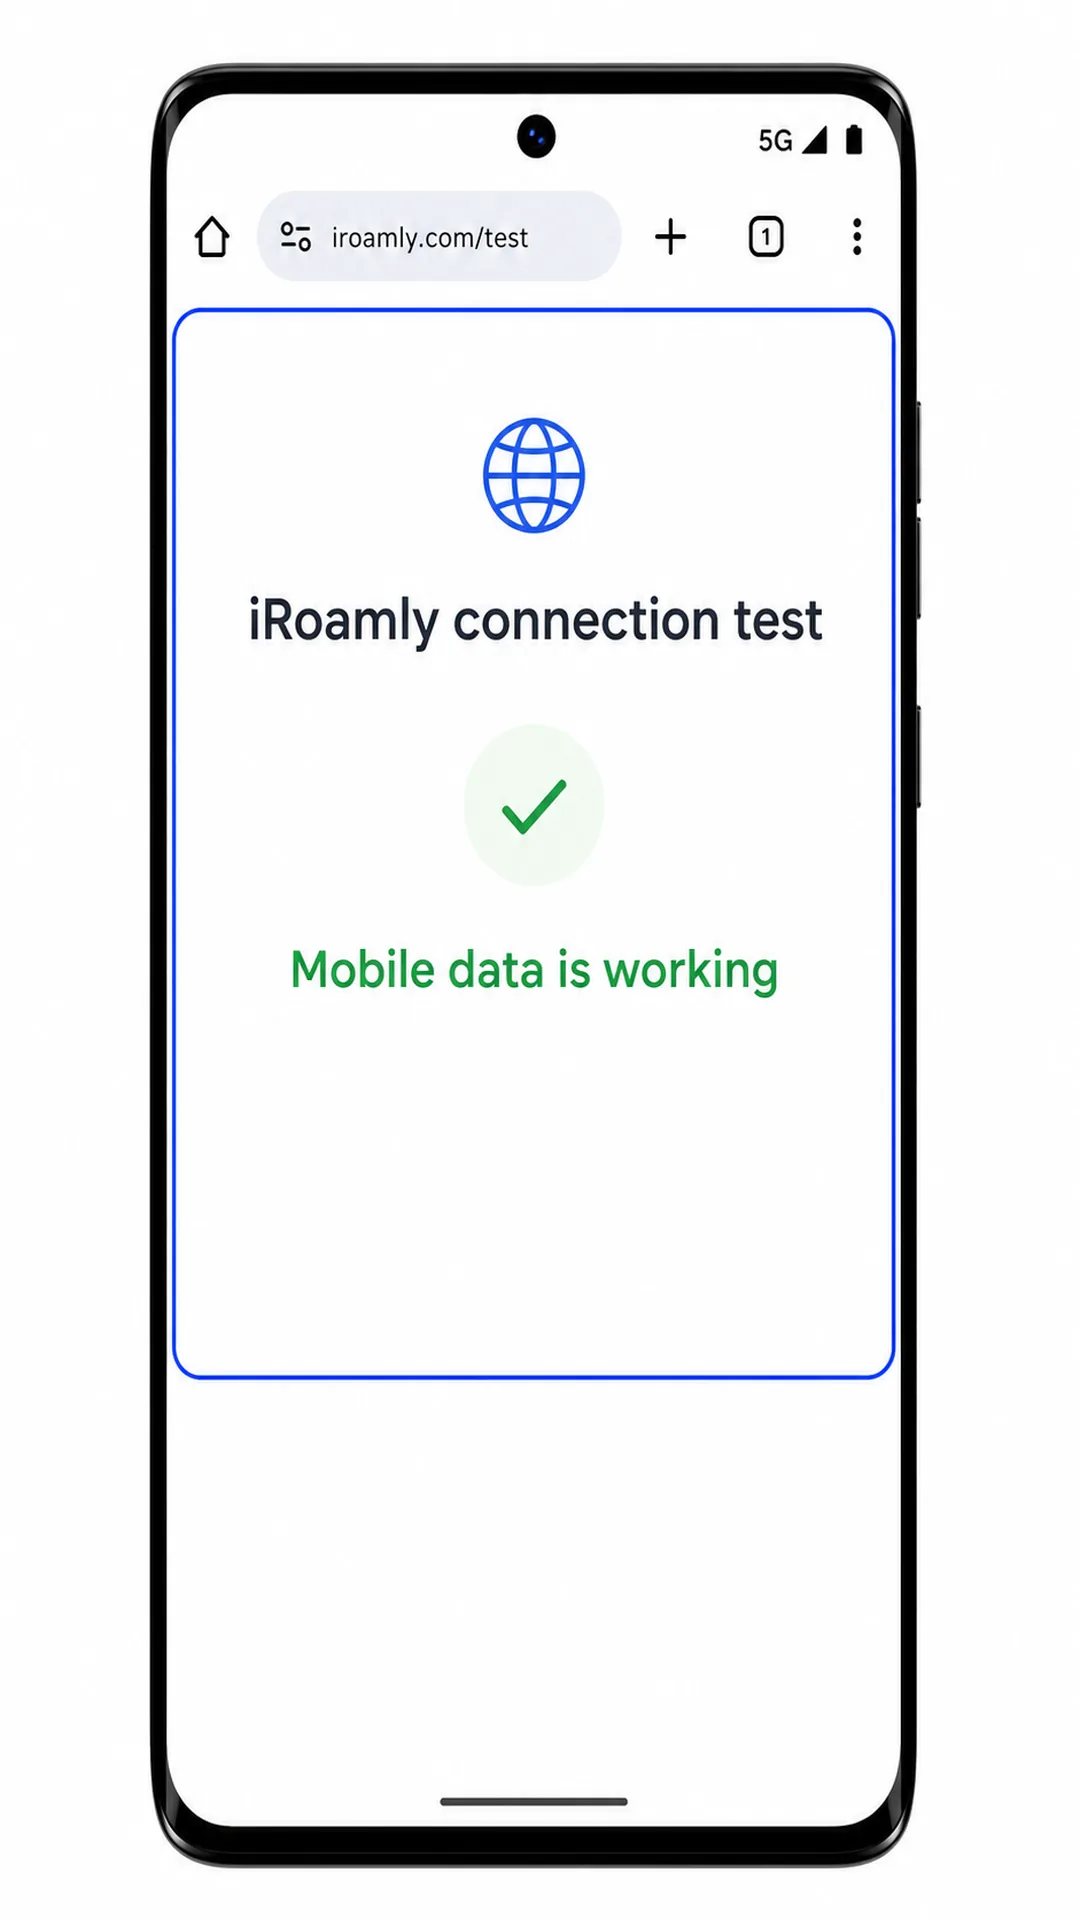
Open a webpage using mobile data after arrival. If it loads normally, the iRoamly eSIM is ready for travel data.
Troubleshooting
If Add SIM or Set up an eSIM is missing, confirm that your Motorola Edge 60 Fusion regional variant supports eSIM and that the phone is not carrier-locked.
If the QR code will not scan, increase screen brightness on the device showing the QR code, clean the camera lens, and avoid scanning from a cracked or zoomed-in display.
If the QR code says it was already used, do not delete the profile and try again. Contact iRoamly support because many eSIM QR codes can be installed only once.
If manual activation fails, check every character in the activation code. When using the combined Android format, keep the LPA:1$ prefix and both dollar signs exactly as shown.
If the eSIM installs but mobile data does not work, choose the iRoamly eSIM for Mobile data, enable Roaming for that eSIM if required, then restart the phone.
If activation stays pending, keep Wi-Fi connected and wait a few minutes. Some plans complete activation only after the phone reaches a supported destination network.
If calls or SMS do not work, check your specific iRoamly plan. Many travel eSIM packages are data-only.
More Motorola eSIM Setup Guides
Setting up another Motorola phone? These eSIM activation guides may help.
Conclusion
With the installation complete, your iRoamly eSIM should be ready whenever your plan activates and connects to a supported destination network. Setting everything up in advance helps reduce last-minute troubleshooting and gives you greater confidence that mobile data will be available when you need it.
To get the best experience, keep the eSIM profile installed, review your plan details carefully, and verify your mobile data preferences before traveling. A few minutes of preparation now can save significant time and effort during your trip.