
The Motorola Edge 60 Pro supports eSIM on eSIM-capable regional variants, alongside a physical SIM. This guide assumes Motorola Edge 60 Pro on Android 15 with Motorola Hello UX, where the relevant path is Settings > Network & internet > SIMs.
For travel, an iRoamly eSIM lets you add a data plan before or during a trip without replacing your main SIM. Menu names can vary slightly by region, carrier firmware, and Android update, but the flow below uses the current Motorola/near-stock Android labels.
You will learn two complete setup methods: scanning the iRoamly QR code and entering the manual eSIM details. QR setup is usually fastest, while manual entry is useful if the QR code is on the same phone, hard to scan, or sent as text details.
Before You Set Up Your iRoamly eSIM
Connect the Motorola Edge 60 Pro to stable Wi-Fi before starting the download.
Confirm your phone is unlocked and that your regional model supports eSIM. Some carrier or market variants may hide eSIM options.
Keep your iRoamly QR code open on another screen, printed copy, or email. For manual setup, keep the SM-DP+ Address, Activation Code, and any optional confirmation code ready.
Update the phone to the latest available Android 15 software before installing if you do not see the expected menu labels.
Install the iRoamly eSIM 1-2 days before travel when the plan terms allow it, but do not install too early. iRoamly plan validity starts from activation, and the exact activation trigger can vary by plan, so check the plan details before installing.
Do not delete the iRoamly eSIM profile unless iRoamly support tells you to do so. Many eSIM profiles cannot be reinstalled after removal or after a QR code has already been used.
iRoamly plans may be data-only, and voice calls or SMS are not guaranteed. Check the specific plan details before expecting calling or texting service.
Method 1: Install eSIM by Scanning a QR Code
Open Settings, then tap Network & internet. You should see the phone’s network, Wi-Fi, SIM, and hotspot settings.
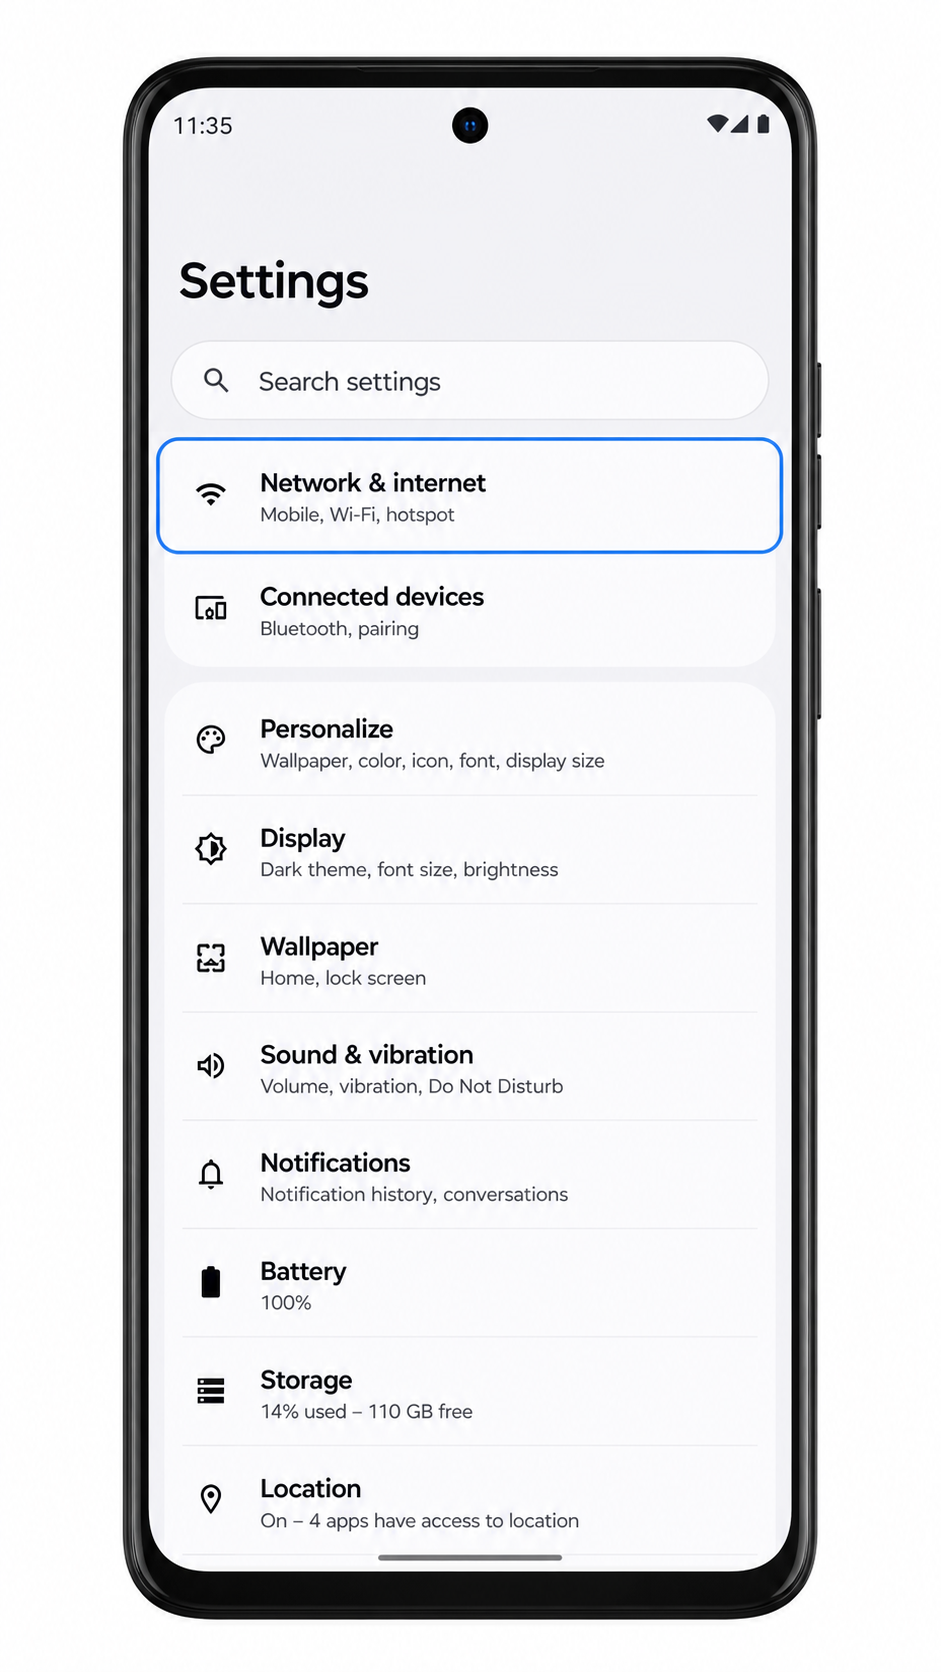
Tap SIMs. The phone opens the page where physical SIMs and downloaded eSIM profiles are managed.

Tap Add eSIM. If your software shows Add SIM instead, tap it and choose the eSIM setup option on the next screen.
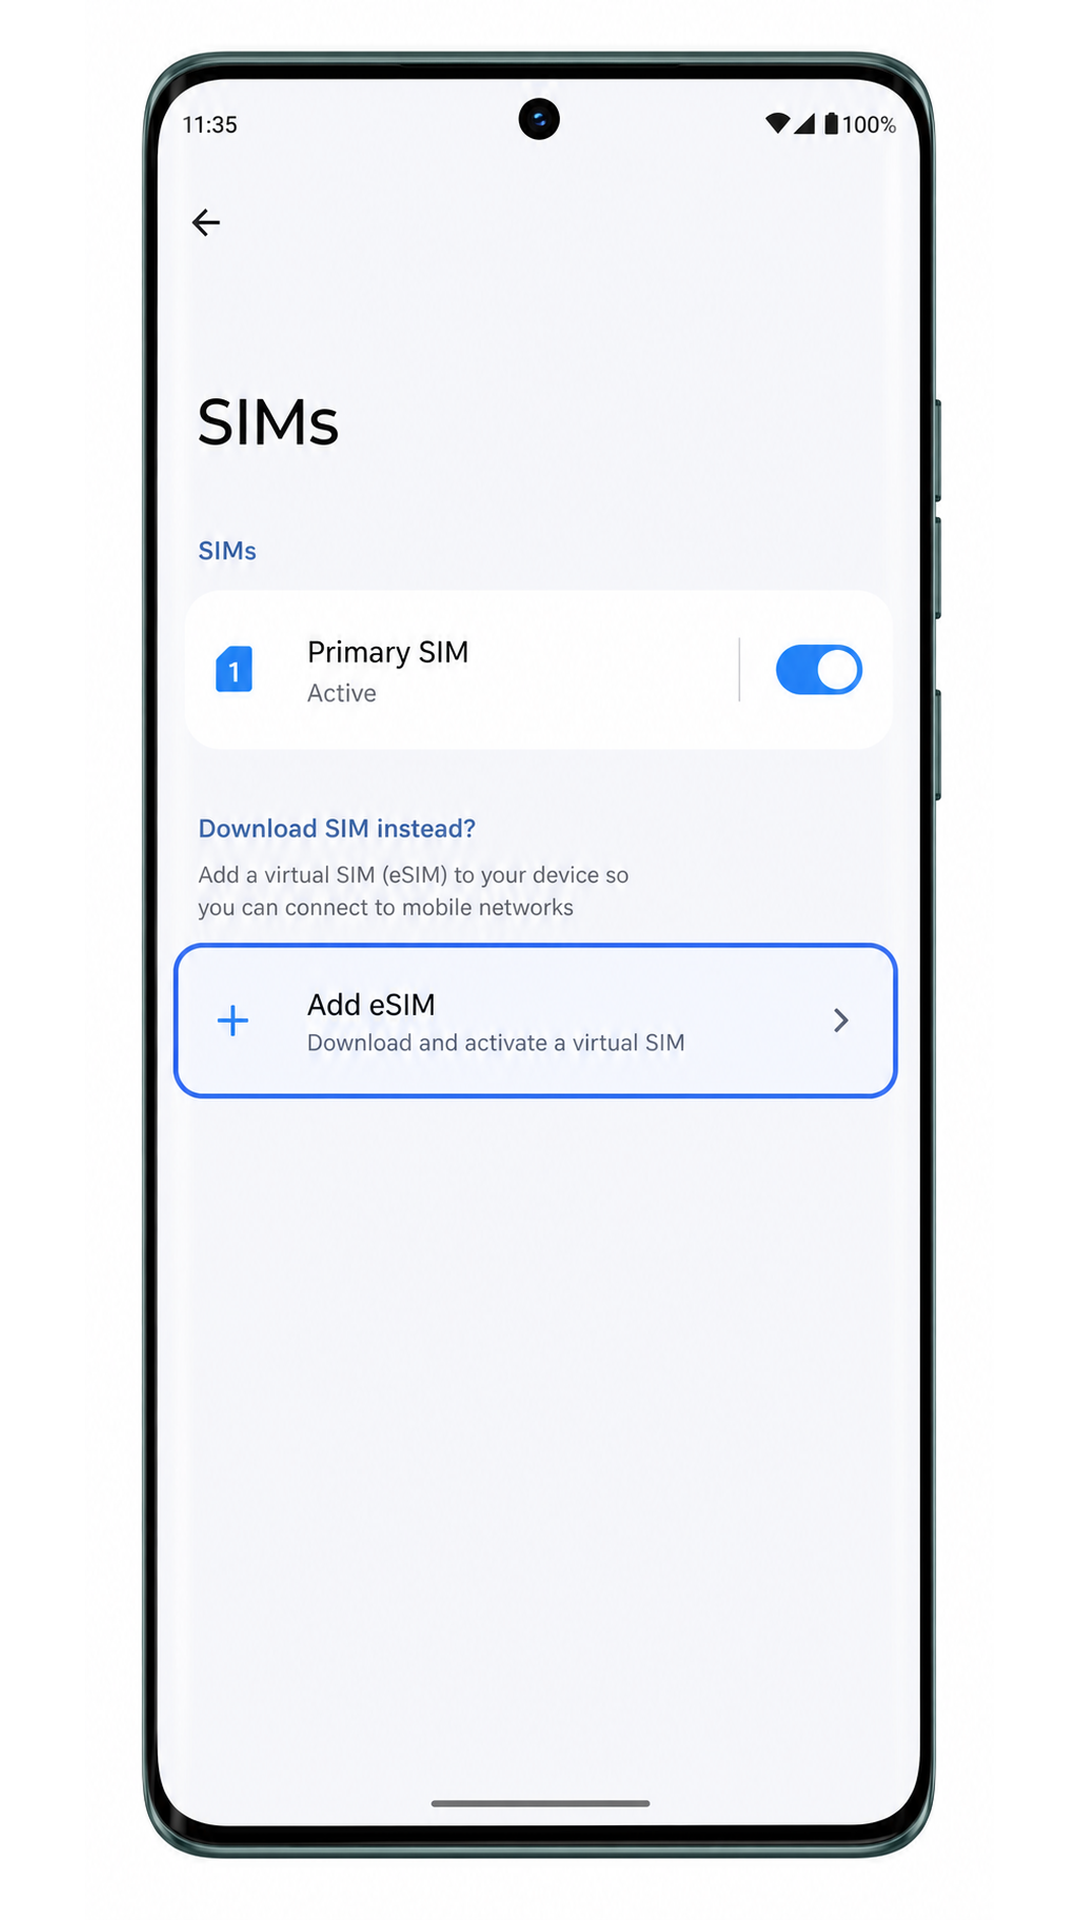
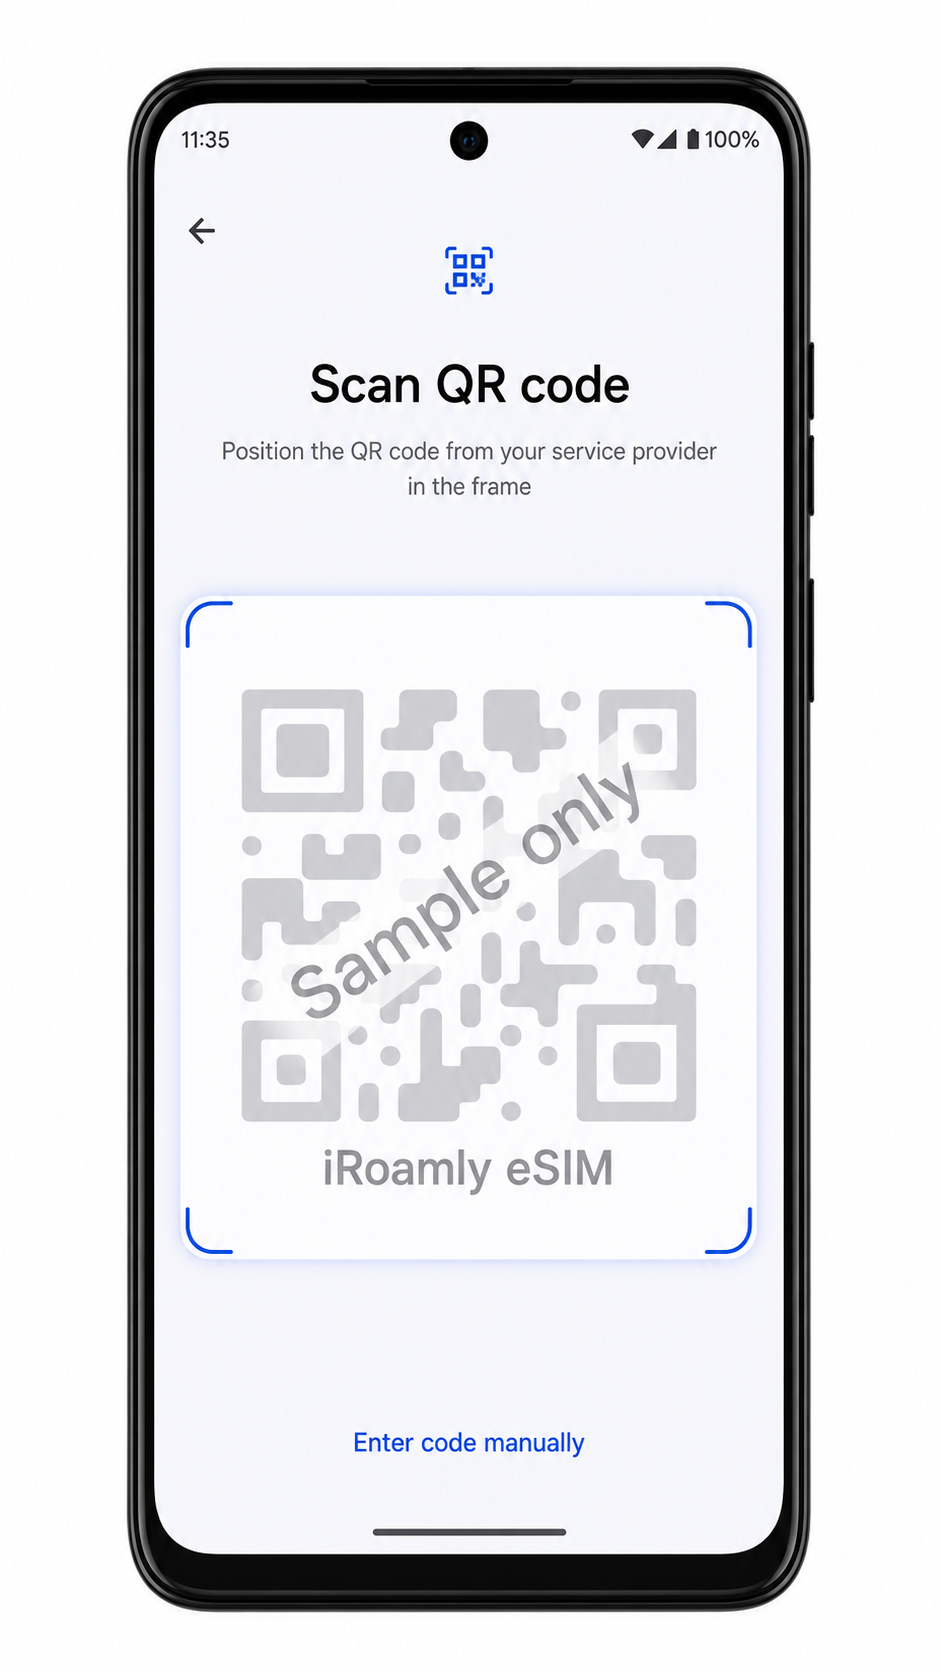
On the setup screen, tap Scan QR code. The phone should open the eSIM scanner.

Point the scanner at the iRoamly QR code. Keep the QR code flat, bright, and fully inside the scan frame until the phone reads it.
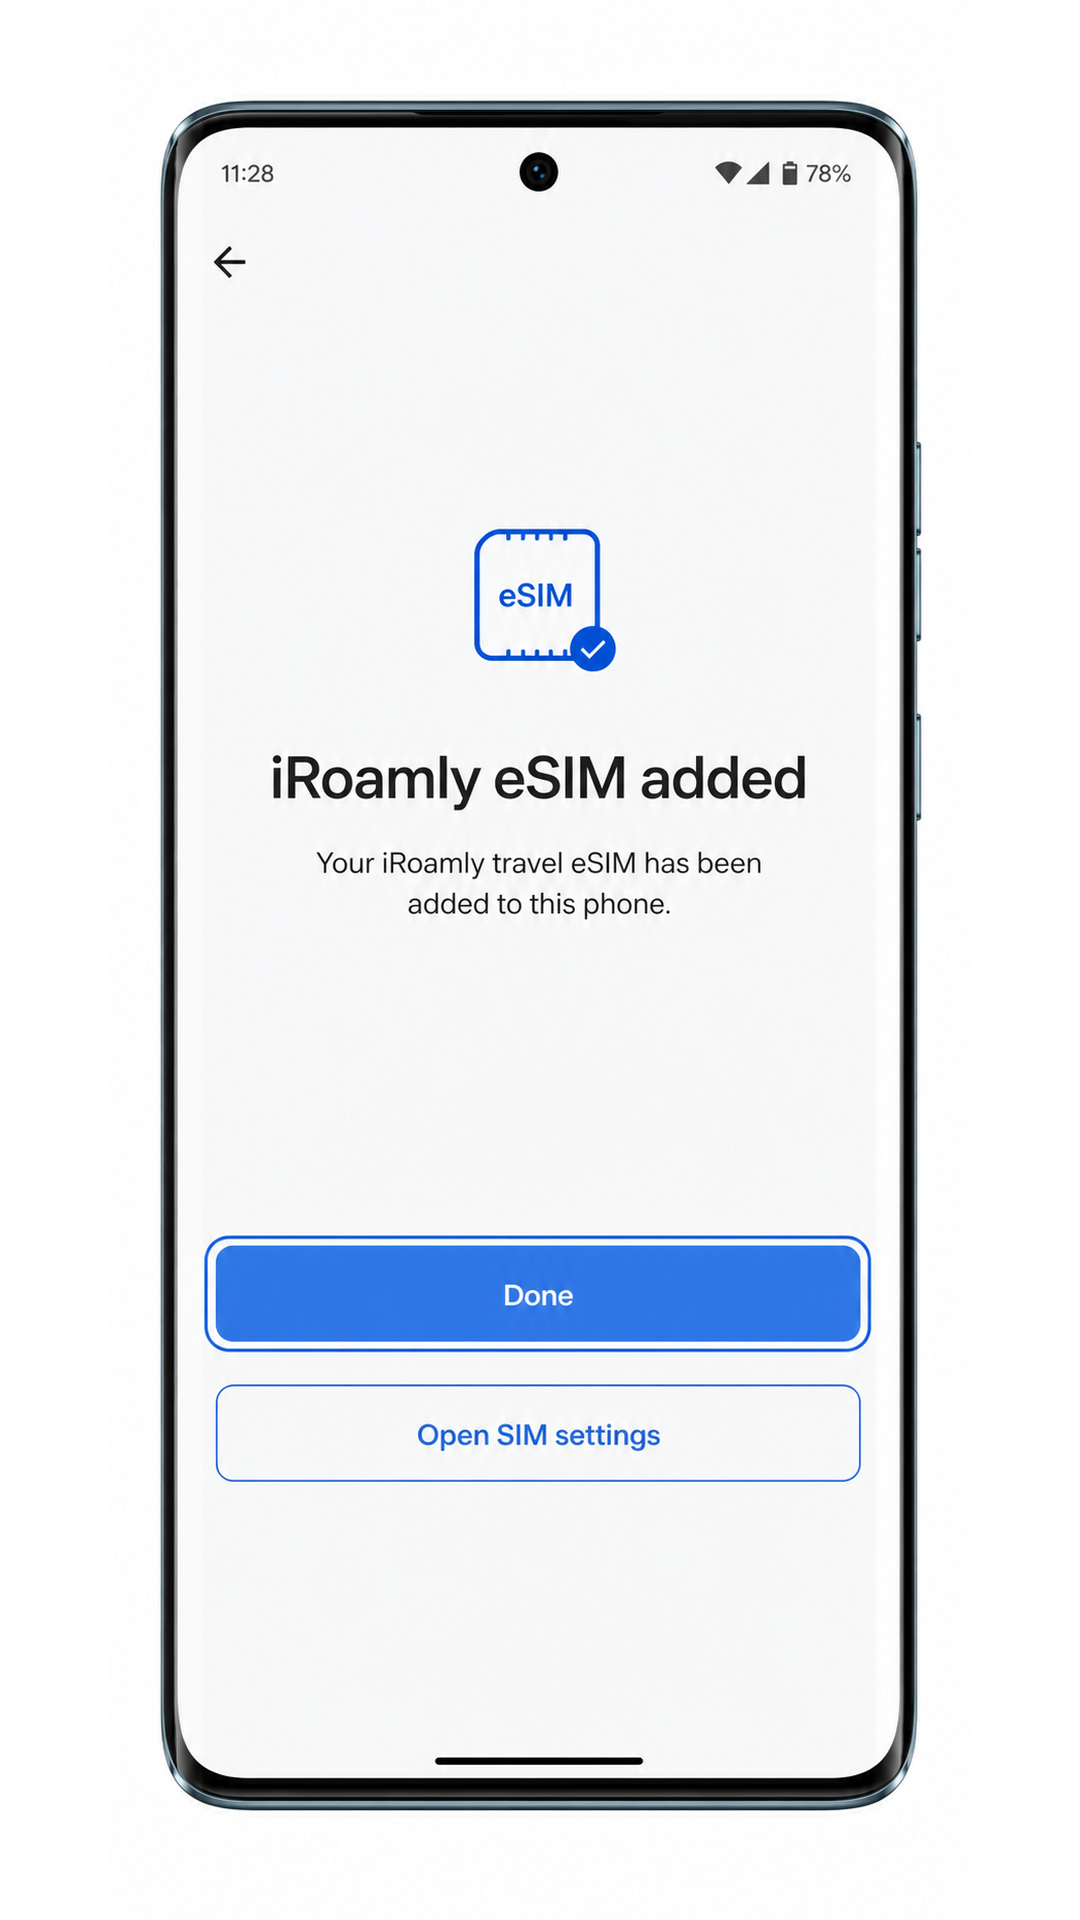
Review the iRoamly eSIM profile and tap Download. Keep Wi-Fi connected until the download finishes.
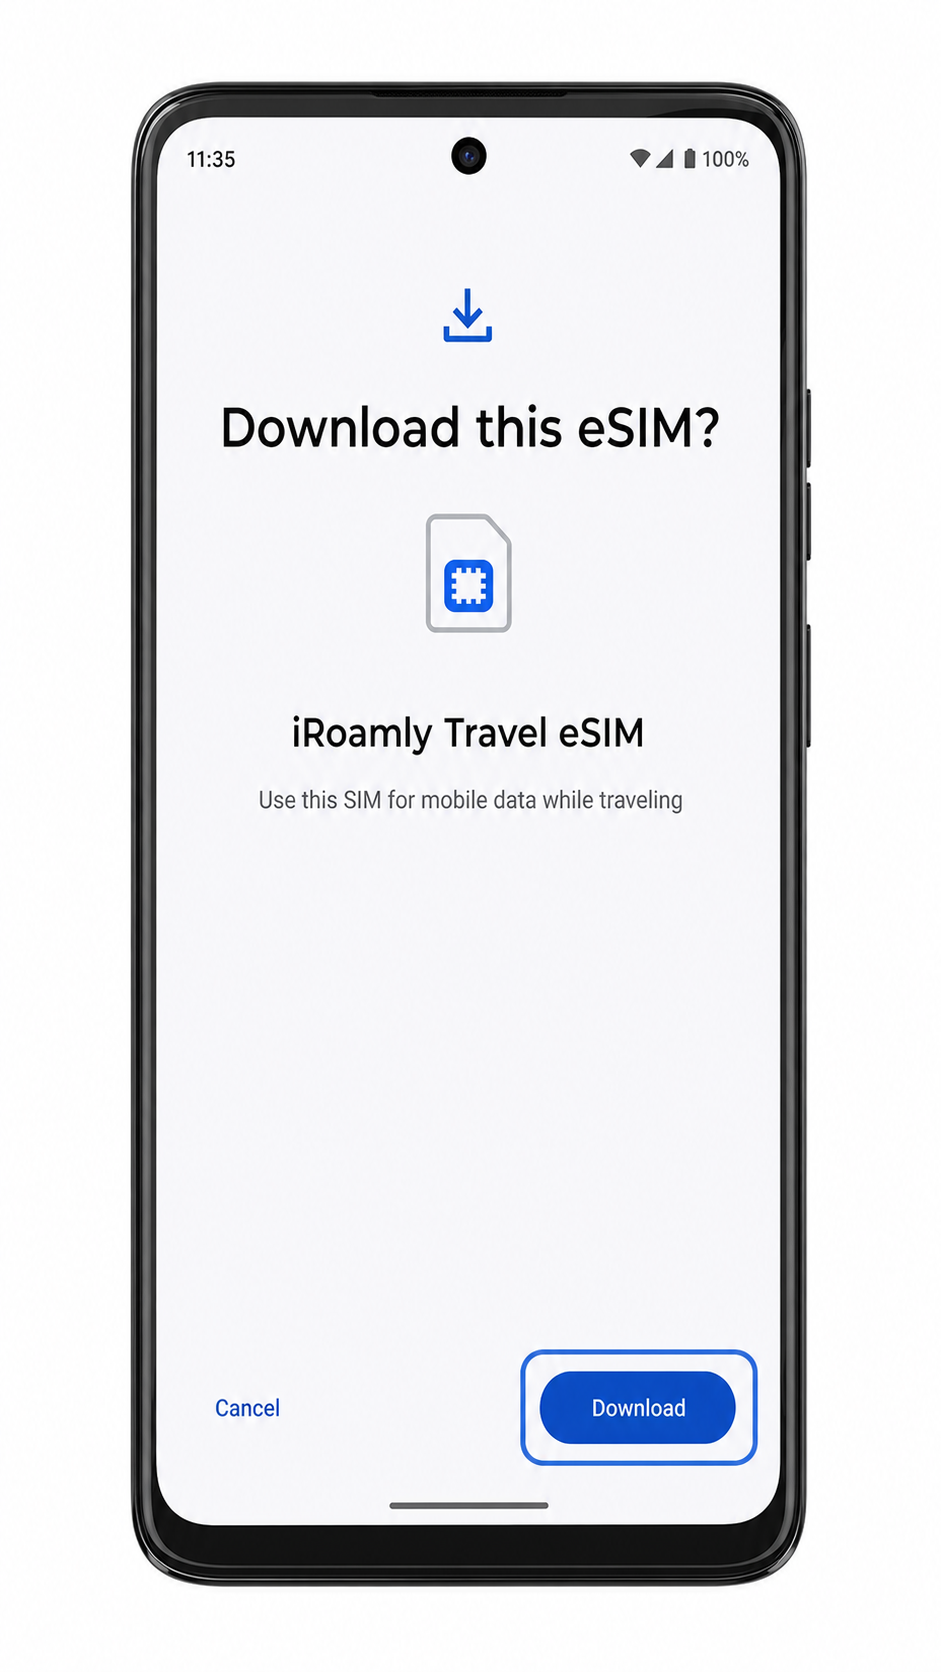
Tap Done when the Motorola Edge 60 Pro confirms the iRoamly eSIM has been added.
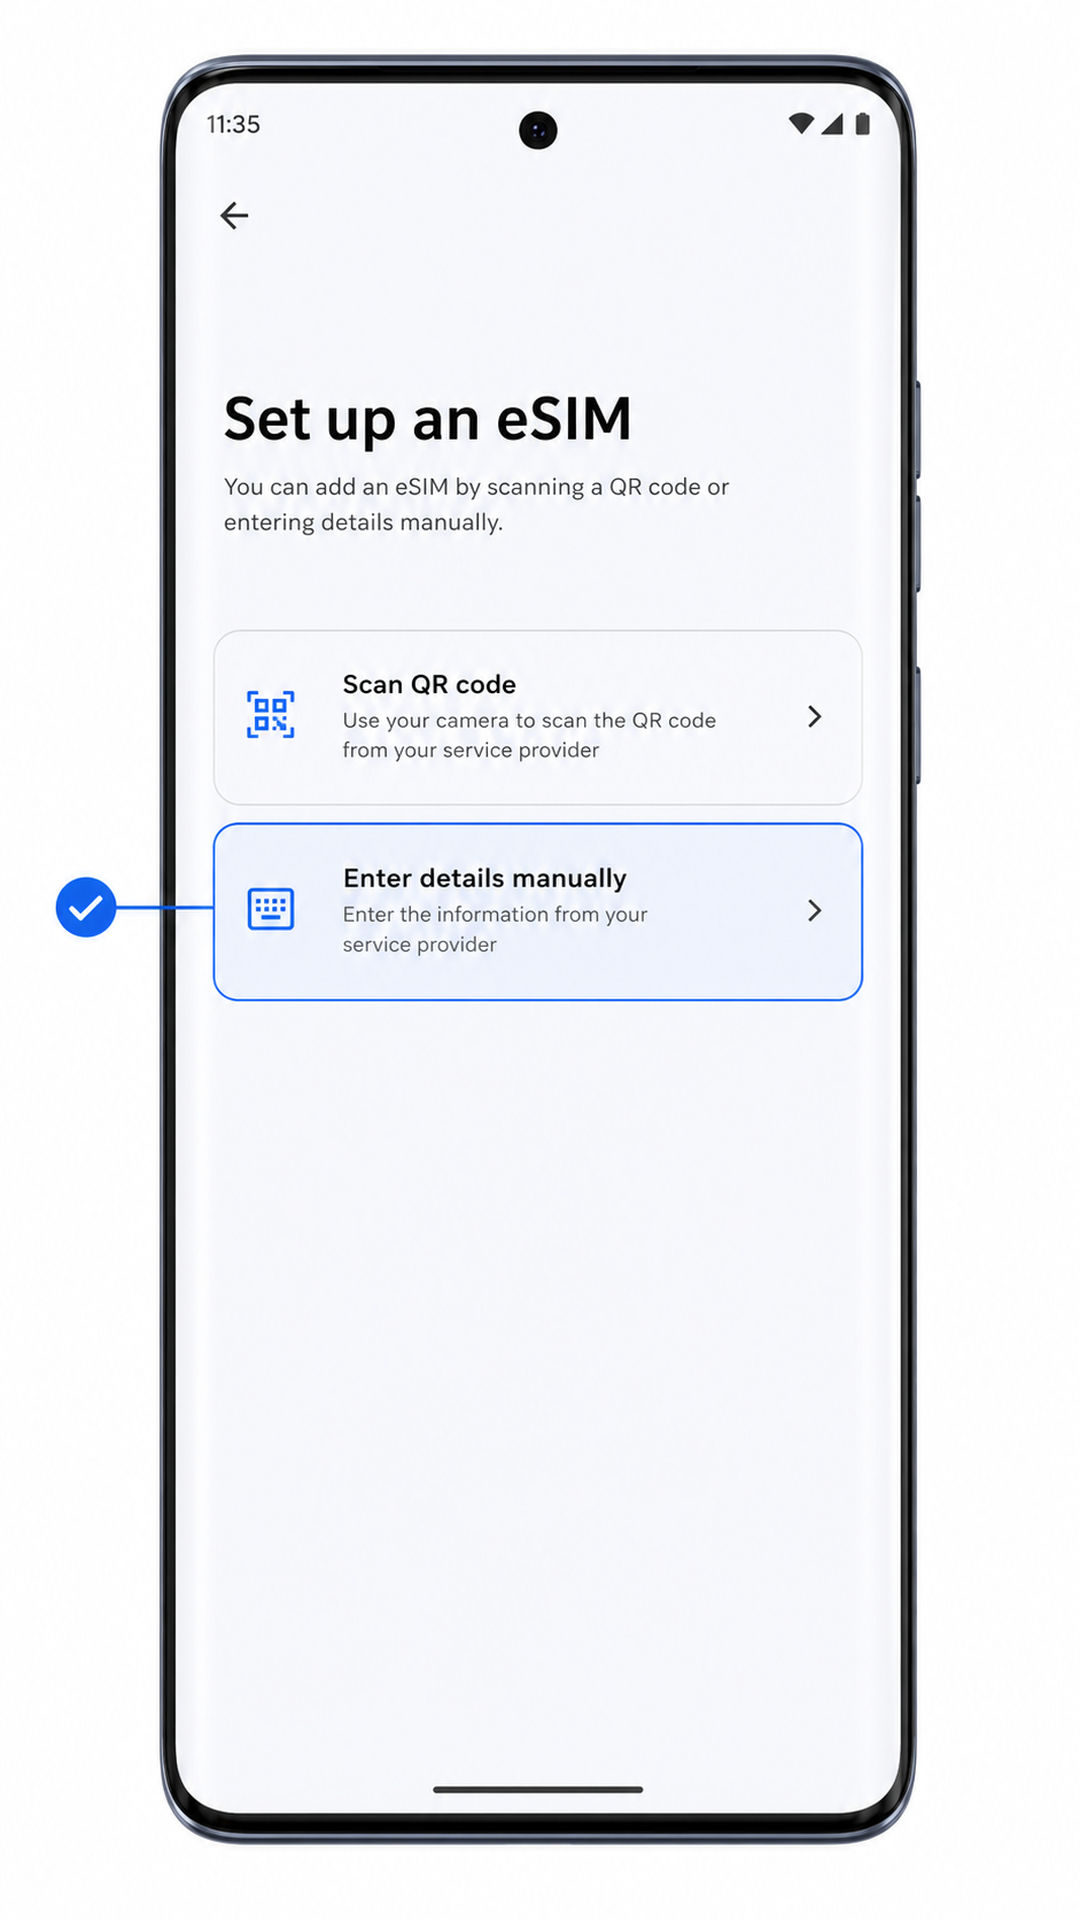
Method 2: Install eSIM Manually
Open Settings, then tap Network & internet. Start here even if you already visited this page during the QR method.
Tap SIMs to open SIM and eSIM management.
Tap Add eSIM. If the page uses Add SIM, tap Add SIM and choose eSIM setup when prompted.
On the eSIM setup screen, tap Enter details manually. Some Android builds may phrase this as Enter activation code manually.
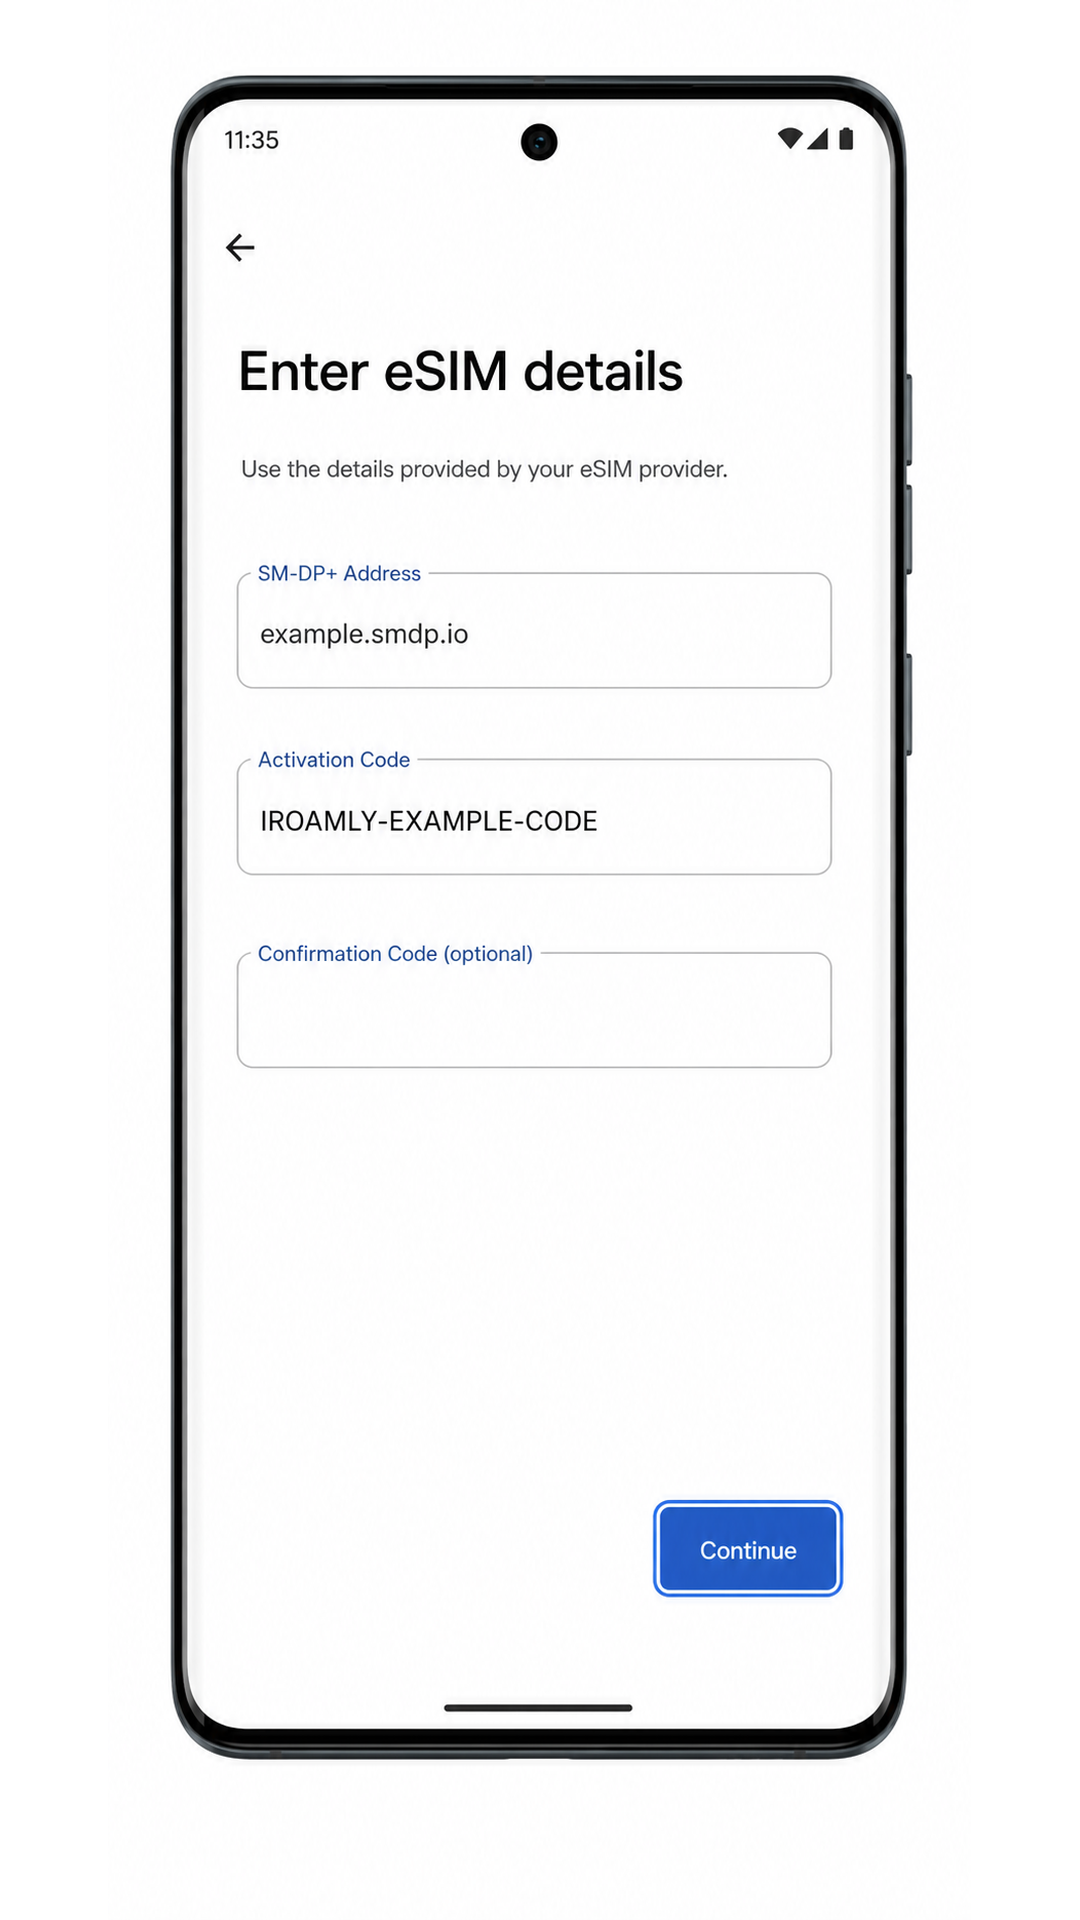
Enter the SM-DP+ Address and Activation Code from iRoamly. If iRoamly provides a confirmation code, enter it in the optional field, then tap Continue.
Review the iRoamly eSIM profile and tap Download. Keep Wi-Fi connected until the download finishes.
Tap Done when the Motorola Edge 60 Pro confirms the iRoamly eSIM has been added.
How to Confirm Your iRoamly eSIM Is Installed
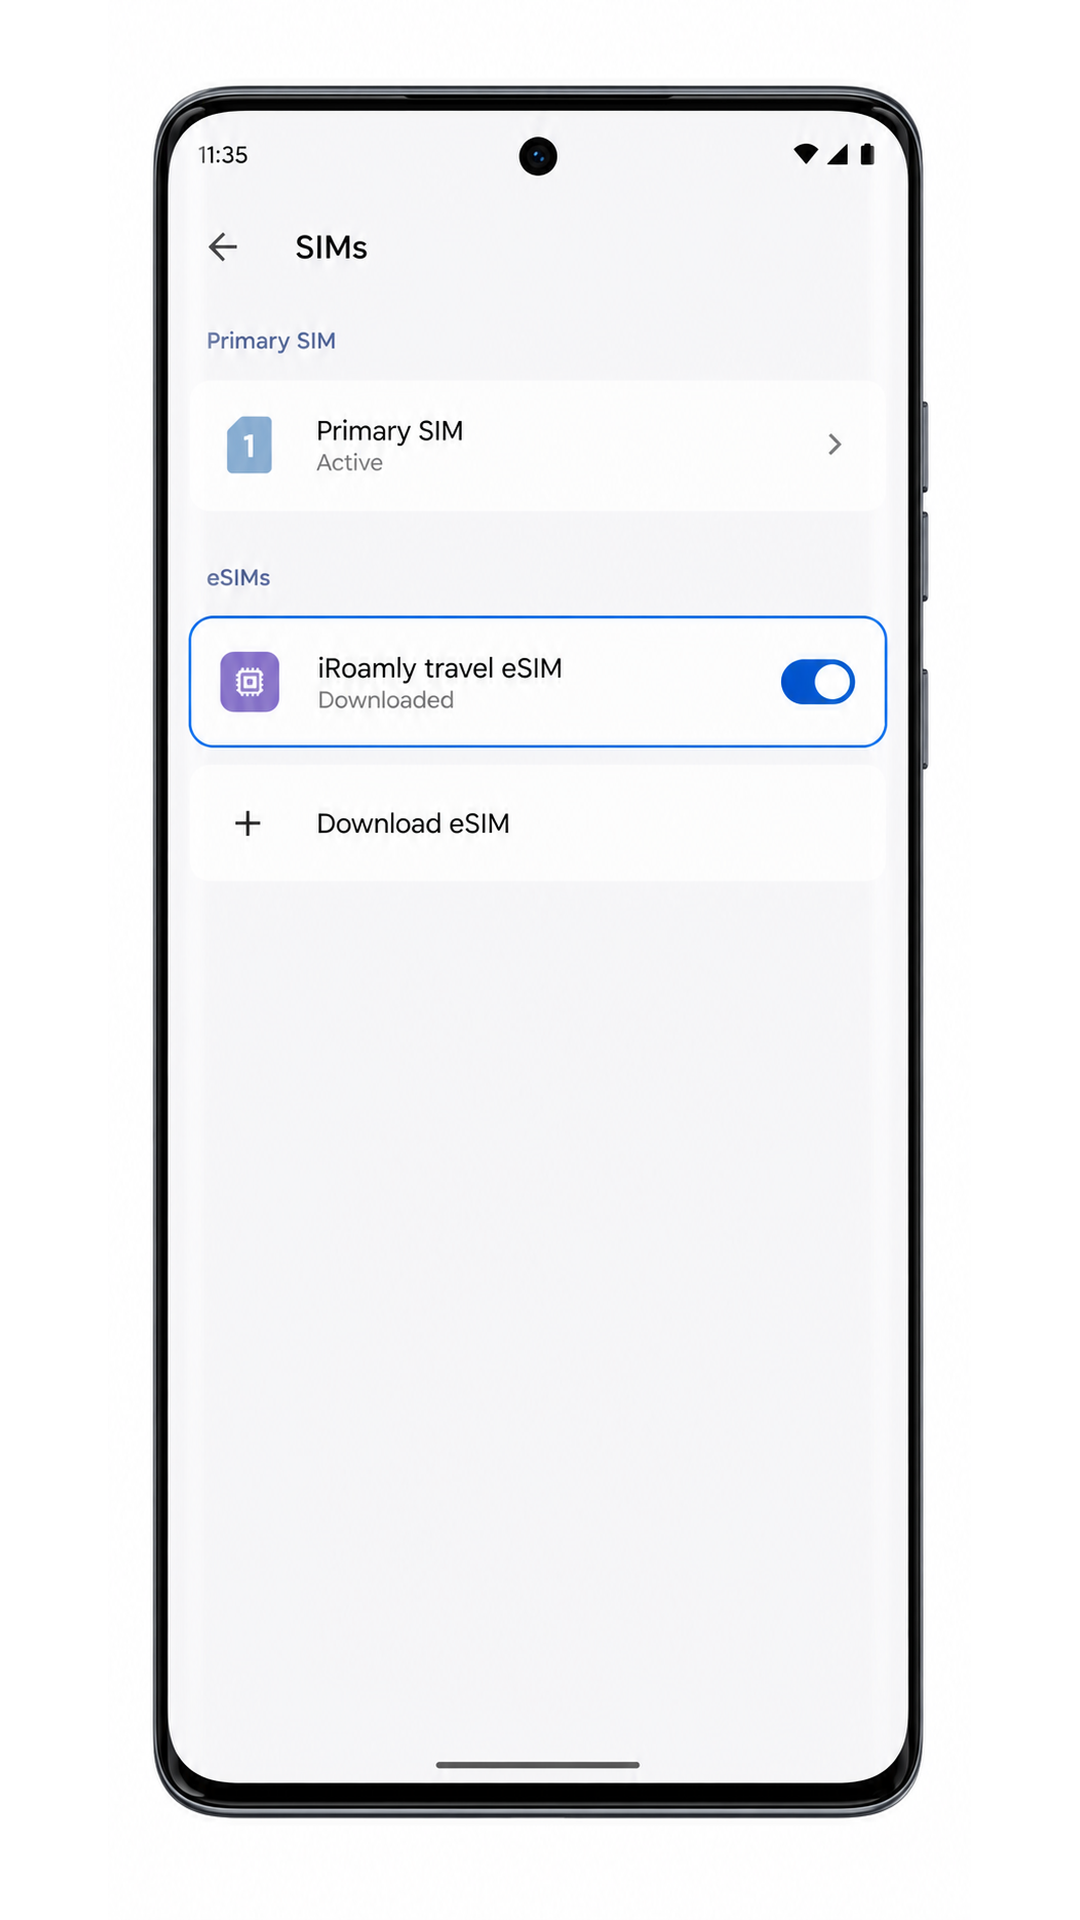
Go to Settings > Network & internet > SIMs. Look for iRoamly travel eSIM or a newly downloaded eSIM profile in the SIM list.
Tap the iRoamly eSIM profile and check that the line can be turned on. If the plan includes data only, do not use SMS or calling tests as proof of failure.
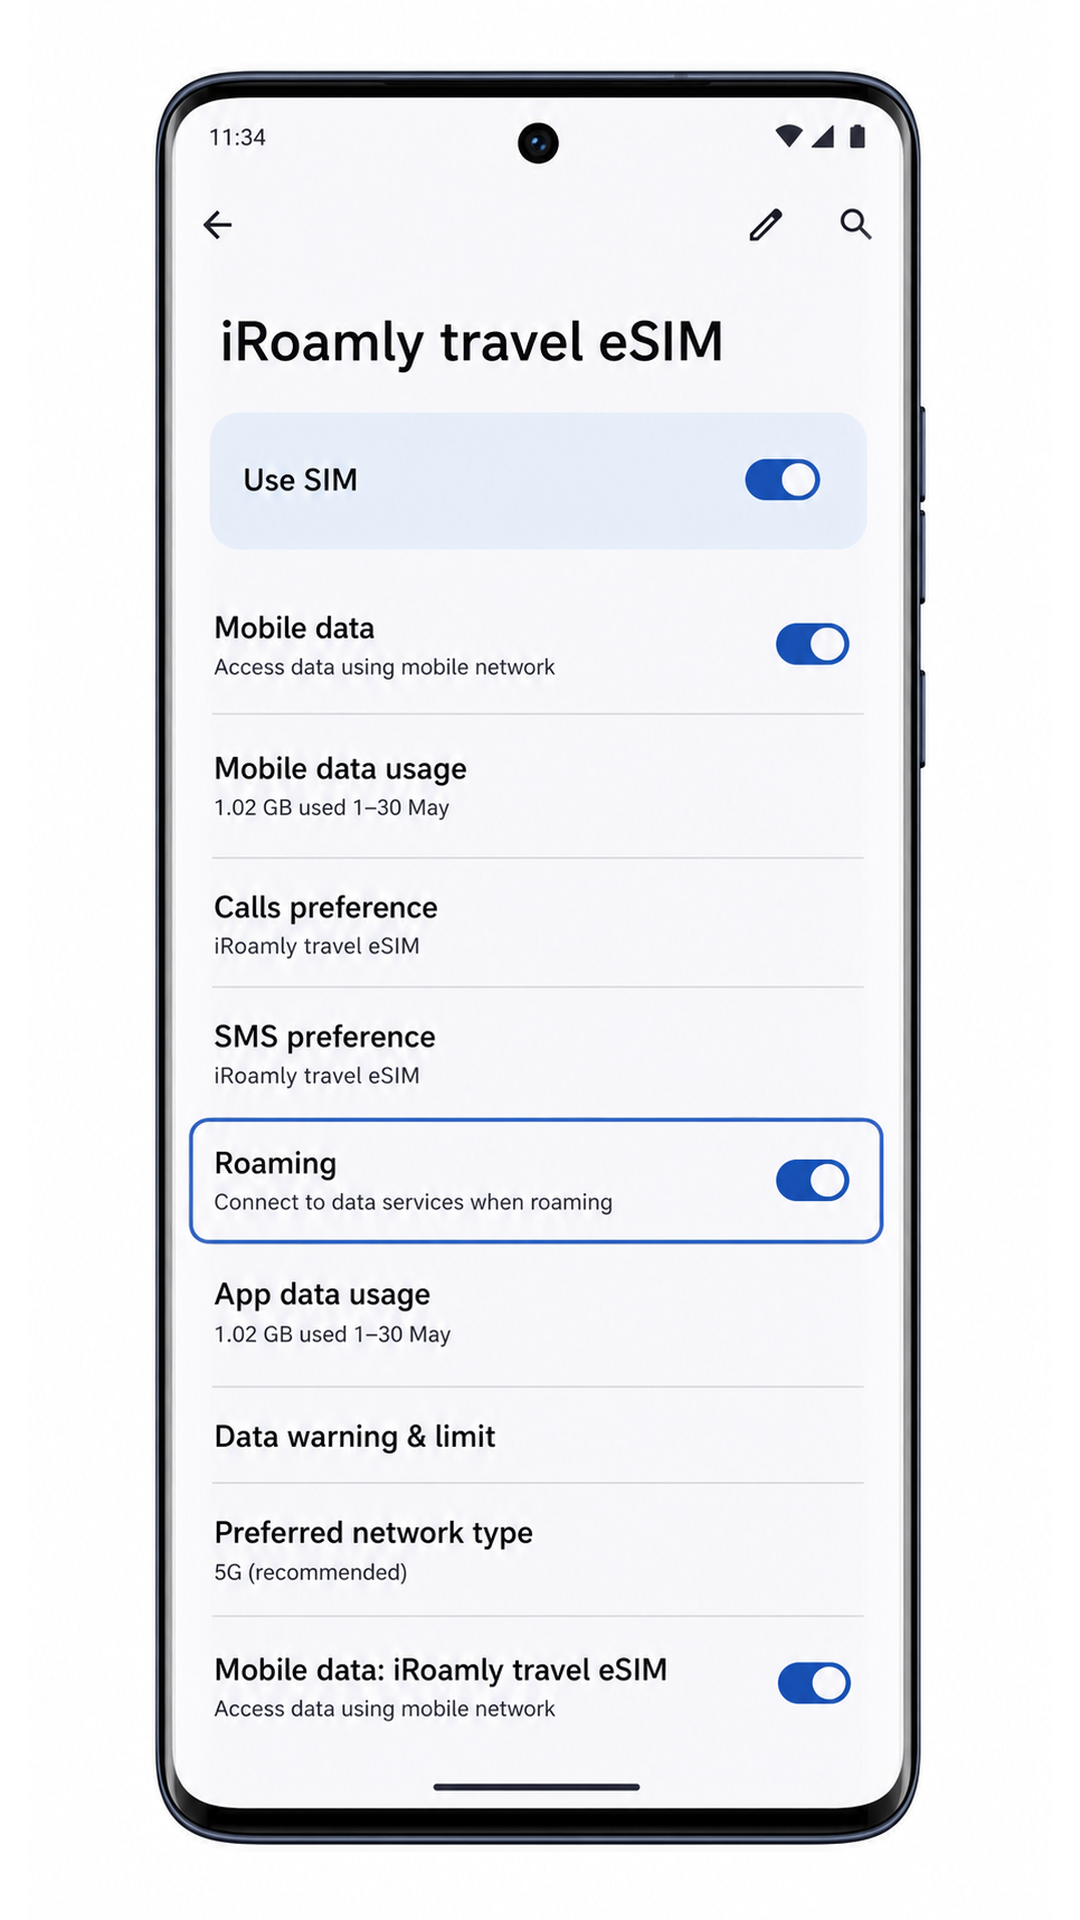
Configure eSIM for Mobile Data
In Settings > Network & internet > SIMs, tap iRoamly travel eSIM and turn on Use SIM if it is off.
Tap Mobile data, then select iRoamly travel eSIM as the data SIM. This prevents the phone from using your primary SIM for travel data.

Return to the iRoamly eSIM detail page and turn on Roaming if your destination plan requires it. Then open a browser or maps app to test mobile data after you arrive in the covered country or region.
Troubleshooting
Add eSIM is missing: confirm the Motorola Edge 60 Pro variant supports eSIM, install the latest software update, restart the phone, and check whether your carrier firmware blocks eSIM setup.
QR code does not scan: increase screen brightness on the device showing the QR code, clean the camera lens, hold the code flat, or use manual entry instead.
QR code was already used: do not delete the installed profile. If the QR code was used on another device or the install failed after activation, contact iRoamly support before trying again.
Manual entry fails: check the SM-DP+ Address and Activation Code exactly as shown by iRoamly. Avoid extra spaces, line breaks, or swapped characters.
eSIM remains activating: keep Wi-Fi on, wait a few minutes, restart the phone if the screen suggests it, then check Settings > Network & internet > SIMs again.
No data after installation: select iRoamly travel eSIM for Mobile data, turn on Roaming when required by the plan, disable unwanted automatic switching to the primary SIM, and test again in the plan’s covered destination.
eSIM appears but calls or texts fail: many travel eSIM plans are data-only. Check your iRoamly plan details before expecting voice or SMS.
Conclusion
For the Motorola Edge 60 Pro, scanning the iRoamly QR code through Settings > Network & internet > SIMs > Add eSIM is the quickest route because Android can read the profile and take you straight to Download. Manual entry is the better backup when the QR code is unavailable, especially if you have the SM-DP+ Address and Activation Code open in your iRoamly account or email.
After installation, the real checkpoint is the SIMs page: the iRoamly travel eSIM should appear as a downloaded profile, turn on normally, and be selectable for Mobile data. Before you rely on it abroad, make the iRoamly line the mobile-data SIM, enable Roaming when the plan requires it, and keep the activation-validity note in mind so the plan starts when you expect.