
The Motorola Edge 40 Pro supports eSIM on compatible regional models, and its recent Motorola Android software uses a near-stock Android path for eSIM setup: Settings > Network & internet > SIMs > Add eSIM. Menu names can vary slightly by software version, region, or carrier firmware.
For travelers, installing an iRoamly travel eSIM before departure can make mobile data setup simpler after landing. Keep Wi-Fi available during installation, and check your exact iRoamly plan because voice calls and SMS availability varies by plan.
This guide covers both setup methods on the Motorola Edge 40 Pro: scanning the iRoamly QR code and entering the eSIM details manually. The QR method is usually faster, while manual entry is useful if the QR code cannot be scanned from another screen.
Before You Set Up Your iRoamly eSIM
Connect the Motorola Edge 40 Pro to stable Wi-Fi before starting.
Confirm your Edge 40 Pro variant supports eSIM and is not locked to a carrier that blocks eSIM installation.
Keep your iRoamly QR code, SM-DP+ Address, Activation Code, and optional Confirmation Code ready.
Sign in to any required Google or device account if your phone asks for it during setup.
Install the eSIM 1-2 days before travel when your plan allows it, but remember that iRoamly plan validity starts from activation. Check the exact activation trigger in your current iRoamly plan details.
Do not delete the iRoamly eSIM after installation unless iRoamly support tells you to. Many travel eSIM profiles cannot simply be reinstalled after removal.
iRoamly eSIM plans may be data-only. Voice calls and SMS are not guaranteed, so check the plan page or order details before relying on them.
Method 1: Install eSIM by Scanning a QR Code
Open Settings on your Motorola Edge 40 Pro and tap Network & internet.
You should see the Android network settings area where SIM and mobile data settings are managed.
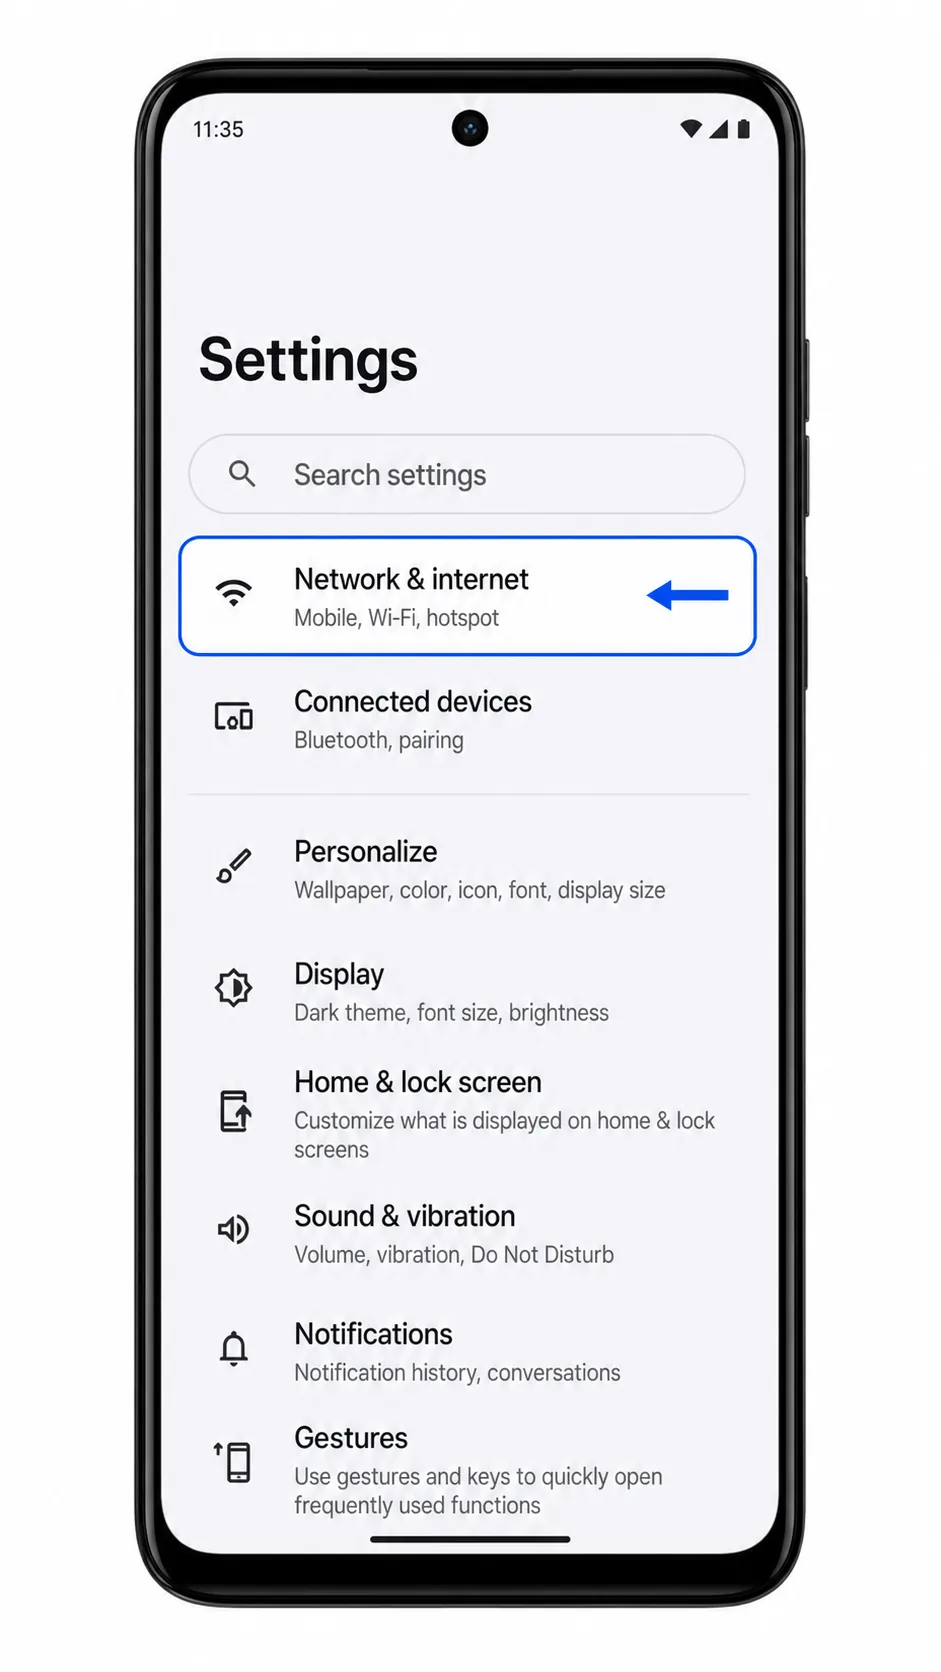
Tap SIMs, then choose Add eSIM or Download new eSIM if it appears on your software version.
The phone should open the eSIM setup flow. On some Motorola Android builds, Add eSIM may appear lower on the Network & internet page or inside the SIMs page.

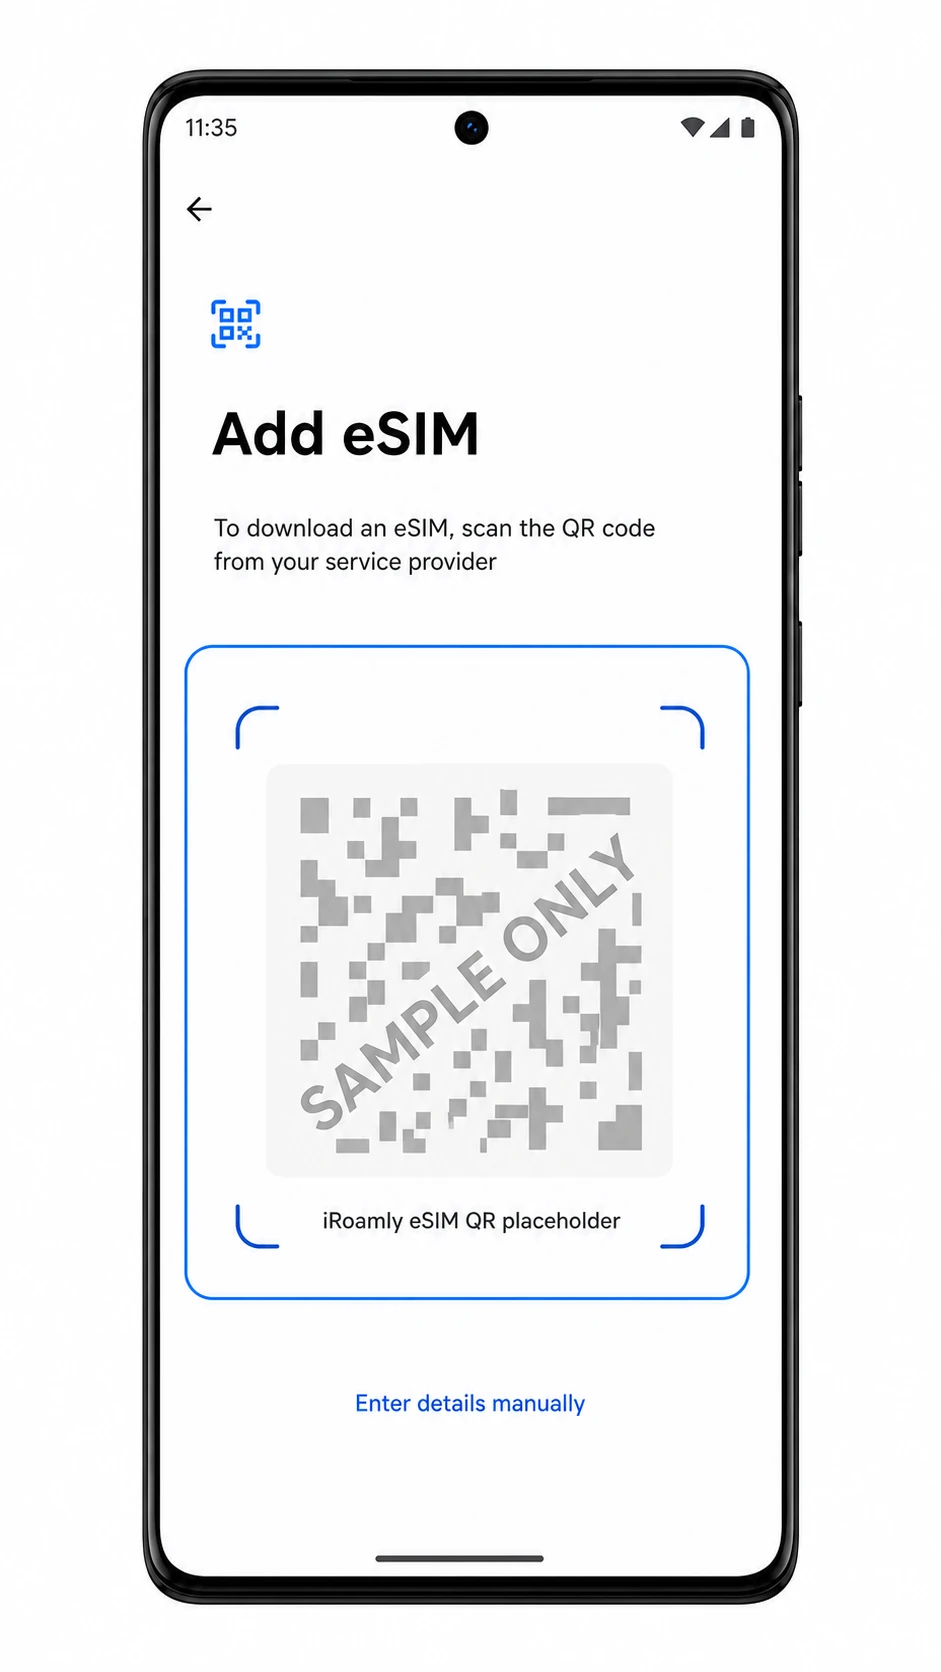
On the Add eSIM screen, point the camera scanner at the iRoamly eSIM QR code.
Use the QR code from your iRoamly order email or account page. Keep the code flat, bright, and fully inside the scan frame.
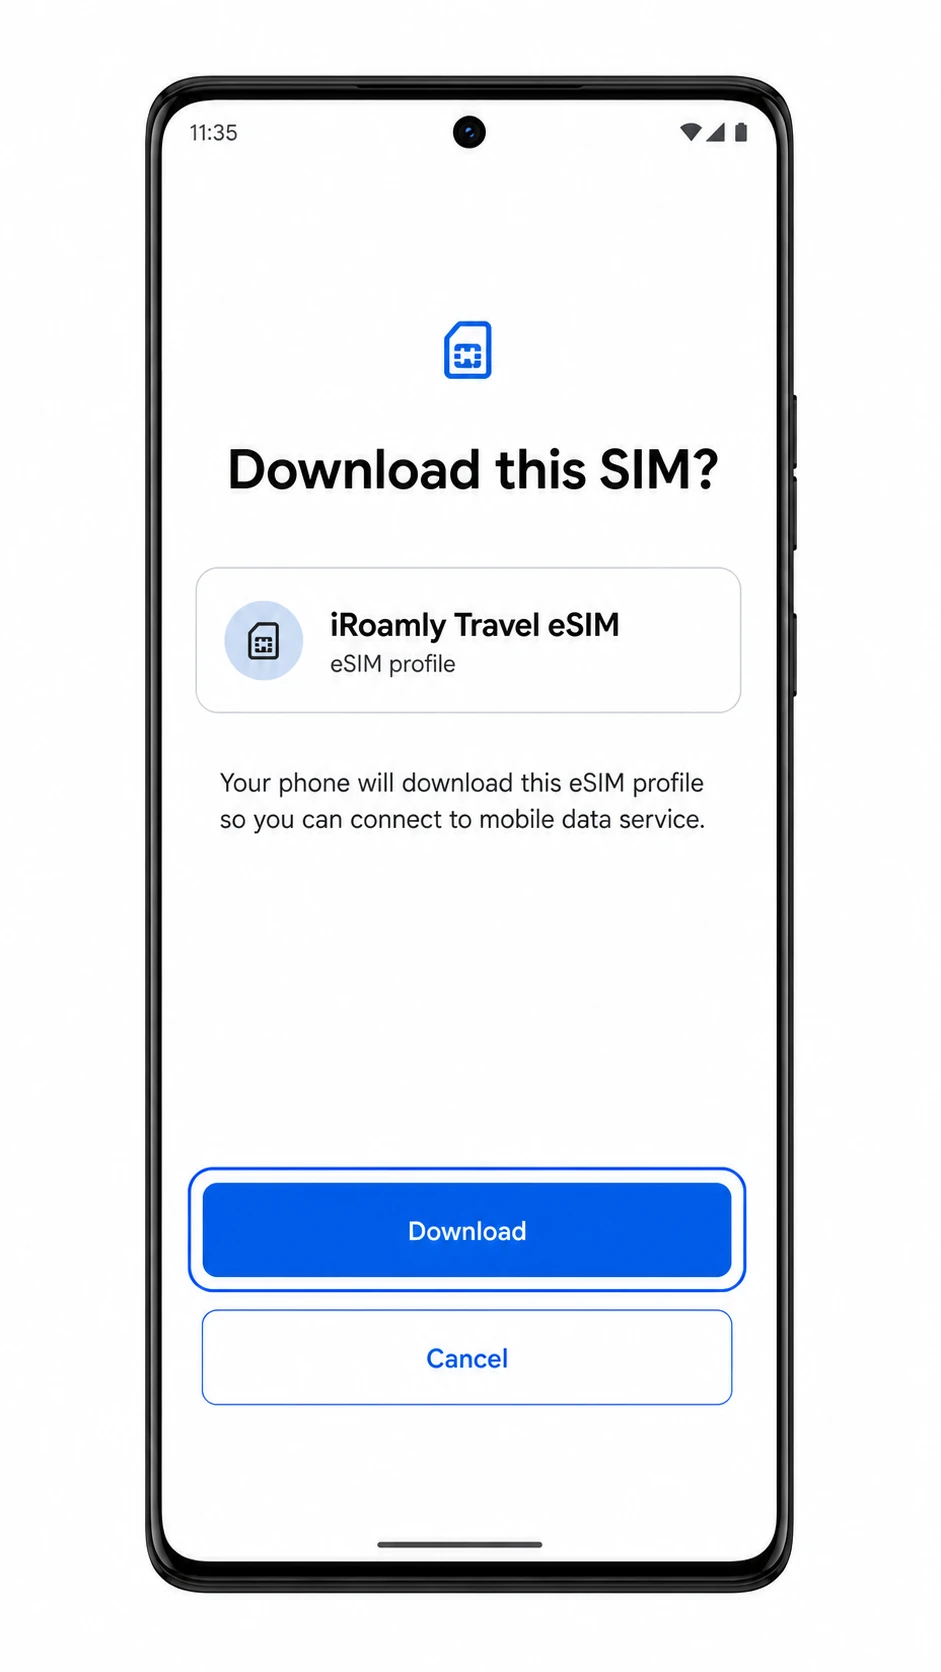
When the phone shows Download this SIM?, review the profile name and tap Download.
Wait for the eSIM profile to download. Keep Wi-Fi connected and do not close Settings while the download is running.
If Android asks whether to use the new eSIM now, choose the option that keeps your primary SIM available for calls or SMS and leaves iRoamly ready for mobile data.
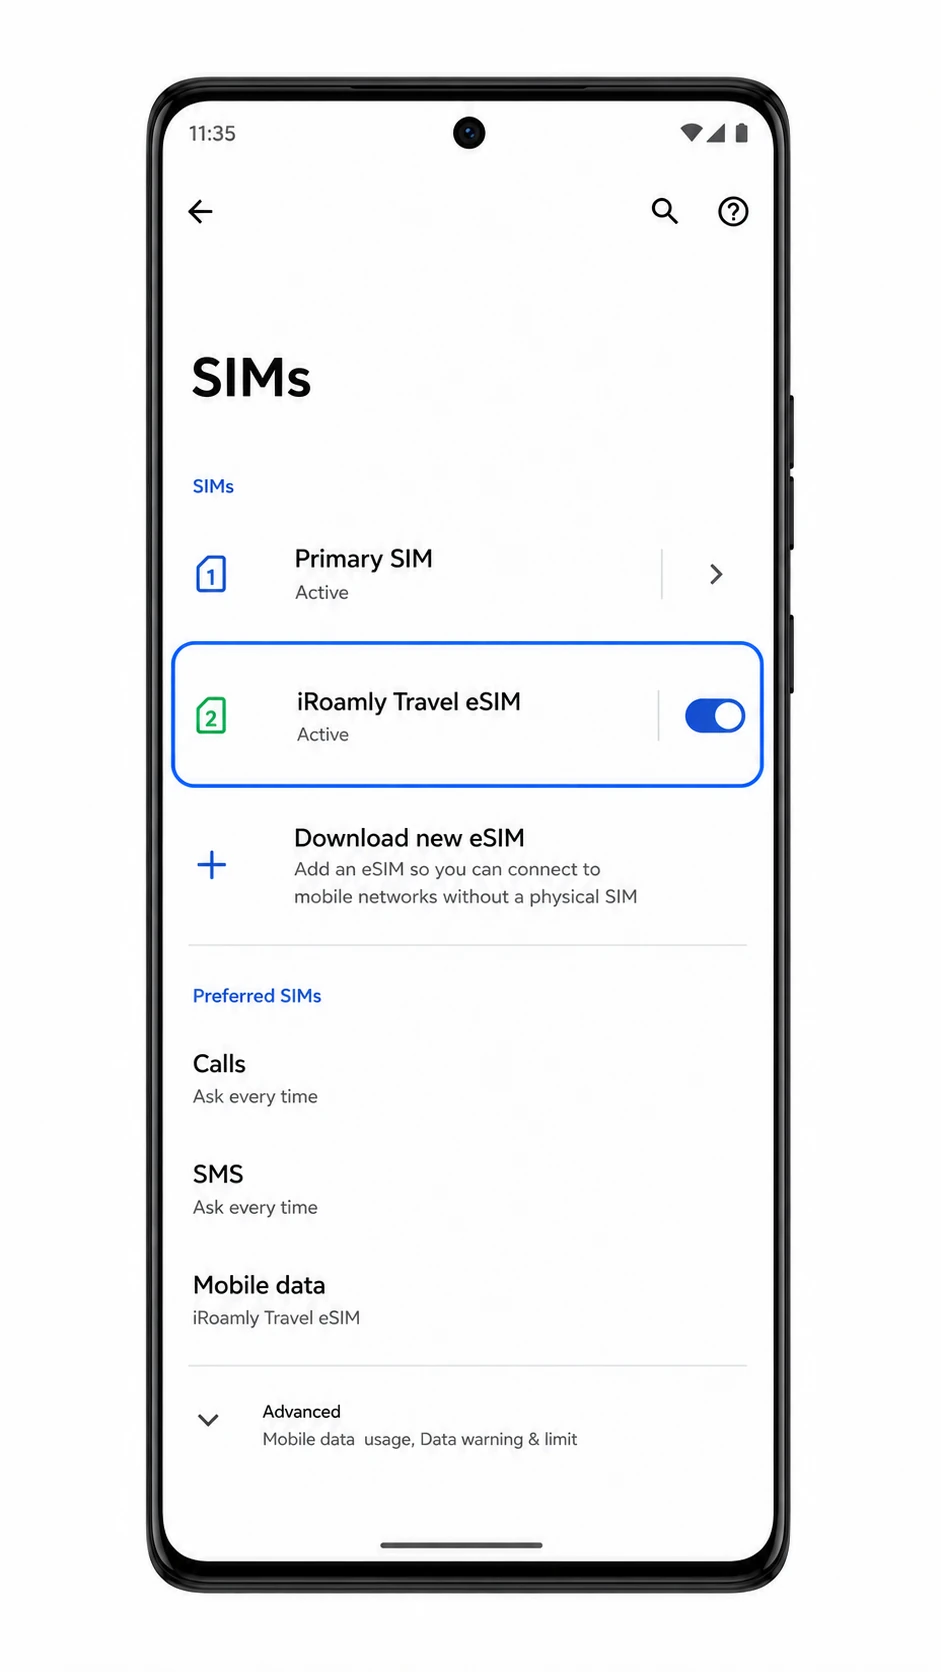
After setup, the iRoamly profile should appear in the SIMs list. You can adjust the data line in the later mobile data section.
Method 2: Install eSIM Manually
Open Settings and tap Network & internet.
This starts from the same Motorola Android network settings path used for QR setup.
Tap SIMs, then tap Add eSIM or Download new eSIM.
The eSIM setup screen should open. If your phone shows Download a SIM instead, choose that option to continue.
On the Add eSIM screen, tap Enter details manually.
Use this option when the QR code is on the same phone, the camera cannot scan it, or you prefer typing the activation details from iRoamly.
Enter the SM-DP+ Address and Activation Code exactly as iRoamly provides them. If iRoamly gives a Confirmation Code, enter it in the optional field, then tap Next.
Do not add extra spaces or punctuation. The Motorola Android manual setup screen uses separate fields for the SM-DP+ Address, Activation Code, and optional confirmation code.
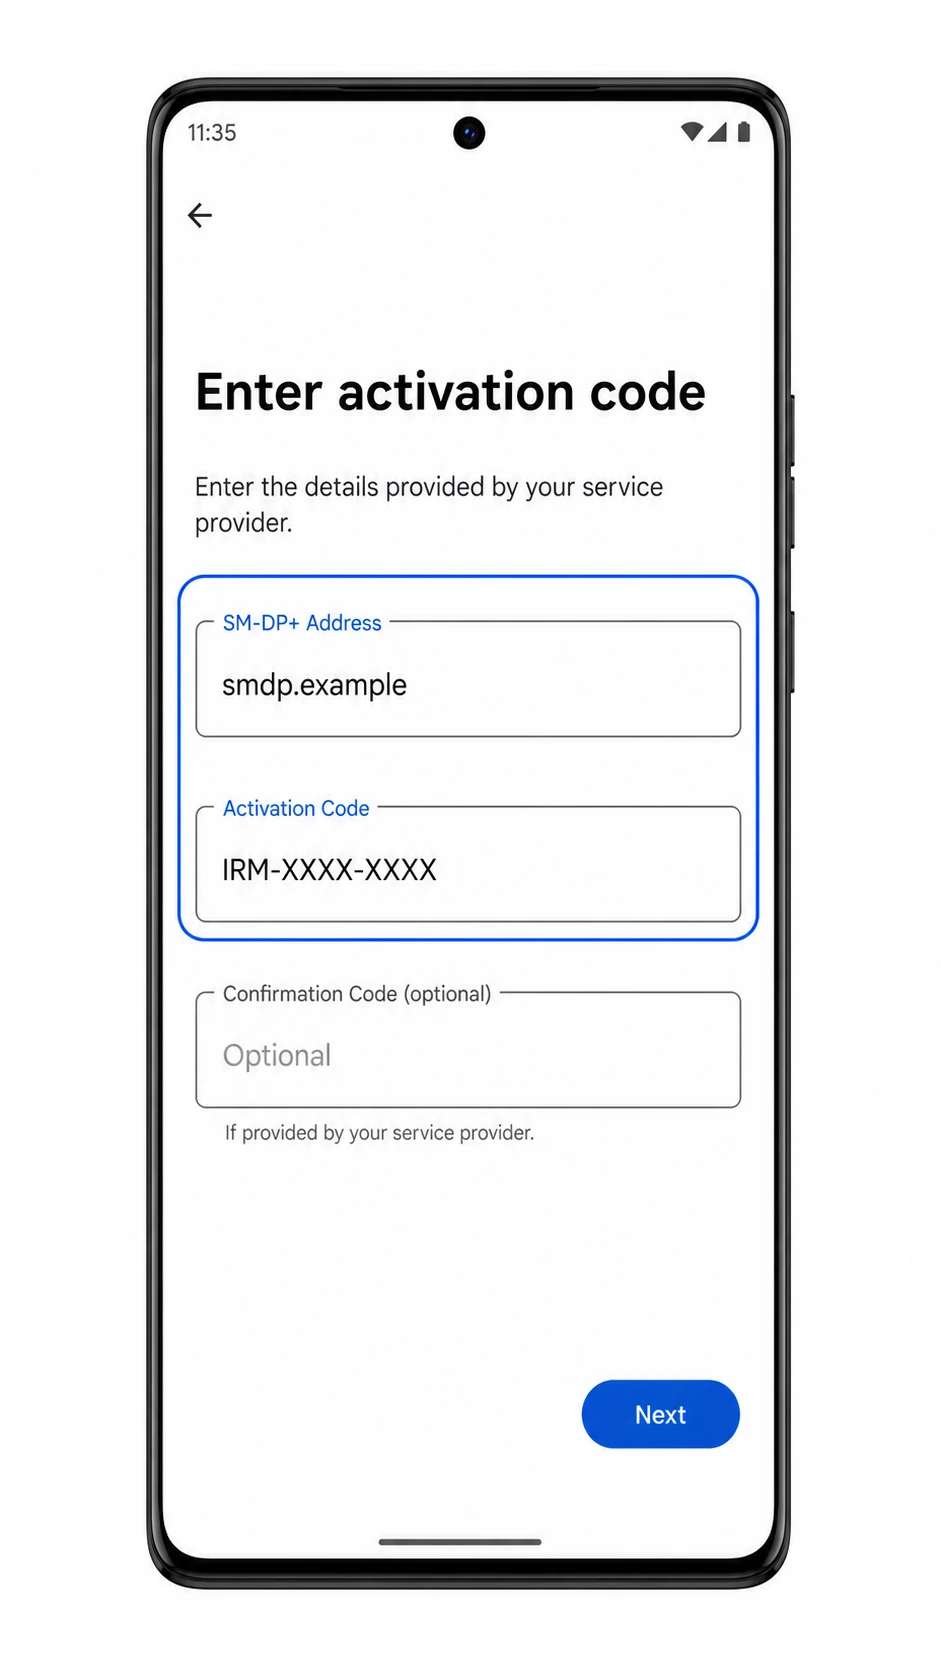
When the phone shows Download this SIM?, confirm the profile is iRoamly Travel eSIM and tap Download.
Keep Wi-Fi connected until the eSIM download completes.
If Android asks how to use the new eSIM, keep your primary SIM for calls or SMS unless your iRoamly plan specifically supports those services.
The iRoamly eSIM should be installed and ready to configure for mobile data.
How to Confirm Your iRoamly eSIM Is Installed
Go to Settings > Network & internet > SIMs.
Look for iRoamly Travel eSIM in the SIM list. The eSIM should appear as an active profile with its switch turned on.
Open the iRoamly Travel eSIM profile and check that Use SIM is turned on.
If your plan is data-only, do not use SMS or calling as the confirmation test. Use mobile data testing after you choose iRoamly as the data SIM.
Configure eSIM for Mobile Data
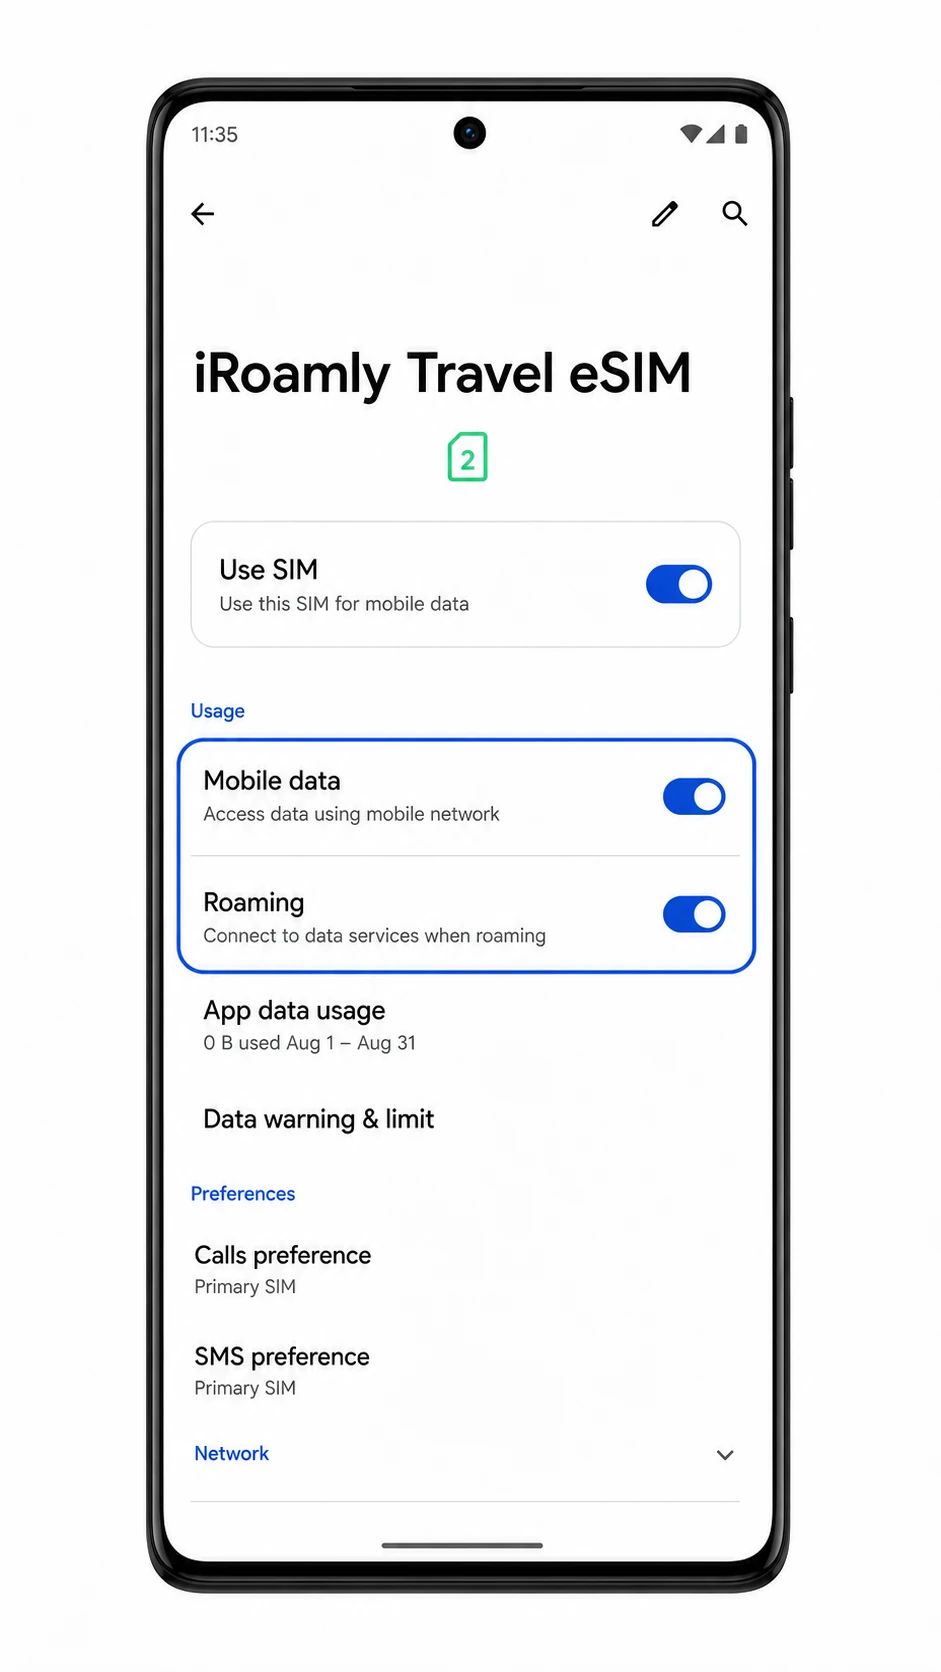
Open Settings > Network & internet > SIMs, then tap iRoamly Travel eSIM.
The iRoamly SIM details page should show data-related controls for the installed eSIM.
Turn on Use SIM and Mobile data for the iRoamly eSIM.
This lets the Motorola Edge 40 Pro use the iRoamly profile for travel data.
Turn on Roaming if your iRoamly destination plan requires roaming for data service.
Many travel eSIMs need data roaming enabled because the plan connects through partner networks abroad.
Check the preferred SIM settings and keep Calls and SMS on your primary SIM unless your iRoamly plan includes those services.
Set Mobile data to iRoamly Travel eSIM when you want travel data to use the iRoamly line.
Troubleshooting
If Add eSIM is missing, confirm the Motorola Edge 40 Pro variant supports eSIM in your region, update Android, restart the phone, and check whether your carrier firmware blocks eSIM setup.
If the QR code will not scan, raise the screen brightness on the device showing the code, clean the camera lens, avoid reflections, or use Enter details manually.
If the QR code says it has already been used, do not delete the eSIM. Contact iRoamly support because many eSIM QR codes can be installed only once.
If manual setup fails, recheck the SM-DP+ Address, Activation Code, and optional Confirmation Code exactly as shown in your iRoamly order details.
If the eSIM remains pending, keep Wi-Fi connected, wait a few minutes, restart the phone, and return to Settings > Network & internet > SIMs.
If mobile data does not work after installation, select iRoamly Travel eSIM for Mobile data, turn on Roaming when required, disable data switching to another SIM if it interferes, and test again in the destination coverage area.
If calls or SMS do not work on the iRoamly line, check the plan details. Many travel eSIM products focus on mobile data and do not include voice or SMS.
Conclusion
Once your iRoamly eSIM is installed, your Motorola Edge 40 Pro can switch to travel data whenever you need it, giving you more flexibility while keeping your primary number available if desired. The setup only takes a few minutes when your activation details and Wi-Fi connection are ready.
If you encounter any issues, most can be resolved by reviewing the activation information, confirming device compatibility, or checking your plan settings. Spending a little time verifying everything in advance can make your travel experience much smoother.