
The Oppo Reno 6 Pro 5G can be confusing for travelers because eSIM support depends on the regional model and carrier firmware.
iRoamly lists the Oppo Reno 6 Pro 5G among supported OPPO devices, but also notes that OPPO eSIM support is limited to Japan and certain regions, so the first step is checking whether your ColorOS build actually shows an eSIM option.
iRoamly is a travel eSIM service, so the normal setup flow is to install the plan before or near your trip, then use the iRoamly line for mobile data when you arrive. On an eSIM-enabled Oppo Reno 6 Pro 5G variant, ColorOS typically places this under Settings > Mobile network > eSIM.
This guide covers both ways to add the iRoamly travel eSIM: scanning the QR code and entering the activation details manually. If your Reno 6 Pro 5G does not show eSIM, Add eSIM, or a similar option, the phone cannot install an iRoamly eSIM in its current regional/carrier configuration.

Stay Connected Abroad with iRoamly
iRoamly is a travel eSIM service for mobile data in destinations around the world. Travelers can choose from available destination, regional, and global options, with plan allowances, validity periods, and supported features varying by location.
On a compatible phone, the installed data line can support travel essentials such as maps, messaging, bookings, ride-hailing, translations, and trip updates.
For an Oppo Reno 6 Pro 5G variant that shows eSIM support in ColorOS, an iRoamly plan can be installed digitally and selected for mobile data while traveling. The existing guide below shows the QR-code and manual-entry methods while keeping the regional compatibility check front and center.
Before You Set Up Your iRoamly eSIM
Connect the Oppo Reno 6 Pro 5G to stable Wi-Fi before adding the iRoamly eSIM.
Confirm the phone is unlocked and that your regional Reno 6 Pro 5G variant supports eSIM. If Settings > Mobile network does not show eSIM, use another eSIM-compatible phone.
Keep the iRoamly QR code and manual activation details ready. Manual details may include an SM-DP+ Address, an Activation Code, and sometimes a Confirmation Code.
Install the iRoamly eSIM 1-2 days before travel when the plan instructions allow it, but check the plan’s activation rule first.
Traveling to Japan or Italy? You can prepare the eSIM before departure, then switch mobile data to the iRoamly line when you are ready to use it abroad. iRoamly plan validity starts from activation, and the trigger can vary by plan.
Do not delete the iRoamly eSIM after installation unless iRoamly support tells you to do so. A used eSIM profile may not be reinstallable.
Check the specific iRoamly plan details for voice and SMS. Many travel eSIM plans are data-focused, and voice/SMS availability varies by plan.
Method 1: Install eSIM by Scanning a QR Code
Open Settings on the Oppo Reno 6 Pro 5G, then tap Mobile network.
You should see the ColorOS mobile network page with SIM options. On an eSIM-capable regional model, an eSIM row or related eSIM entry should be available.
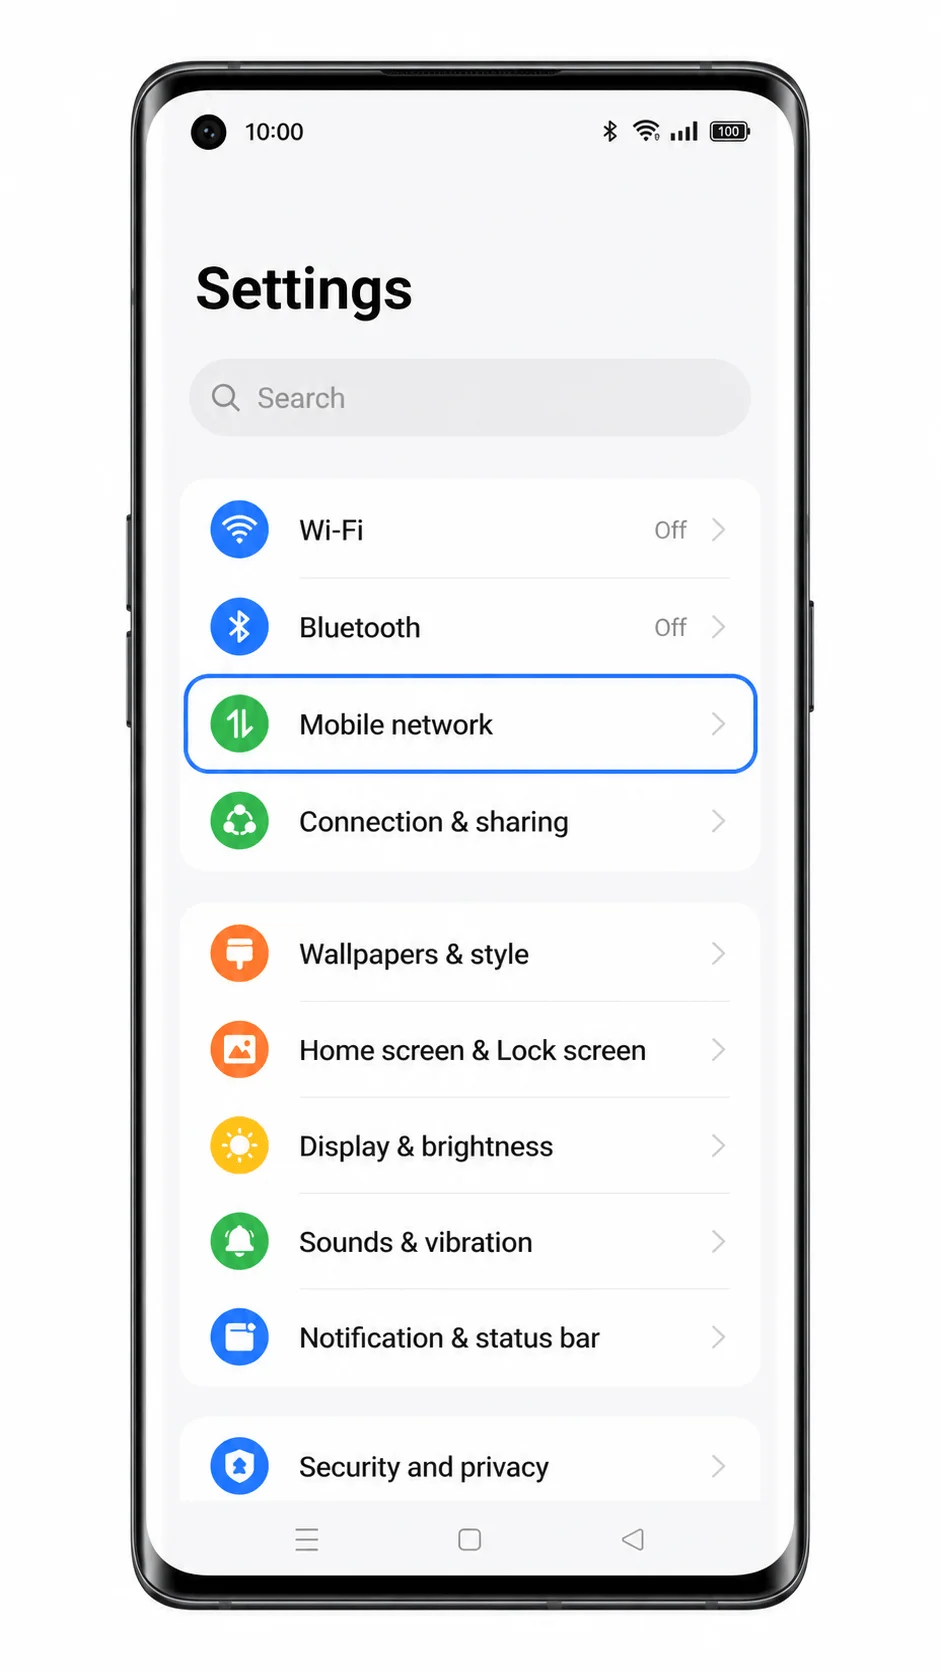
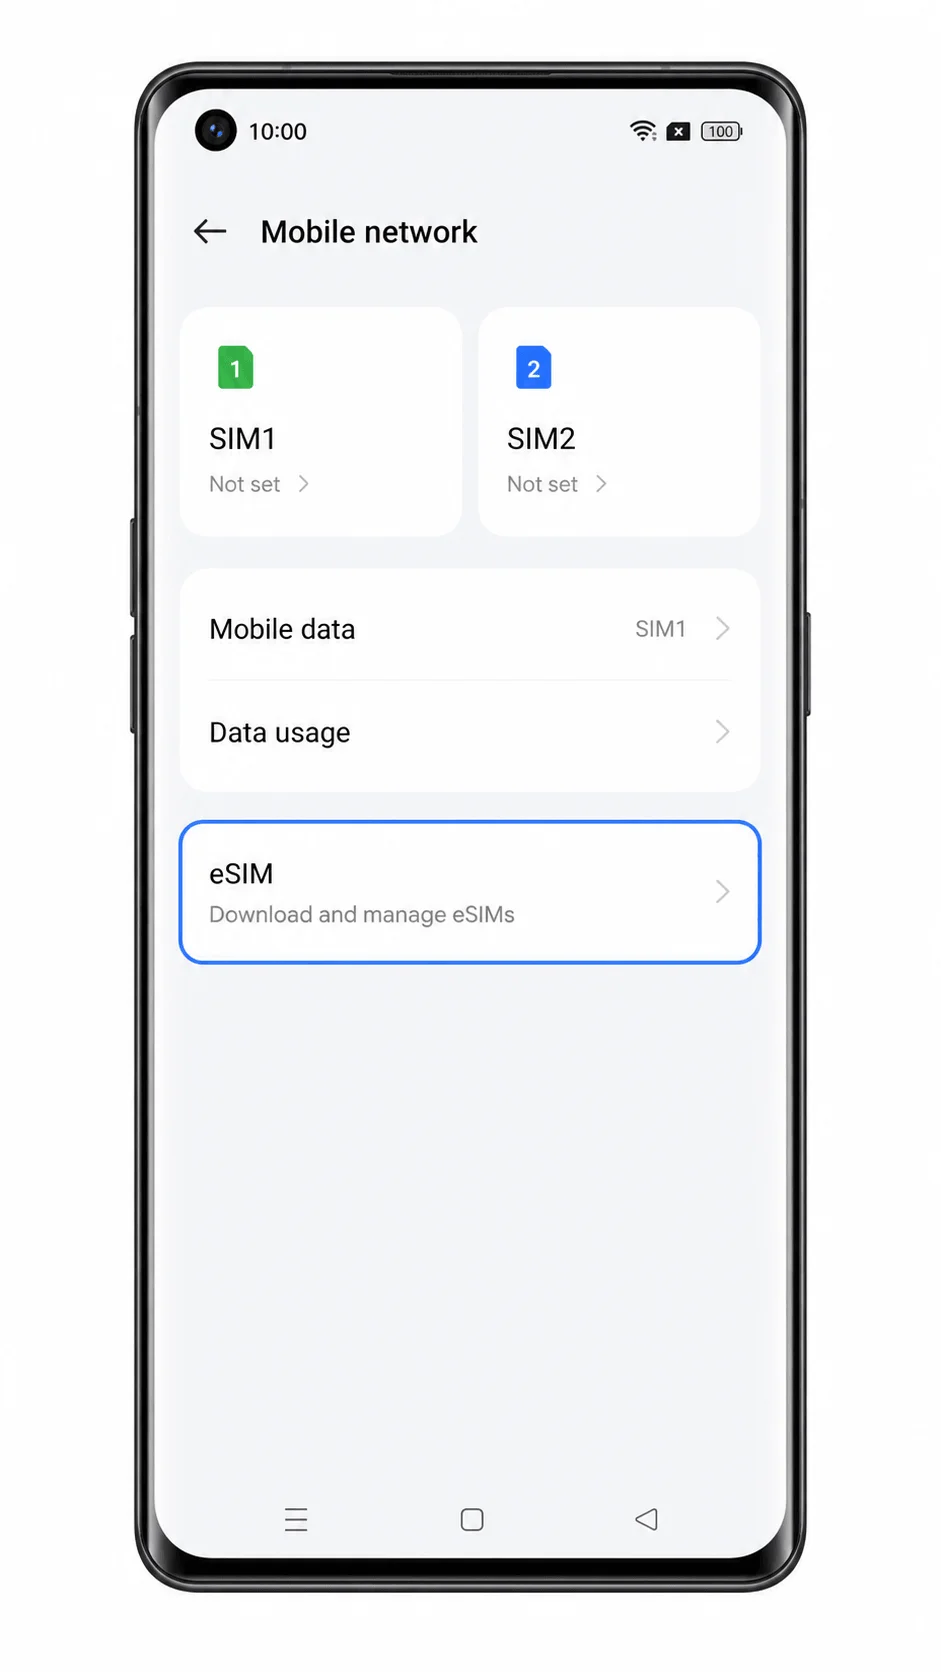
Tap eSIM.
The eSIM management page should open. If you only see physical SIM cards and no eSIM option, this Reno 6 Pro 5G variant cannot continue with iRoamly eSIM installation.
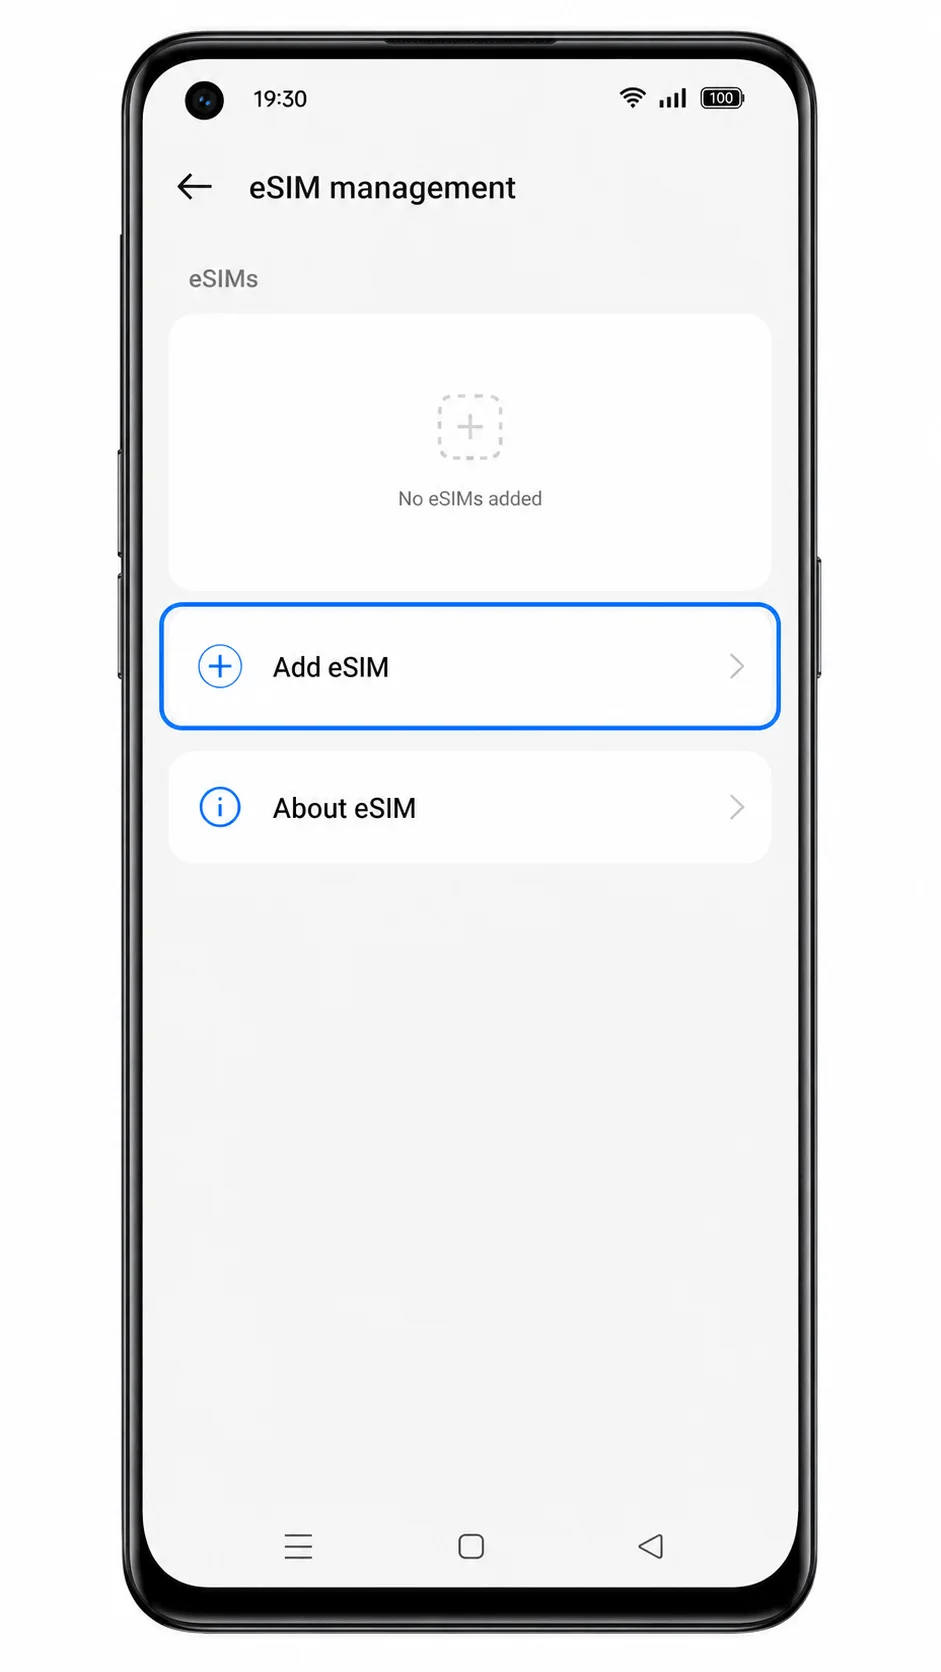
Tap Add eSIM.
ColorOS should open the add-eSIM screen and offer a QR-code setup path.
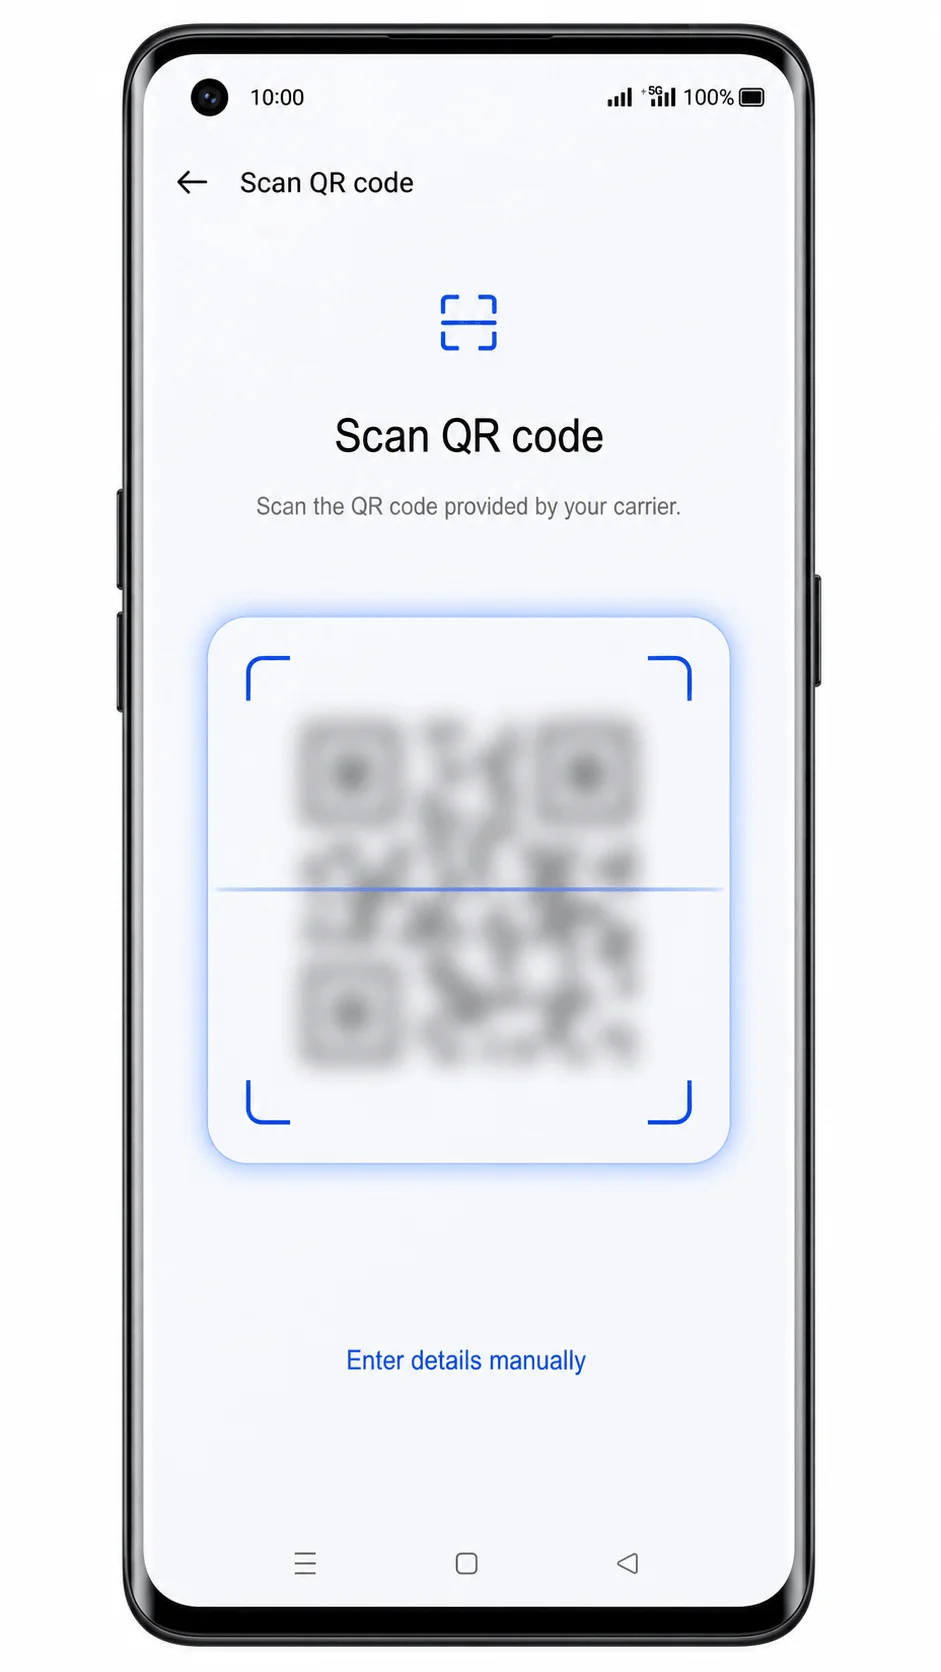
Tap Scan QR code, then point the camera at the QR code in your iRoamly purchase email or iRoamly account page.
Keep the QR code steady and fully inside the scanner frame. The QR code should be a placeholder in screenshots or public documents, not a real private activation code.
Review the detected iRoamly eSIM profile, then tap Download or Add.
Wait for ColorOS to download the eSIM profile over Wi-Fi. Do not close Settings while the download is in progress.
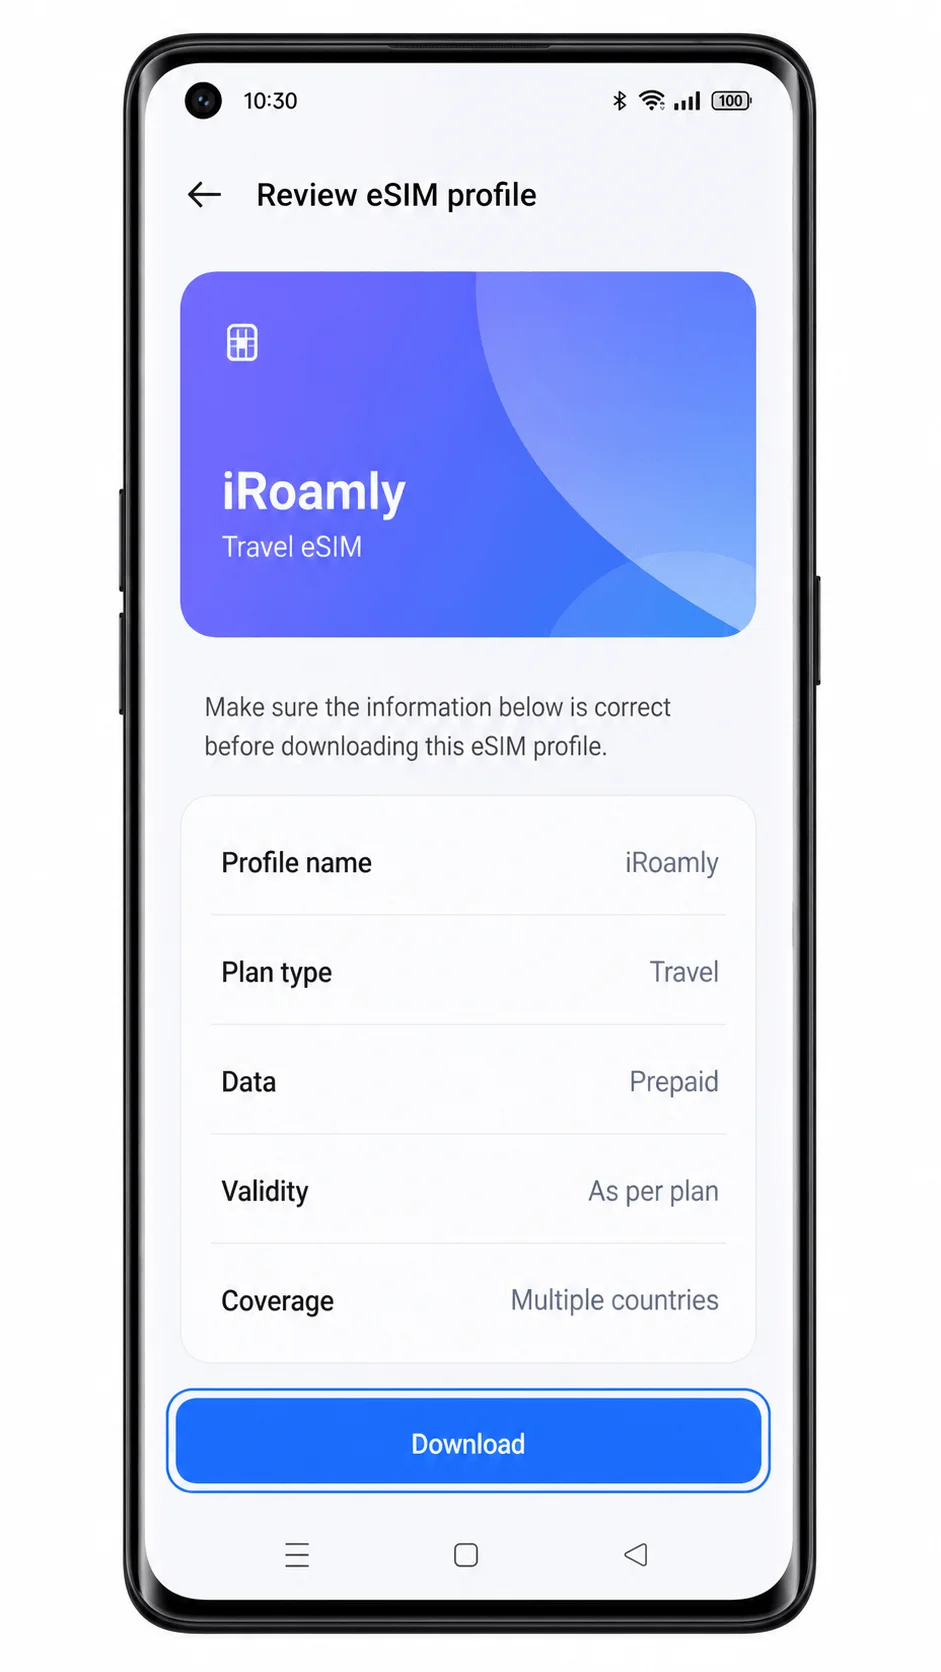
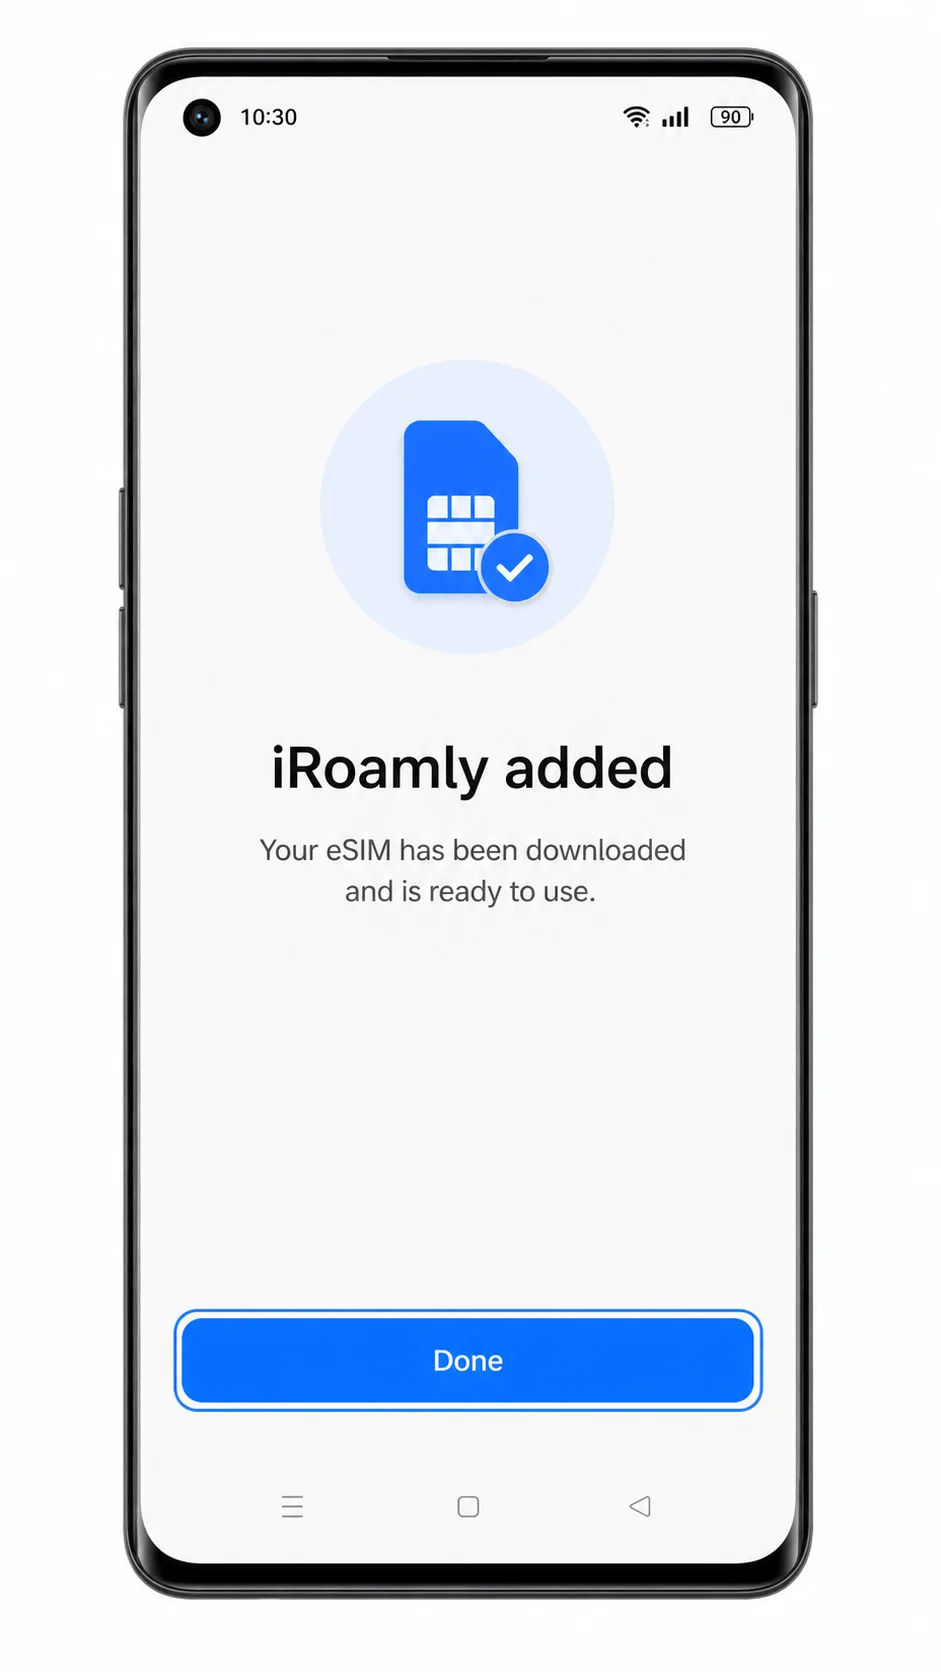
When the download finishes, tap Done.
The iRoamly eSIM should now appear in the eSIM list or mobile network settings. If ColorOS asks whether to turn on the new eSIM now, leave it on unless your iRoamly plan says activation starts immediately on installation and you are not ready to begin validity.
Method 2: Install eSIM Manually
Open Settings on the Oppo Reno 6 Pro 5G, then tap Mobile network.
Start from the same ColorOS mobile network page used for QR setup. This confirms you are working inside the phone’s SIM and network controls.
Tap eSIM.
The eSIM management page should open. If eSIM is missing, this device or carrier firmware does not support eSIM installation, so manual entry will not be available either.
Tap Add eSIM.
ColorOS should show the QR setup screen. Manual entry is normally reached from this QR-code step.
Tap Enter details manually or Enter activation code.
The manual entry page should appear. On OPPO/Android eSIM setup screens, the activation details are commonly entered as an SM-DP+ Address, an Activation Code, and an optional Confirmation Code if iRoamly provides one.
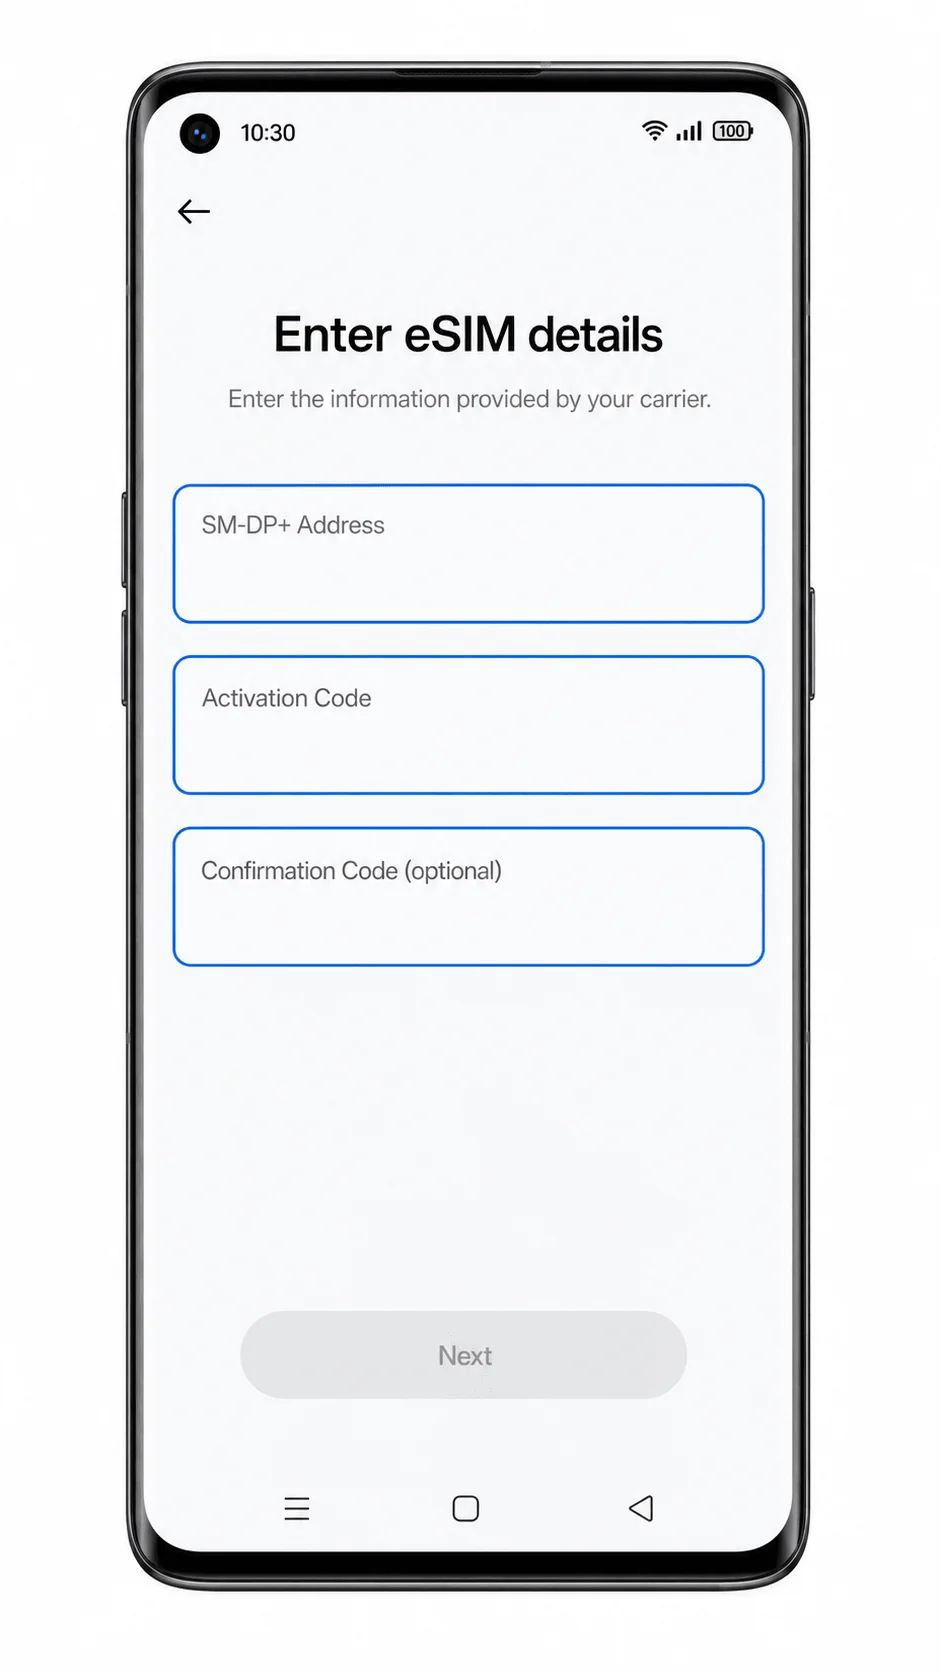
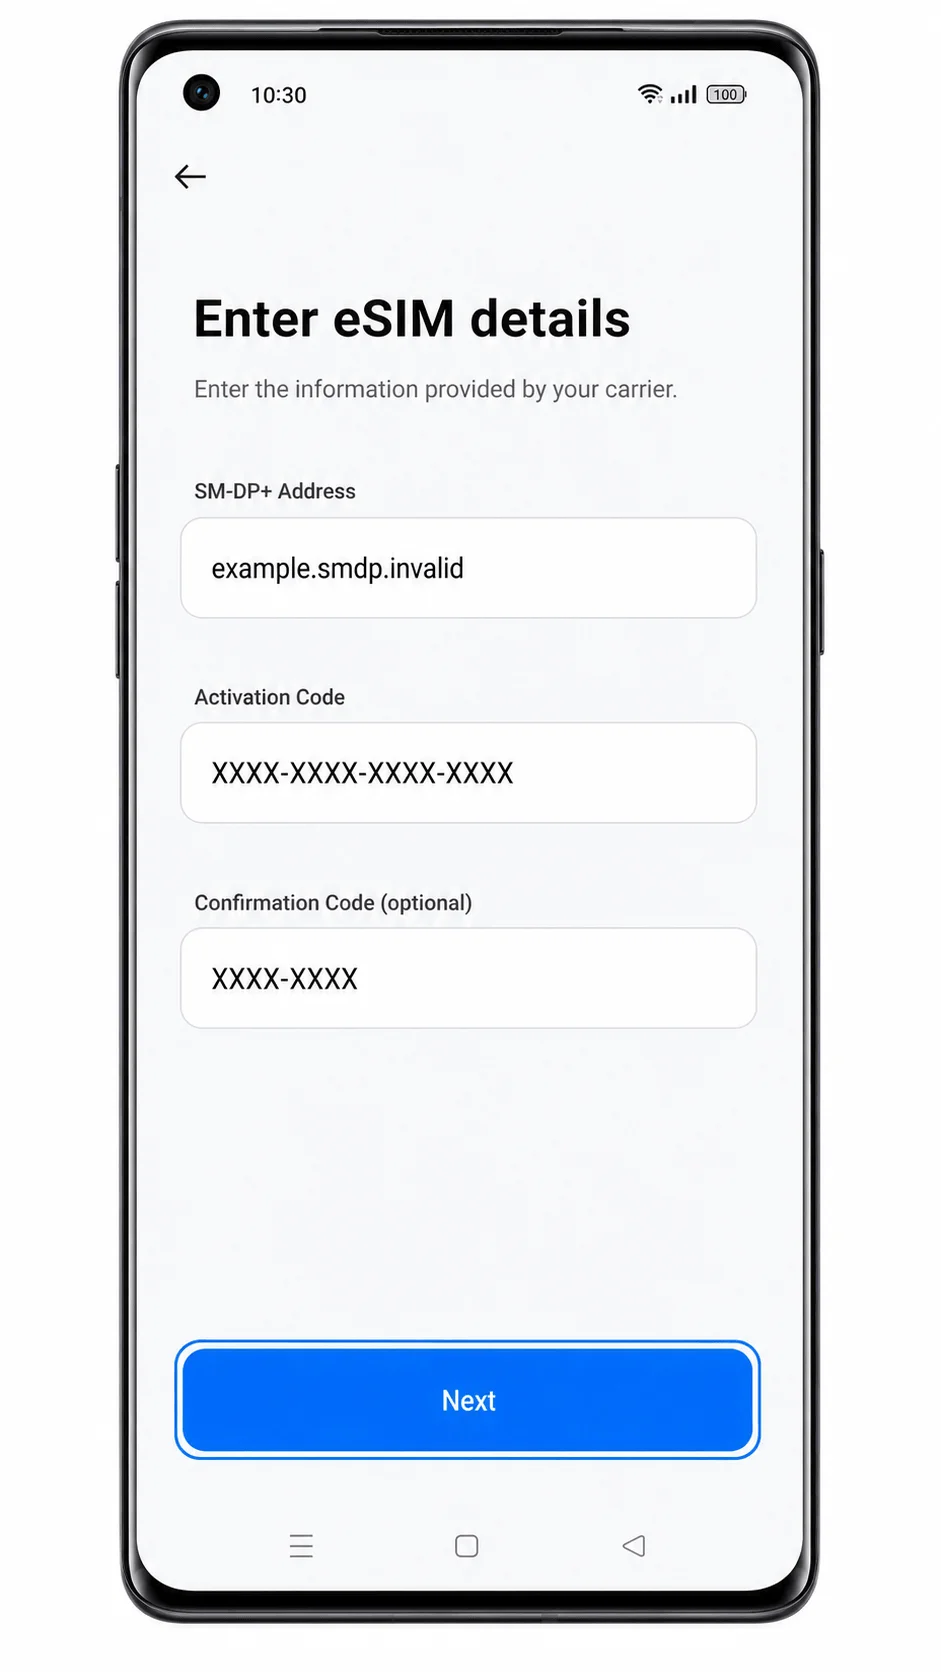
Enter the SM-DP+ Address and Activation Code exactly as iRoamly provides them, then tap Next.
Do not add spaces, change letter case, or type example data from a screenshot. If iRoamly provides a confirmation code, enter it only in the confirmation-code field.
Review the iRoamly eSIM profile, then tap Download or Add.
Keep Wi-Fi connected while ColorOS downloads the profile. If the phone reports that the activation code is invalid, check whether the code has already been used or copied incorrectly.
Tap Done after the eSIM is added.
The iRoamly eSIM should now appear in the eSIM list. If ColorOS prompts for a label, name it iRoamly so it is easy to select later for travel data.
How to Confirm Your iRoamly eSIM Is Installed
Go to Settings > Mobile network > eSIM.
Look for an installed eSIM profile labeled iRoamly, Travel, or the carrier name provided with your iRoamly plan. If no eSIM profile appears here, the installation did not finish.
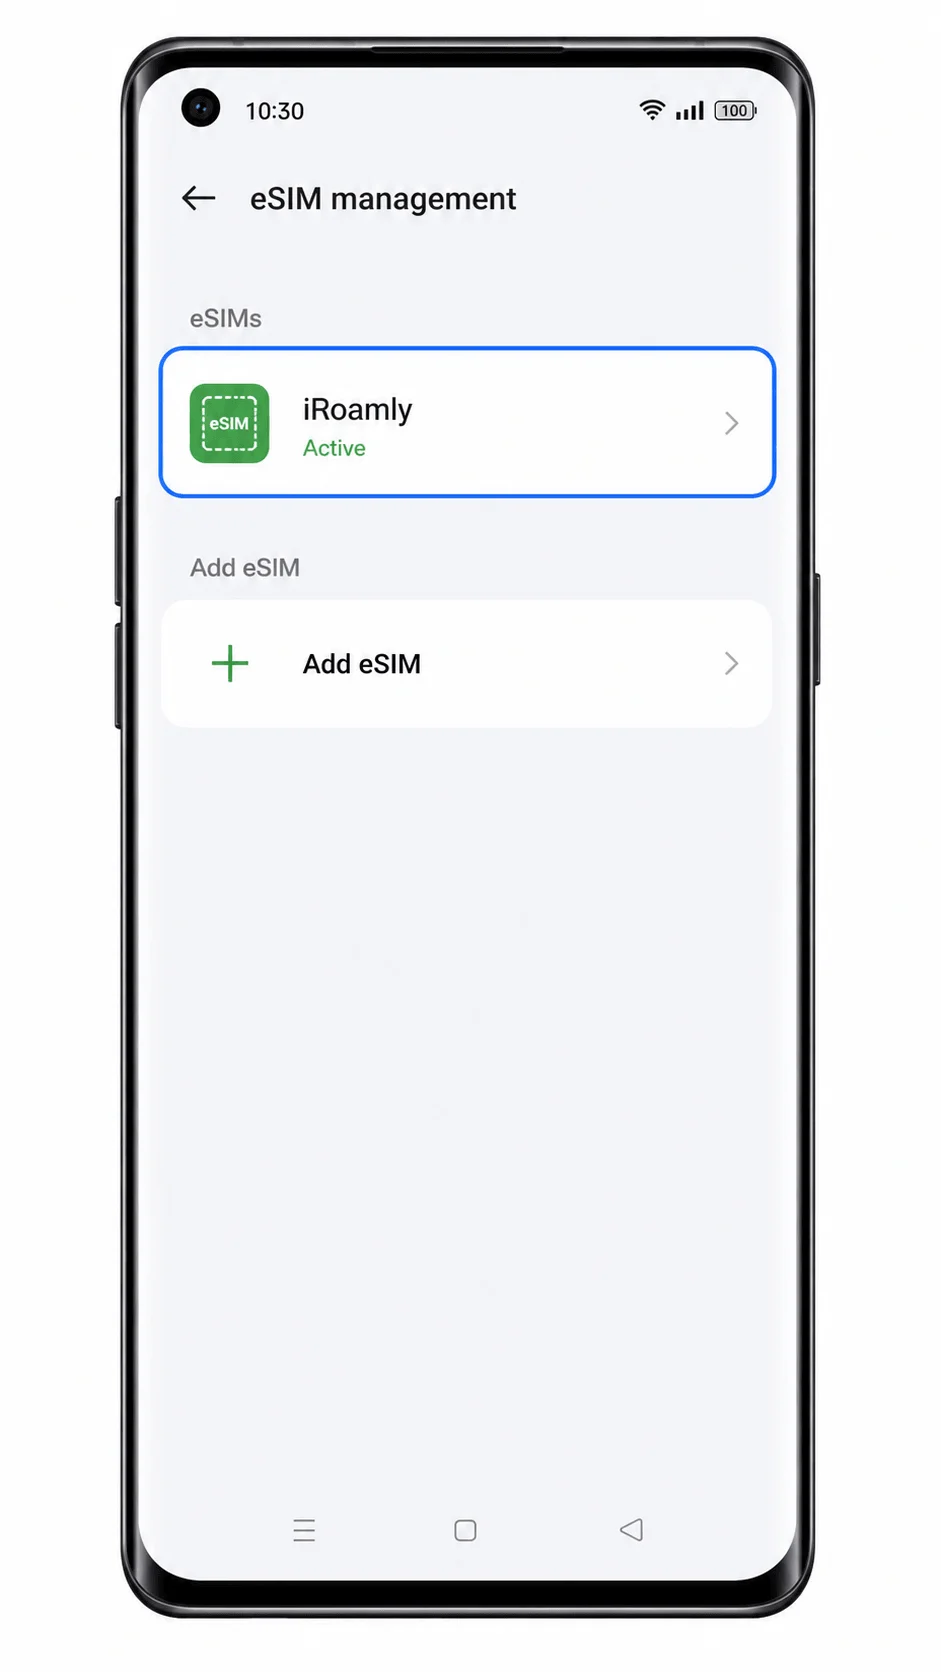
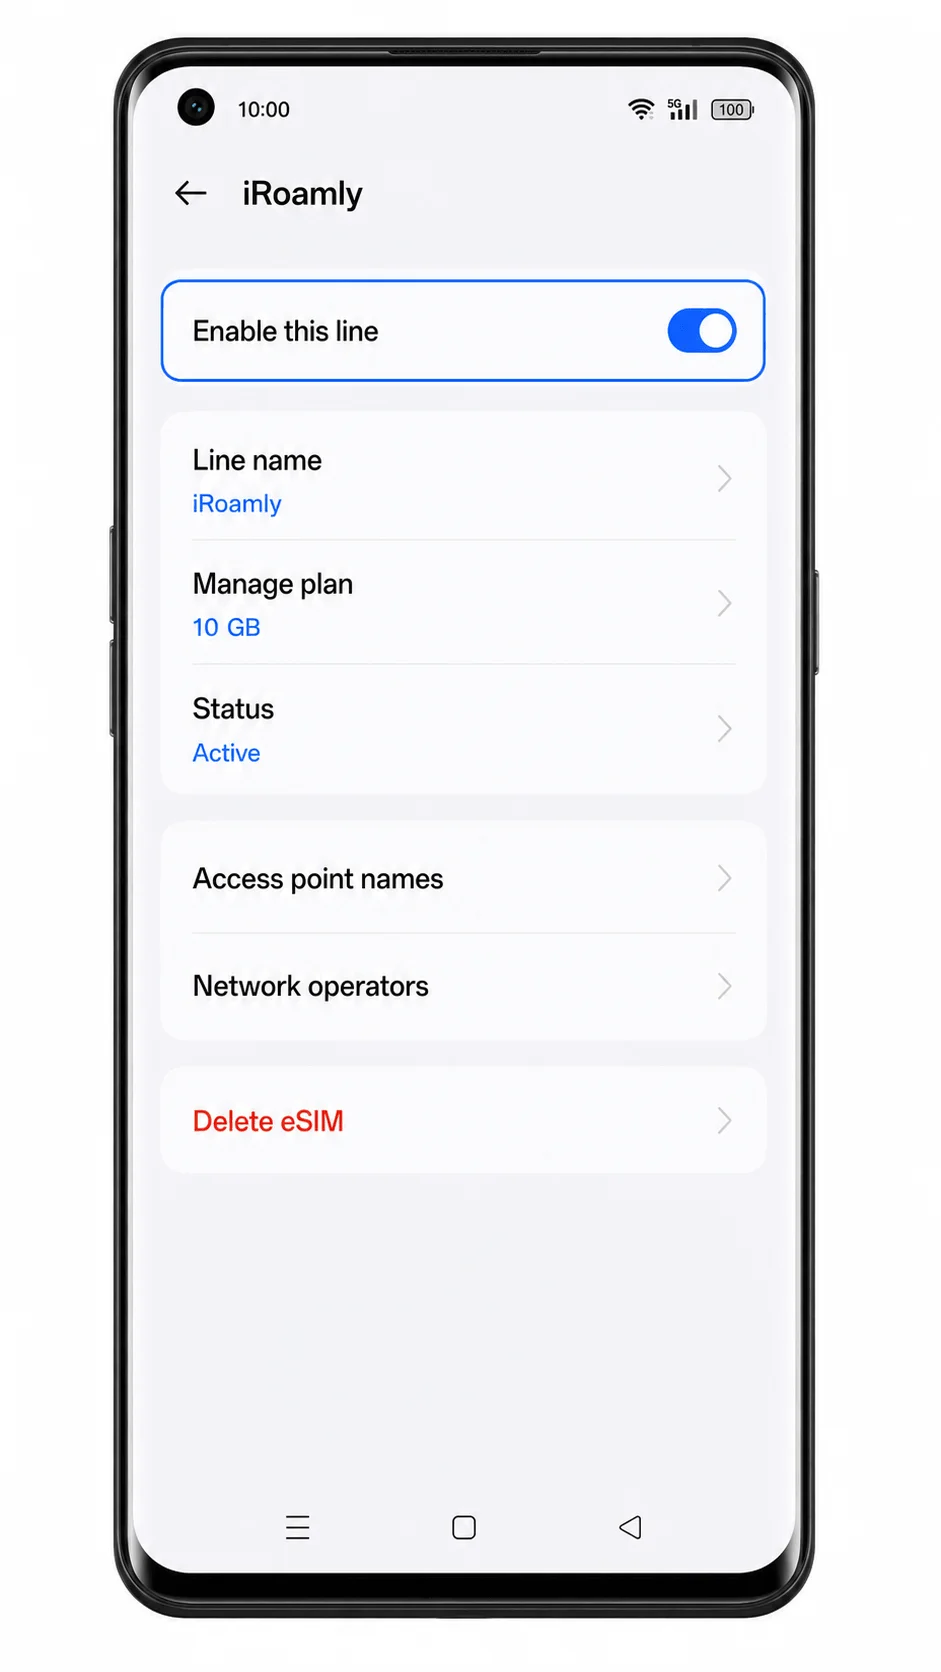
Tap the iRoamly eSIM profile and confirm the line is turned on.
The eSIM detail page should show a switch for enabling the line. A signal indicator may appear after the phone connects to a supported network at your destination.
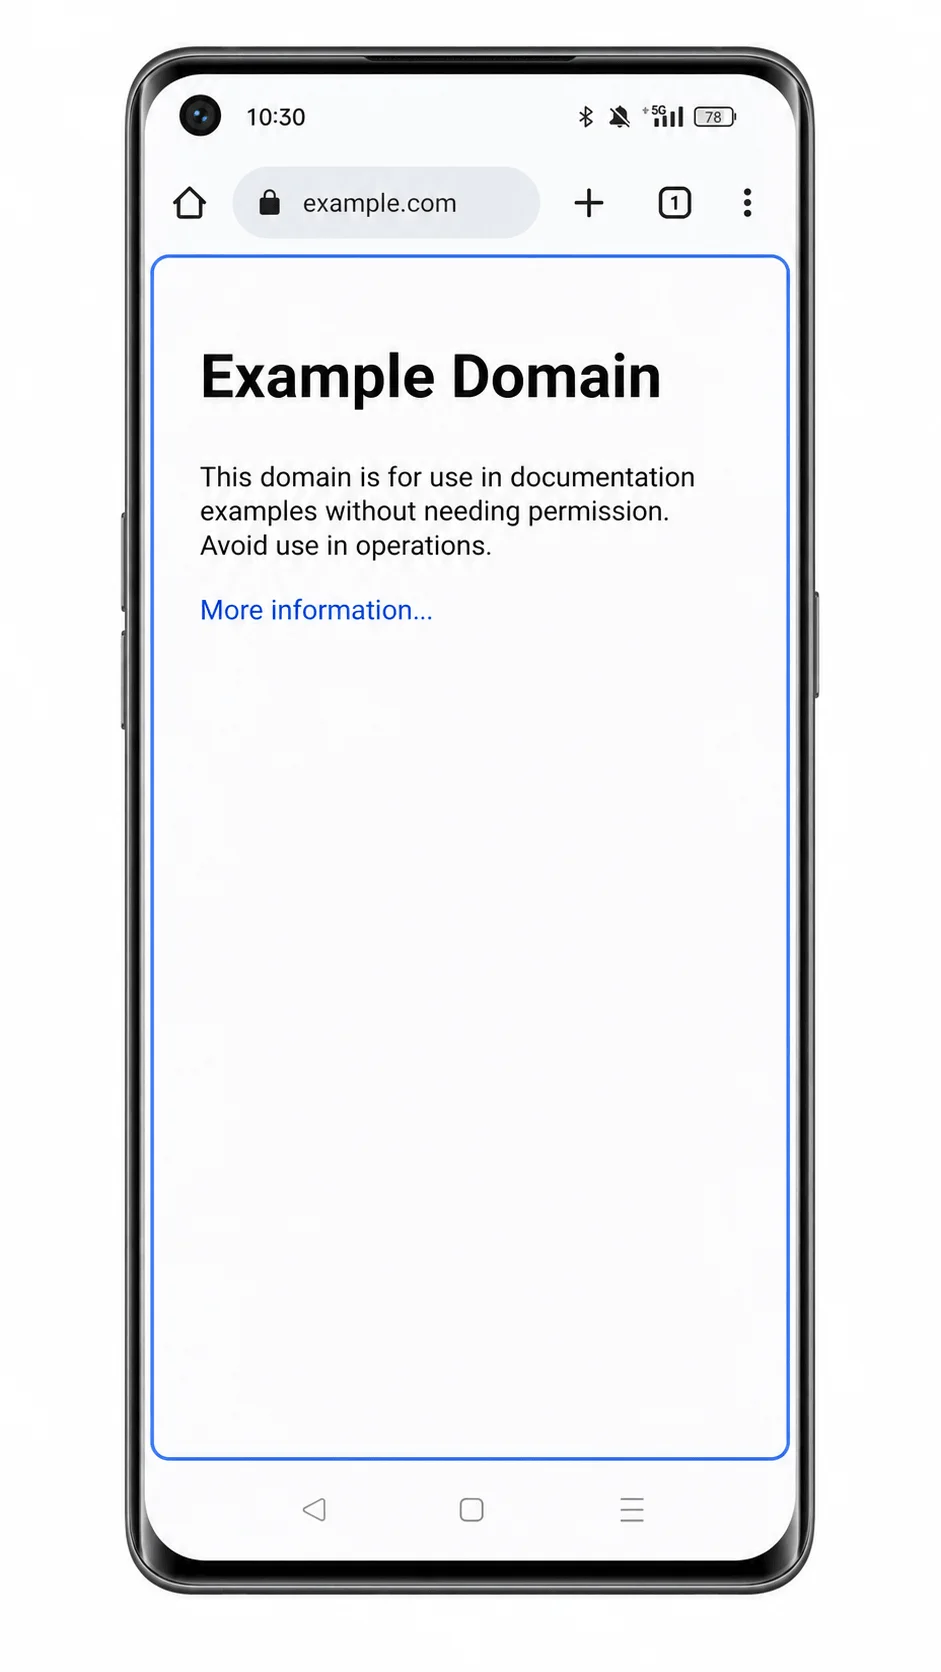
Test mobile data only if your iRoamly plan is active and you are ready to use it.
Open a webpage or map app with Wi-Fi off. Do not use SMS or voice-call tests unless your specific iRoamly plan says those services are included.
Configure eSIM for Mobile Data
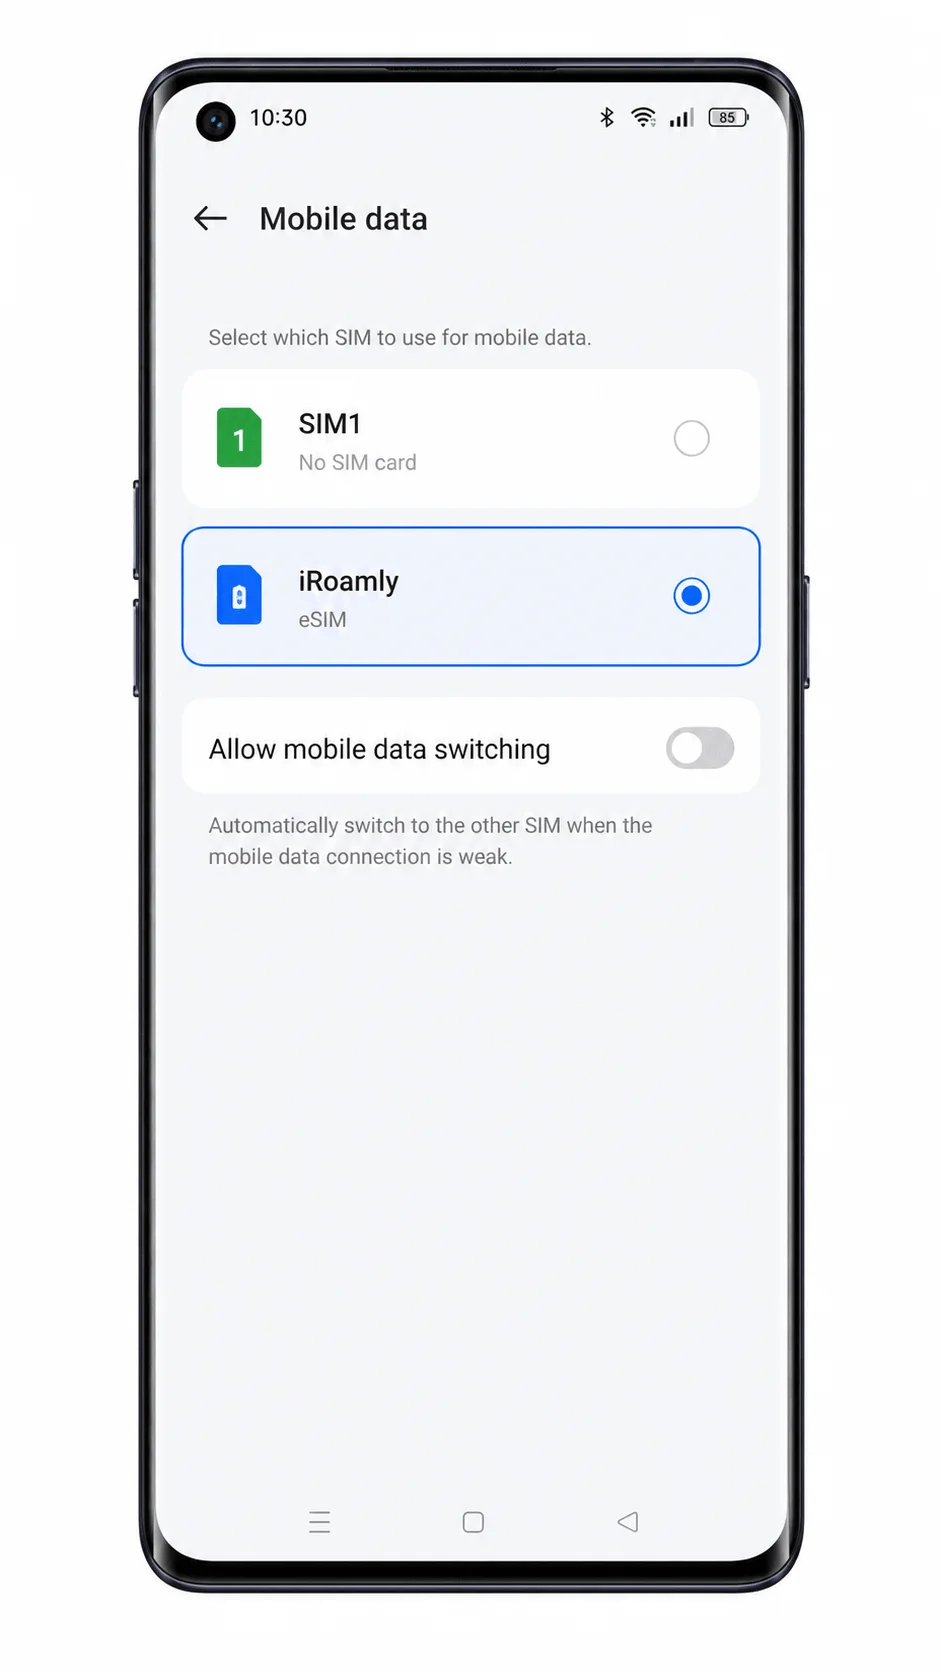
Open Settings > Mobile network, then tap Mobile data.
The mobile data selection screen should show available SIM and eSIM lines.
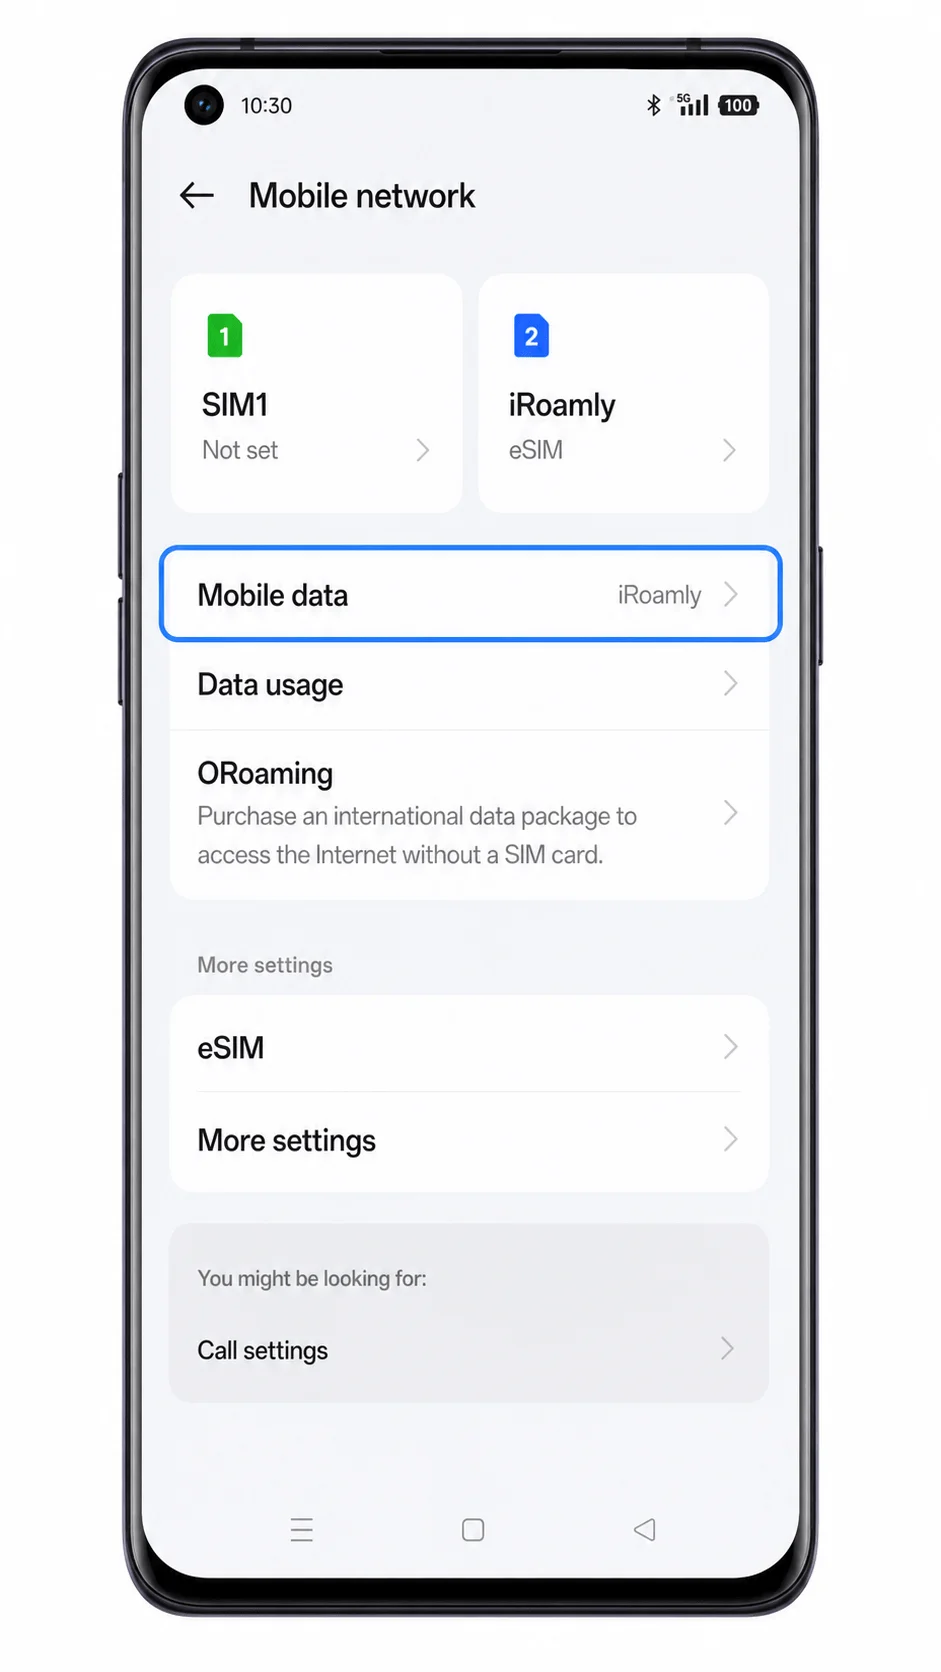
Select the iRoamly eSIM as the preferred mobile data line.
This tells the Oppo Reno 6 Pro 5G to use the iRoamly travel eSIM for internet access instead of your primary SIM.
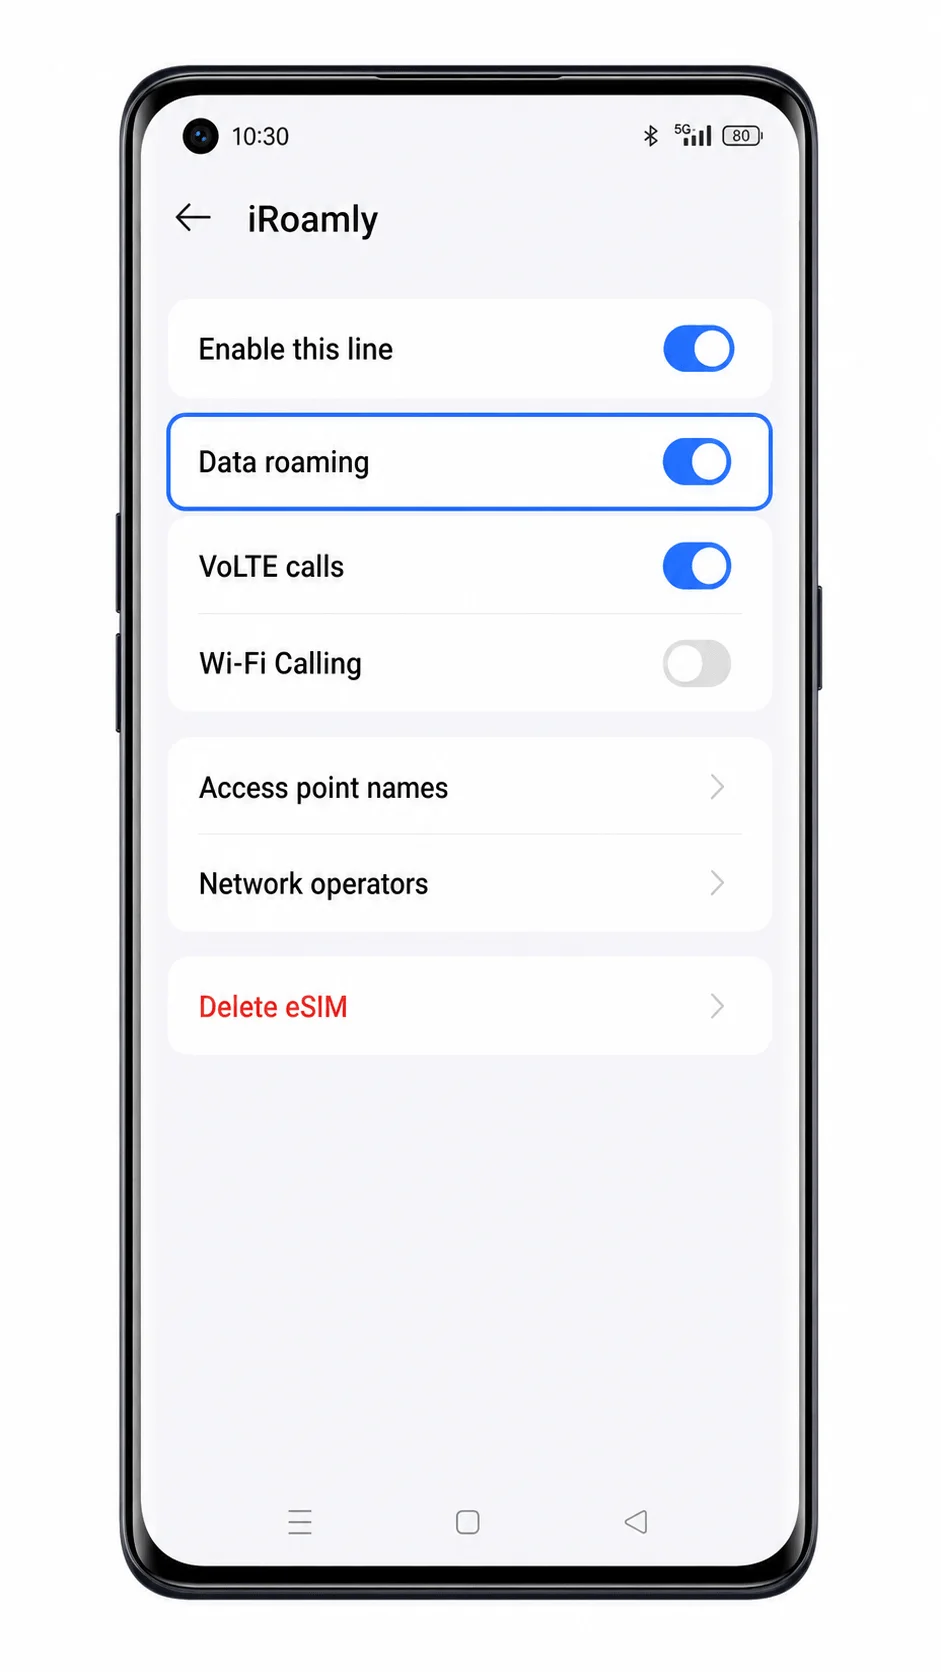
Open the iRoamly eSIM details page and turn on Data roaming if your destination plan requires roaming.
Many travel eSIMs need data roaming enabled to connect through partner networks. Leave roaming off for your primary SIM if you want to avoid unexpected charges.
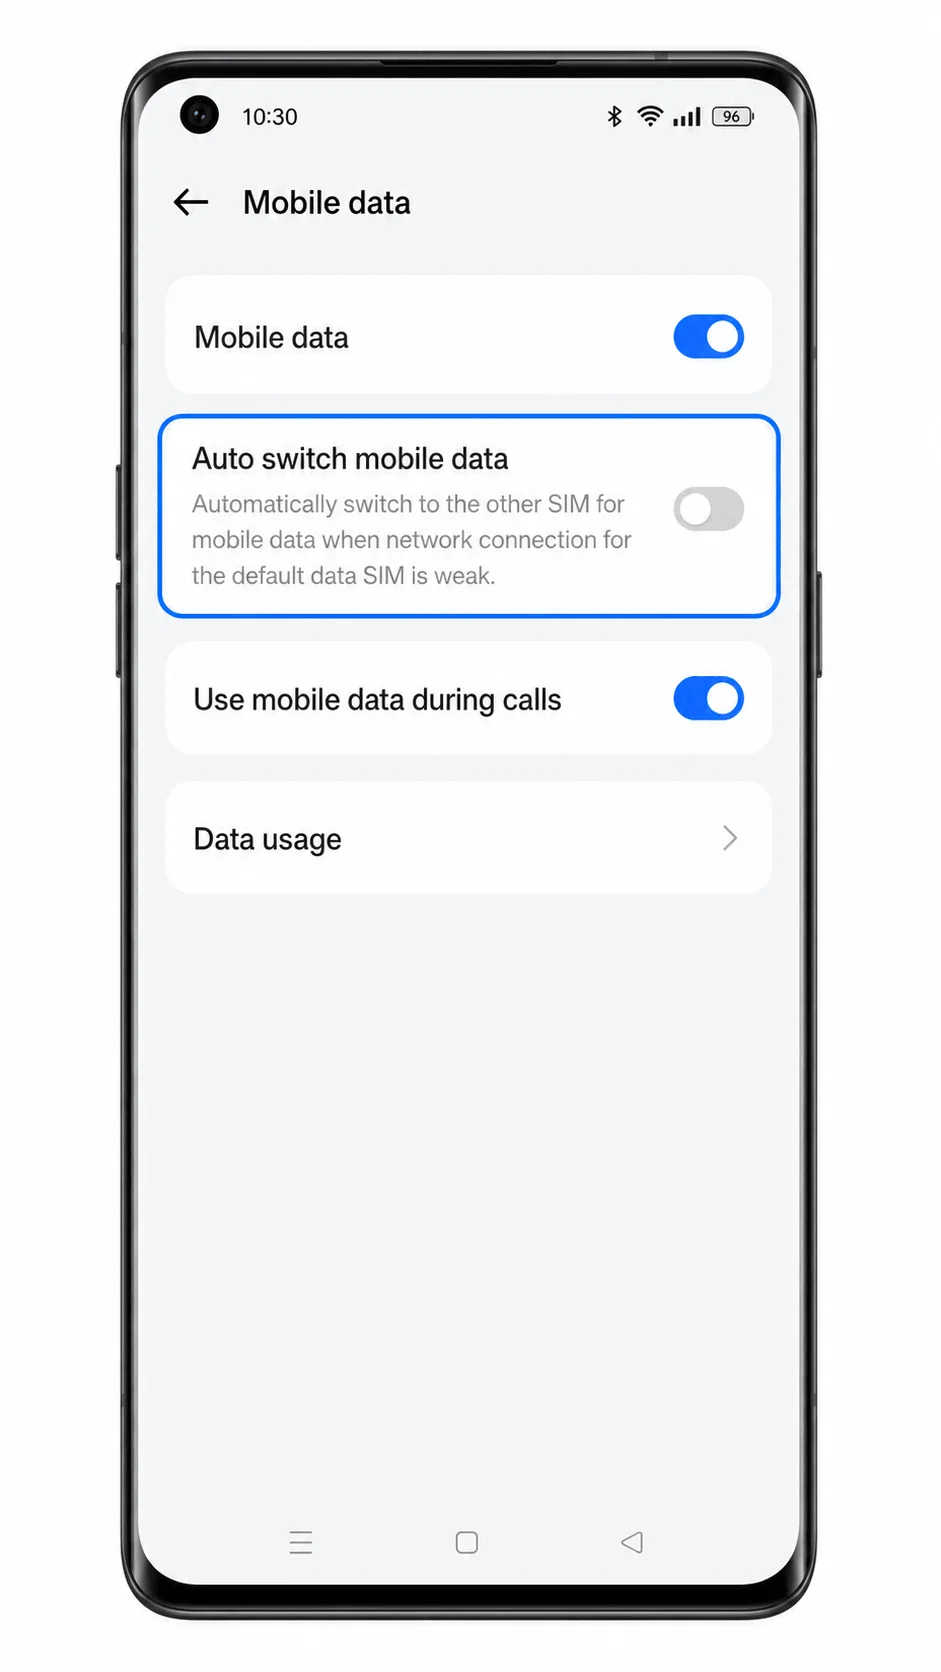
Turn off automatic mobile data switching if ColorOS offers that option.
This helps prevent the phone from switching back to your primary SIM for data while you are traveling.
Troubleshooting
eSIM or Add eSIM is missing: Your Oppo Reno 6 Pro 5G may be a region or carrier variant without eSIM support. iRoamly notes that OPPO eSIM availability is limited to Japan and certain regions.
The QR code will not scan: Increase screen brightness on the device showing the QR code, clean the camera lens, and make sure the full QR code is visible. Use manual entry if scanning still fails.
The activation code is rejected: Check the SM-DP+ Address, Activation Code, and optional Confirmation Code carefully. A QR code or activation code that has already been used may not work again.
The eSIM installs but shows no signal: Restart the phone, confirm the iRoamly line is on, and wait until you are in a destination covered by the plan.
Mobile data does not work: Select the iRoamly eSIM for Mobile data, enable Data roaming when required, and turn Wi-Fi off for a short test.
The phone asks to delete and reinstall the eSIM: Do not delete it casually. Contact iRoamly support first because many eSIM profiles cannot be reinstalled after removal.
Calls or SMS do not work: Check your iRoamly plan details. Do not assume voice or SMS is included.
More Oppo eSIM Setup Guides
Using another Oppo phone? These eSIM setup and activation guides may help.
Conclusion
For an eSIM-enabled regional Oppo Reno 6 Pro 5G, scanning the iRoamly QR code is the fastest route because ColorOS can move from Mobile network to eSIM and Add eSIM with fewer manual fields.
Manual entry is still useful when the QR code is on the same phone or the camera cannot read it, but the SM-DP+ Address and Activation Code must match the iRoamly details exactly.
Once the iRoamly profile appears under Settings > Mobile network > eSIM, finish the travel setup by choosing it for Mobile data and enabling Data roaming when the plan requires it.
If your Reno 6 Pro 5G does not show an eSIM menu at all, that is a compatibility limit of the phone variant or carrier firmware, not an iRoamly setup step you can bypass.