
The Oppo Find X8 Pro is a ColorOS 15 phone based on Android 15, and the global model is listed with eSIM support in current compatibility references. Because Oppo eSIM availability can vary by region, carrier, and model variant, confirm that your Find X8 Pro shows an eSIM option before travel.
For travelers, an iRoamly travel eSIM lets you prepare mobile data before landing without swapping your physical SIM. The easiest setup is scanning the QR code from your iRoamly order, but manual entry is useful when the QR code is on the same phone, the camera cannot scan it, or you prefer to copy the activation details.
This guide uses the ColorOS path Settings > Mobile network > eSIM > Add eSIM, then covers QR installation, manual installation with SM-DP+ Address and Activation Code, confirmation, mobile data settings, and common troubleshooting. Menu names may vary slightly by ColorOS version or regional firmware.

Travel with Mobile Data from iRoamly
iRoamly is a travel eSIM service that provides mobile data plans for destinations around the world. Travelers can choose local, regional, and global options, with data allowances, validity periods, and plan features varying by destination.
Once installed, travel data can support maps, messaging, translations, bookings, and other everyday apps while abroad.
On a compatible Oppo Find X8 Pro, the iRoamly eSIM can be added through ColorOS with either a QR code or manual activation details. The guide below keeps the focus on the Find X8 Pro setup path, then shows how to confirm the profile and choose it for mobile data.
Before You Set Up Your iRoamly eSIM
Connect the Oppo Find X8 Pro to stable Wi-Fi before downloading the eSIM profile.
Make sure the phone is unlocked and that your regional model supports eSIM. Oppo eSIM support can vary by market and carrier.
Keep your iRoamly QR code, SM-DP+ Address, and Activation Code available from your order email or iRoamly account.
Heading to Japan or the United States? Preparing the travel eSIM before departure can leave less to set up when you arrive.
Install the eSIM 1-2 days before travel when possible, but avoid turning on travel data roaming until you need it.
Do not delete the iRoamly eSIM after installation unless iRoamly support tells you to. Many eSIM profiles cannot be reinstalled after removal.
iRoamly plan validity starts from activation. For travel plans, check the current plan details for the exact activation trigger before installing or connecting abroad.
iRoamly eSIM plans may not include voice calls or SMS. Voice and SMS availability varies by plan, so check the plan page before relying on those services.
Method 1: Install eSIM by Scanning a QR Code
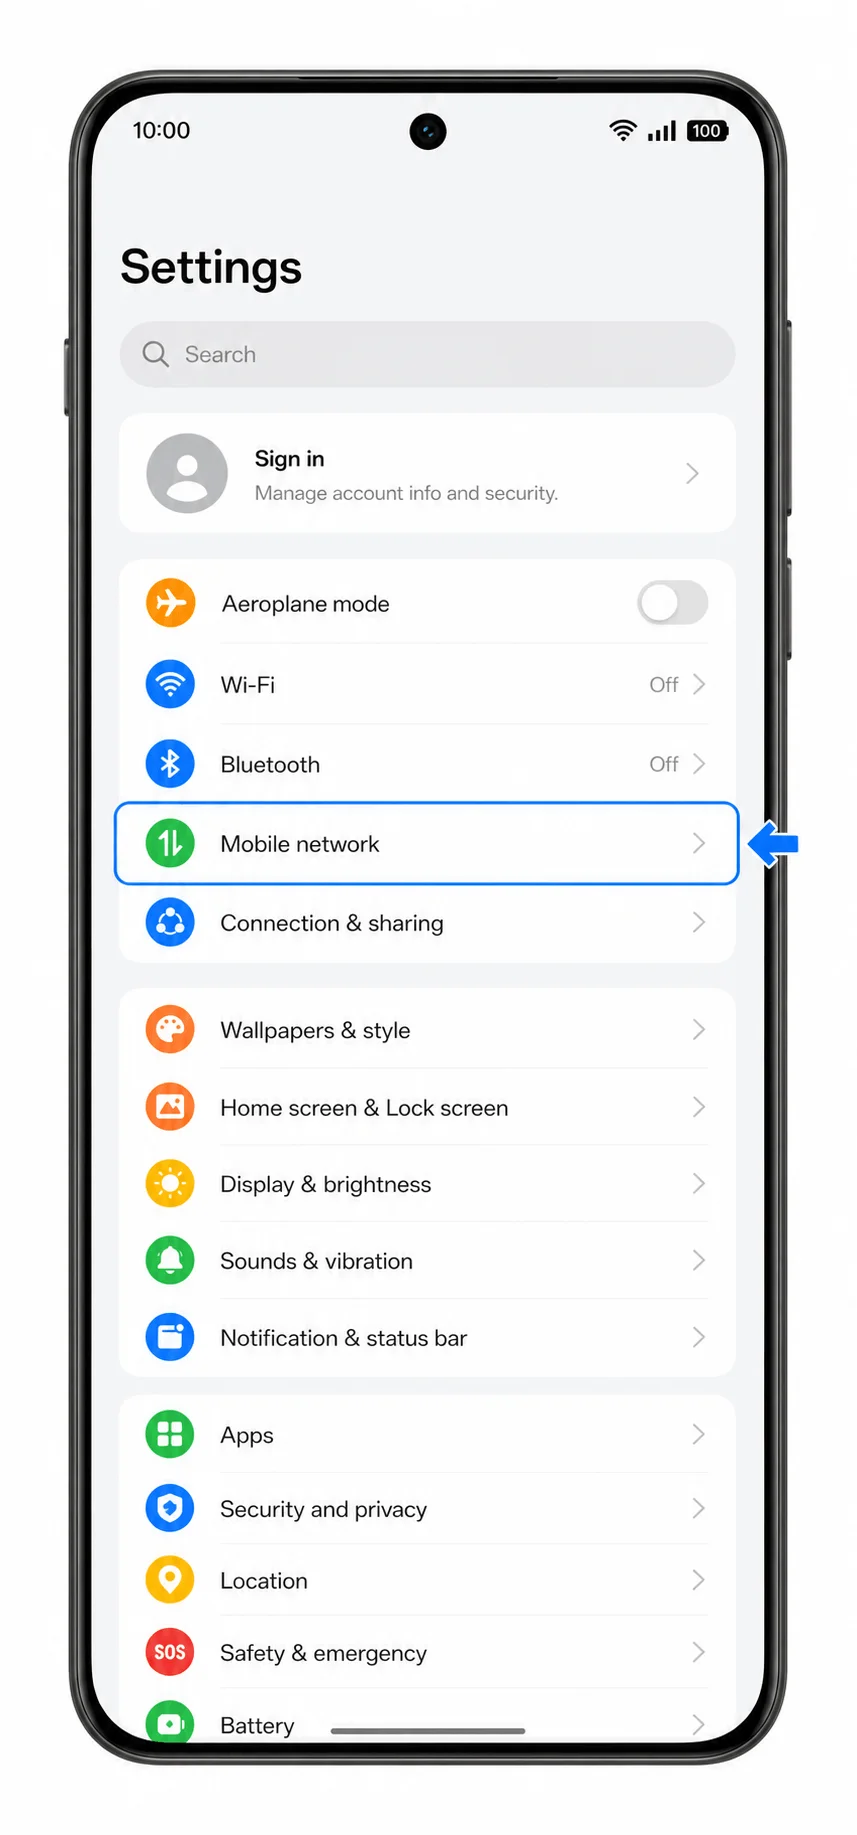
1. Open Settings on the Oppo Find X8 Pro and tap Mobile network.
You should see the ColorOS mobile network page where SIM and eSIM settings are managed.
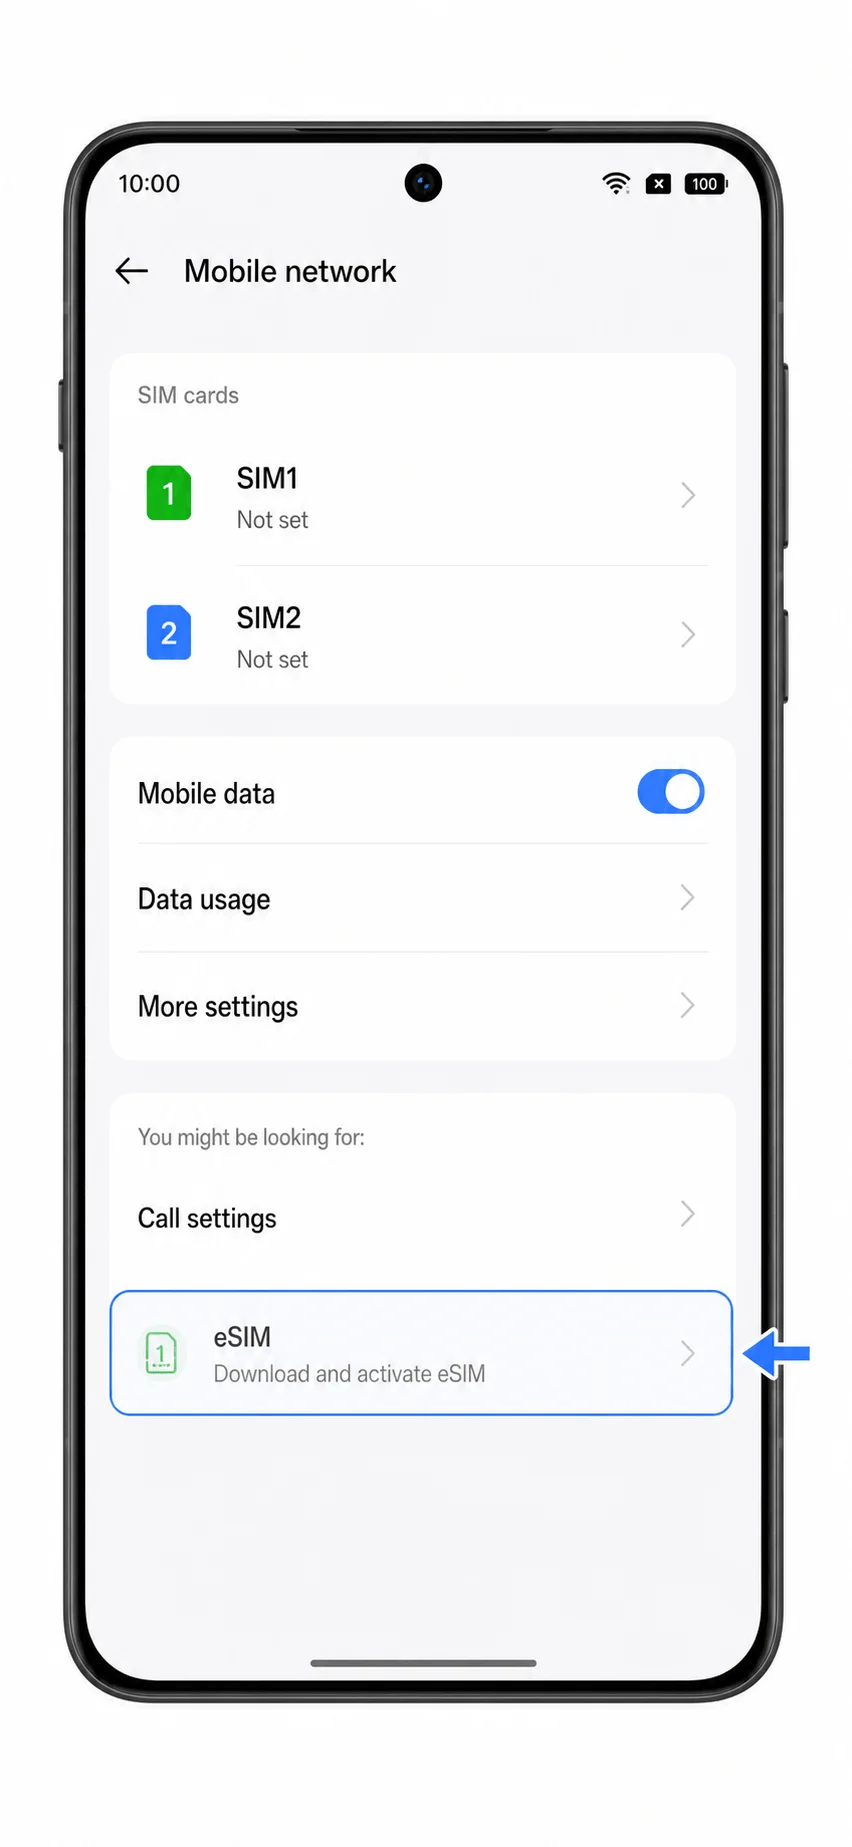
2. Tap eSIM.
The phone should open the eSIM management page. If eSIM is missing, check the troubleshooting section before continuing.
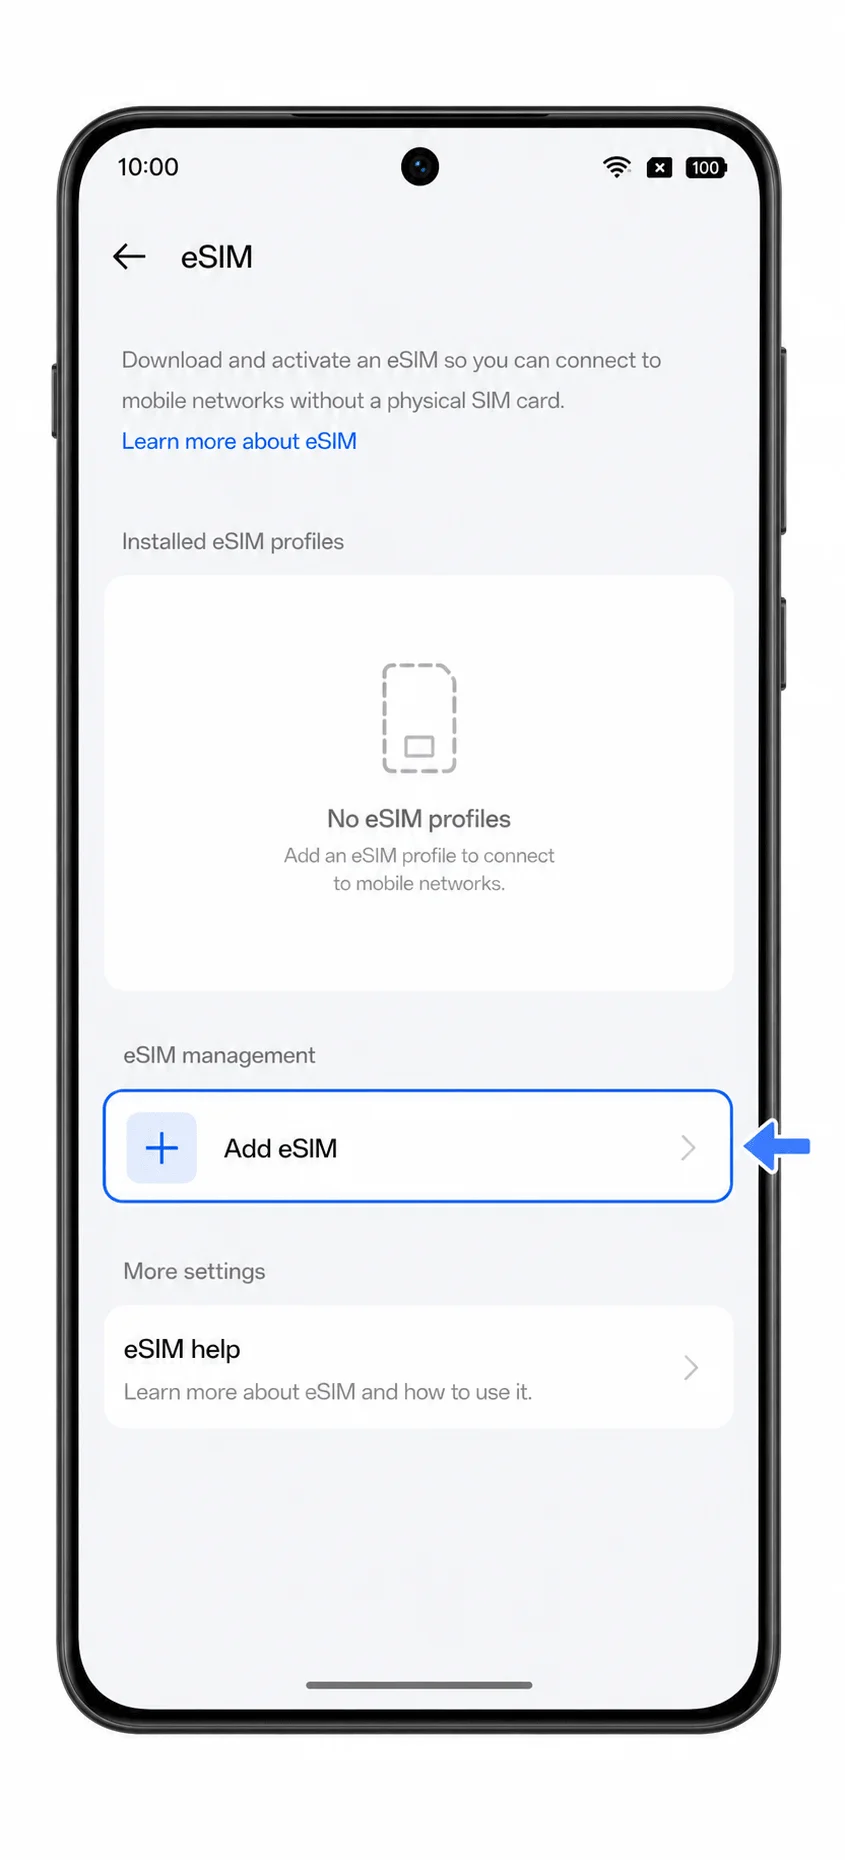
3. Tap Add eSIM.
ColorOS should open the add eSIM flow and prepare the QR scanner.
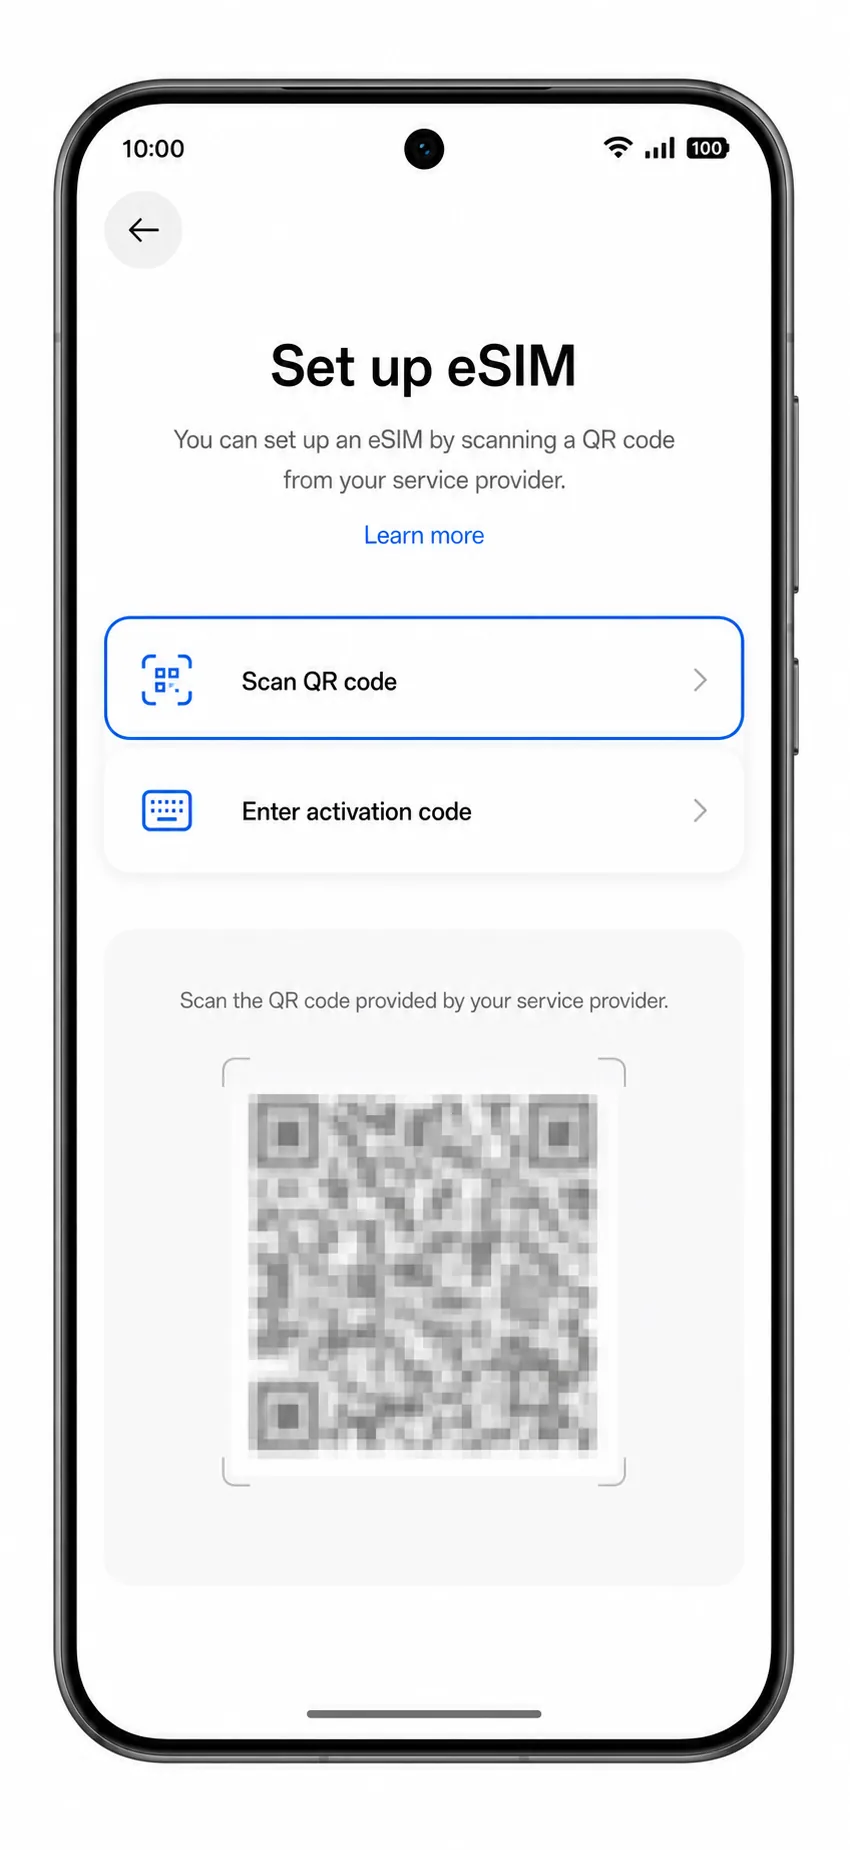
4. Choose Scan QR code if the phone asks for a setup method, then scan the iRoamly QR code from another screen or printed copy.
Keep the QR code flat and fully visible. Do not scan a QR code that has already been used on another device.
5. Tap Download or Add when the iRoamly eSIM profile is found.
Wait on Wi-Fi while ColorOS downloads the eSIM profile. Do not close Settings during the download.
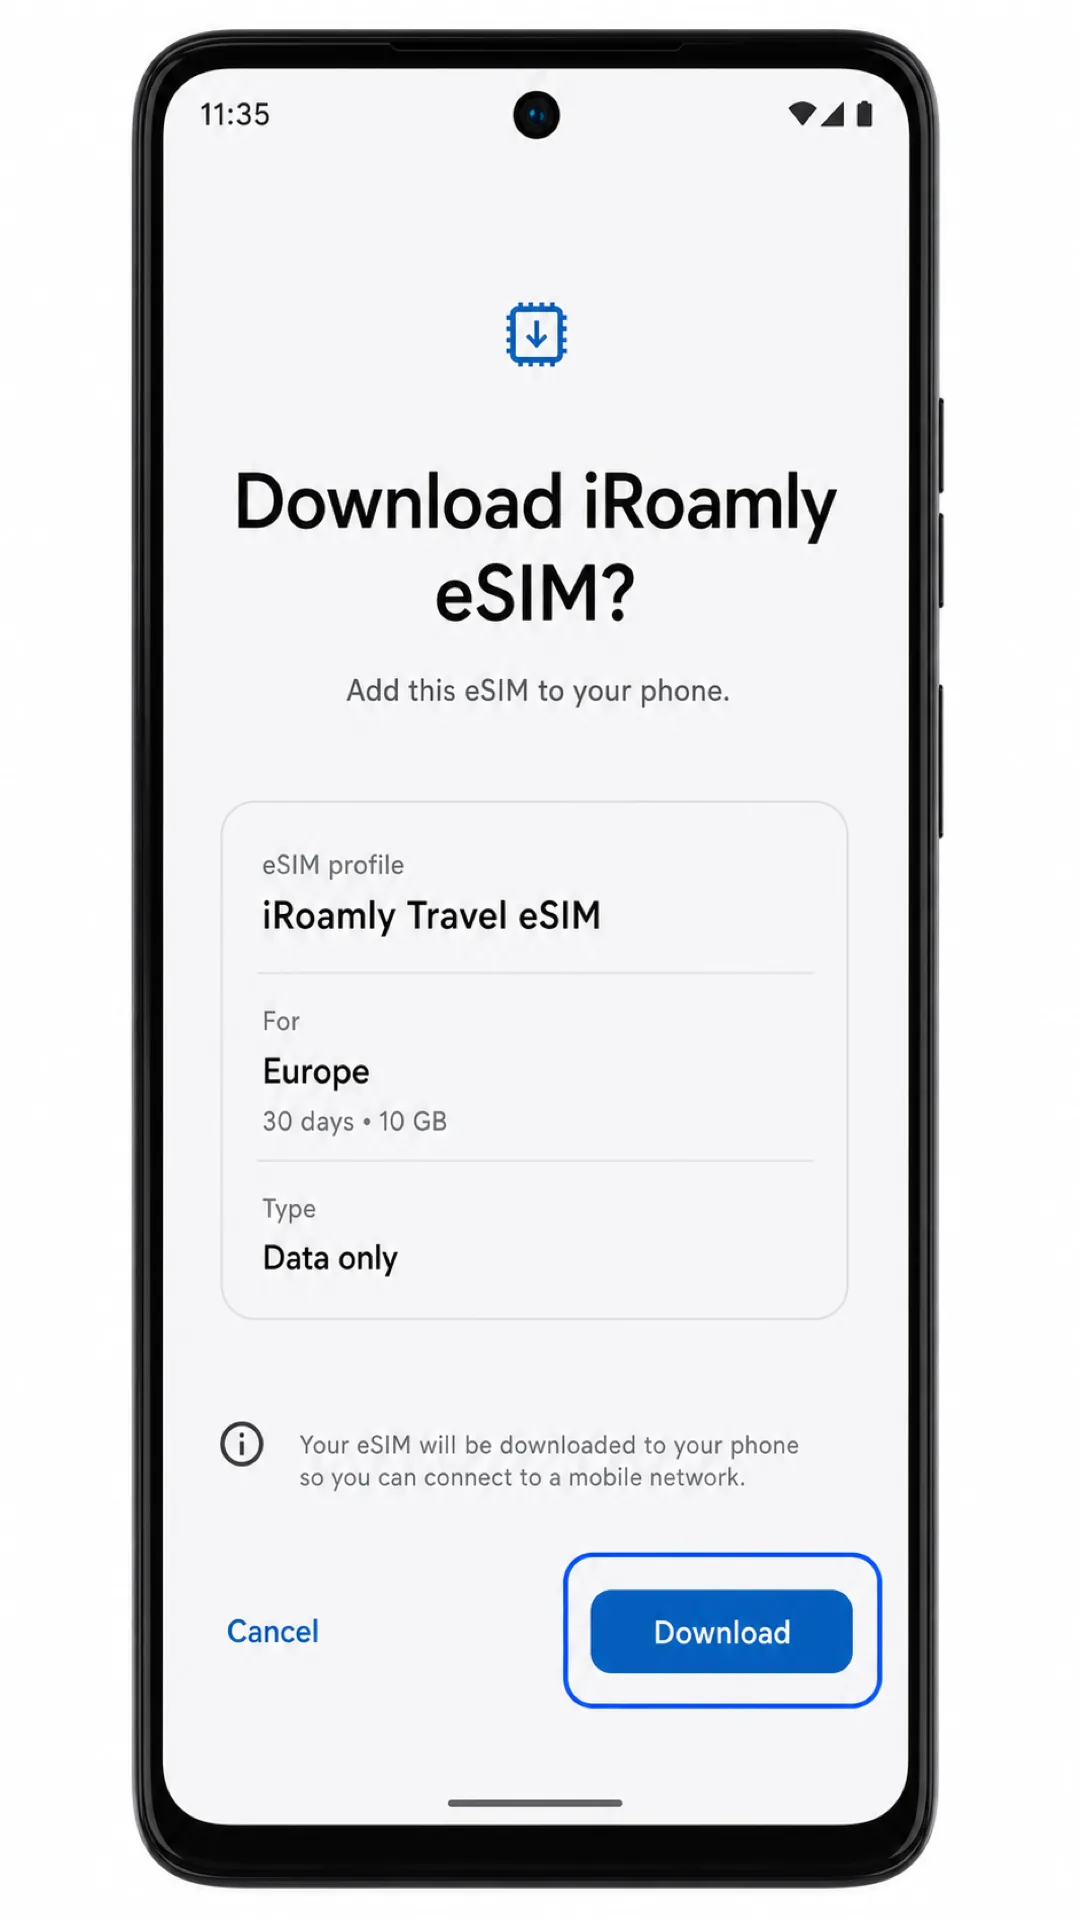
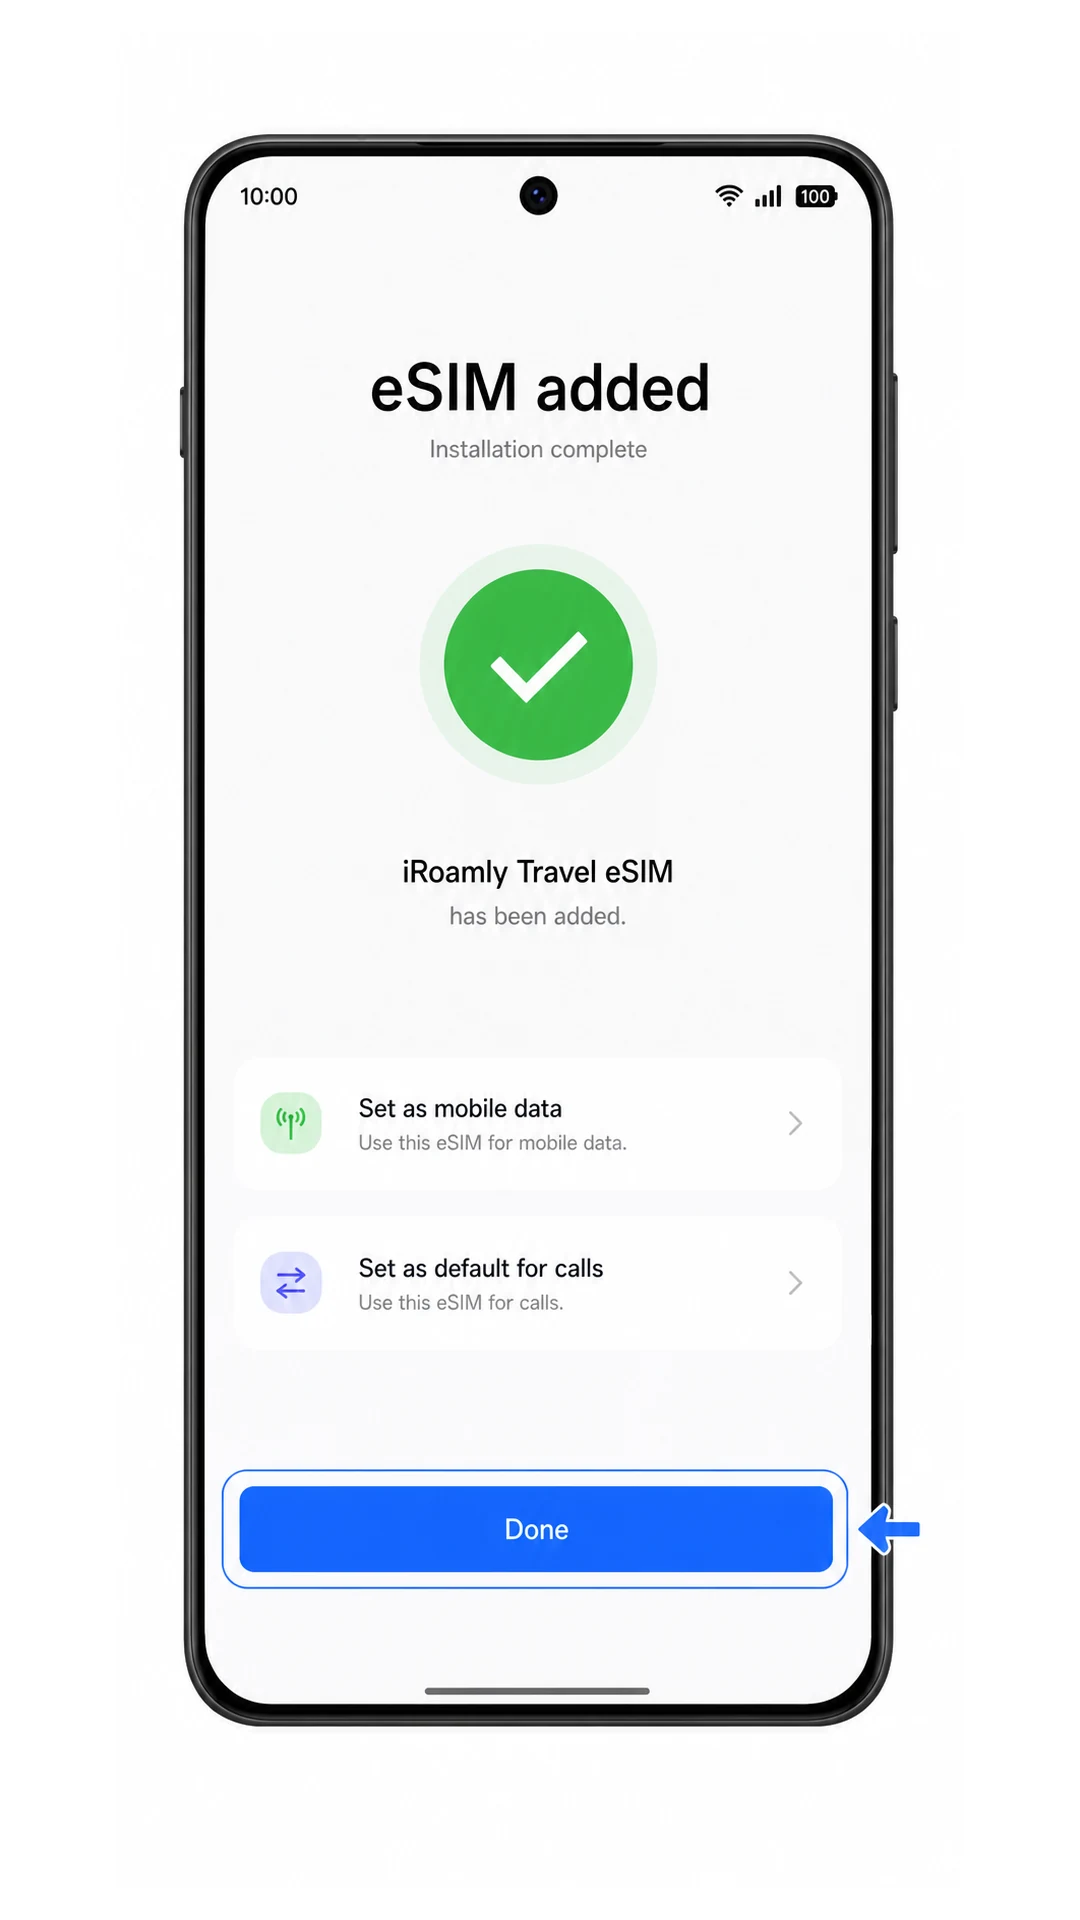
6. Tap Done when the installation finishes.
The iRoamly eSIM should now appear in the phone's eSIM list, although it may remain inactive until you enable it or reach the supported destination network.
Method 2: Install eSIM Manually
1. Open Settings on the Oppo Find X8 Pro and tap Mobile network.
This is the same entry point used for QR setup.
2. Tap eSIM.
The eSIM page is where ColorOS stores downloaded eSIM profiles.
3. Tap Add eSIM.
ColorOS should open the same add eSIM setup flow.
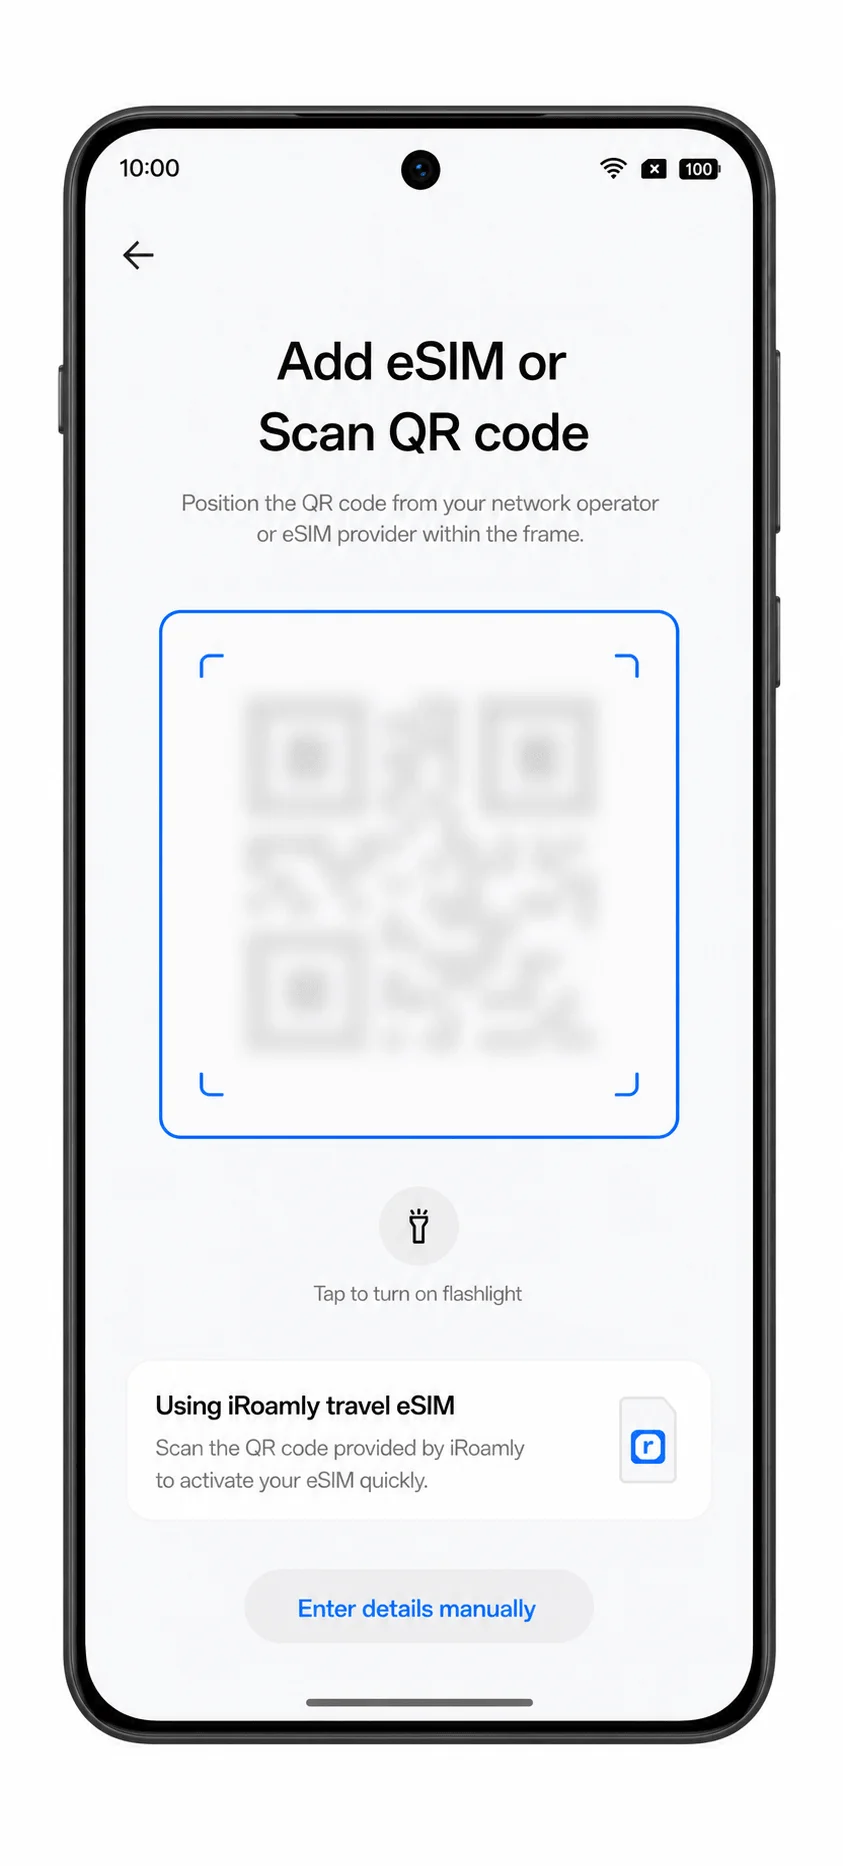
4. Tap Enter details manually or Enter manually on the QR scanning screen.
Use this option when you cannot scan the QR code or when the QR code is displayed on the same phone.
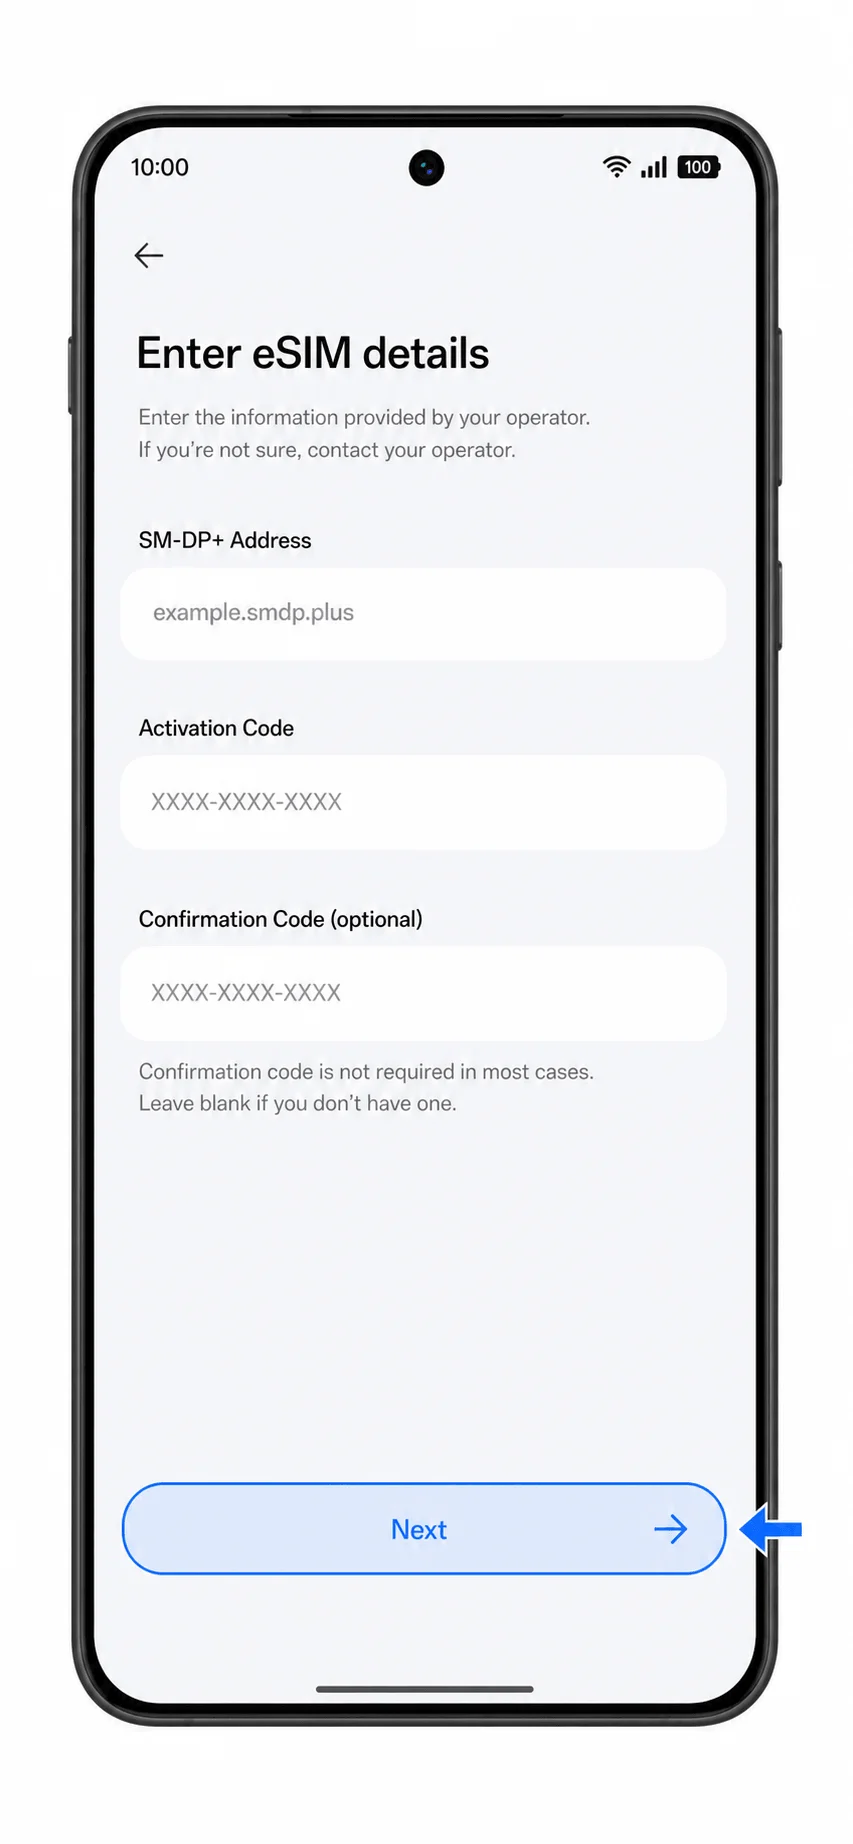
5. Enter the SM-DP+ Address and Activation Code from iRoamly, then tap Next.
If iRoamly provides a confirmation code, enter it only when ColorOS shows a matching optional field. Do not add spaces or extra characters.
6. Tap Download or Add when ColorOS finds the iRoamly eSIM profile.
Keep the phone connected to Wi-Fi until the download completes.
7. Tap Done when the manual installation finishes.
The iRoamly profile should now be saved on the Oppo Find X8 Pro.
How to Confirm Your iRoamly eSIM Is Installed
1. Go to Settings > Mobile network > eSIM.
Look for the newly added iRoamly eSIM profile in the eSIM list. It may show as a travel carrier name, the destination network, or a label you set during installation.
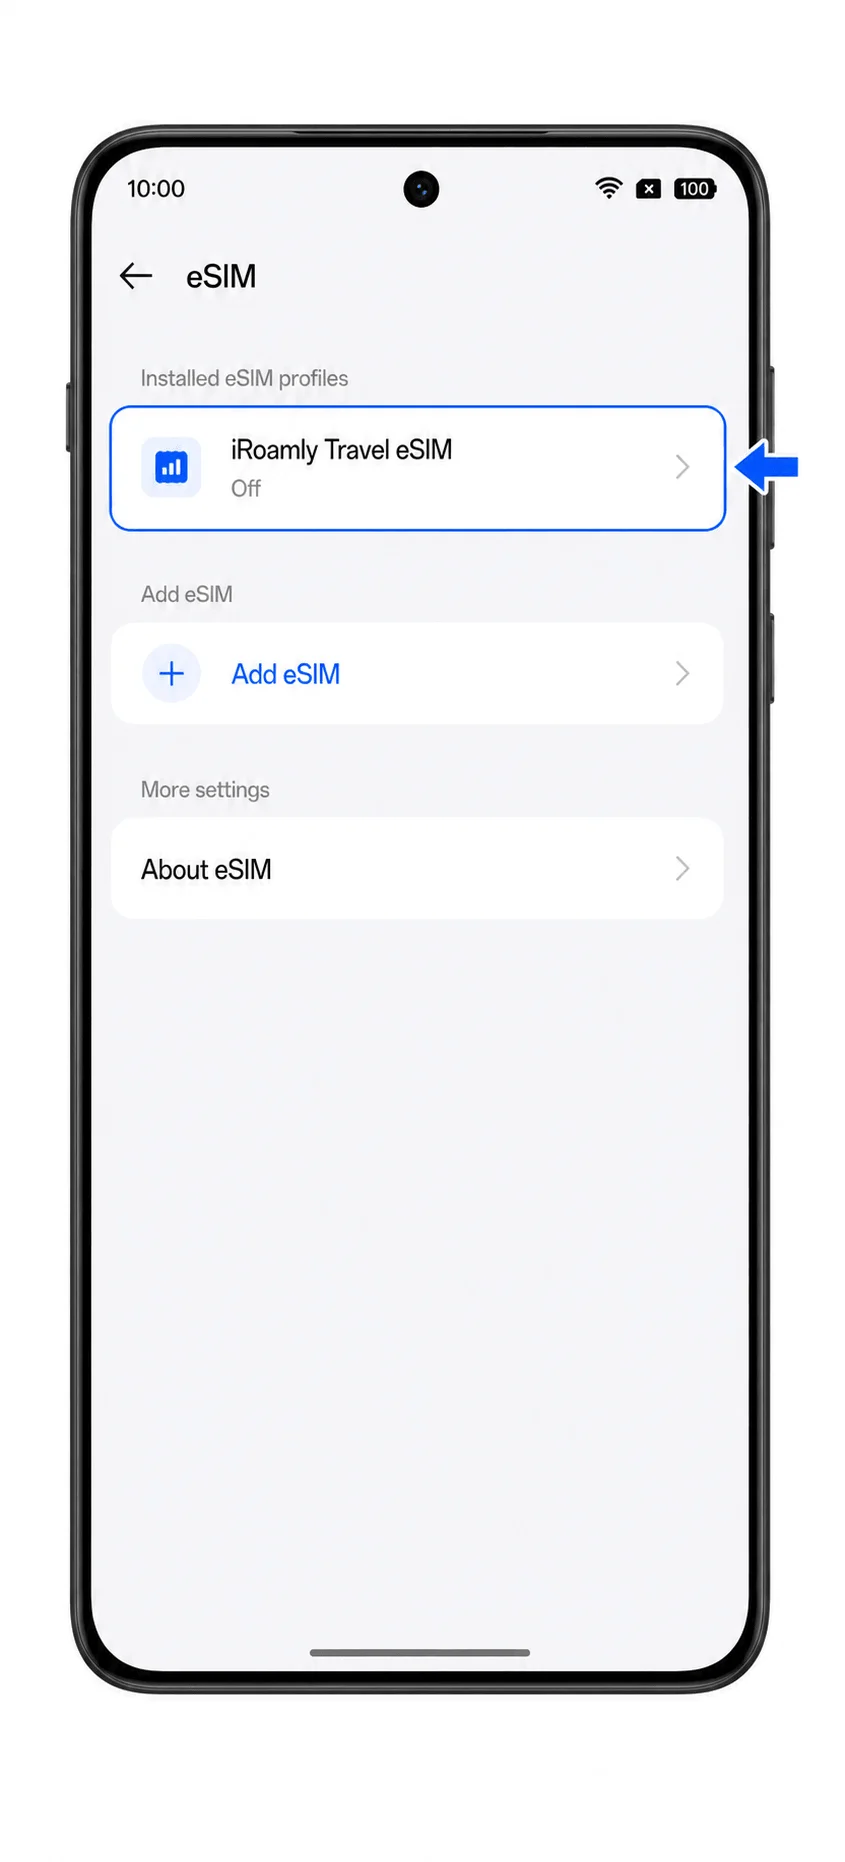
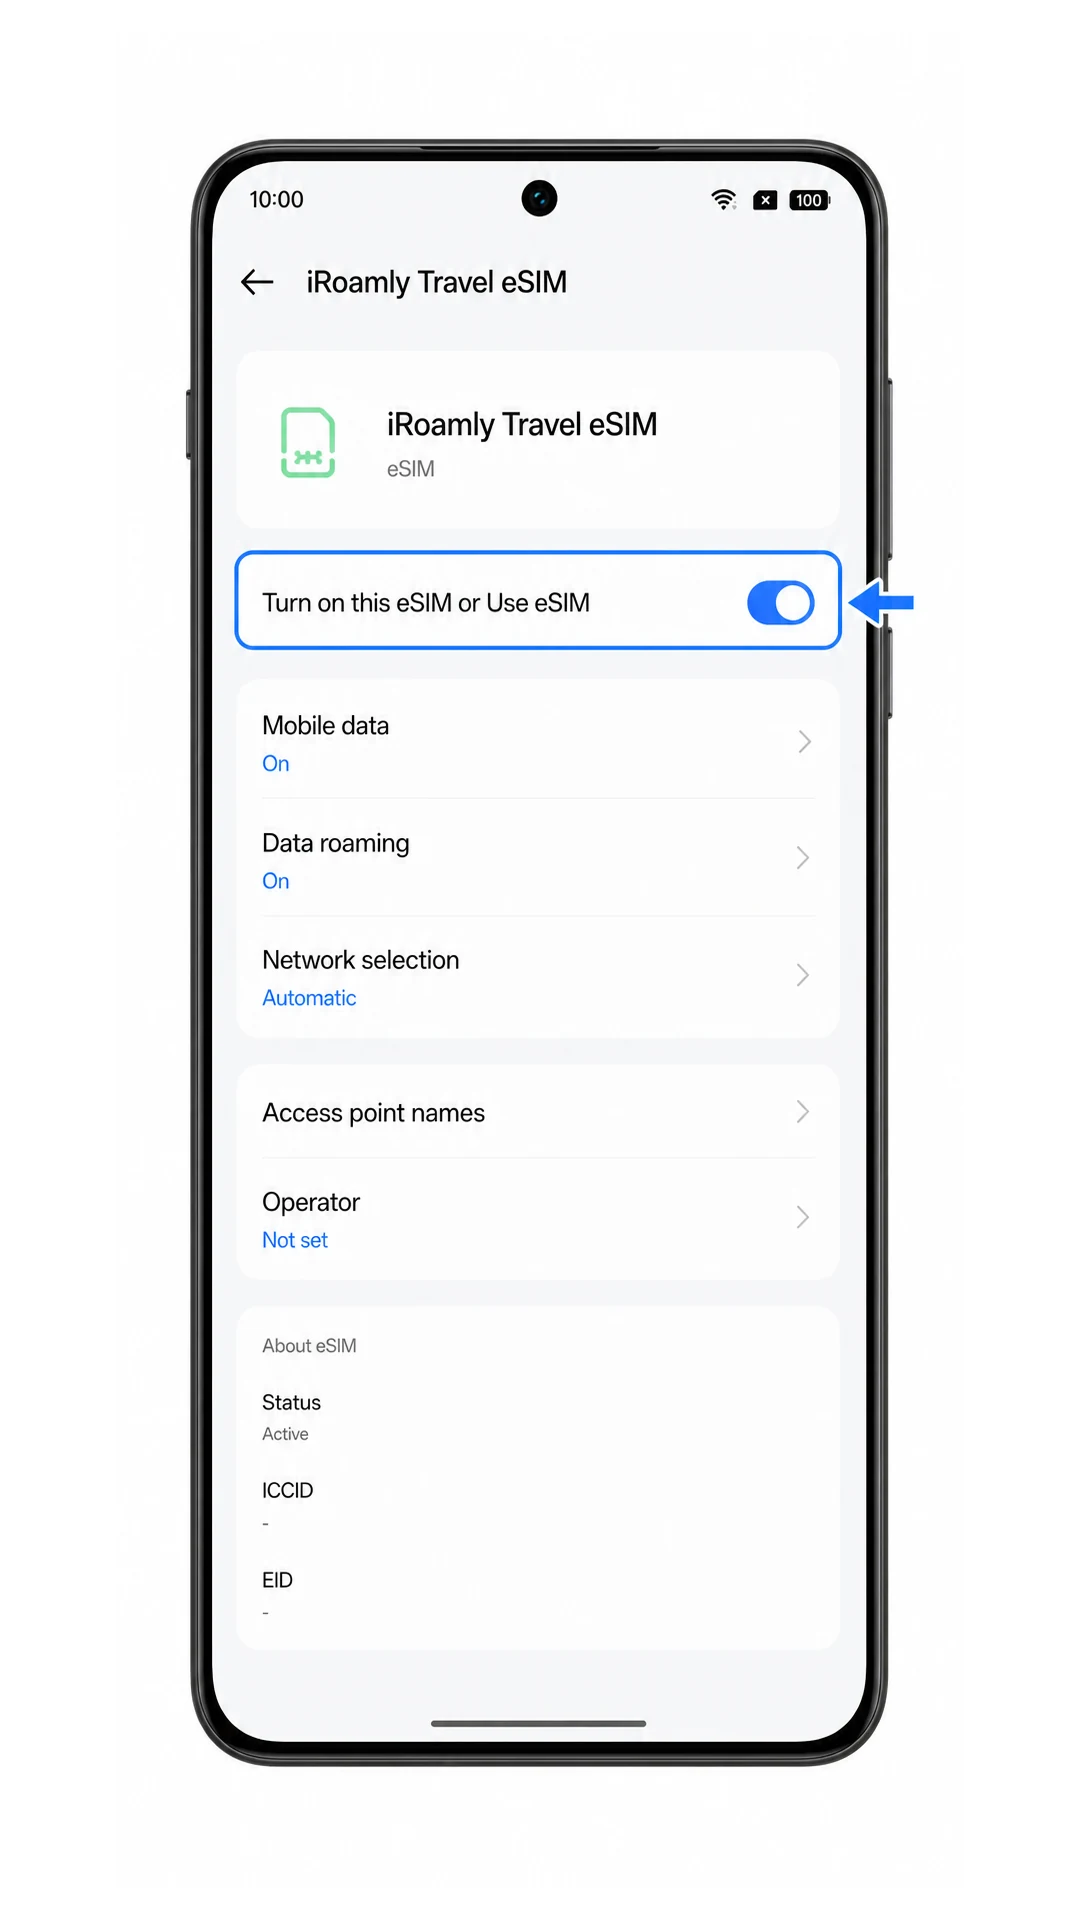
2. Tap the installed iRoamly eSIM profile and check that the line can be switched on.
The profile details page should show a line switch and data options. If the switch is off, turn it on when you are ready to use the plan.
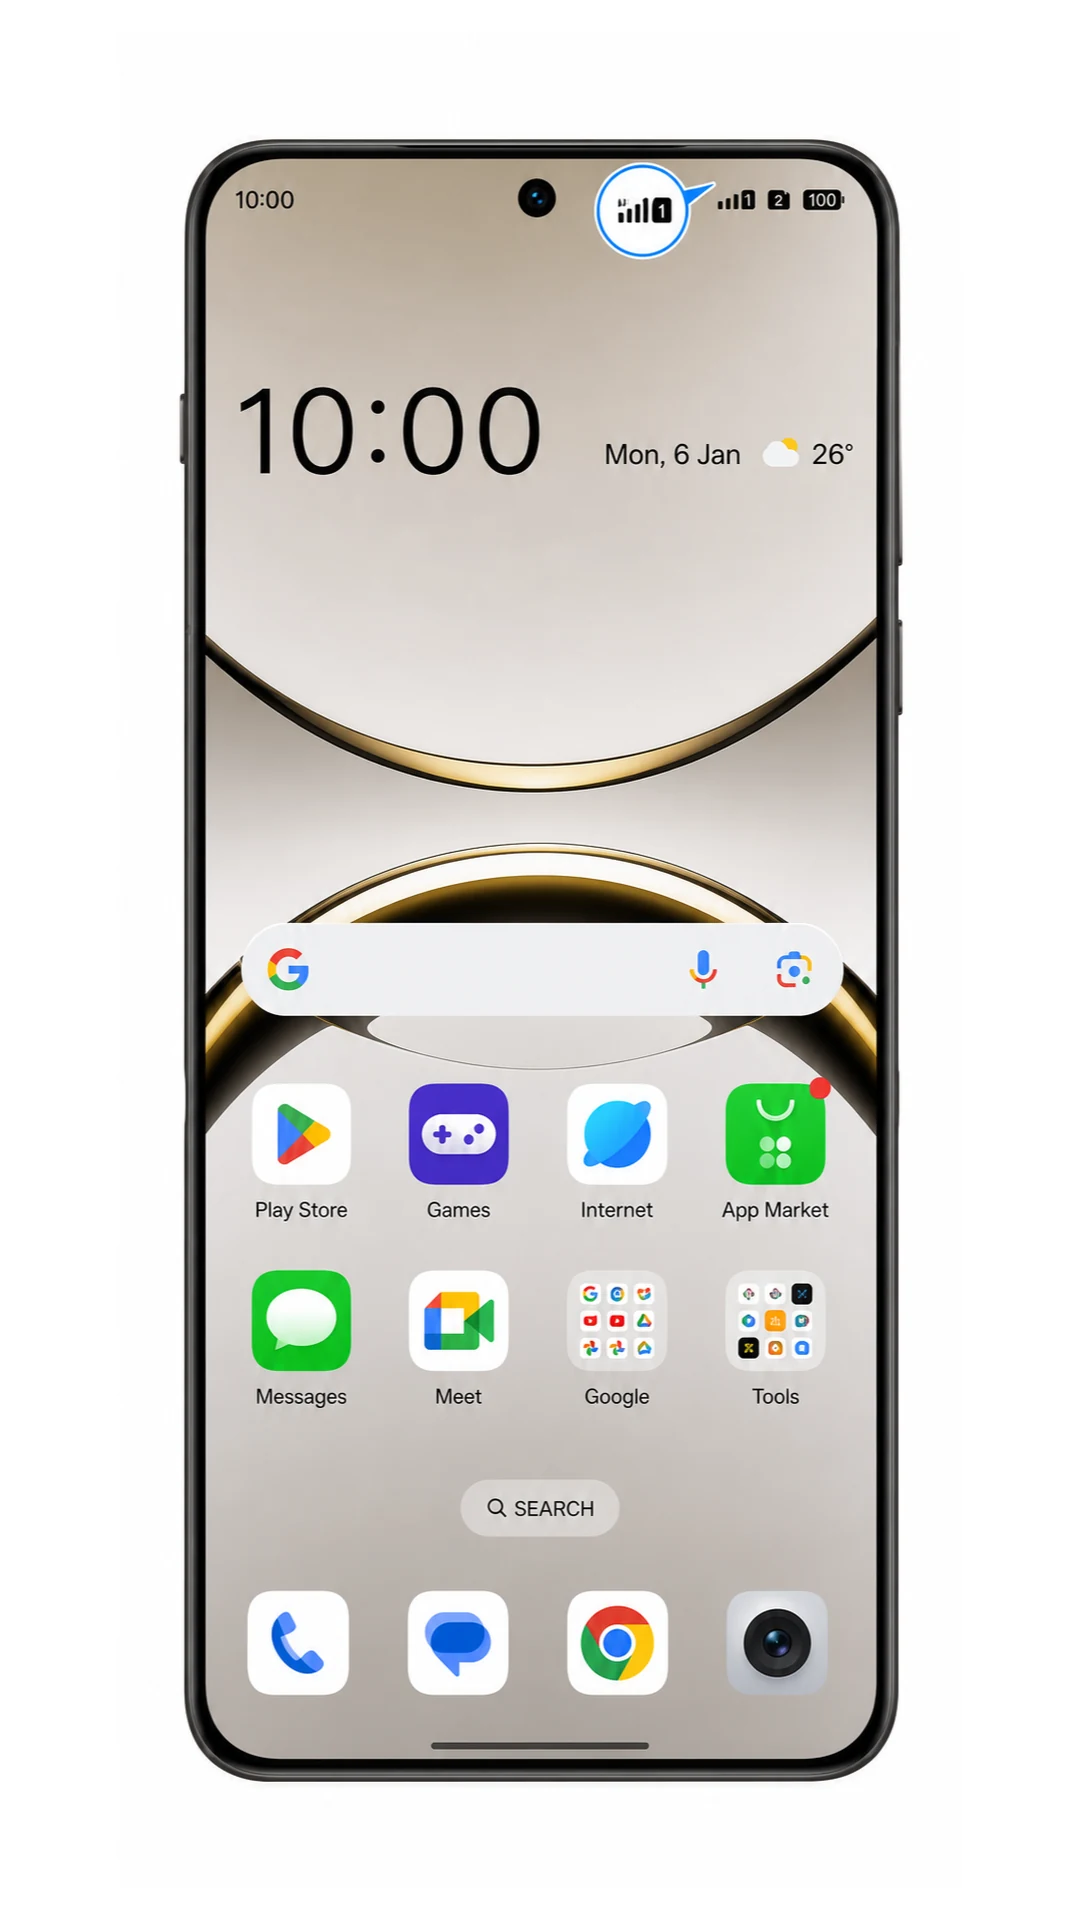
3. Check the status bar or quick settings after the line is on.
When the destination network is available, the phone should show a mobile signal indicator for the iRoamly eSIM. If you are still outside the destination, the profile may stay pending or have no service until arrival.
Configure eSIM for Mobile Data
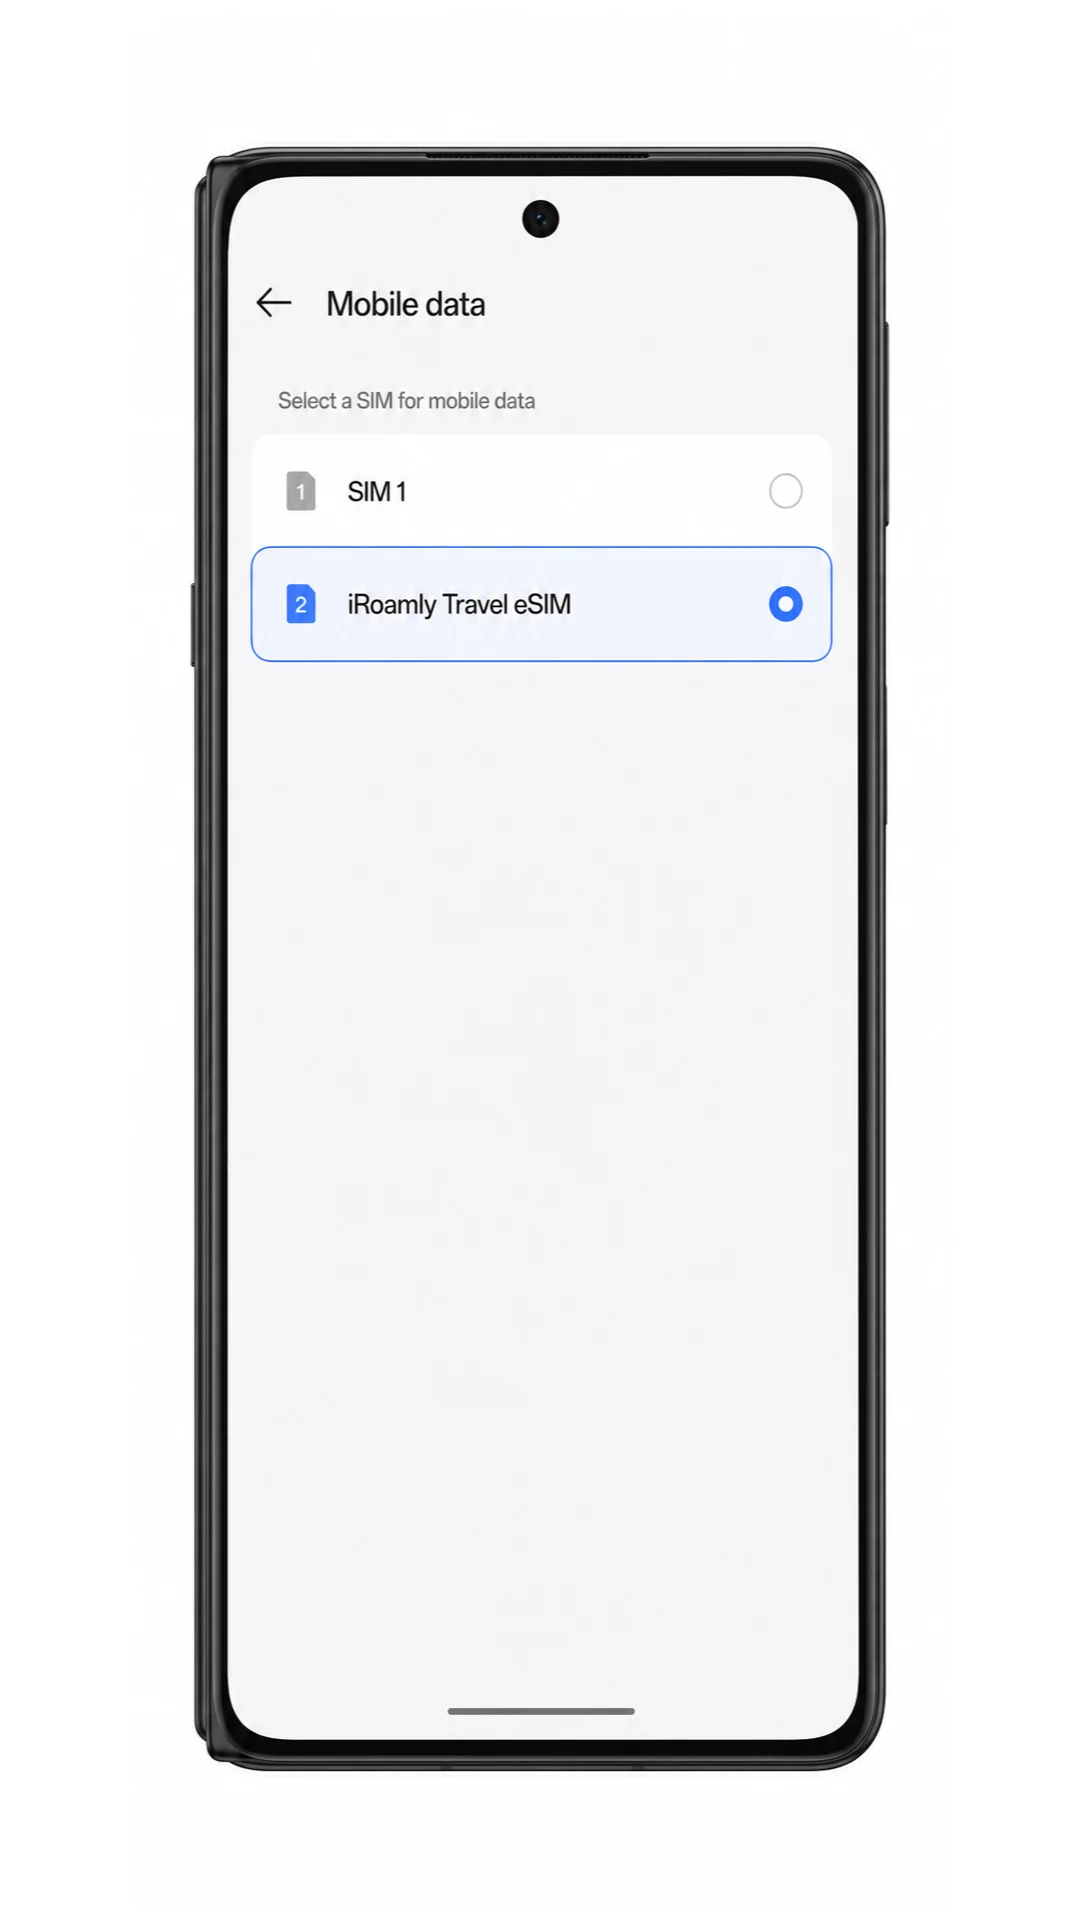
1. Open Settings > Mobile network and tap Mobile data.
This page controls which SIM or eSIM the Oppo Find X8 Pro uses for internet access.
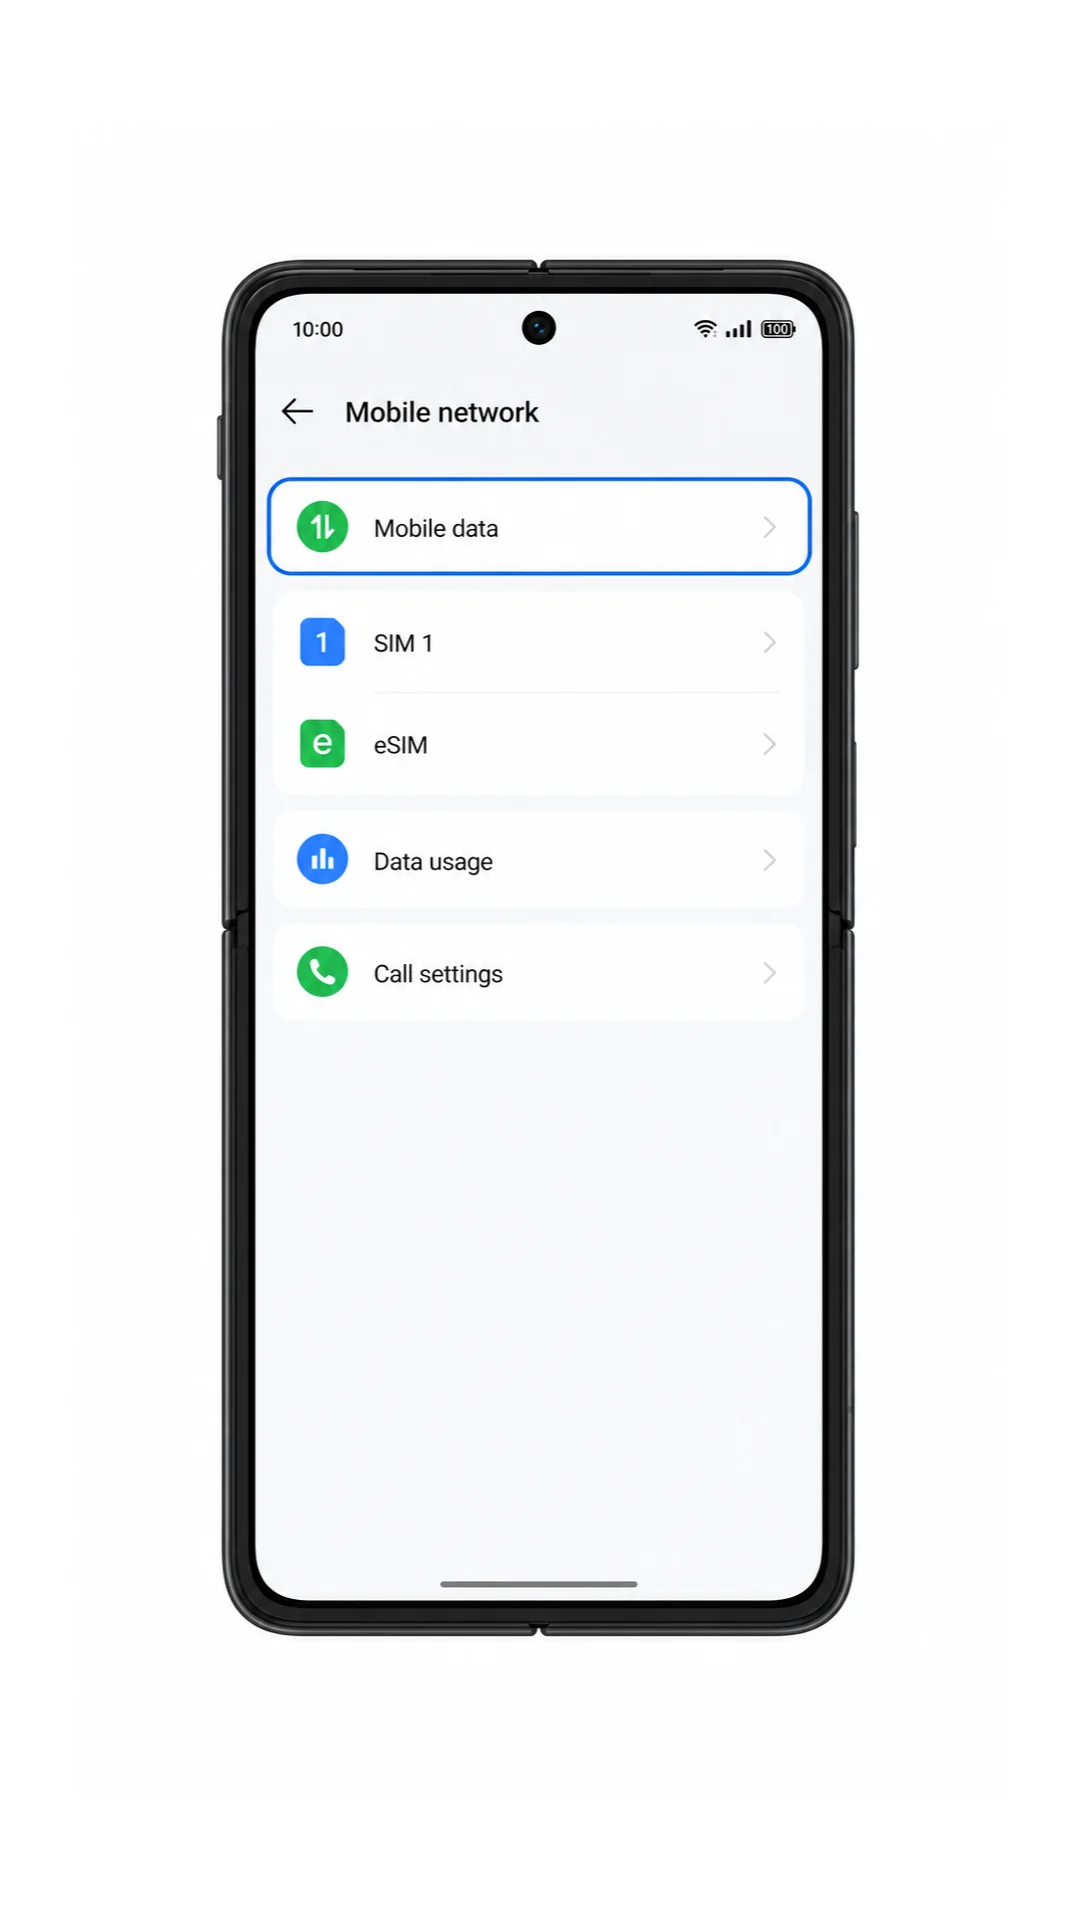
2. Select the iRoamly eSIM as the mobile data line.
Keep your primary SIM available for calls or texts if needed, but use iRoamly for travel data to avoid roaming charges from your home carrier.
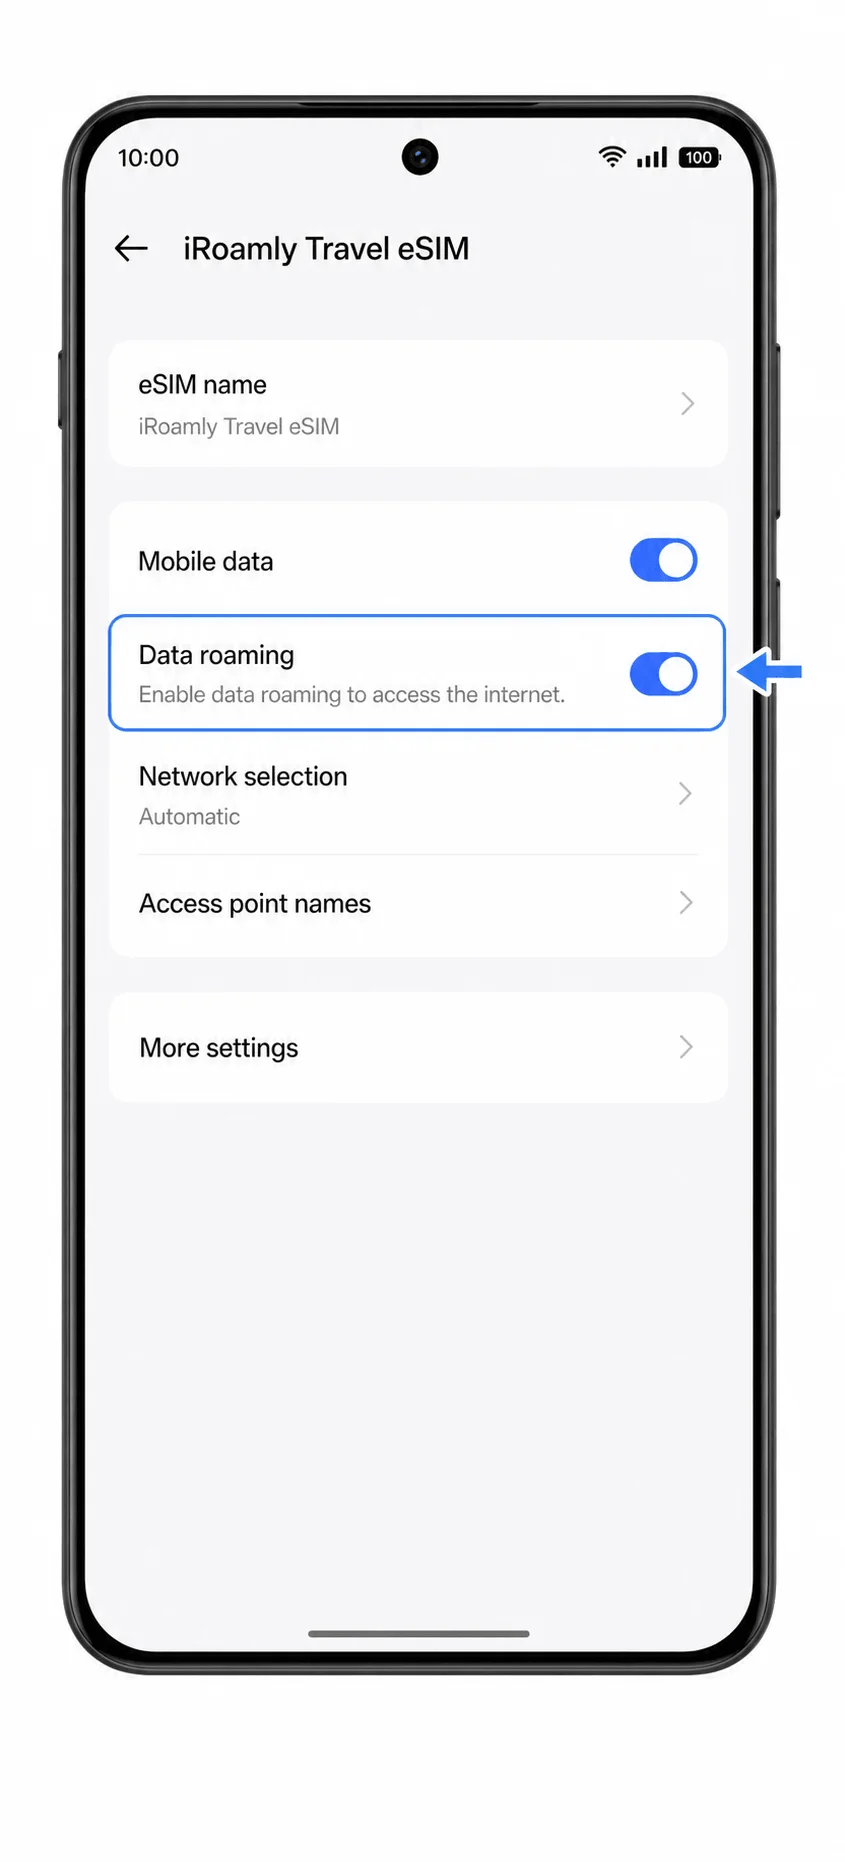
3. Open the iRoamly eSIM profile and turn on Data roaming if your iRoamly plan or destination instructions require it.
Travel eSIM plans often need roaming enabled because they connect through partner networks. Leave roaming off for your primary SIM unless you intentionally want to use it abroad.
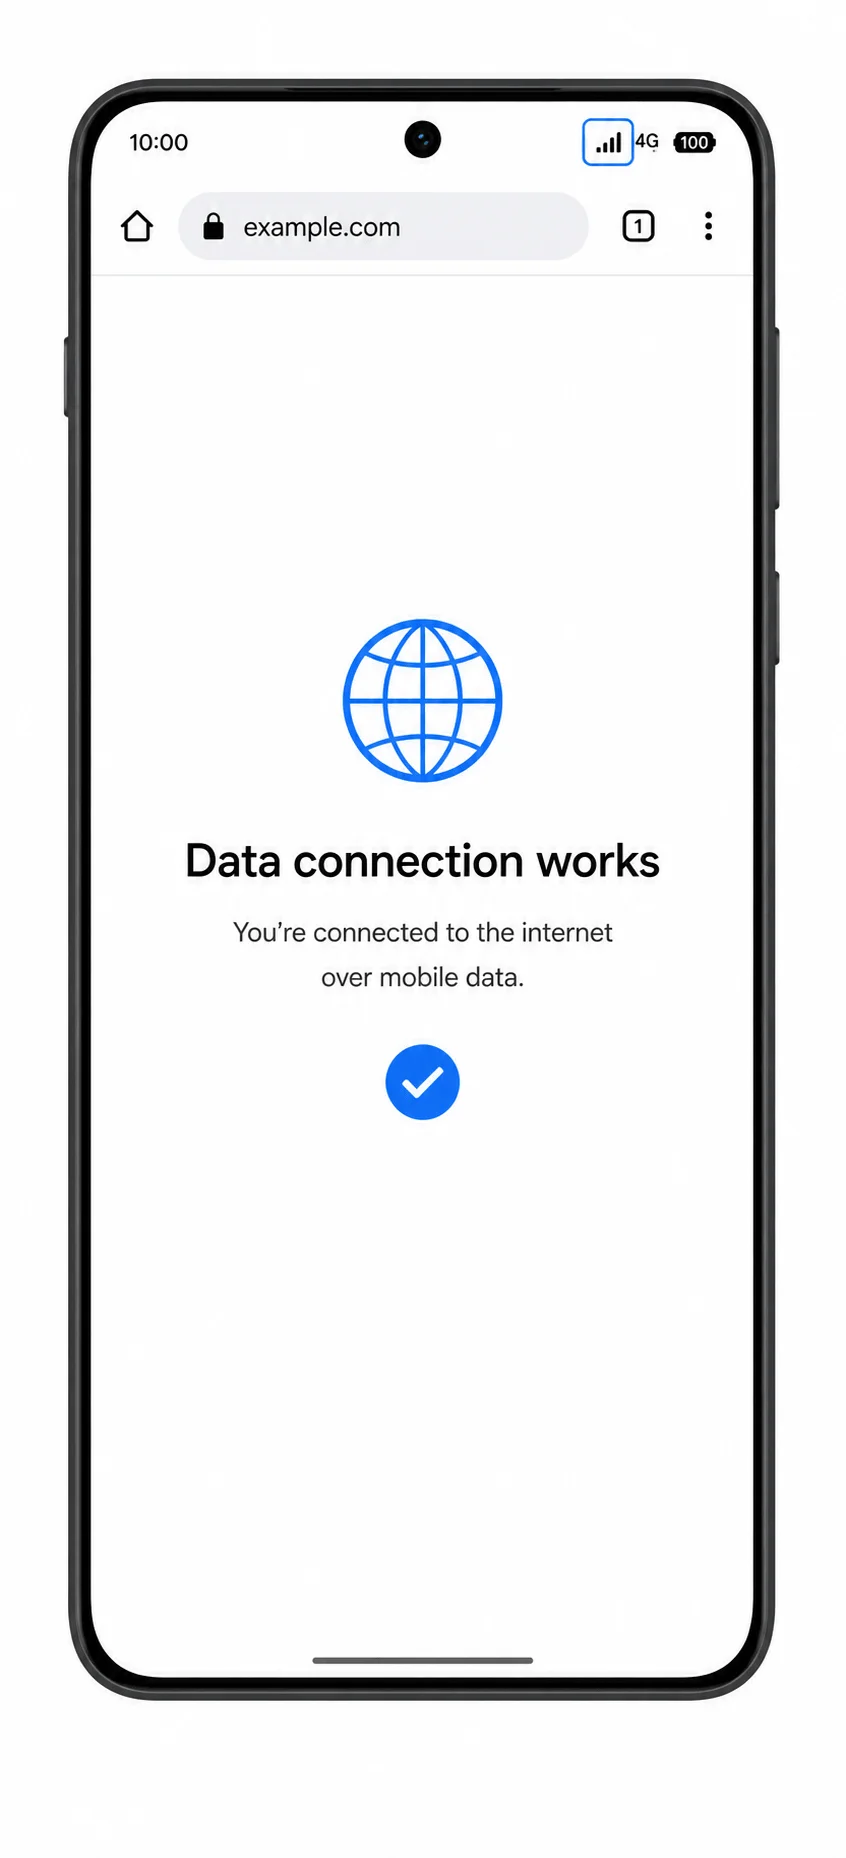
4. Open a browser and load a webpage using mobile data.
If the page loads with Wi-Fi off, the iRoamly eSIM is ready for travel data. If it does not load, check APN or network selection instructions from iRoamly for your destination.
Troubleshooting
Add eSIM or eSIM is missing: confirm that your Oppo Find X8 Pro variant supports eSIM in your region. Some Oppo models and carrier firmware builds may not expose eSIM even when the model name is similar.
QR code will not scan: increase screen brightness on the device showing the QR code, clean the camera lens, or use manual entry with the SM-DP+ Address and Activation Code.
QR code already used: most eSIM QR codes can be installed only once. Contact iRoamly support instead of deleting and retrying.
Activation stays pending: keep the phone on Wi-Fi, wait a few minutes, restart the Oppo Find X8 Pro, and check again under Settings > Mobile network > eSIM.
No data after installation: select the iRoamly eSIM under Mobile data, enable Data roaming for the iRoamly line if required, turn Wi-Fi off for testing, and confirm you are in a supported destination.
Wrong manual details: copy the SM-DP+ Address and Activation Code exactly as iRoamly provides them. Do not paste the full QR string into one field unless ColorOS specifically asks for a single activation string.
Voice or SMS does not work: many travel eSIM plans are data-only. Check your iRoamly plan details before using the eSIM for calls or texts.
More Oppo Find eSIM Setup Guides
Using another Oppo Find model? These setup guides may help.
Conclusion
Your Oppo Find X8 Pro is now prepared for international travel with your iRoamly eSIM already installed. When your travel plan becomes active, you'll be able to use mobile data across supported destinations while continuing to keep your physical SIM available for your regular mobile service if needed.
Having your travel connection ready before departure means less time searching for local mobile service and more time enjoying your destination. It's a simple way to stay connected throughout your journey.