
The Oppo Find X5 supports eSIM on compatible regional variants, and the setup flow is handled through ColorOS mobile network settings. On current ColorOS builds, the path is usually Settings > Mobile network > eSIM, though labels can vary slightly by software version, country, and carrier firmware.
For travelers, installing an iRoamly travel eSIM before departure can make arrival easier because the data profile is already on the phone. The QR code method is usually the fastest option when you can display the iRoamly QR code on another screen or printed page.
Manual entry is useful when the QR code will not scan, you are setting up from one device only, or the purchase email provides separate activation details. This guide covers both methods, then shows how to confirm the iRoamly eSIM is installed and choose it for travel data on the Oppo Find X5.

Get Your Oppo Find X5 Ready with iRoamly
iRoamly is a travel eSIM service that provides mobile data plans for destinations around the world. Available options may include local, regional, and global plans, with data amounts, validity periods, and features varying by destination.
Installing the eSIM before a trip can make mobile data available for maps, messages, translations, bookings, and travel updates after arrival.
For the Oppo Find X5, the iRoamly eSIM setup uses the ColorOS mobile network and eSIM menus described below. This guide continues with QR code installation, manual entry, installation checks, and mobile data configuration for travel use.
Before You Set Up Your iRoamly eSIM
Confirm your Oppo Find X5 variant supports eSIM. Some regional or carrier versions may not show the eSIM menu.
Update ColorOS if an update is available, then connect the phone to stable Wi-Fi.
Keep your iRoamly QR code ready, or open the manual details from your iRoamly order: SM-DP+ Address, Activation Code, and any optional confirmation code if provided.
Make sure the phone is unlocked for travel use if you plan to use iRoamly outside your home country.
Do not delete the iRoamly eSIM after installation unless iRoamly support tells you to. A used eSIM profile may not reinstall like a normal app.
Planning a trip to Indonesia or France? Having the travel eSIM installed before departure can make the arrival setup simpler.
Install the eSIM 1-2 days before travel when possible, but check your plan details first. iRoamly plan validity starts from activation, and the exact activation trigger can vary by plan.
iRoamly travel eSIM plans may be data-only. Voice calls and SMS are not guaranteed, so check the specific plan details before relying on them.
Method 1: Install eSIM by Scanning a QR Code
1. Open Settings on your Oppo Find X5, then tap Mobile network.
You should see the ColorOS mobile network settings area where SIM and eSIM options are managed.
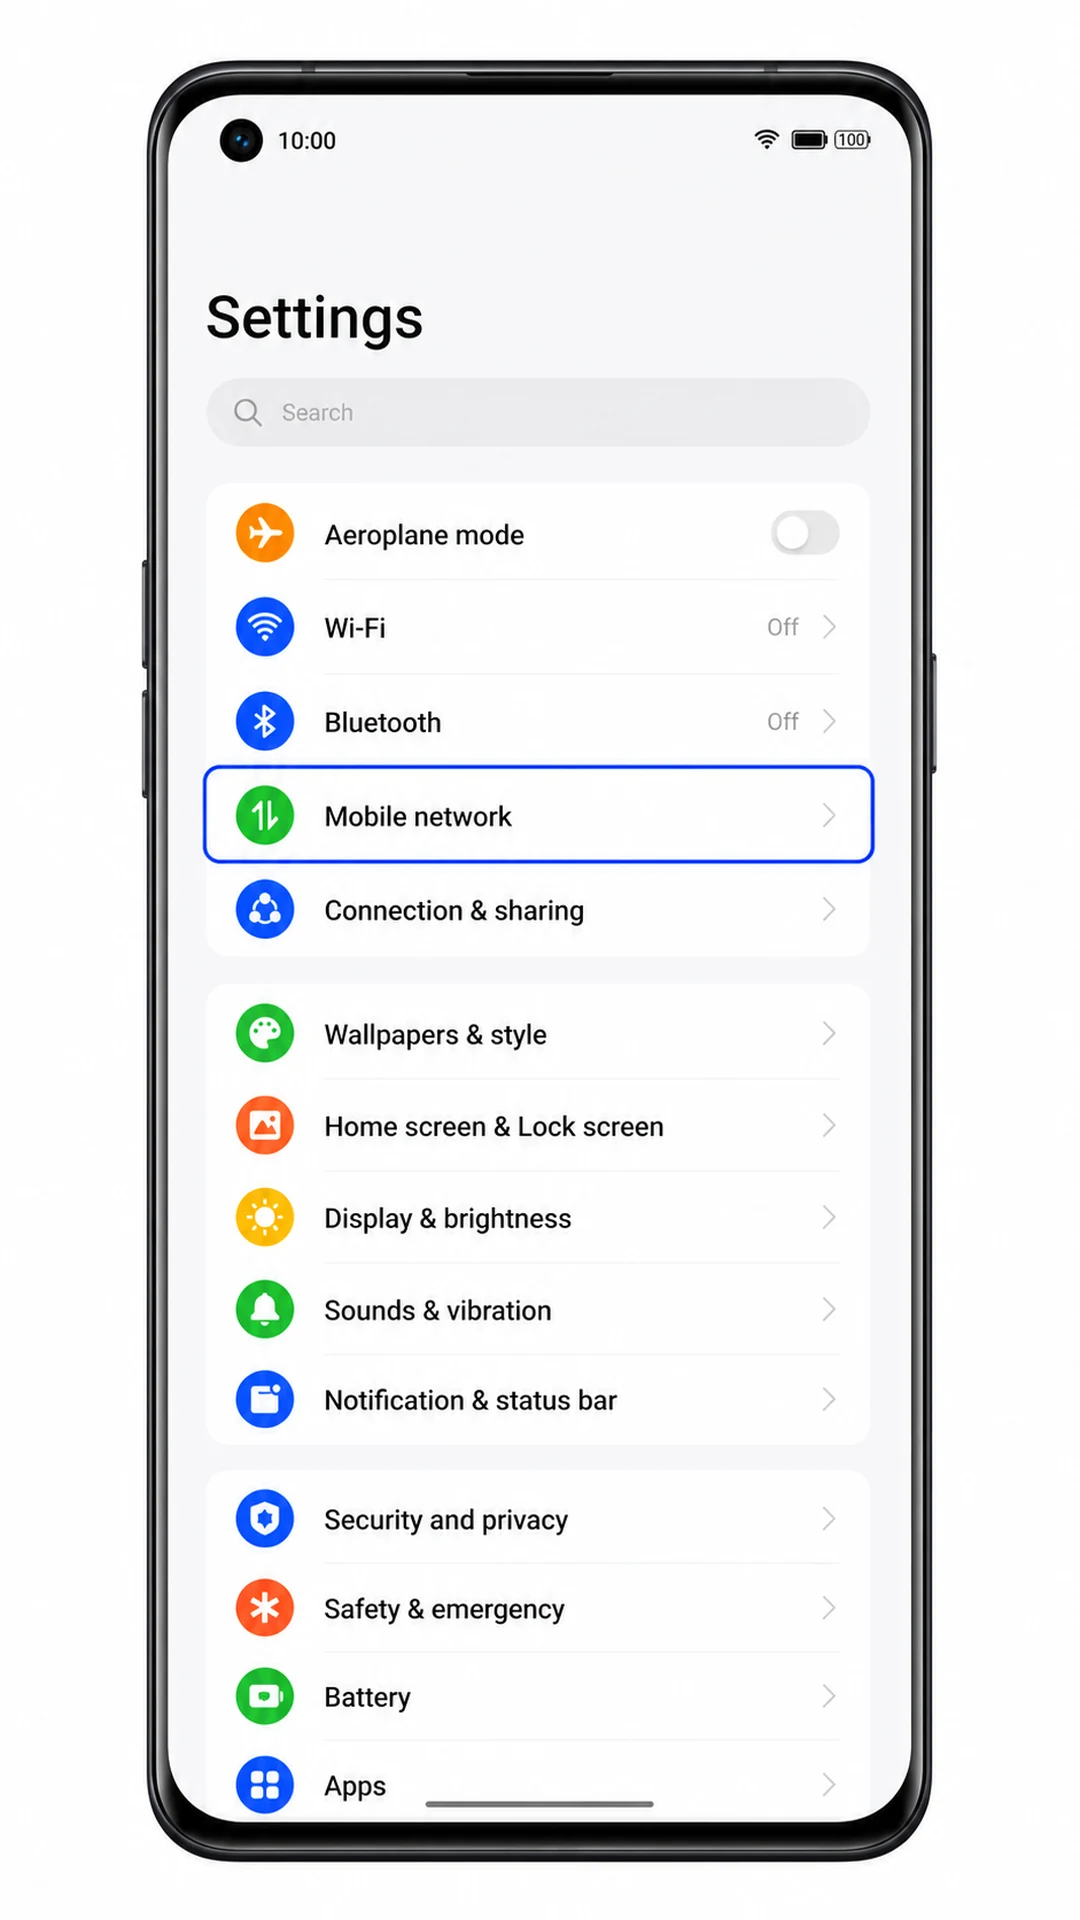
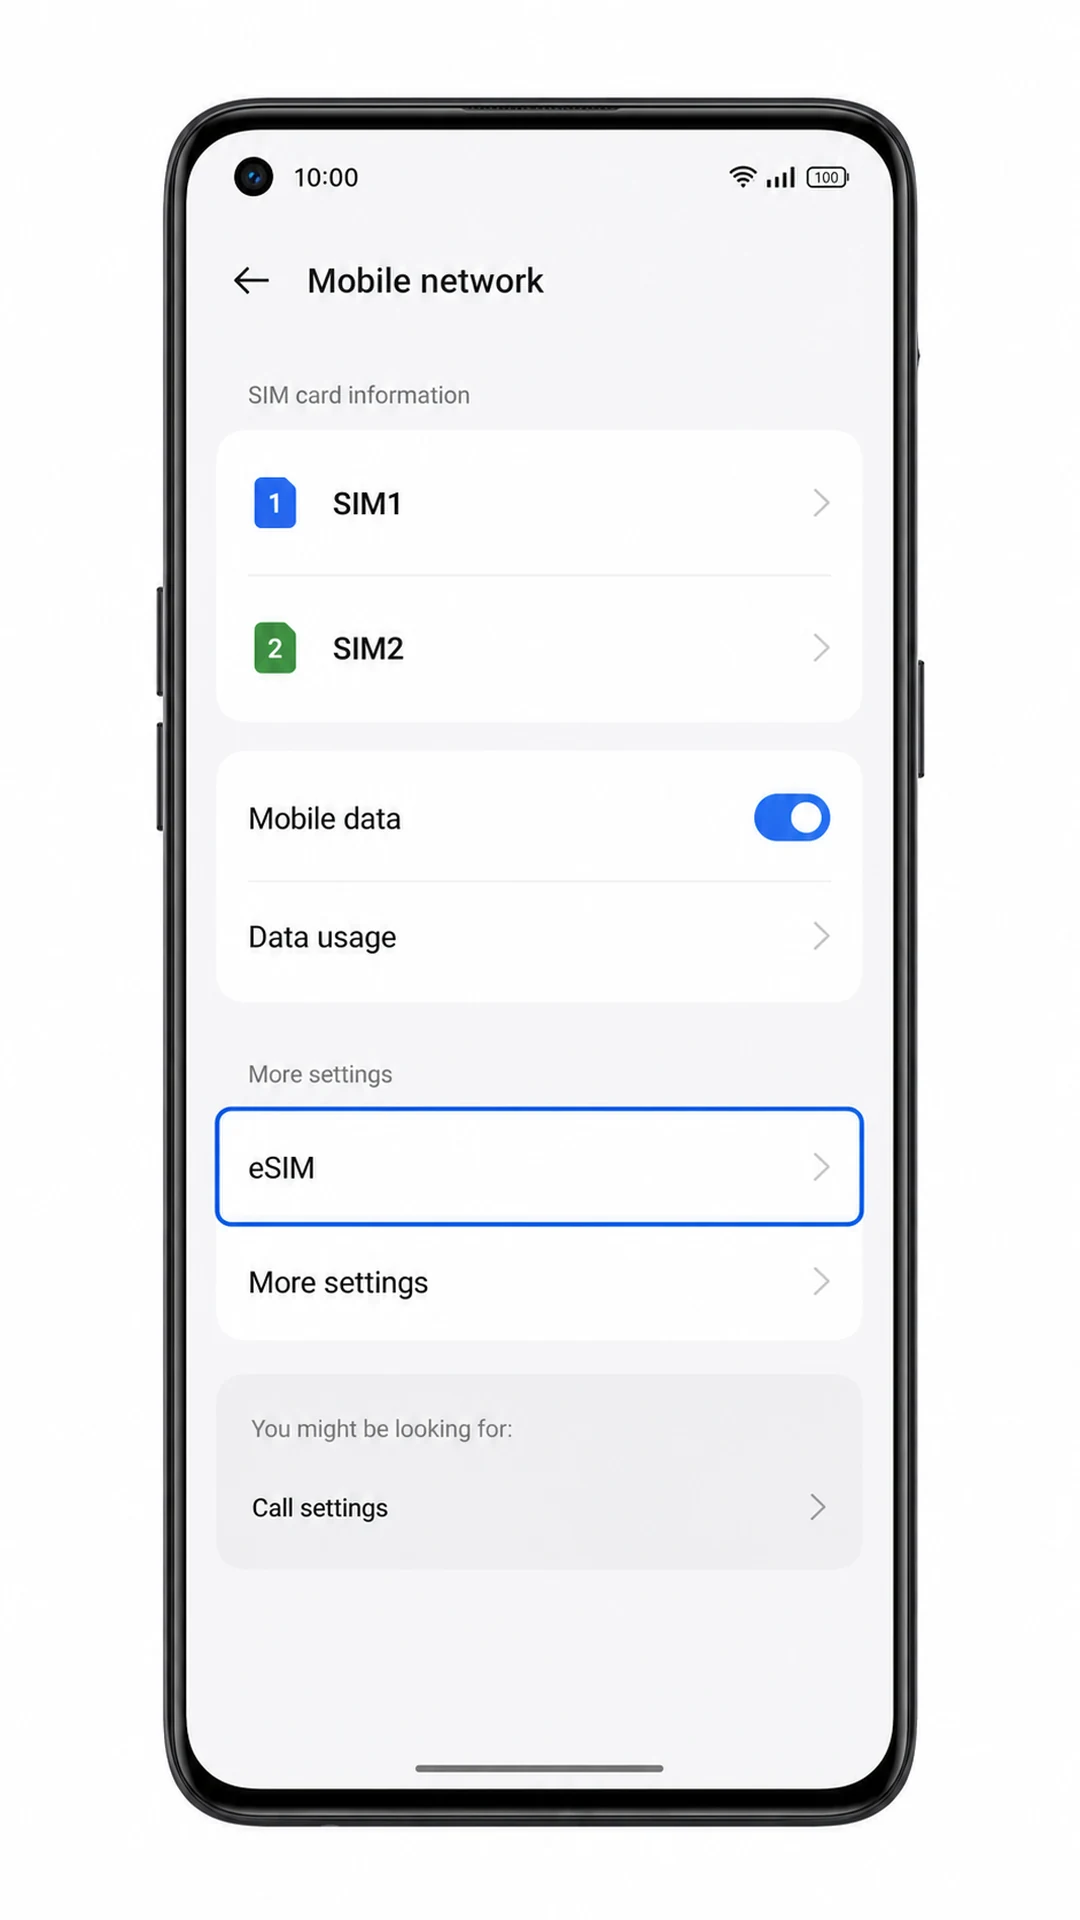
2. On the Mobile network screen, tap eSIM.
The phone should open the eSIM management area. If eSIM is missing, check the troubleshooting section because your model, region, carrier firmware, or software version may not support it.
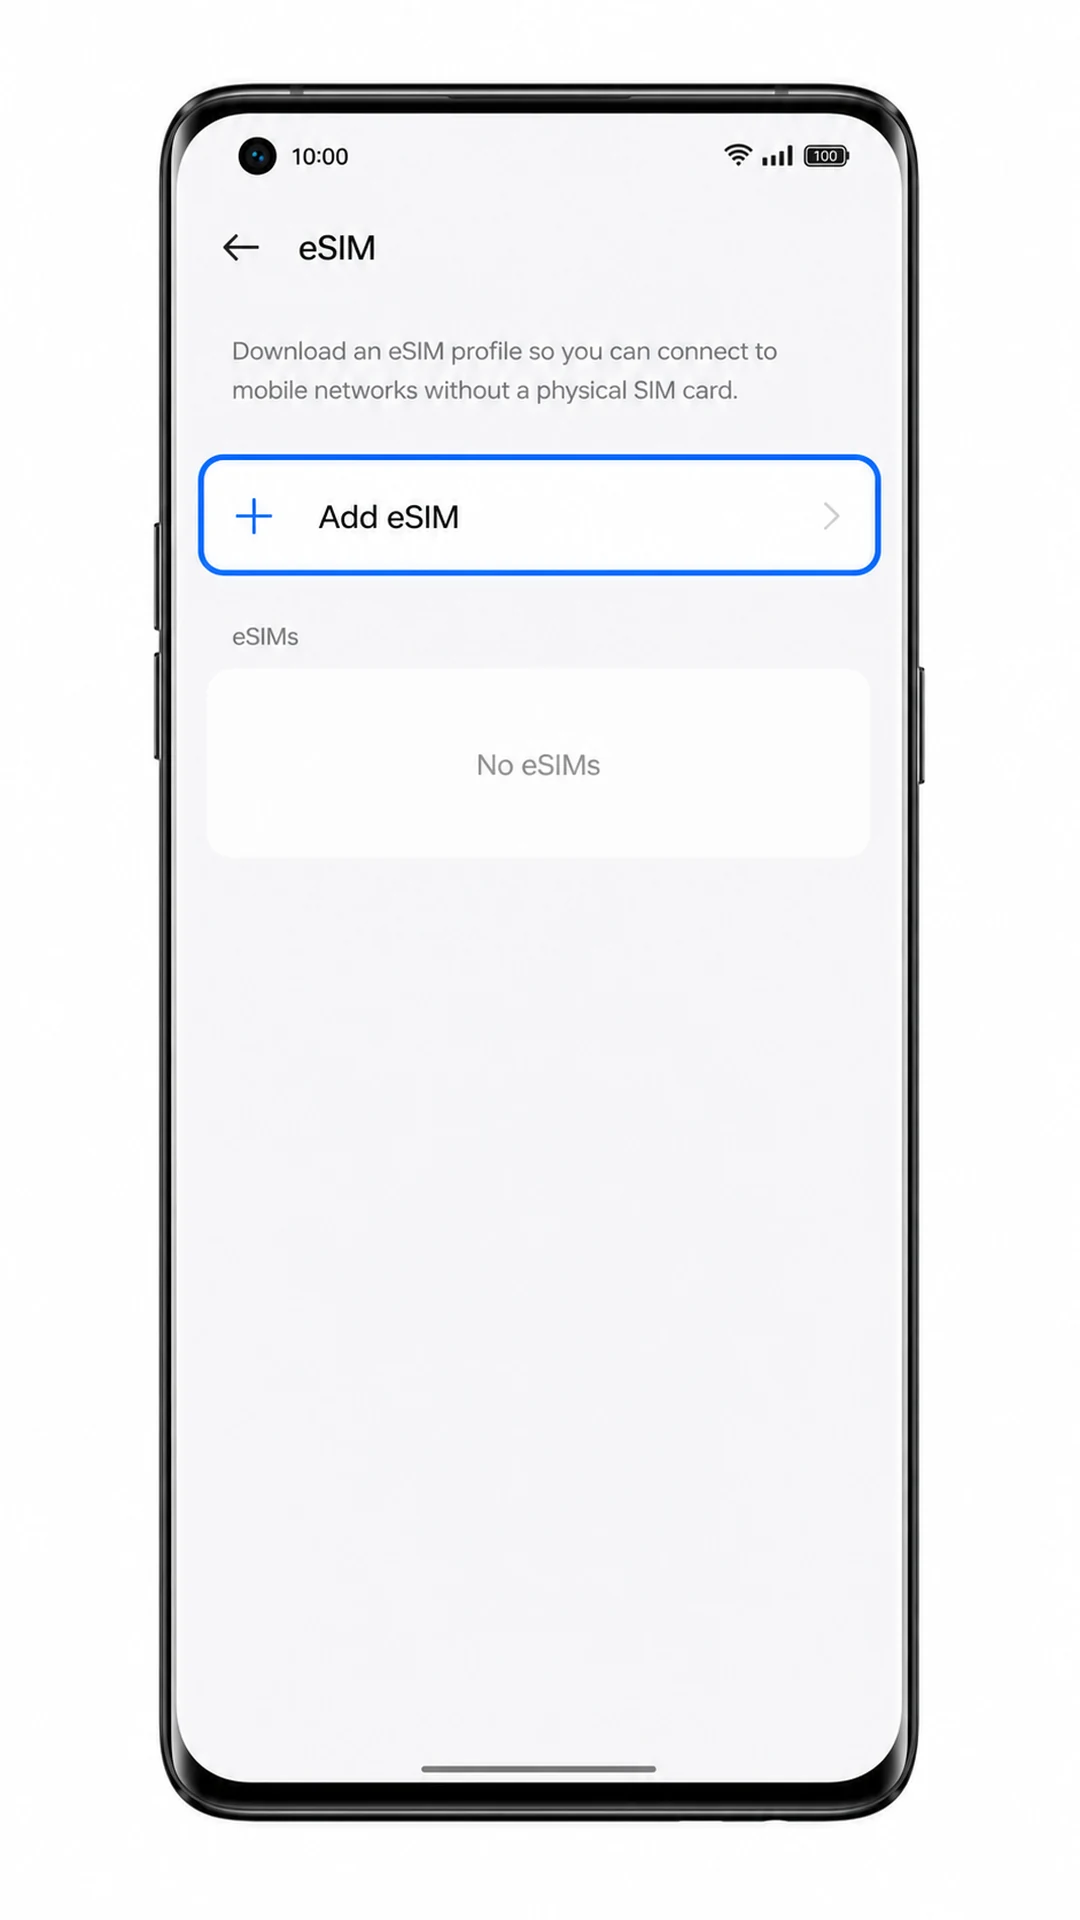
3. Tap Add eSIM.
The Oppo Find X5 should move to the eSIM setup screen, where you can add a new eSIM profile.
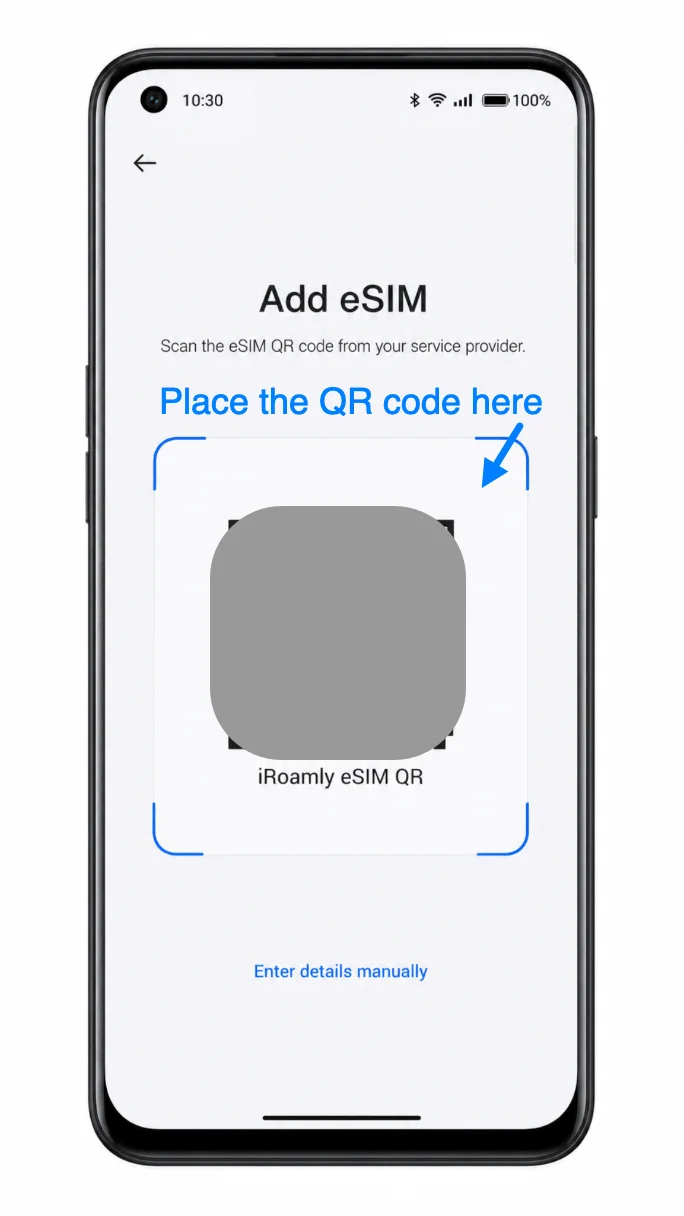
4. Choose the QR code setup option and scan the iRoamly QR code from another screen or printed copy.
Keep the QR code inside the scan frame until the phone recognizes it. Do not share your real QR code publicly, and do not use a QR code that has already been installed on another device.
5. When the iRoamly eSIM profile appears, tap Download.
Keep Wi-Fi connected while ColorOS downloads the eSIM profile. If the phone asks for confirmation, follow the on-screen prompt to continue.
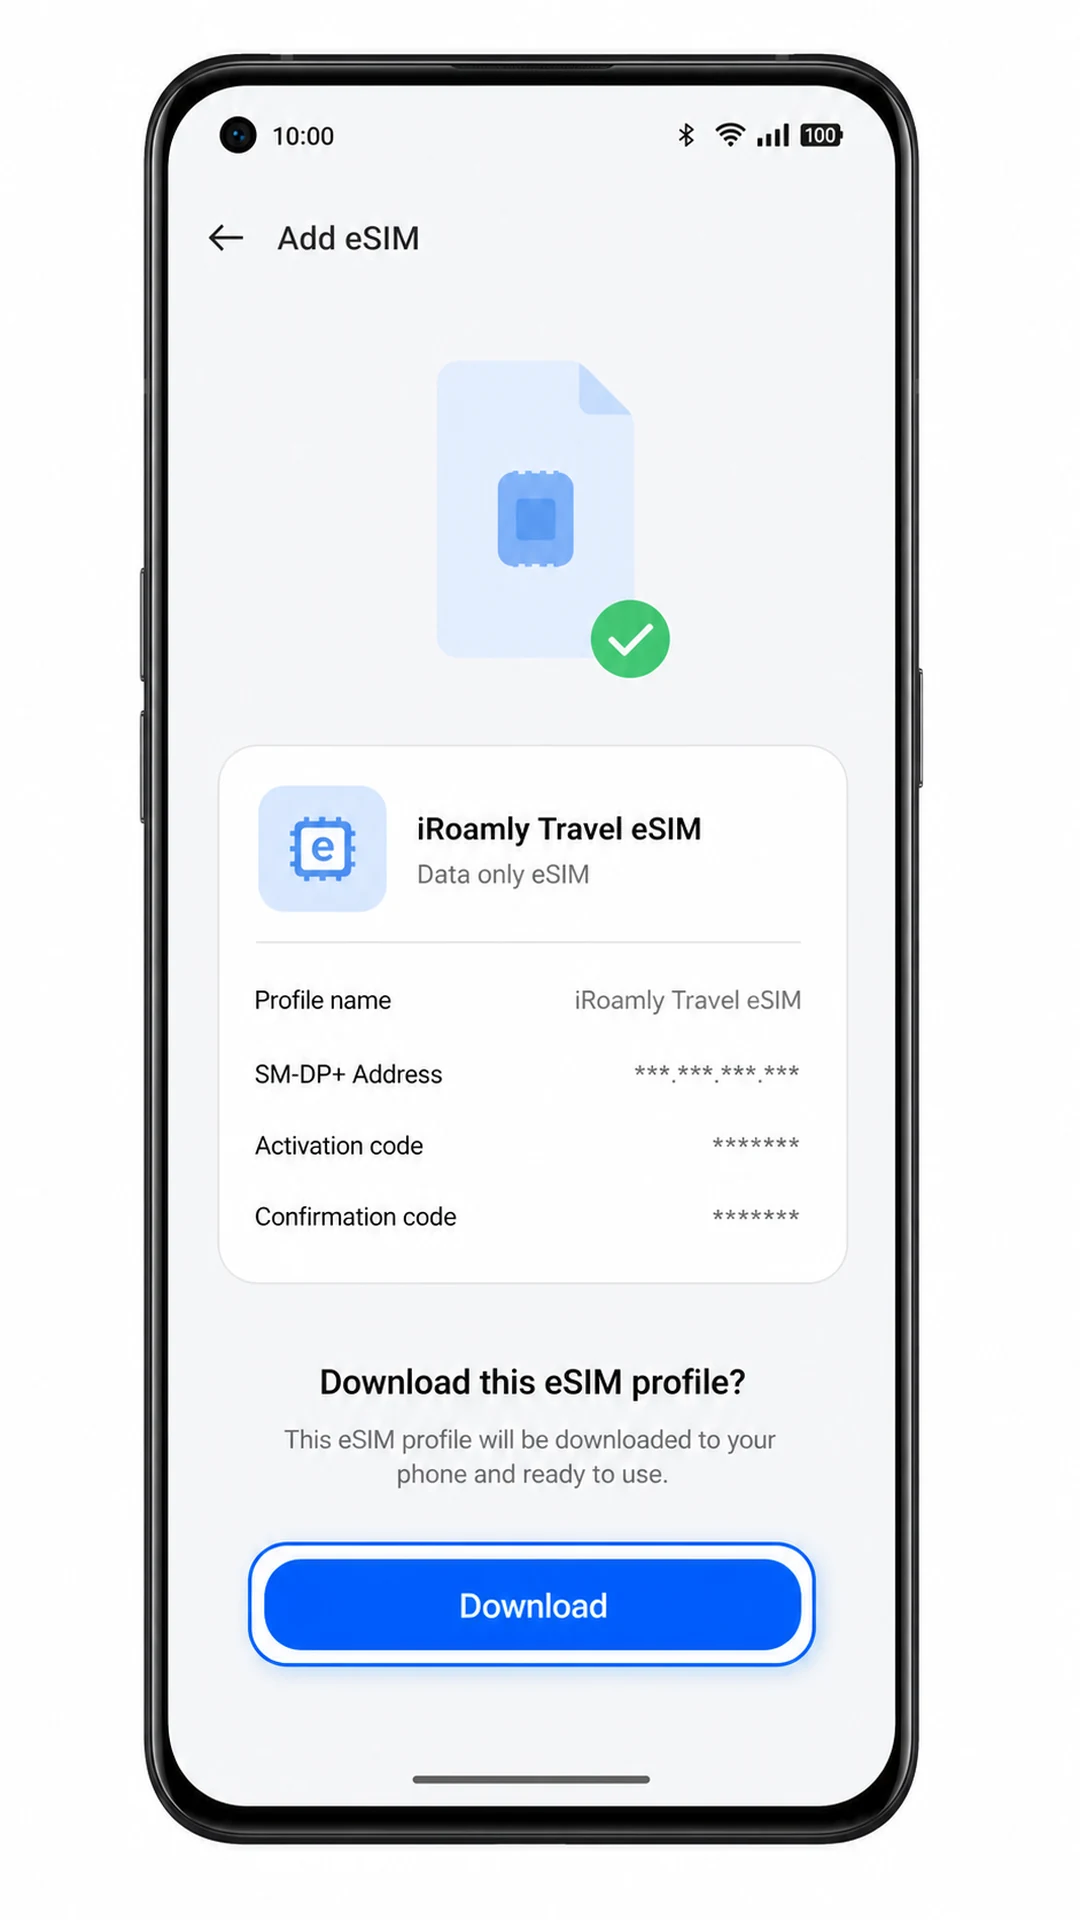
6. Wait for the download to finish, then tap Done or return to the eSIM screen.
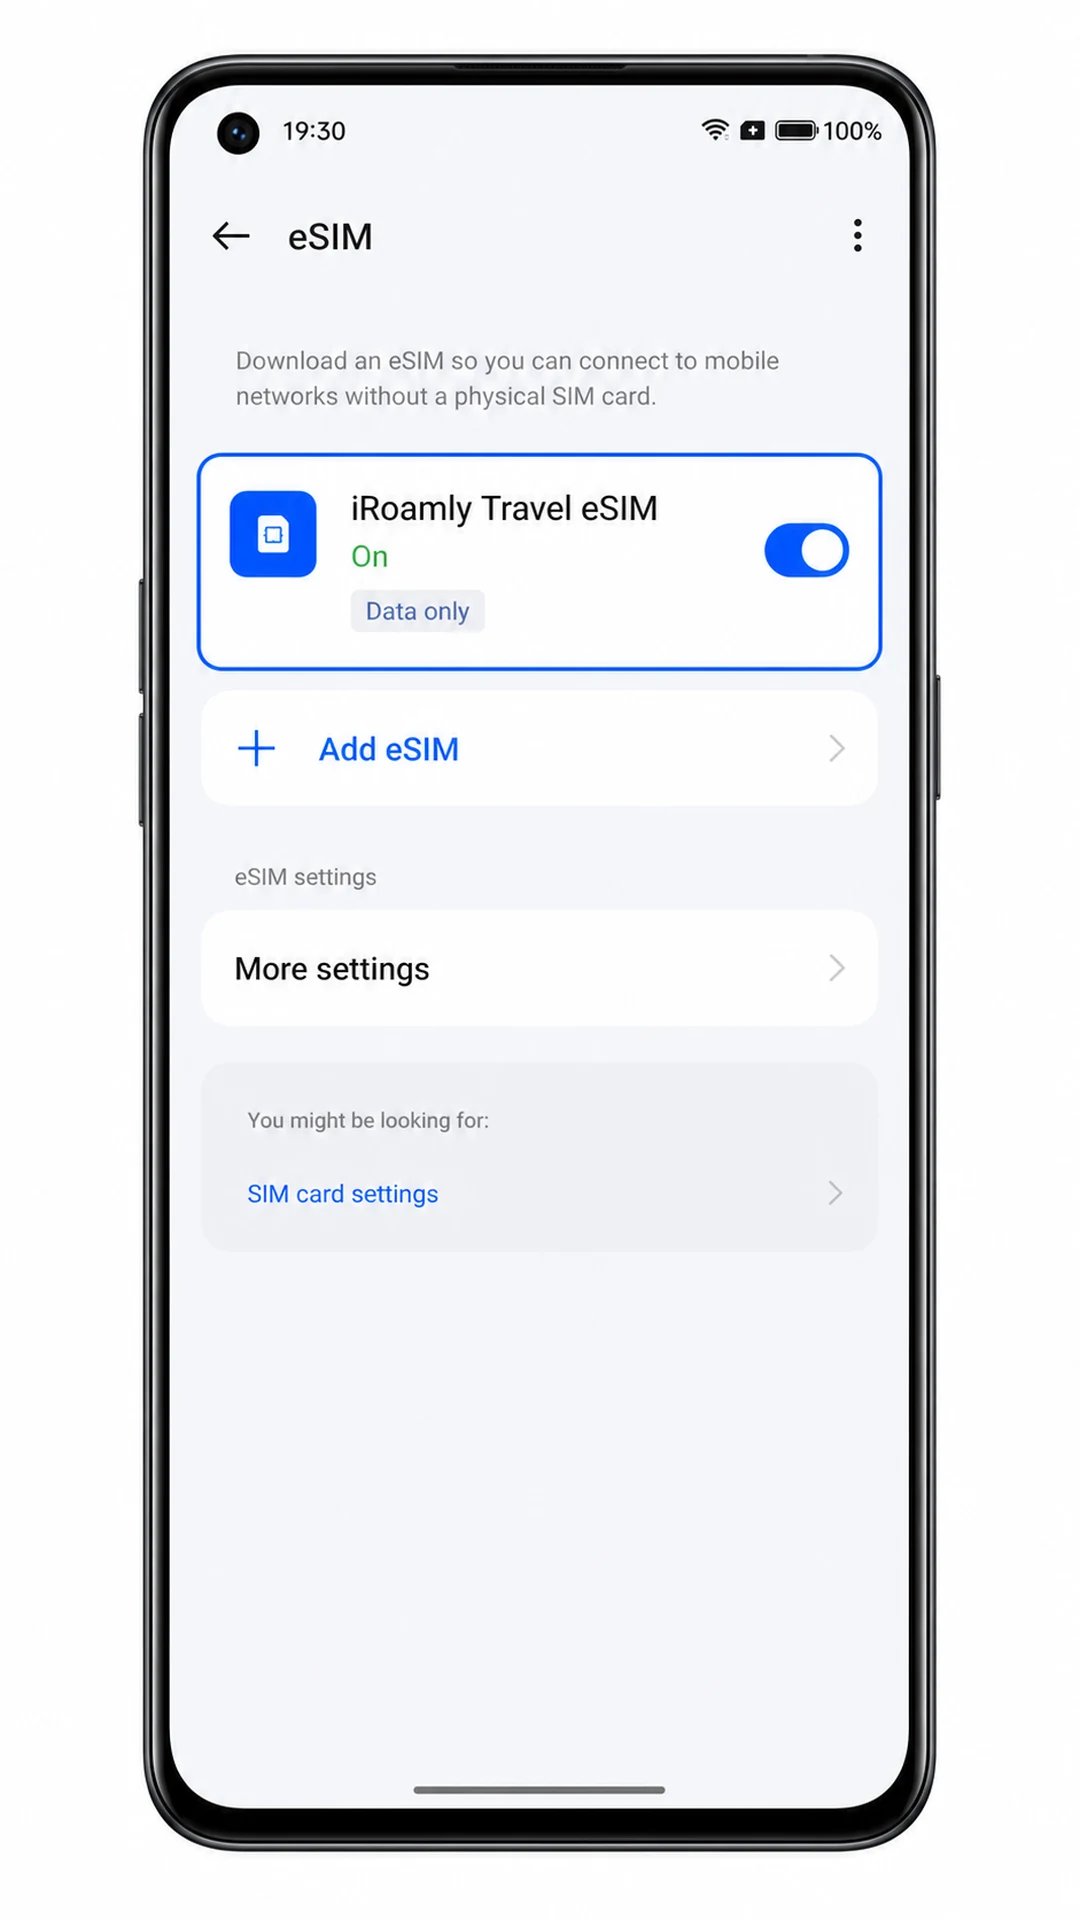
The iRoamly profile should now appear in the eSIM list. If ColorOS asks whether to turn the eSIM on, switch it on unless you are intentionally waiting until travel day.
Method 2: Install eSIM Manually
1. Open Settings on your Oppo Find X5, then tap Mobile network.
This starts from the same ColorOS settings path as the QR code method, but you will enter the iRoamly details by hand instead of scanning.
2. Tap eSIM on the Mobile network screen.
The phone should open the eSIM management page for adding or managing digital SIM profiles.
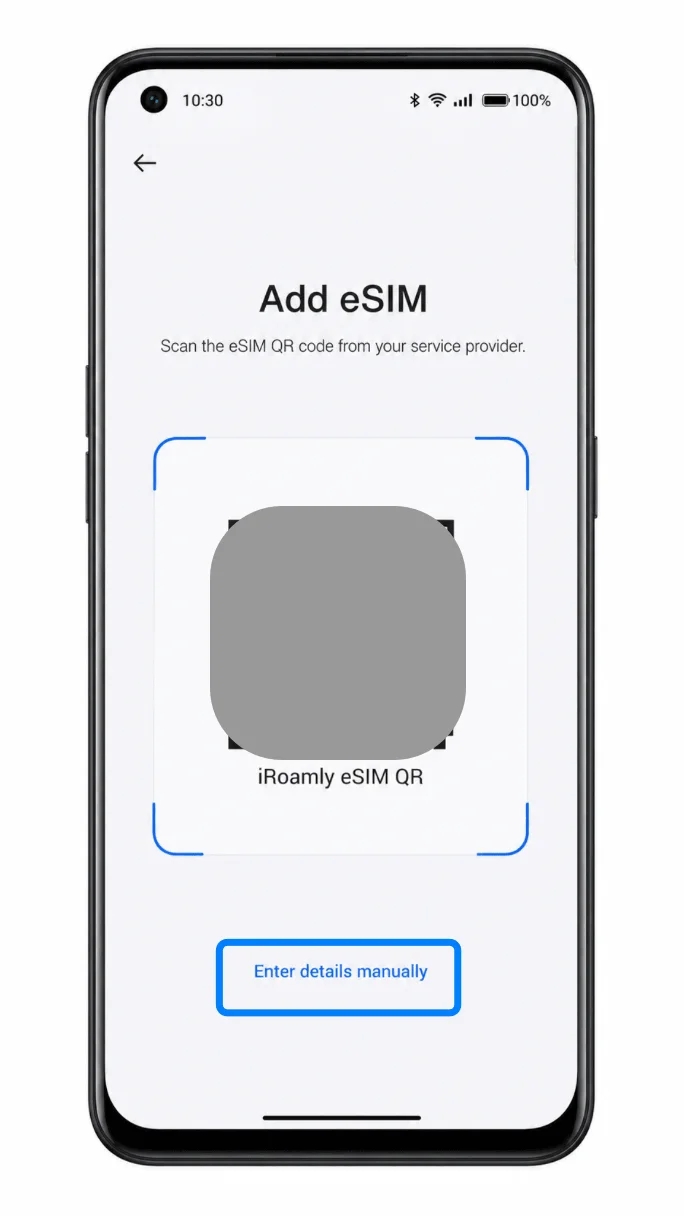
3. Tap Add eSIM, then choose Enter details manually on the QR setup screen.
On some ColorOS versions, the manual option appears as a text link on the QR scanner page. If you do not see it at first, look near the bottom of the setup screen.
4. Enter the iRoamly SM-DP+ Address and Activation Code, then add the optional Confirmation code only if iRoamly provides one.
Copy the values exactly from your iRoamly order page or email. Avoid extra spaces, and do not replace the SM-DP+ Address with a website URL unless iRoamly provides it in that field.
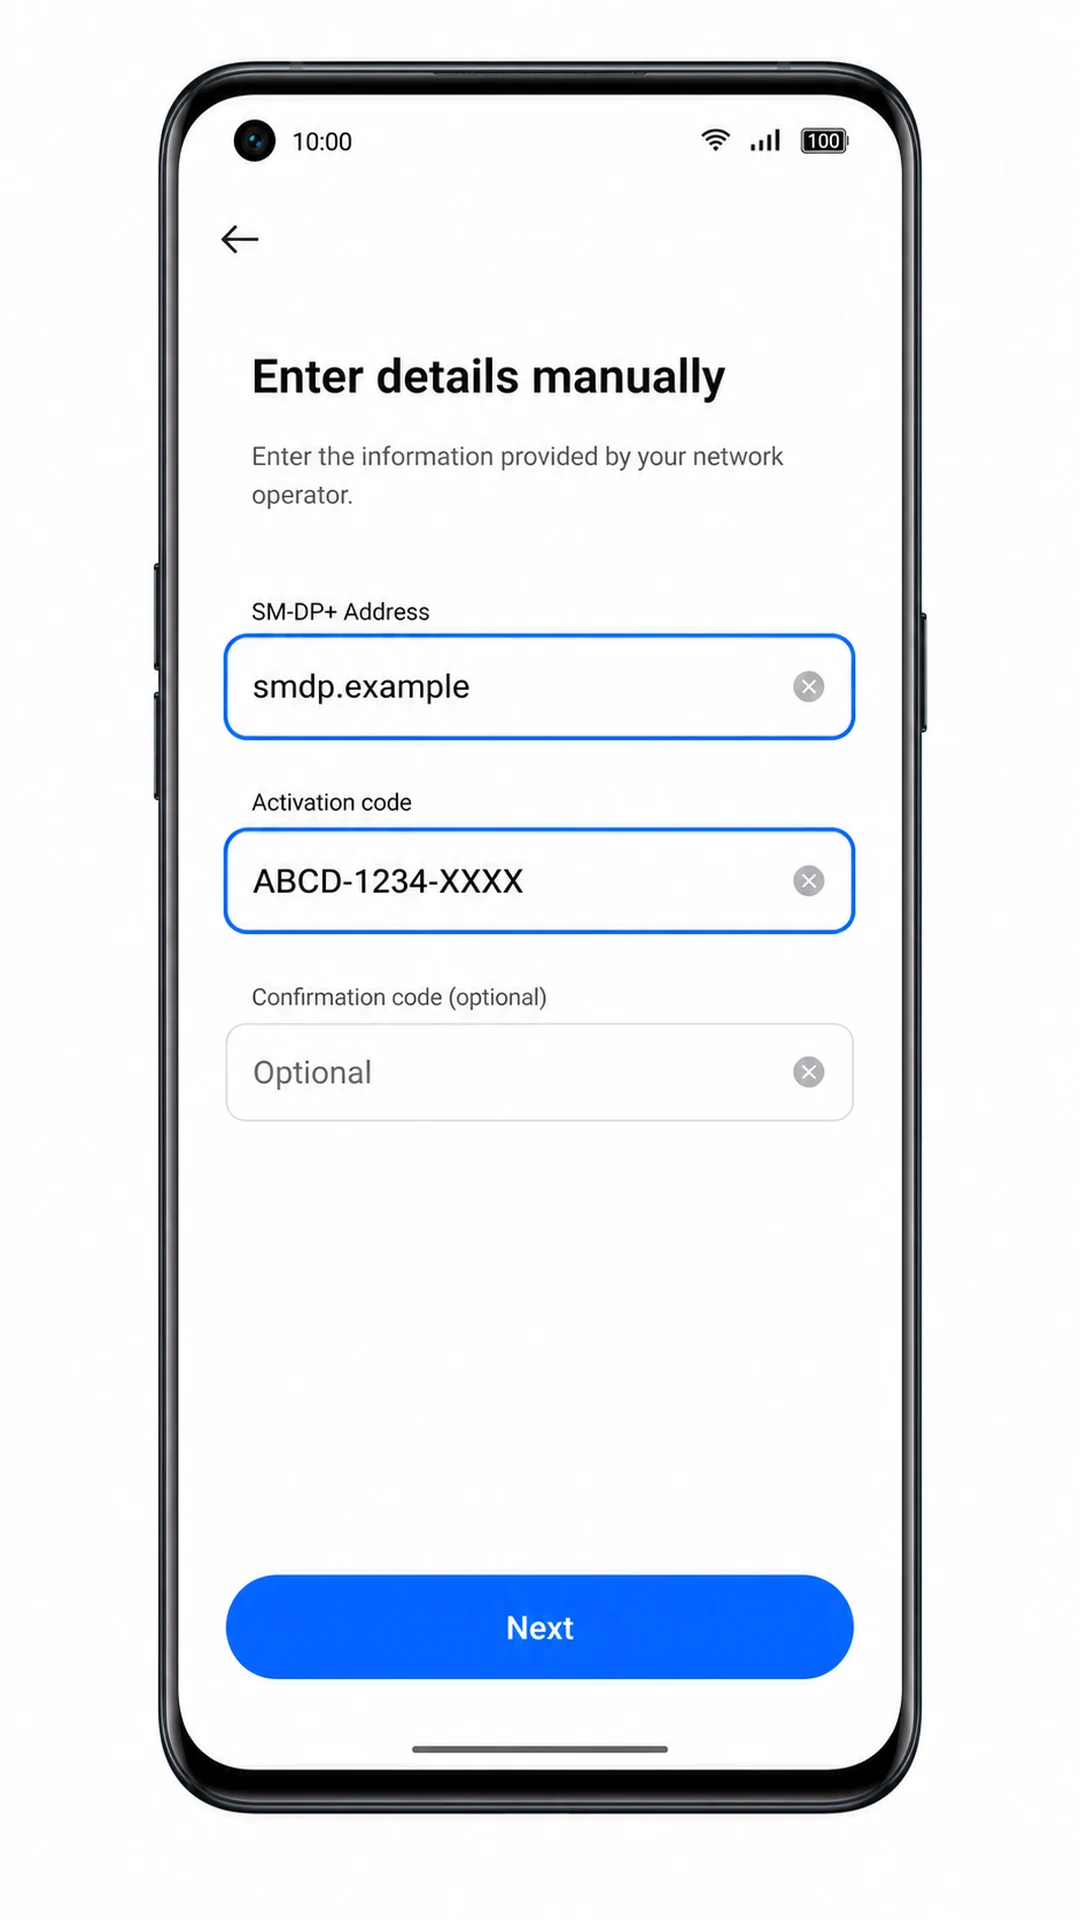
5. Tap Next, review the eSIM profile details, then tap Download.
Keep Wi-Fi connected until the download completes. If the profile name can be edited, label it iRoamly Travel eSIM so it is easier to identify later.
6. Wait for ColorOS to finish adding the profile, then tap Done or return to eSIM.
The iRoamly eSIM should appear in the eSIM list. If the phone asks whether to enable the eSIM now, you can switch it on and configure data settings in the next section.
How to Confirm Your iRoamly eSIM Is Installed
1. Go to Settings > Mobile network > eSIM and check that iRoamly Travel eSIM appears in the list.
The profile should show as installed. If there is an on/off switch, turn it on when you are ready to use the travel plan.
2. Open the iRoamly eSIM profile and confirm it is enabled.
If the plan is data-only, do not expect normal phone calls or SMS from that eSIM. Use mobile data testing instead, such as opening a webpage after travel data settings are configured.
Configure eSIM for Mobile Data
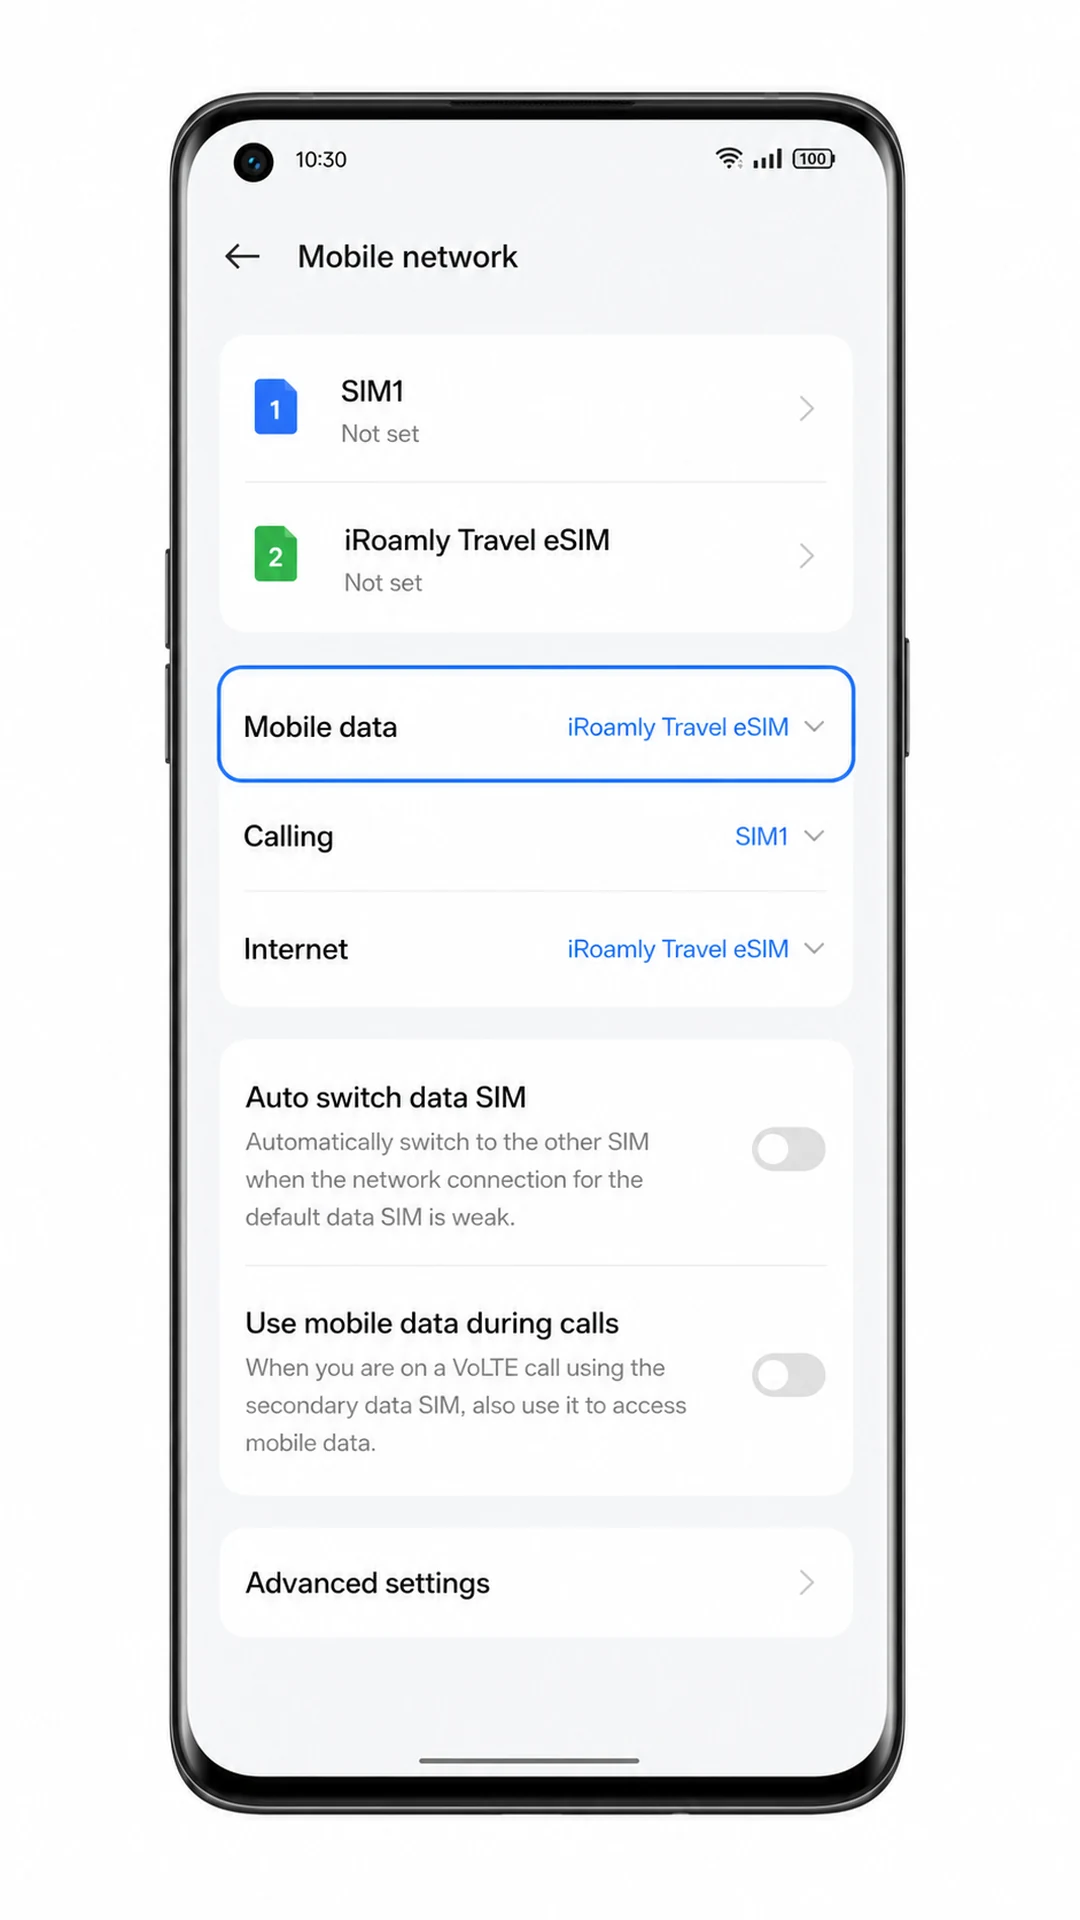
1. Go to Settings > Mobile network, tap the Mobile data line selector, and choose iRoamly Travel eSIM.
This tells the Oppo Find X5 to use the iRoamly eSIM for mobile data instead of your primary SIM.
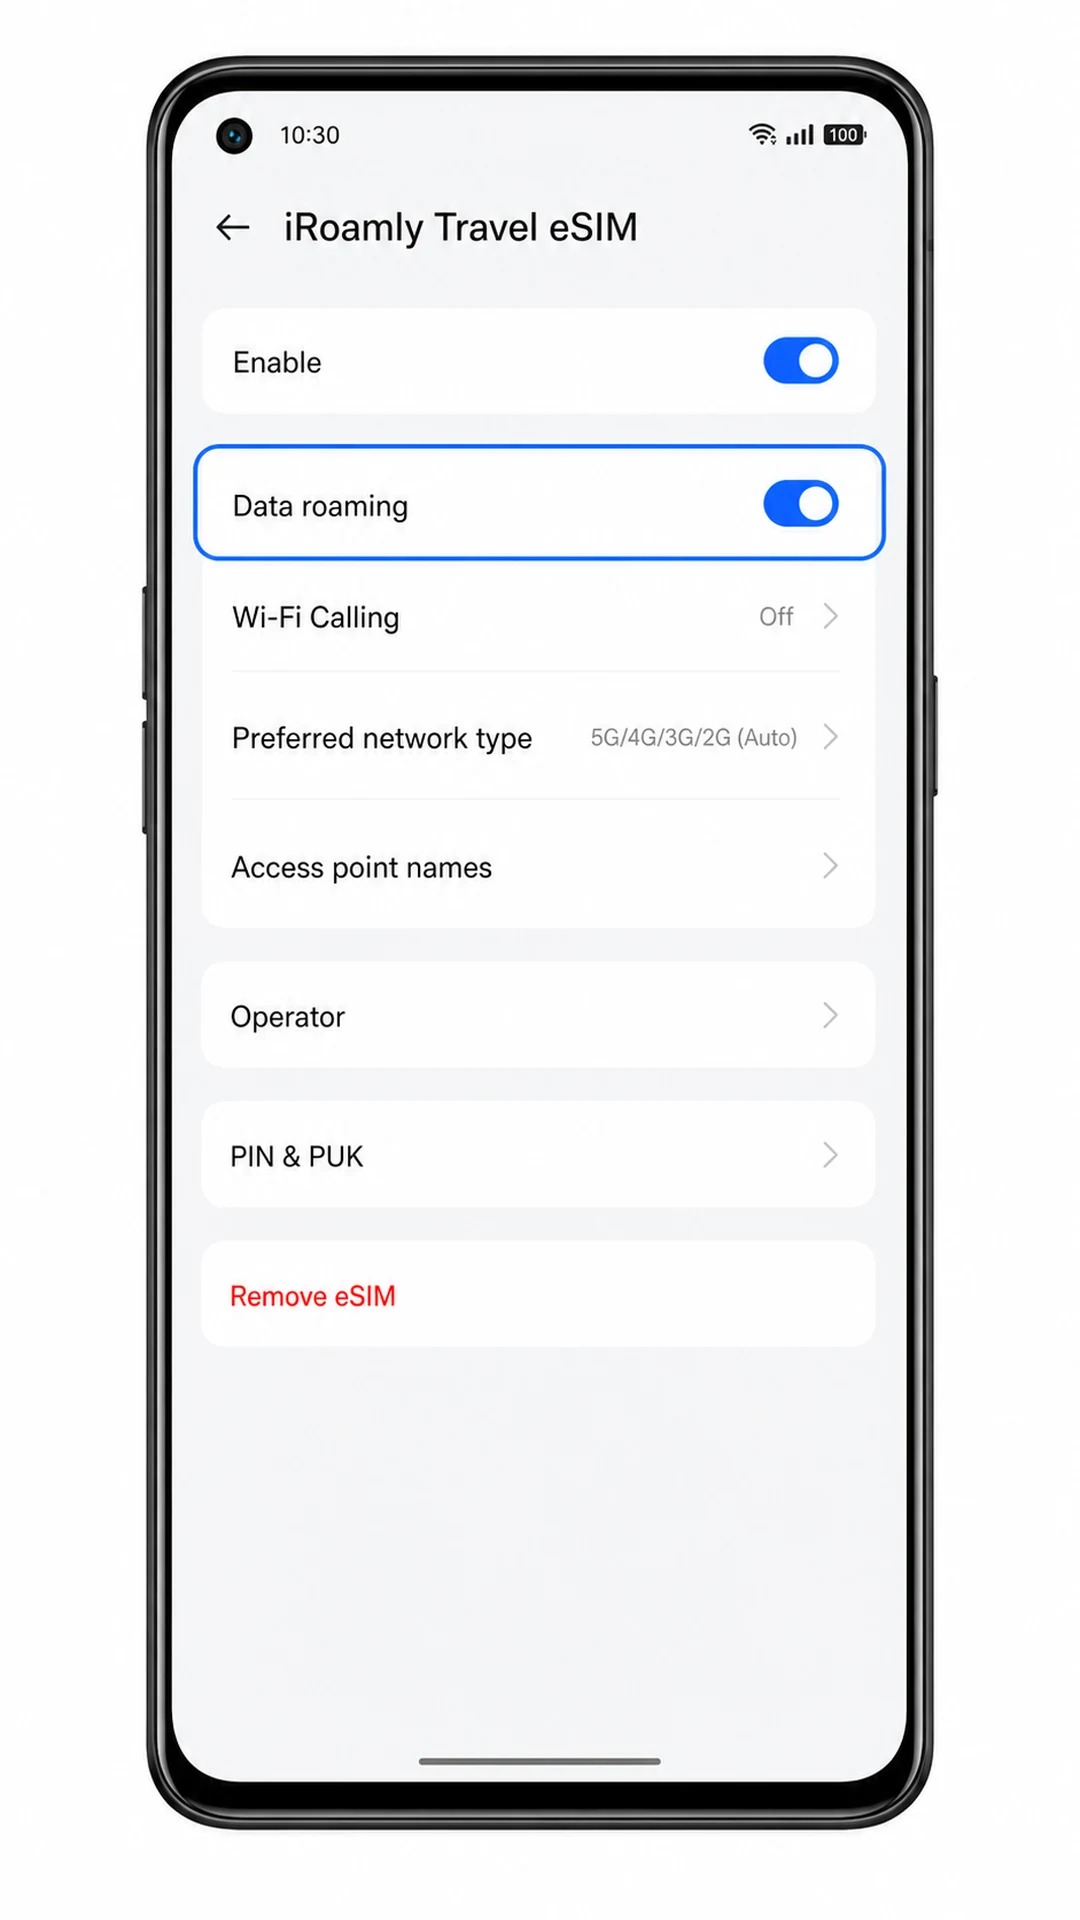
2. Open the iRoamly Travel eSIM profile and turn on Data roaming if your iRoamly plan or destination requires it.
Travel eSIMs often need roaming enabled because they connect through partner networks abroad. Keep your primary SIM data off if you want to avoid unwanted roaming charges from your home carrier.
3. Turn off automatic mobile data switching if your ColorOS version offers that option.
This helps prevent the phone from falling back to your primary SIM for data. After arrival, test the connection by opening a webpage with Wi-Fi turned off.
Troubleshooting
eSIM does not appear in Mobile network: confirm that your Oppo Find X5 regional variant supports eSIM, update ColorOS, restart the phone, and check whether your carrier firmware hides eSIM setup.
The QR code will not scan: increase screen brightness on the device showing the QR code, clean the Oppo camera lens, avoid glare, and try manual entry with the iRoamly activation details.
The QR code says it has already been used: do not delete and retry repeatedly. Contact iRoamly support because eSIM QR codes are often single-use after installation starts.
Manual entry fails: check every character in the SM-DP+ Address and Activation Code, remove extra spaces, and confirm you are entering the details in the manual eSIM setup screen.
The eSIM is installed but there is no data: choose iRoamly Travel eSIM for Mobile data, enable Data roaming for the iRoamly profile if required, turn Wi-Fi off for testing, and restart the phone.
Activation is pending: stay connected to Wi-Fi and wait a few minutes. If you are not yet in the destination country, the plan may not connect to a supported network until you arrive.
Calls or SMS do not work: check the iRoamly plan details. Many travel eSIM plans are data-only, so calling and texting may need an internet app or your primary SIM.
Recommended Oppo eSIM Reading
Setting up another Oppo Find model? Take a look at these guides.
Conclusion
Now that your iRoamly eSIM has been added to your Oppo Find X5, your travel connection is ready whenever your trip begins. Once you're connected in a supported destination, you'll have mobile data available for the apps and services you use every day, from maps and messaging to travel guides and online bookings.
Preparing your eSIM before departure removes one more task from your travel checklist and helps make international travel smoother. Wherever your next destination is, you'll be ready to stay connected from the moment you arrive.