
The Oppo Find X3 Pro can use eSIM on supported regional and carrier variants, which makes it a practical phone for travelers who want to add an iRoamly travel eSIM without swapping a physical SIM card.
On ColorOS, the relevant path is usually Settings > SIM card & mobile data, then the eSIM area. Some software builds or carrier firmware may hide eSIM if the model, region, or mobile operator does not support it.
This guide covers both setup routes: scanning the iRoamly QR code and entering the eSIM details manually. Manual entry is useful if the QR code will not scan, if you are installing from the same phone that displays the QR code, or if you only have the activation details from your iRoamly account or email.

Meet iRoamly for Easier Travel Connectivity
iRoamly is a travel eSIM service that provides mobile data plans for trips abroad. Depending on the destination, travelers can choose from available local, regional, or global options, with plan types, validity, and data allowances varying by plan.
Once installed on a compatible phone, the eSIM can support travel apps for maps, messaging, bookings, and updates without replacing the physical SIM.
The Oppo Find X3 Pro can use this iRoamly setup on supported regional and carrier variants. The guide below keeps the original ColorOS path intact and explains QR code installation, manual entry, confirmation, and mobile data selection.
Before You Set Up Your iRoamly eSIM
Connect the Oppo Find X3 Pro to stable Wi-Fi before starting the download.
Confirm the phone is unlocked and that your regional Find X3 Pro variant supports eSIM.
Keep your iRoamly QR code ready, or prepare the manual details: SM-DP+ Address, Activation Code, and Confirmation Code if one is provided.
Traveling to China or Japan? You can install the travel eSIM before departure, then select it for mobile data when you are ready to use it abroad.
Install the eSIM 1-2 days before travel when possible, but check your selected iRoamly plan details first.
iRoamly plan validity starts from activation; for many travel eSIMs, activation may happen when the eSIM is installed or when it first connects to a supported destination network, depending on the plan.
Do not delete the iRoamly eSIM profile after installation unless iRoamly support tells you to. Many eSIM profiles cannot be installed again after removal.
iRoamly eSIM plans may be data-only. Voice calls and SMS availability varies by plan, so check the specific plan details before relying on those services.
Method 1: Install eSIM by Scanning a QR Code
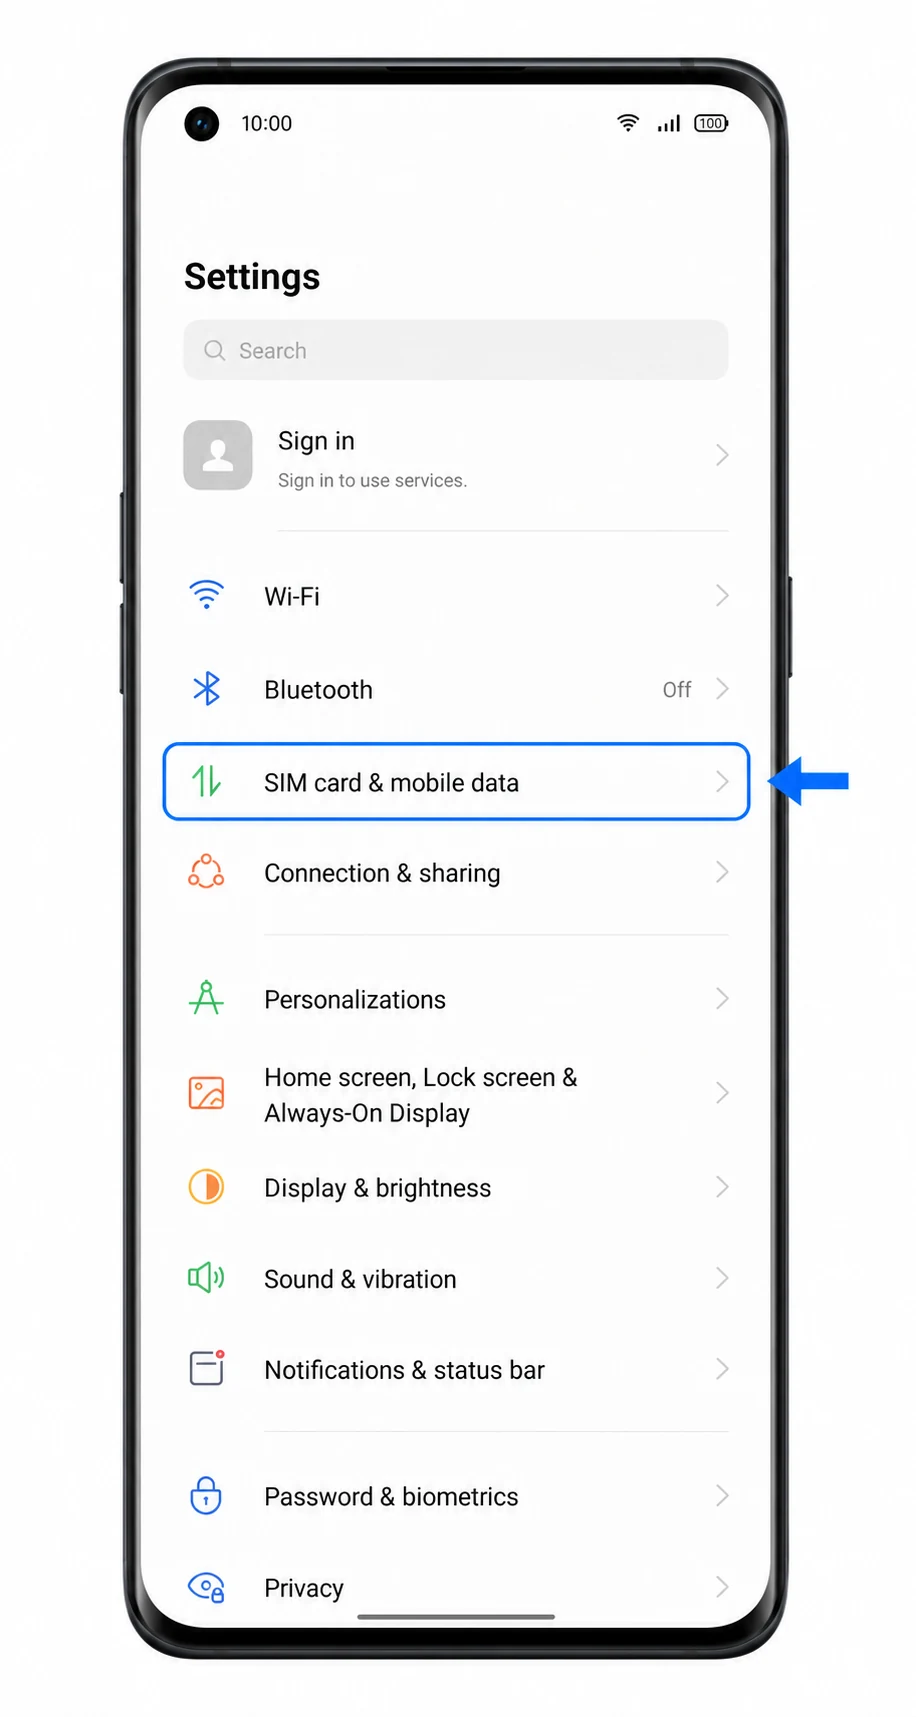
Open Settings on the Oppo Find X3 Pro, then tap SIM card & mobile data.
You should see the ColorOS mobile network settings where physical SIMs and supported eSIM options are managed.
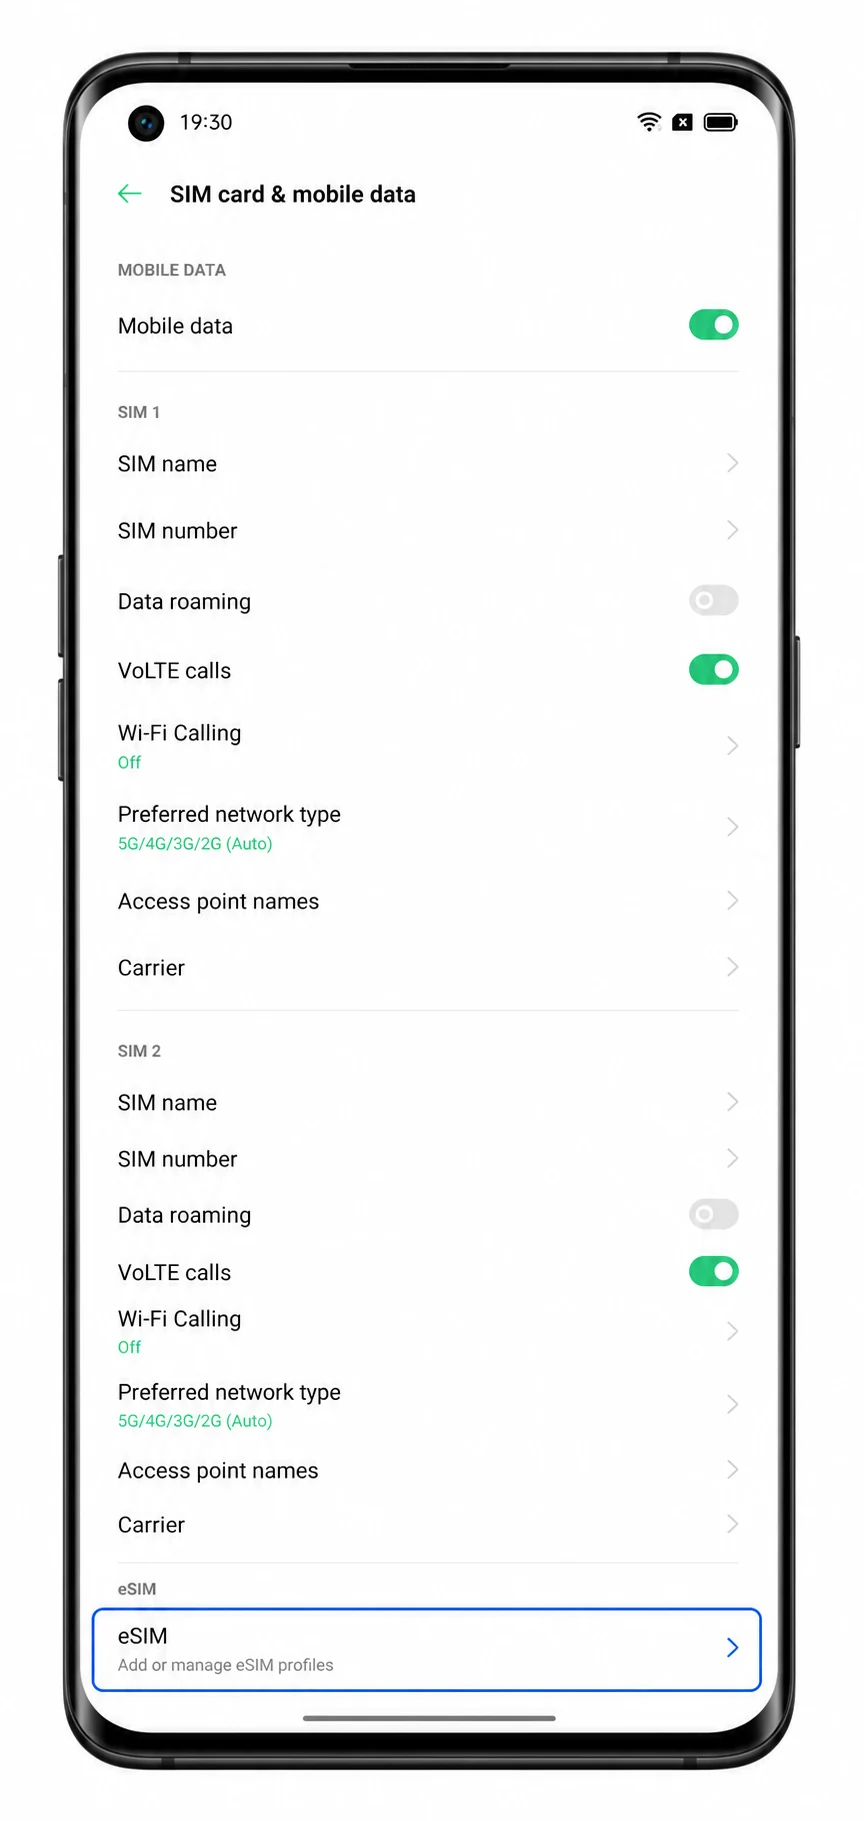
Tap eSIM in SIM card & mobile data.
The phone should open the eSIM management area. If eSIM is missing, check the troubleshooting section before continuing.
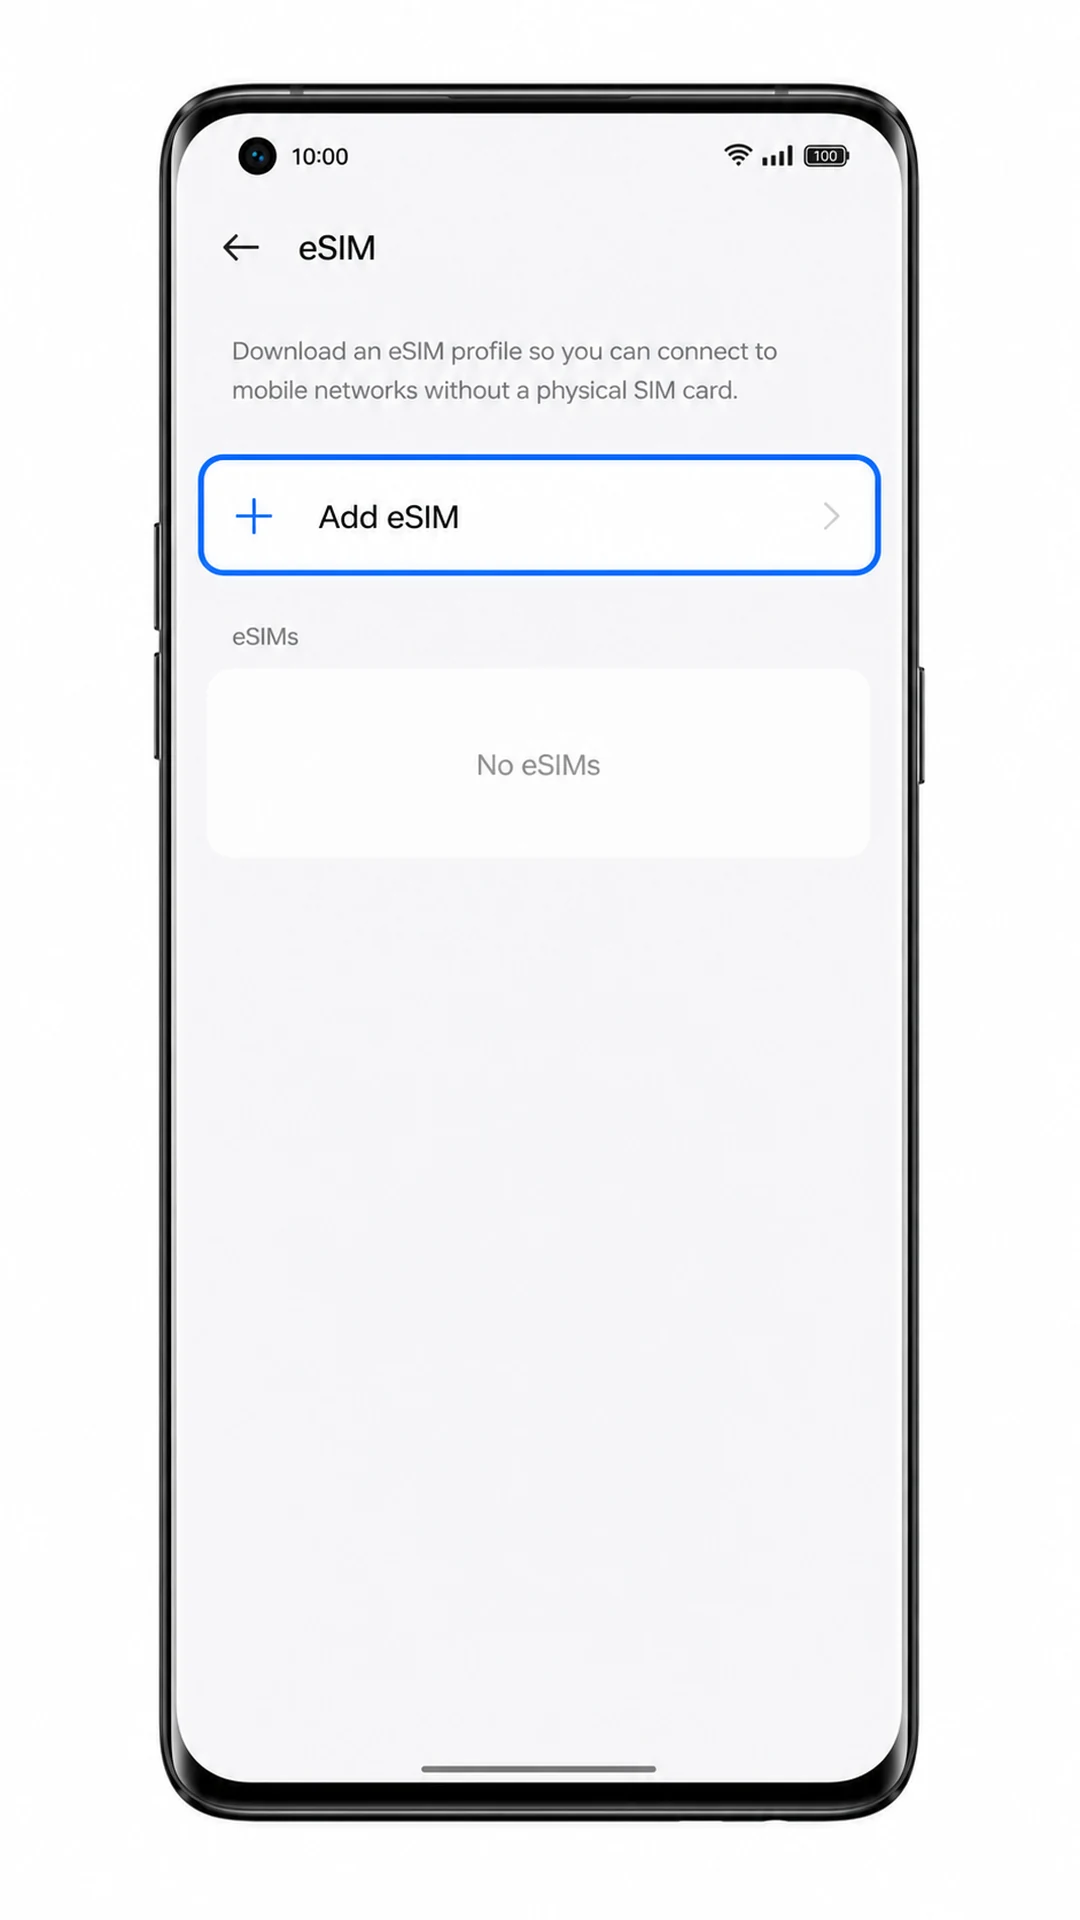
Tap Add eSIM.
ColorOS should open the add-profile screen for downloading a new eSIM.
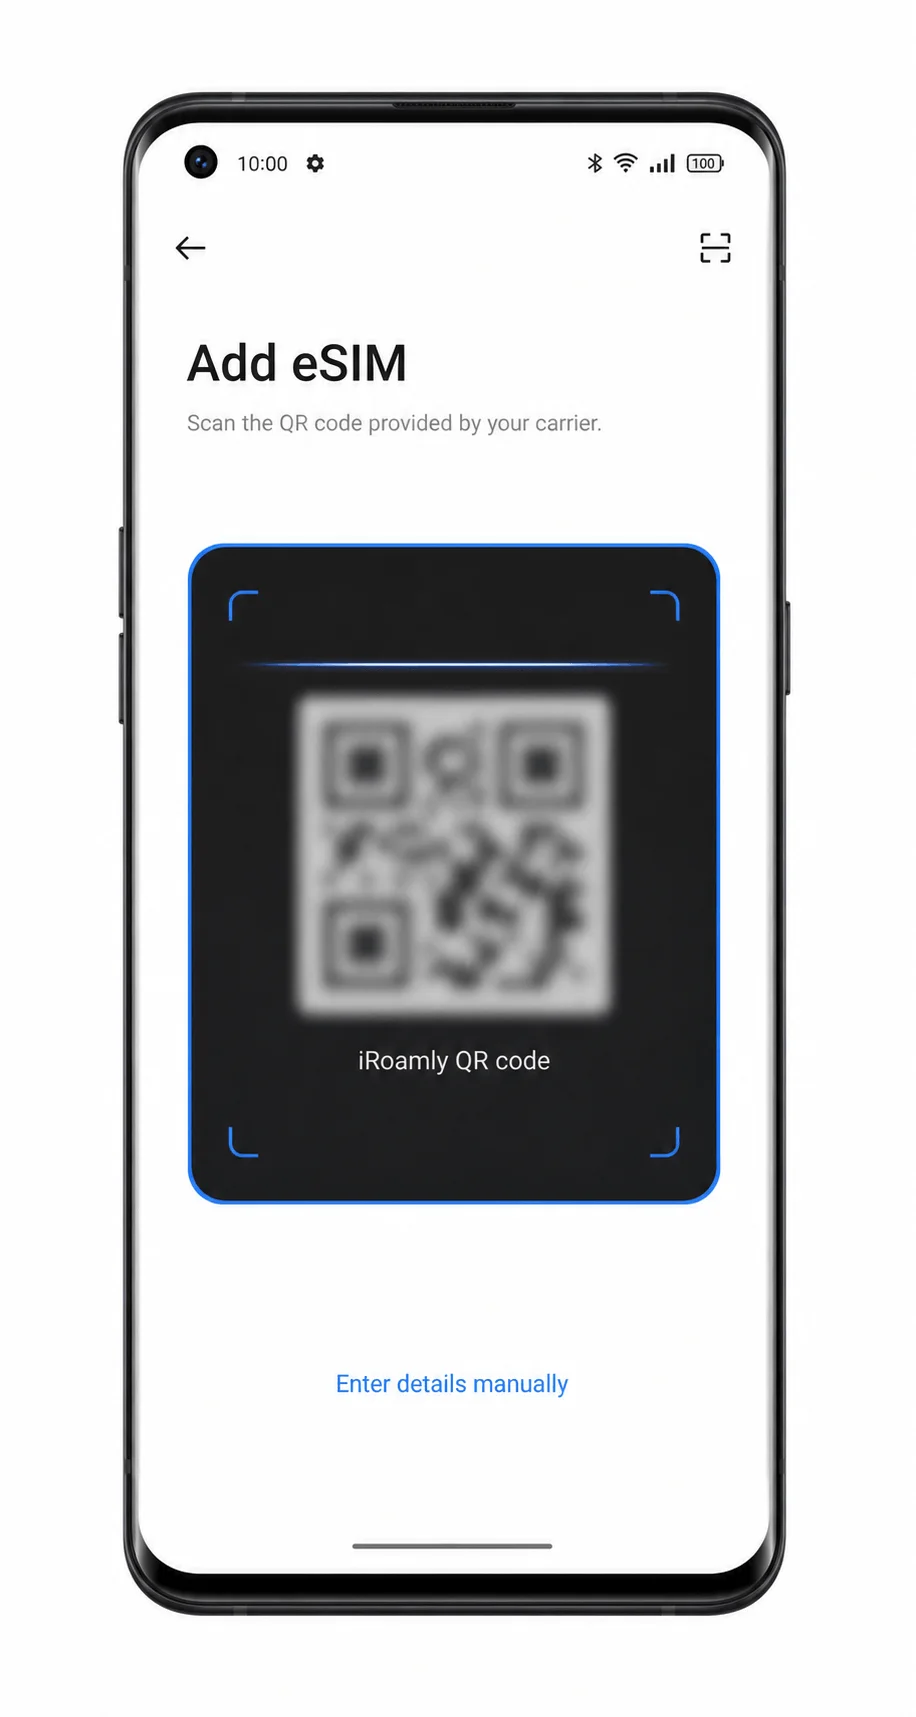
Point the QR scanner at the iRoamly QR code.
Use the QR code from your iRoamly order page or email. Keep the code flat and bright enough to scan. Do not scan a QR code that has already been used on another phone.
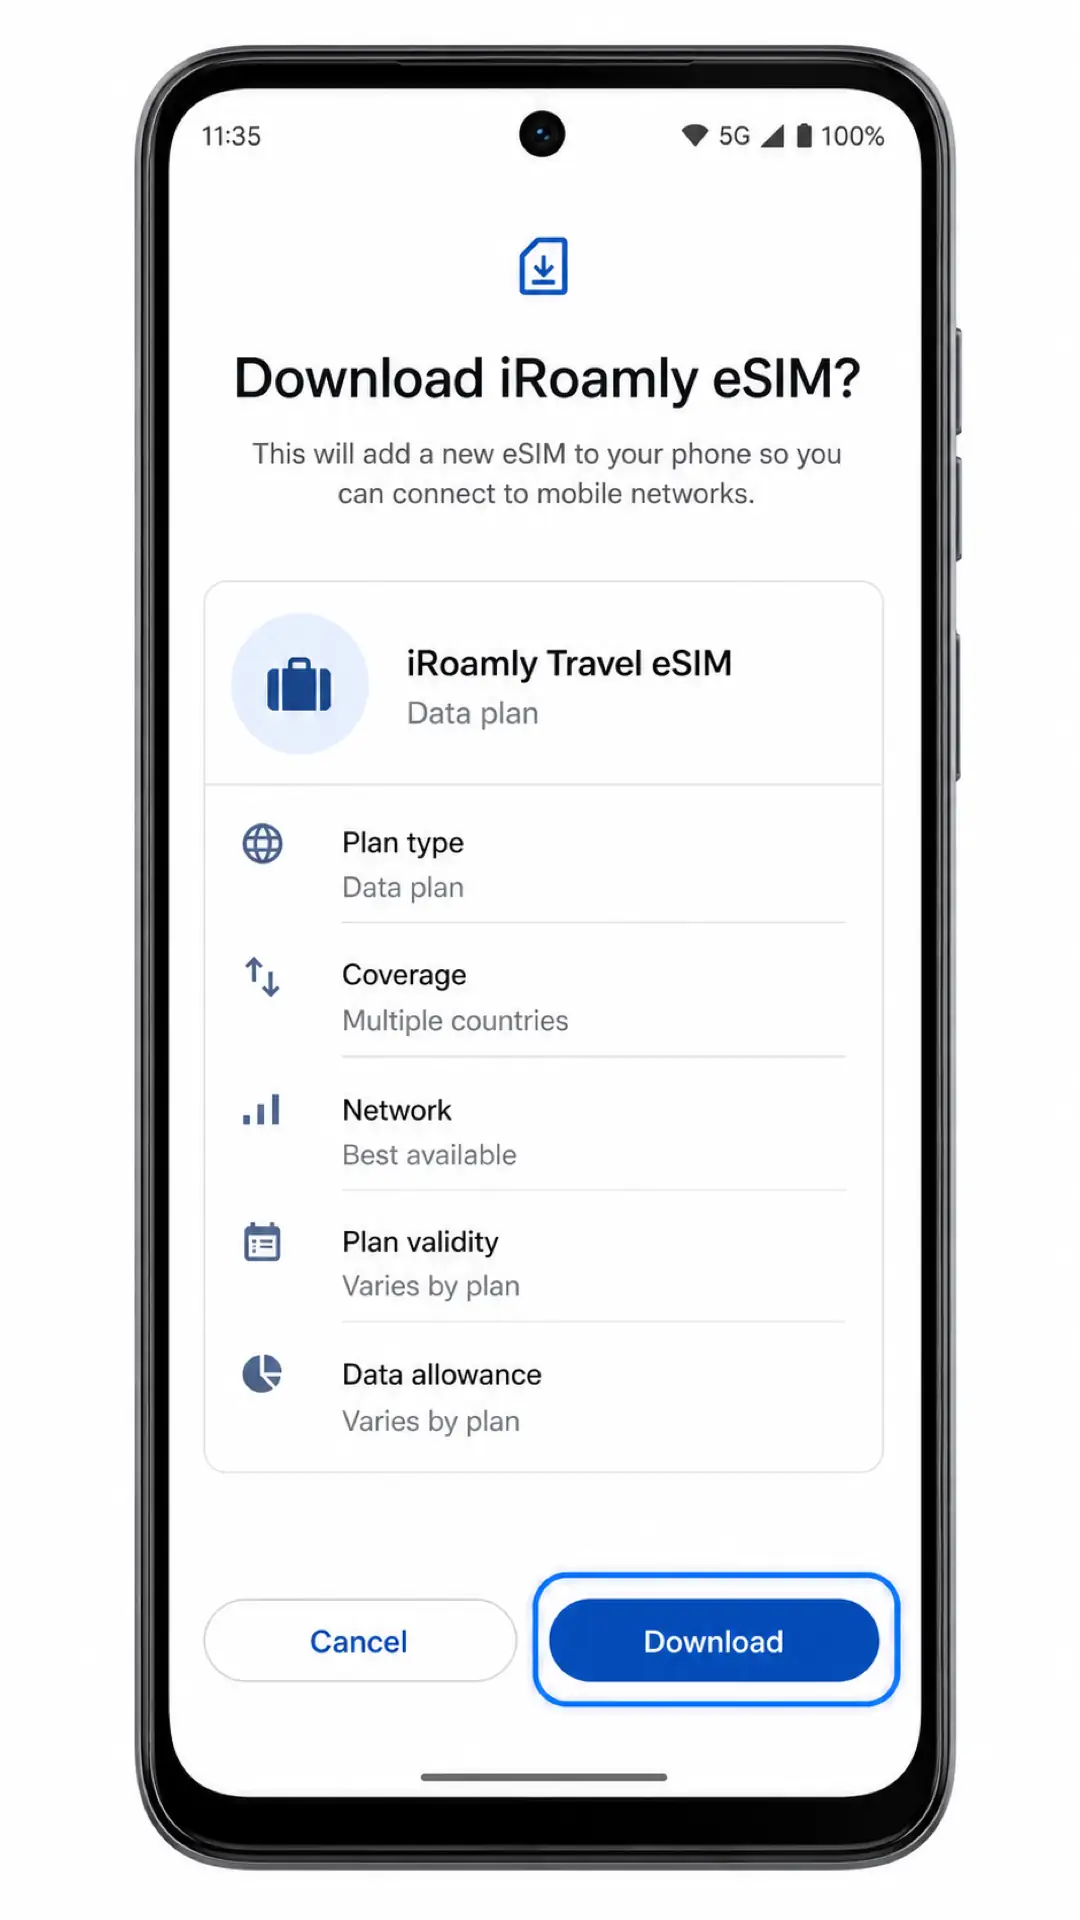
Review the detected iRoamly Travel eSIM profile, then tap Download.
Keep the phone connected to Wi-Fi until the download and profile addition finish. If ColorOS asks whether to enable the profile now, choose the option that keeps the iRoamly eSIM available for travel use.
Method 2: Install eSIM Manually
Open Settings on the Oppo Find X3 Pro, then tap SIM card & mobile data.
This is the same starting point used for QR installation, but you still need to begin from Settings so the phone can open the eSIM download flow.
Tap eSIM in SIM card & mobile data.
The eSIM management screen should appear if your Find X3 Pro variant and carrier firmware support eSIM.
Tap Add eSIM.
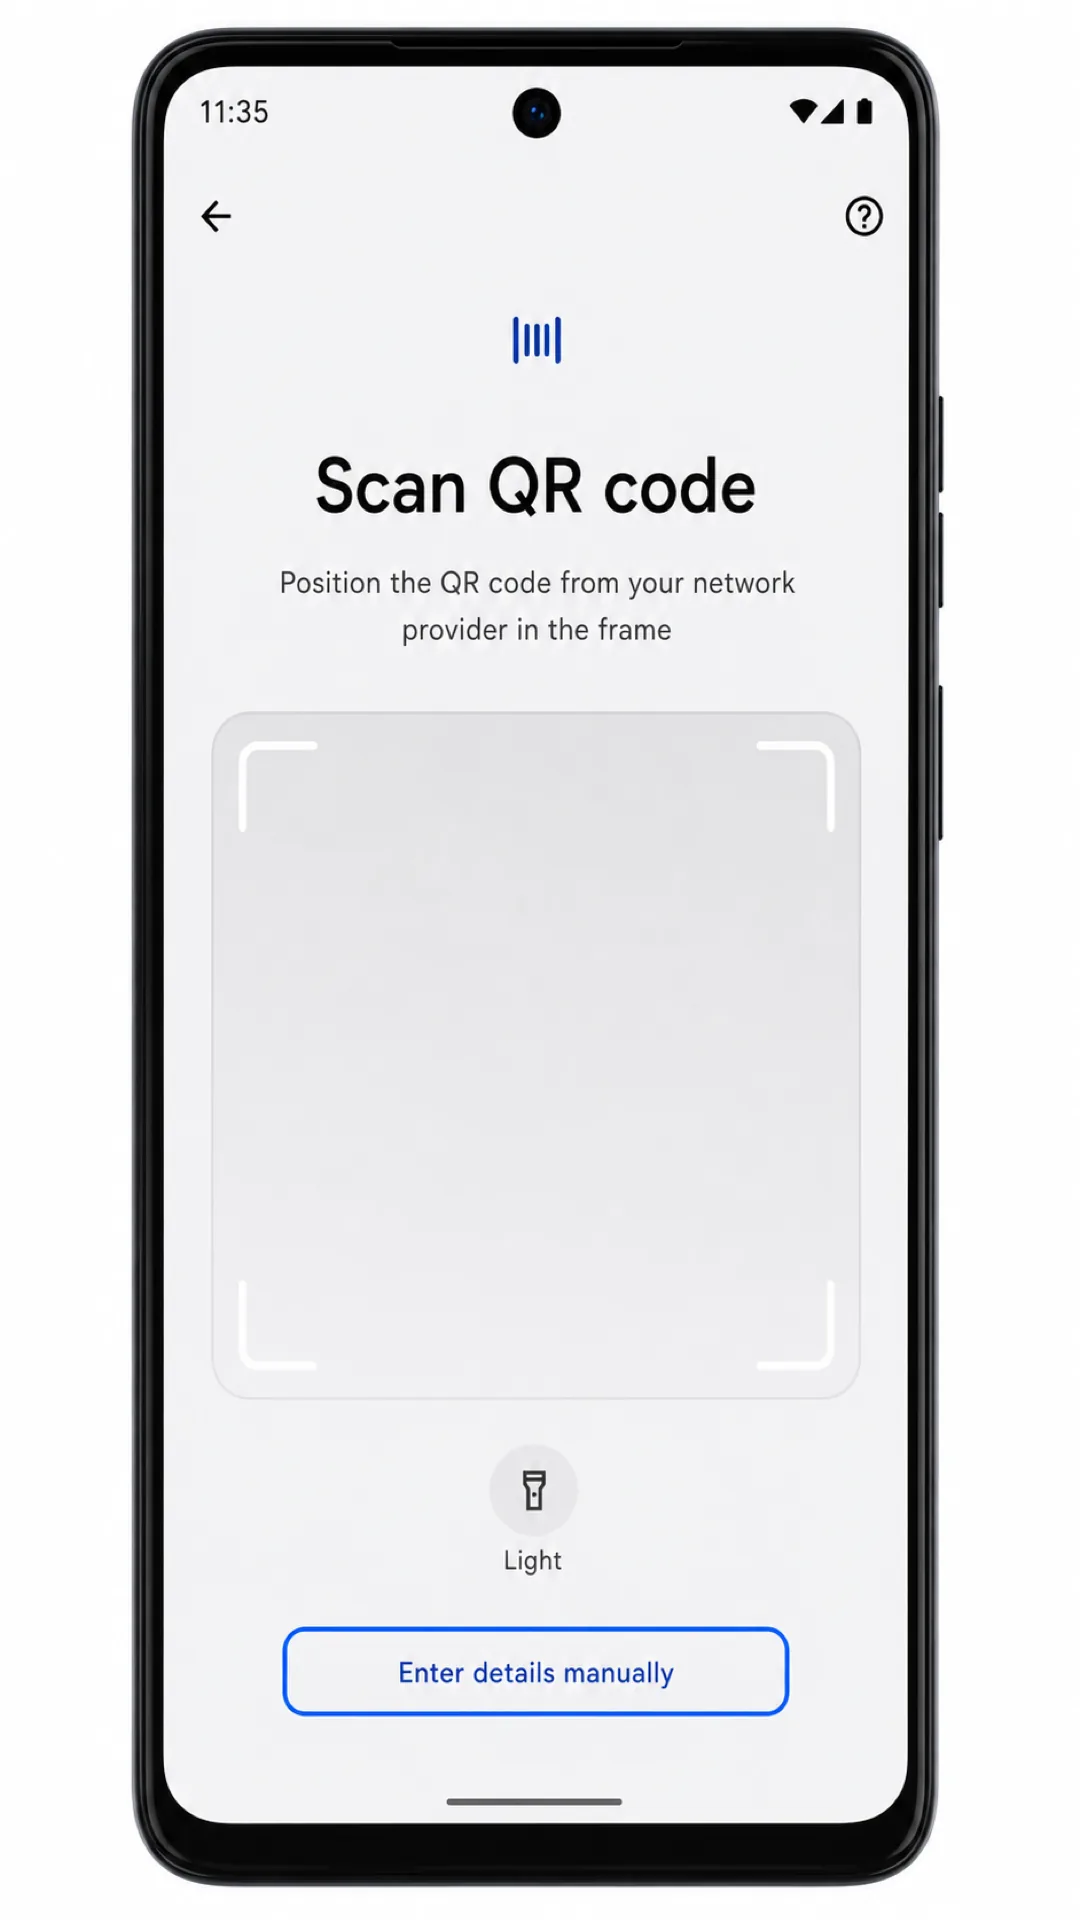
ColorOS should open the screen that can scan a QR code or accept manual setup details.
Tap Enter details manually.
Use this option when the QR code is on the same phone, the camera cannot scan it, or iRoamly provides text activation details instead.
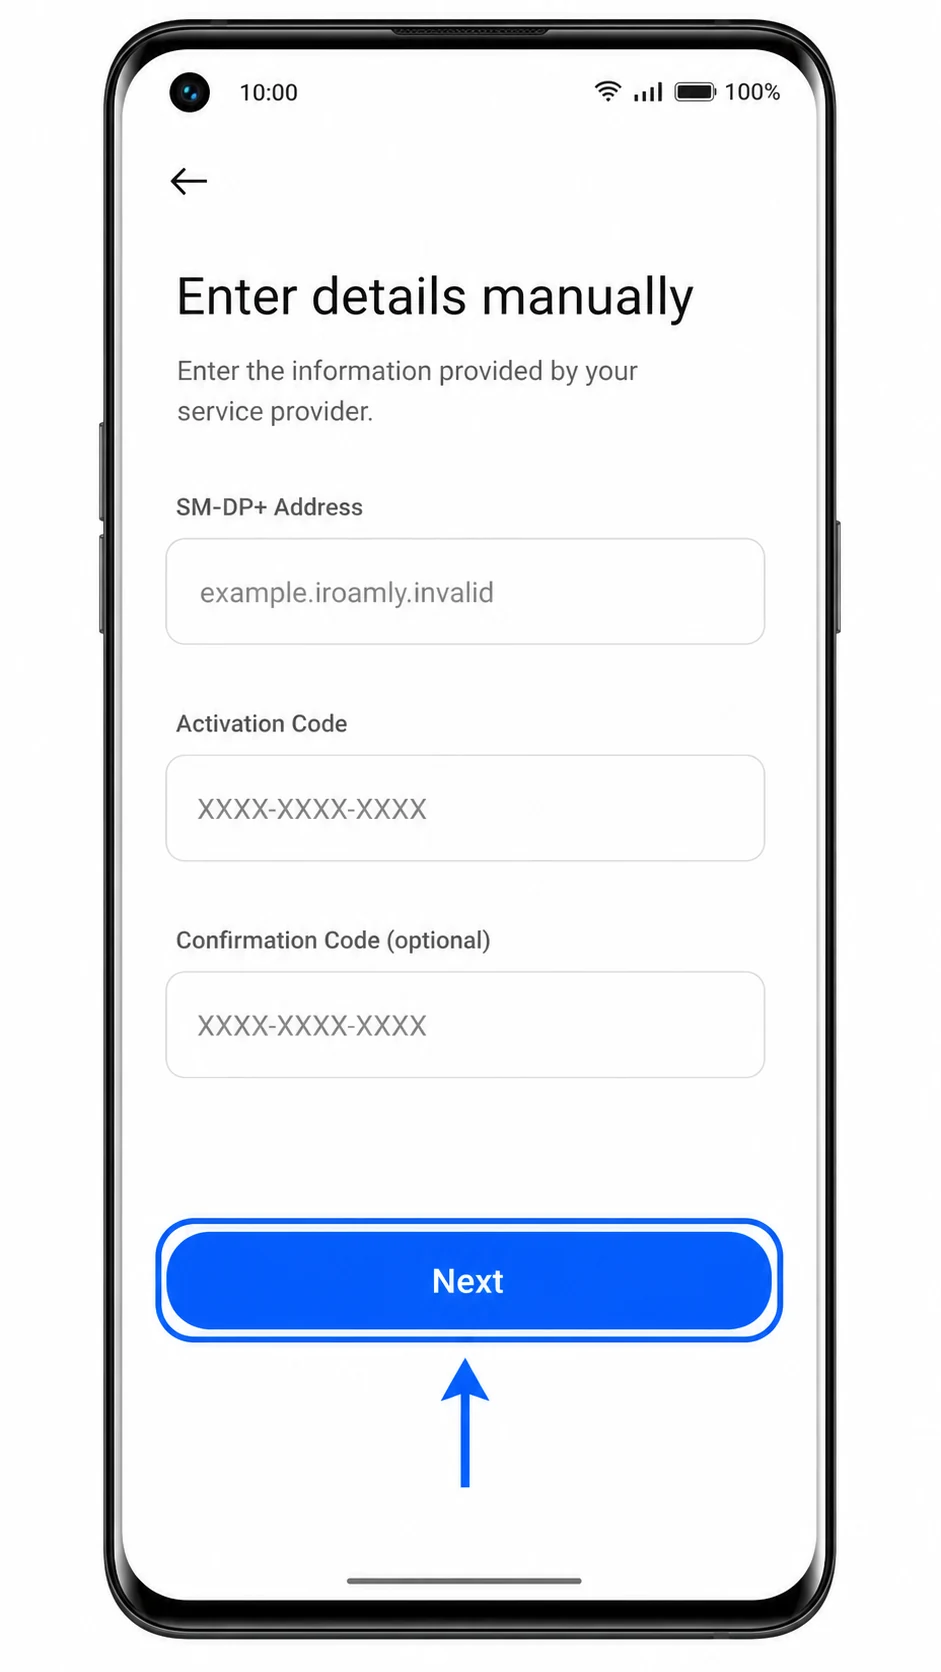
Enter the SM-DP+ Address and Activation Code exactly as shown by iRoamly, add the Confirmation Code only if iRoamly provides one, then tap Next.
Do not add spaces, change capitalization, or split the activation code into a different format. ColorOS uses separate manual-entry fields for the SM-DP+ server address and activation code.
Review the detected iRoamly Travel eSIM profile, then tap Download.
Wait for ColorOS to finish adding the profile before closing Settings or restarting the phone.
How to Confirm Your iRoamly eSIM Is Installed
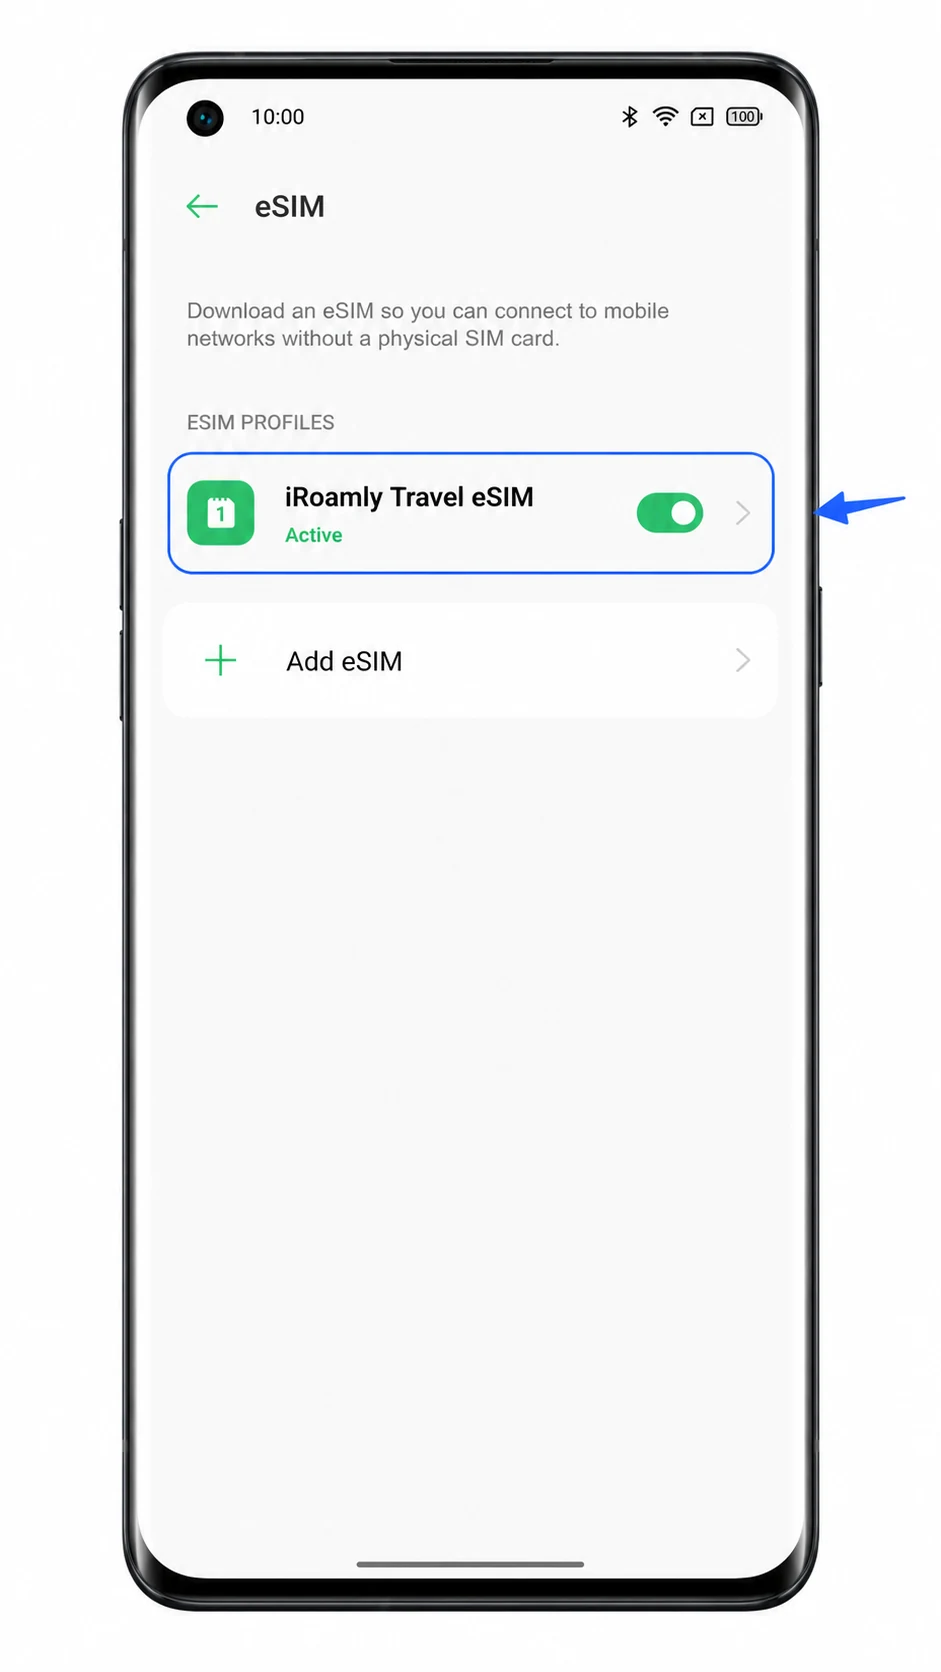
Go to Settings > SIM card & mobile data > eSIM, then look for iRoamly Travel eSIM in the installed profiles list.
The profile should appear as installed or active. If it is off, switch it on before travel data setup.
If you are already at your destination, turn off Wi-Fi briefly and check whether mobile data loads through the iRoamly eSIM after you configure data settings.
Do not test calls or SMS unless your specific iRoamly plan says those services are included. Many travel eSIM plans are data-only.
Configure eSIM for Mobile Data
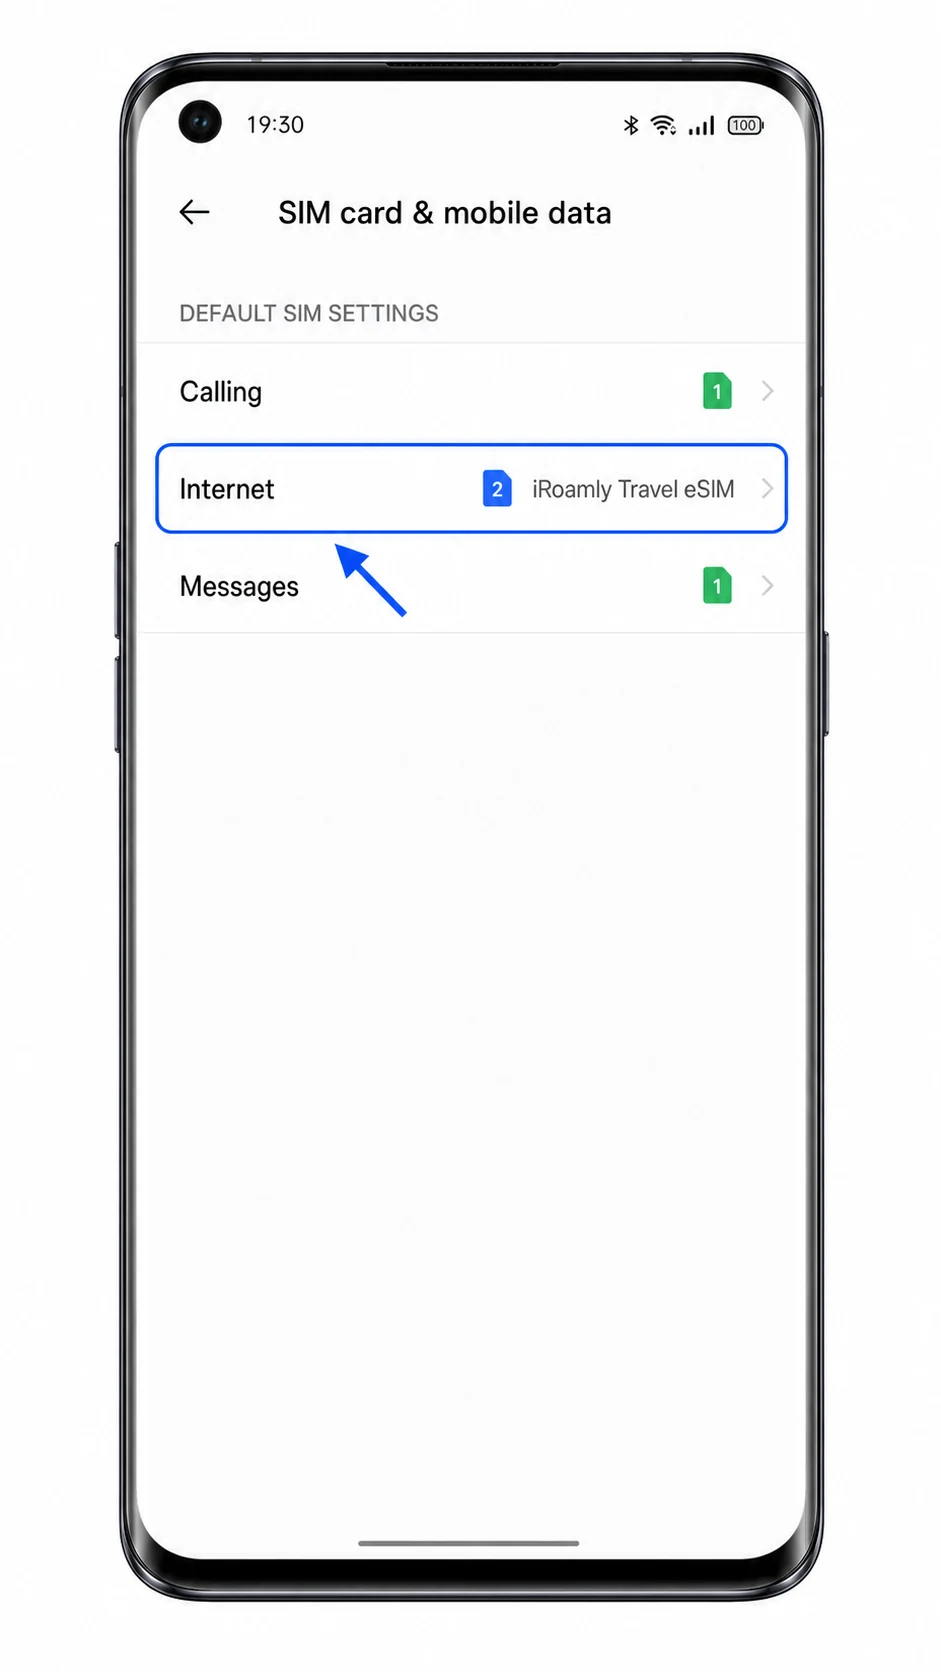
Open Settings > SIM card & mobile data, then choose the Internet or mobile data row under default SIM settings and select iRoamly Travel eSIM.
This makes the iRoamly eSIM the data line, while your physical SIM can remain available for supported calls or messages if you want to keep it on.
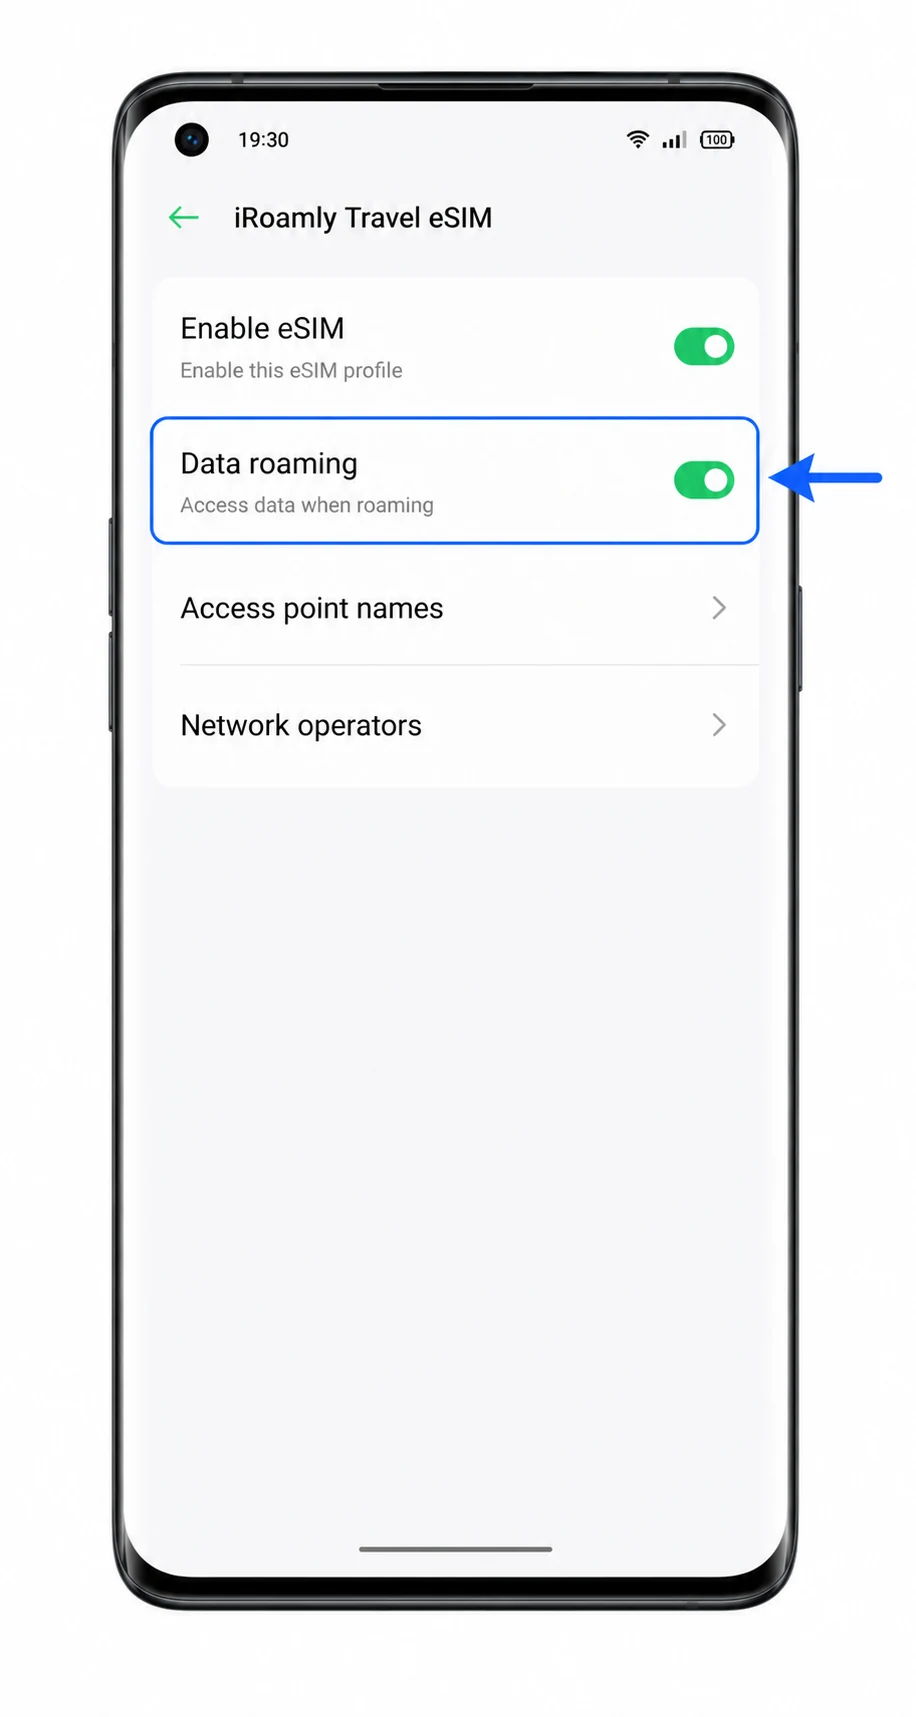
Open the iRoamly Travel eSIM profile and turn on Data roaming if your iRoamly plan or destination instructions require it.
Travel eSIMs often need data roaming enabled to connect to partner networks outside your home country. If data does not work after landing, check this switch first.
Troubleshooting
If eSIM or Add eSIM is missing, confirm that your Oppo Find X3 Pro regional model supports eSIM and that your carrier firmware has not disabled it. Also install the latest ColorOS update available for the phone.
If the QR code does not scan, increase screen brightness on the device showing the code, clean the camera lens, or use Enter details manually.
If ColorOS says the QR code was already used, do not keep retrying. Contact iRoamly support because many eSIM QR codes can be installed only once.
If activation stays pending, keep Wi-Fi connected, leave the eSIM profile on, and restart the phone once. Some plans finish activation only after reaching the destination network.
If the iRoamly eSIM does not appear after download, return to Settings > SIM card & mobile data > eSIM and check whether the profile is switched off or waiting to finish setup.
If mobile data does not work, select iRoamly Travel eSIM for Internet, enable Data roaming, turn Wi-Fi off for testing, and check that the destination is covered by your iRoamly plan.
If calls or SMS do not work, check the plan details. Do not assume these services are included with a travel eSIM.
More Oppo Find eSIM Guides
Have another Oppo Find model to set up? Use the guide for that phone.
Conclusion
For the Oppo Find X3 Pro, scanning the iRoamly QR code is usually the fastest route because ColorOS can detect the eSIM profile from the Add eSIM scanner and move straight to Download.
Manual entry is the better fallback when the QR code is unavailable or hard to scan, as long as you copy the separate SM-DP+ Address and Activation Code exactly.
After installation, the most useful checks are inside Settings > SIM card & mobile data > eSIM: make sure iRoamly Travel eSIM is present and switched on, then choose it for Internet and enable Data roaming when your destination plan requires it. Once those settings are in place, the Find X3 Pro is ready to use the iRoamly eSIM for travel data.