
The Oppo Reno 15 5G global model CPH2825 supports eSIM and runs ColorOS 16. Its eSIM setup path is handled from Settings > Mobile network > eSIM, with the new profile added through Add eSIM.
For travelers, an iRoamly travel eSIM can keep mobile data separate from the primary SIM while abroad. This is useful when you want to keep your usual number in the phone but use a destination data plan for maps, messaging apps, tickets, and ride-hailing.
This guide covers both setup routes: scanning the iRoamly QR code and entering the SM-DP+ Address plus Activation Code manually. Menu names can vary slightly by region, carrier firmware, or ColorOS update, but the steps below use the verified Oppo Reno 15 5G and ColorOS 16 flow.

Get Your Oppo Ready for Travel with iRoamly
iRoamly eSIM is a travel eSIM service that provides mobile data plans you can install digitally on compatible phones. Available options may include destination, regional, and global plans, while plan duration, data amount, and supported features can vary by destination.
With the profile installed, your travel data can support everyday online needs such as maps, messaging, transport, bookings, and travel alerts.
Because supported Oppo Reno 15 5G models can add an eSIM profile through ColorOS settings, iRoamly can work as the travel data line alongside your regular SIM. The instructions below show how to install the profile by QR code or manual entry and then select it for mobile data.
Before You Set Up Your iRoamly eSIM
Connect the Oppo Reno 15 to stable Wi-Fi before downloading the eSIM profile.
Confirm that your Reno 15 variant supports eSIM. The global CPH2825 specification lists eSIM support, but availability can still vary by region or carrier software.
Keep your iRoamly QR code open on another device, printed, or available in your iRoamly account or purchase email.
For manual setup, keep the iRoamly SM-DP+ Address, Activation Code, and any optional confirmation code ready.
Install the eSIM 1-2 days before travel when your plan allows it, but wait to use travel data until you need the plan.
Heading to the United States or Spain? You can keep the destination eSIM installed as the Oppo travel data line, then choose it for mobile data when the plan should be used.
iRoamly eSIM validity starts from activation. The exact activation trigger can vary by plan, so check your current plan details before installing or using data.
Many iRoamly travel eSIM plans are data-focused. Voice calls and SMS vary by plan, so do not assume they are included unless your specific plan says so.
Do not delete the iRoamly eSIM after installation unless iRoamly support tells you to. Many eSIM profiles cannot be installed again after removal.
Method 1: Install eSIM by Scanning a QR Code
1. Open Settings on the Oppo Reno 15, then tap Mobile network. You should see the ColorOS mobile network page with SIM and eSIM controls.
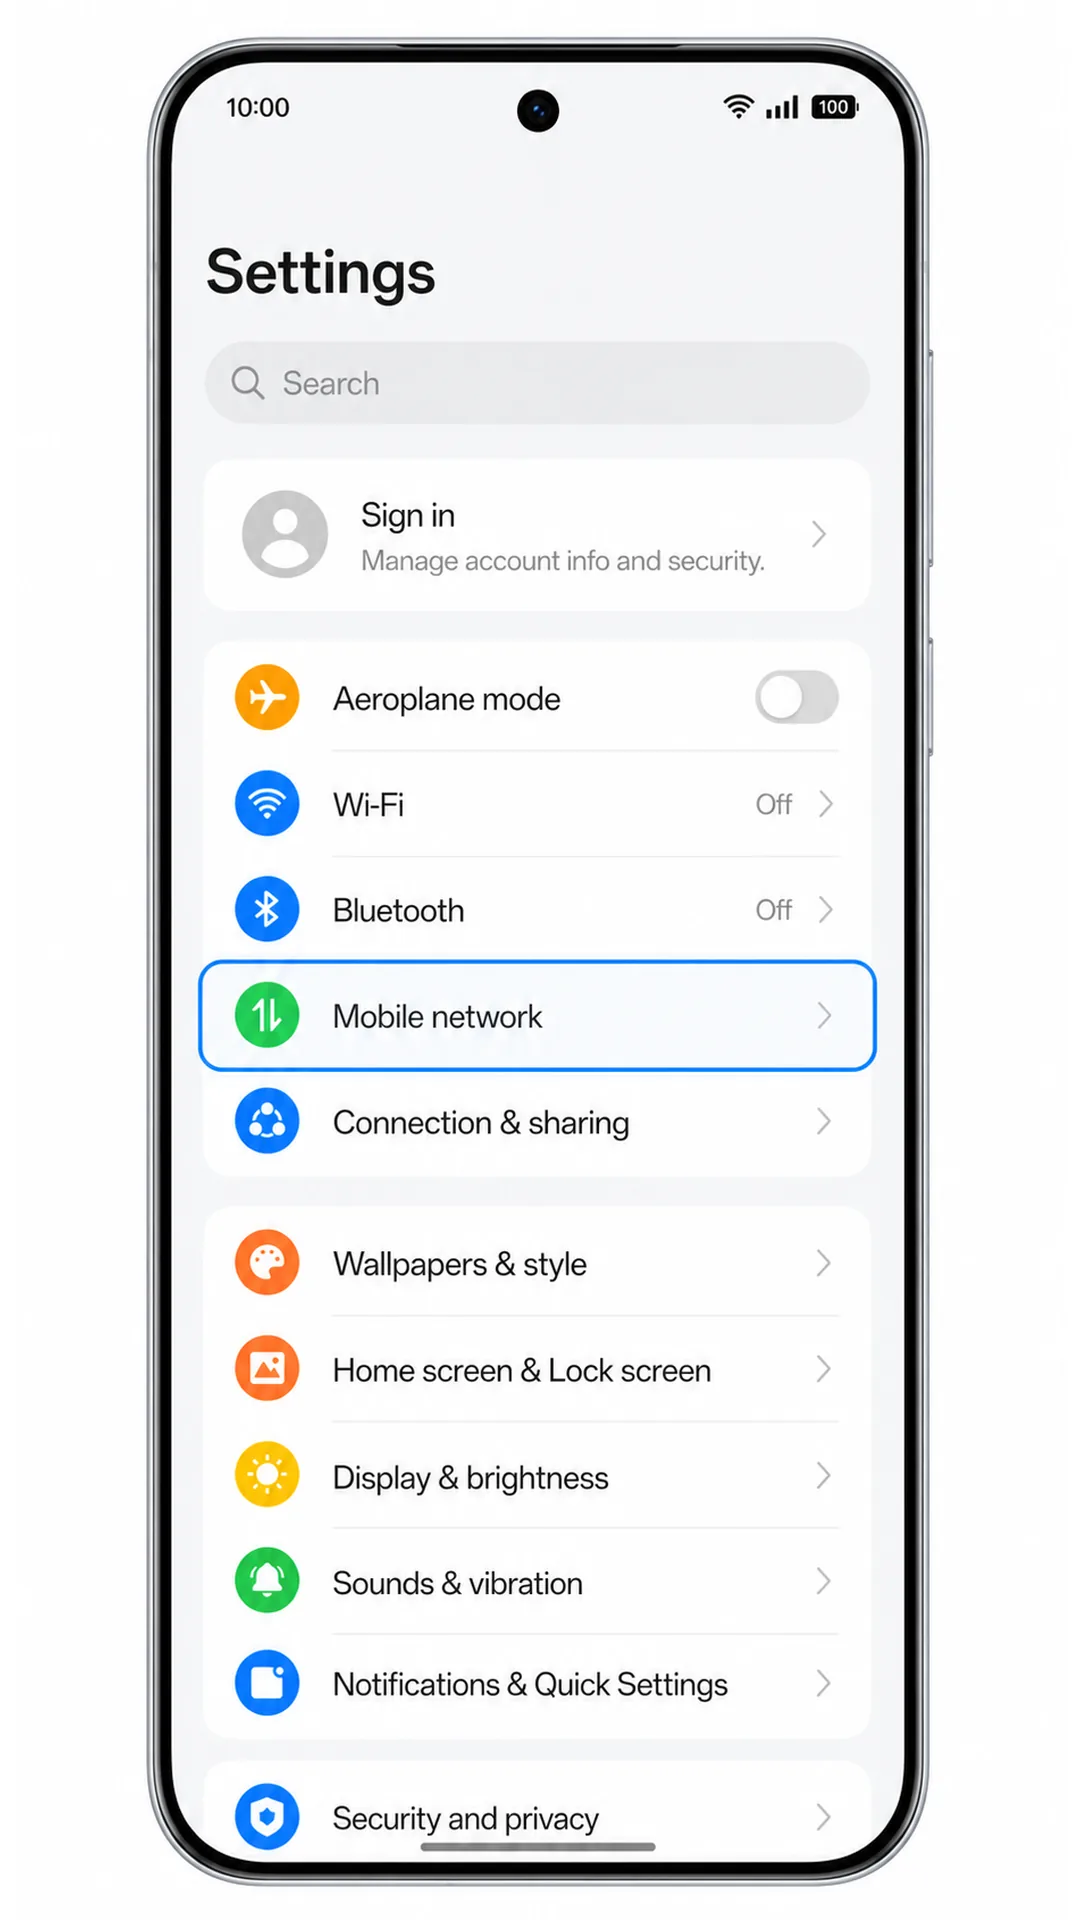
2. Tap eSIM on the Mobile network page. The phone should open the eSIM management screen.
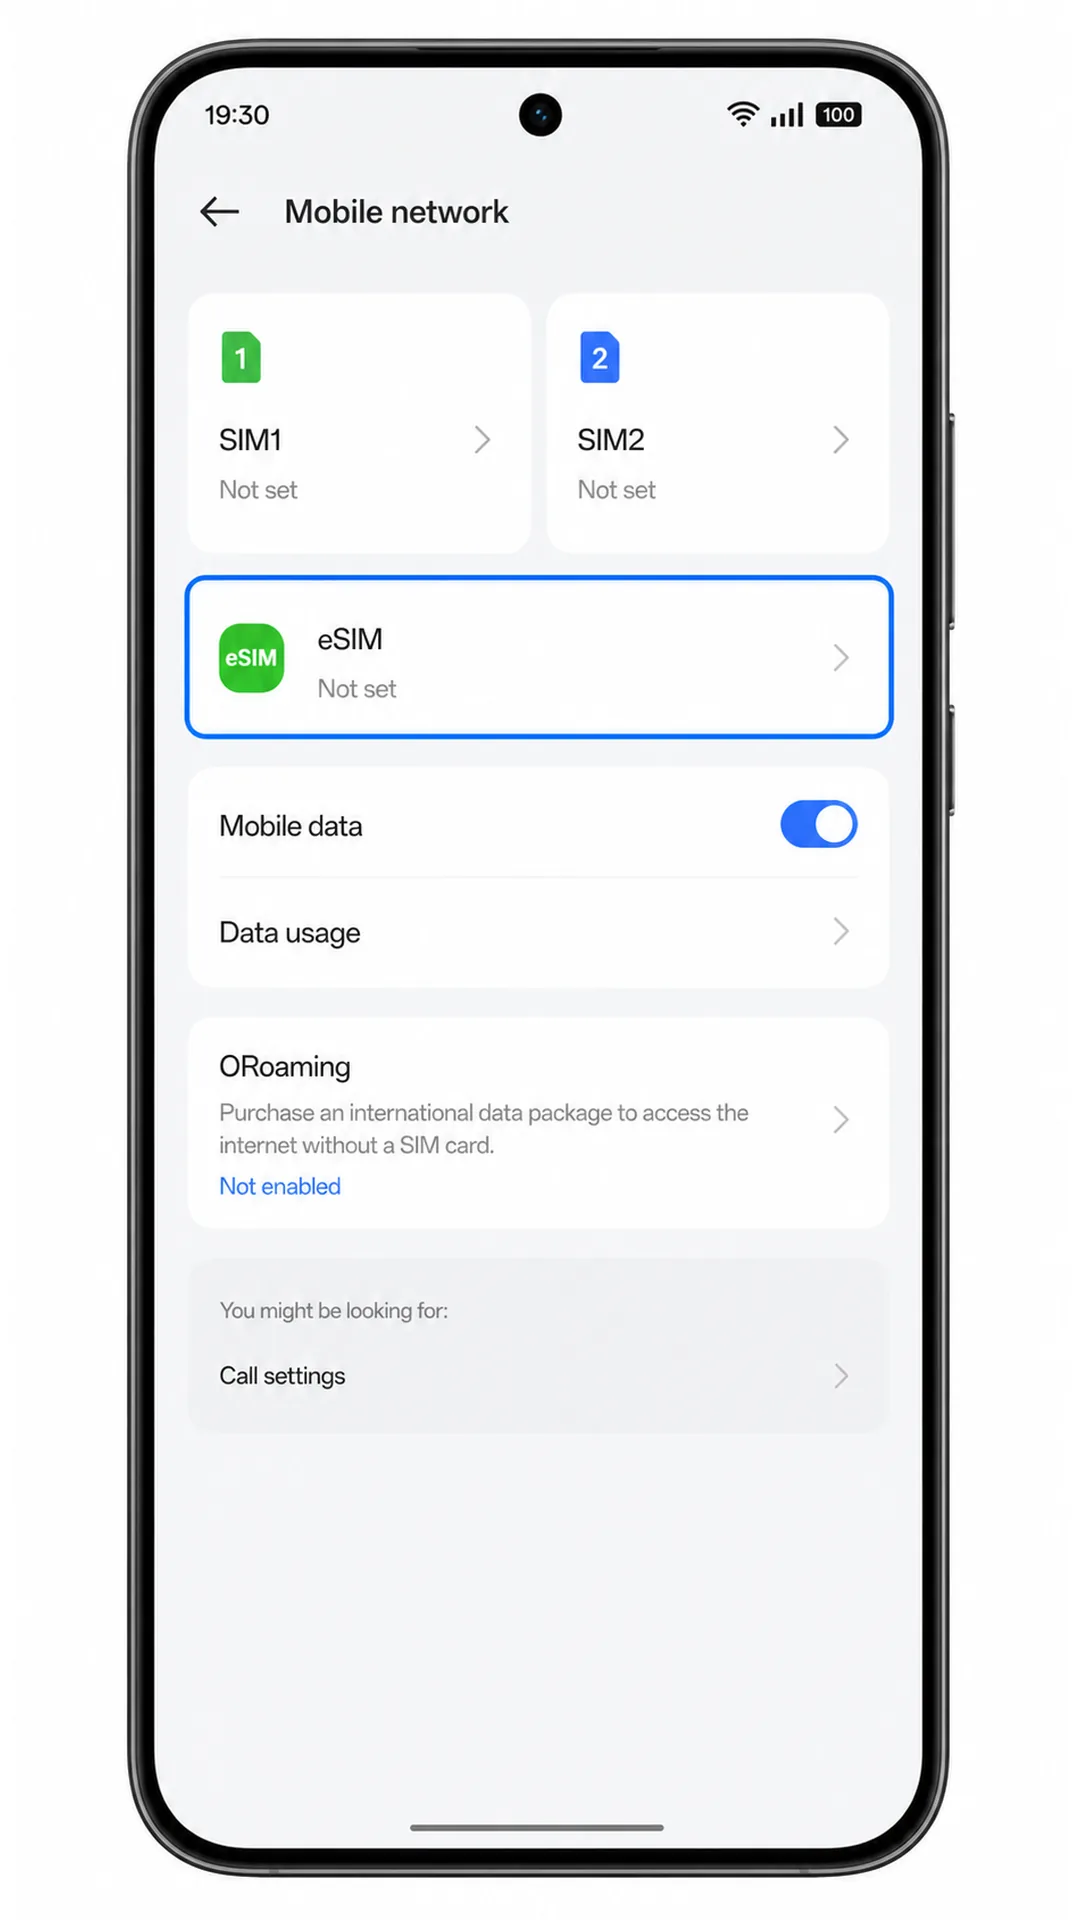
3. Tap Add eSIM. ColorOS should start the add-eSIM setup flow.
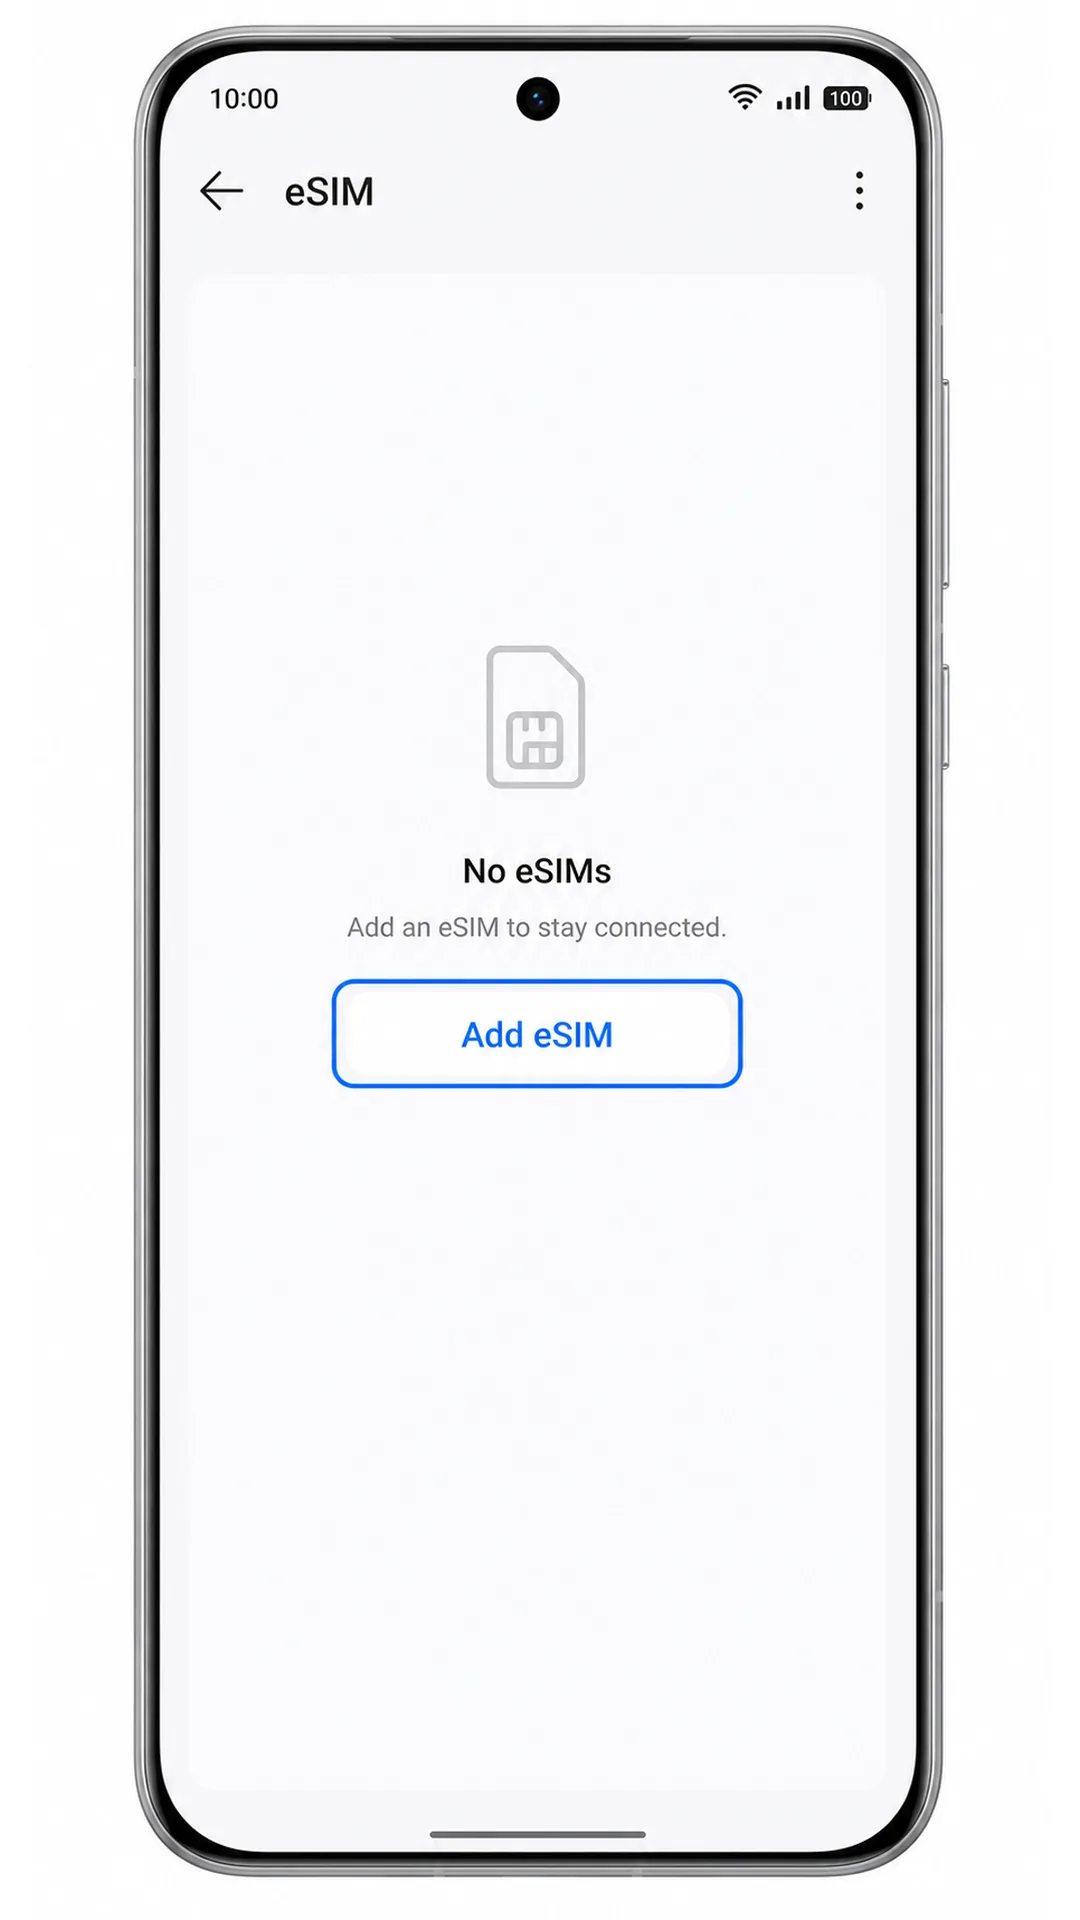
4. Choose Scan QR code if ColorOS asks for a setup method, then point the camera at the iRoamly QR code. Keep the code bright and flat until the phone reads it.
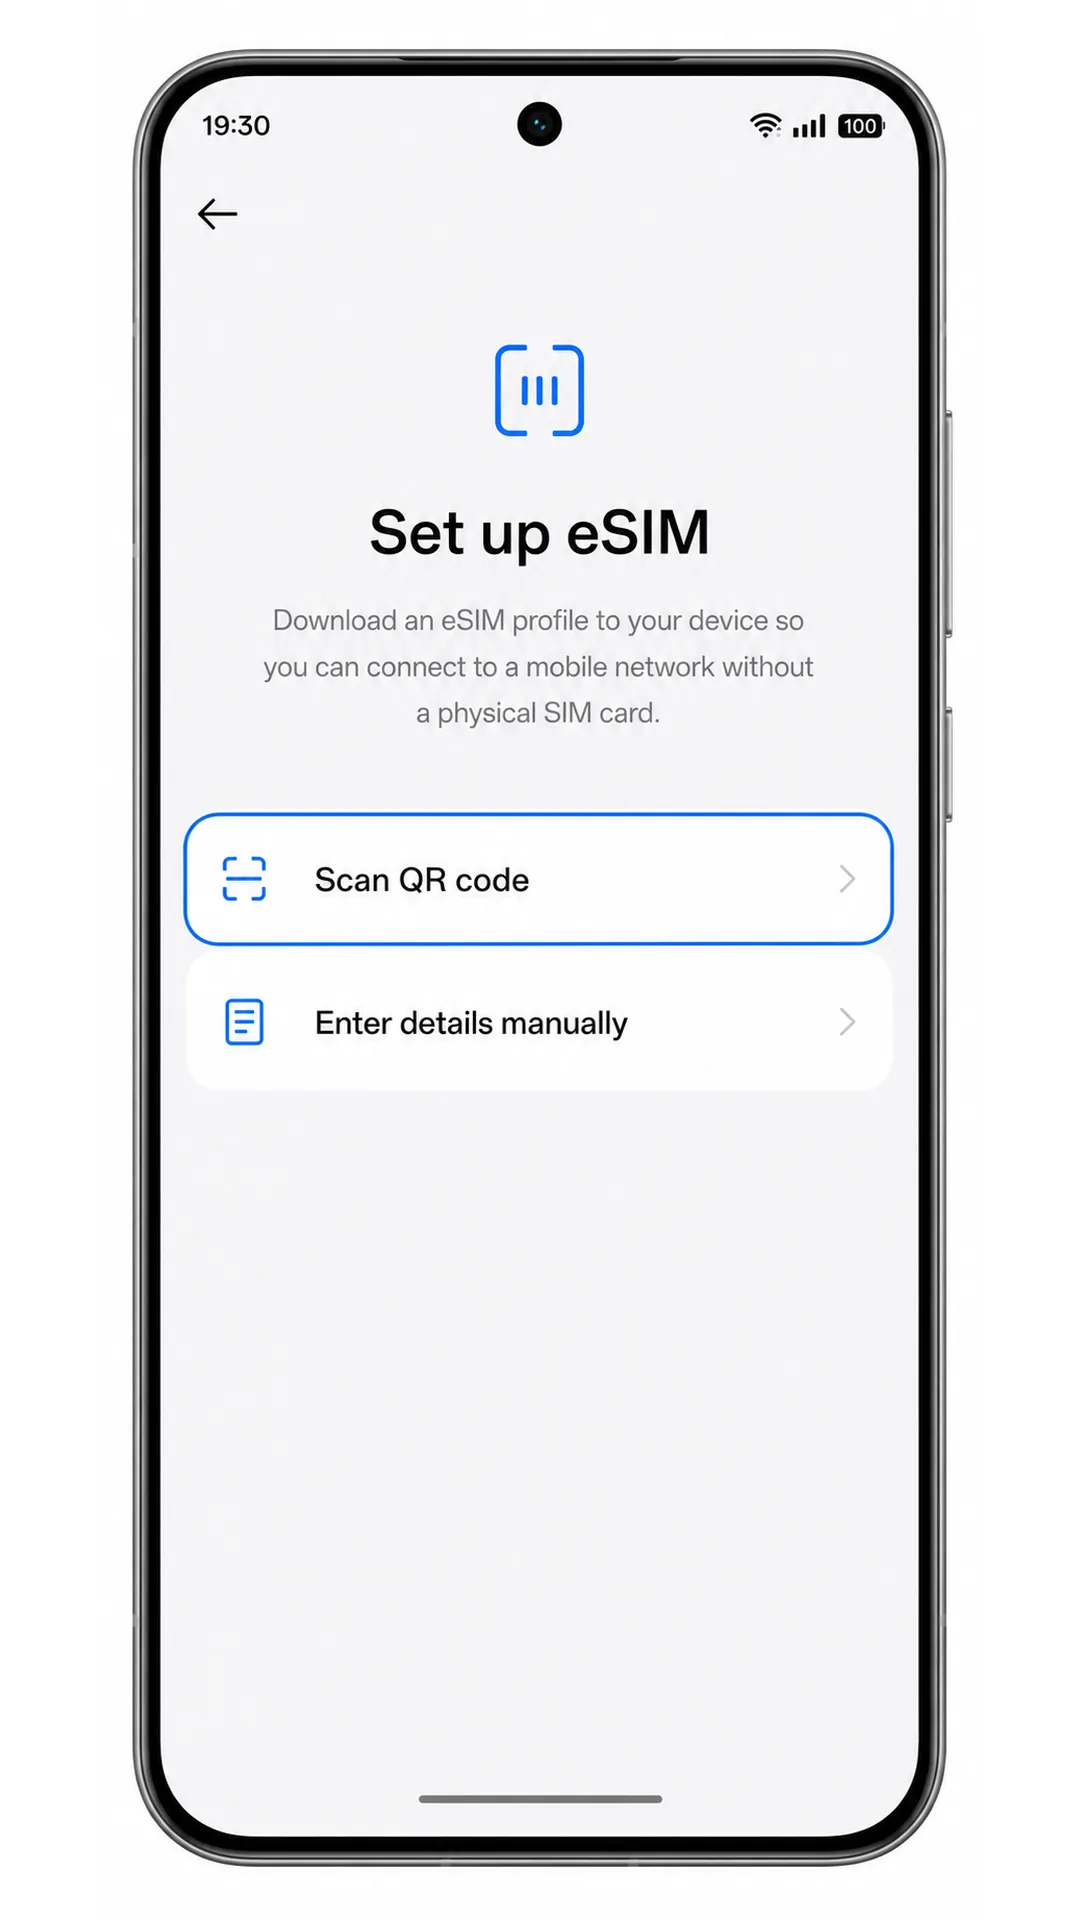
5. Review the detected iRoamly eSIM profile, then tap Download or Add. Keep Wi-Fi connected while the Reno 15 downloads the profile.
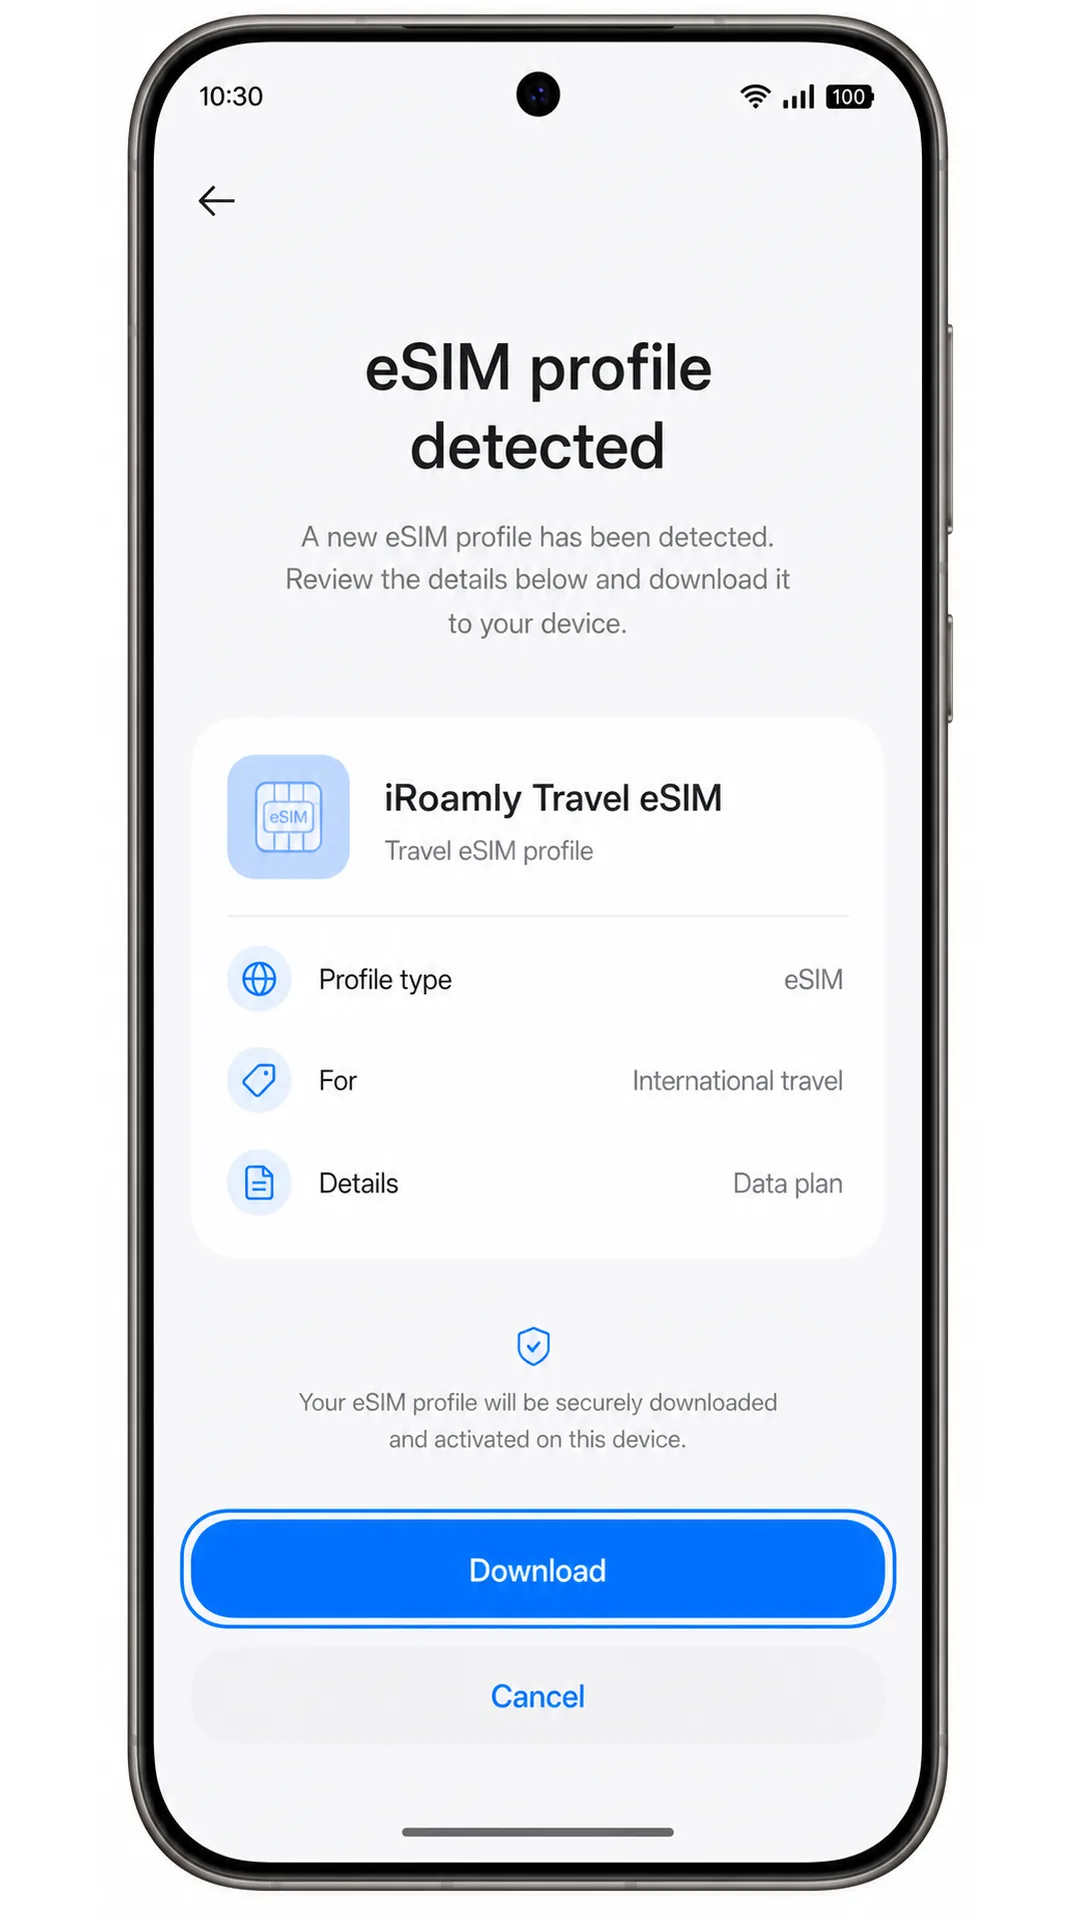
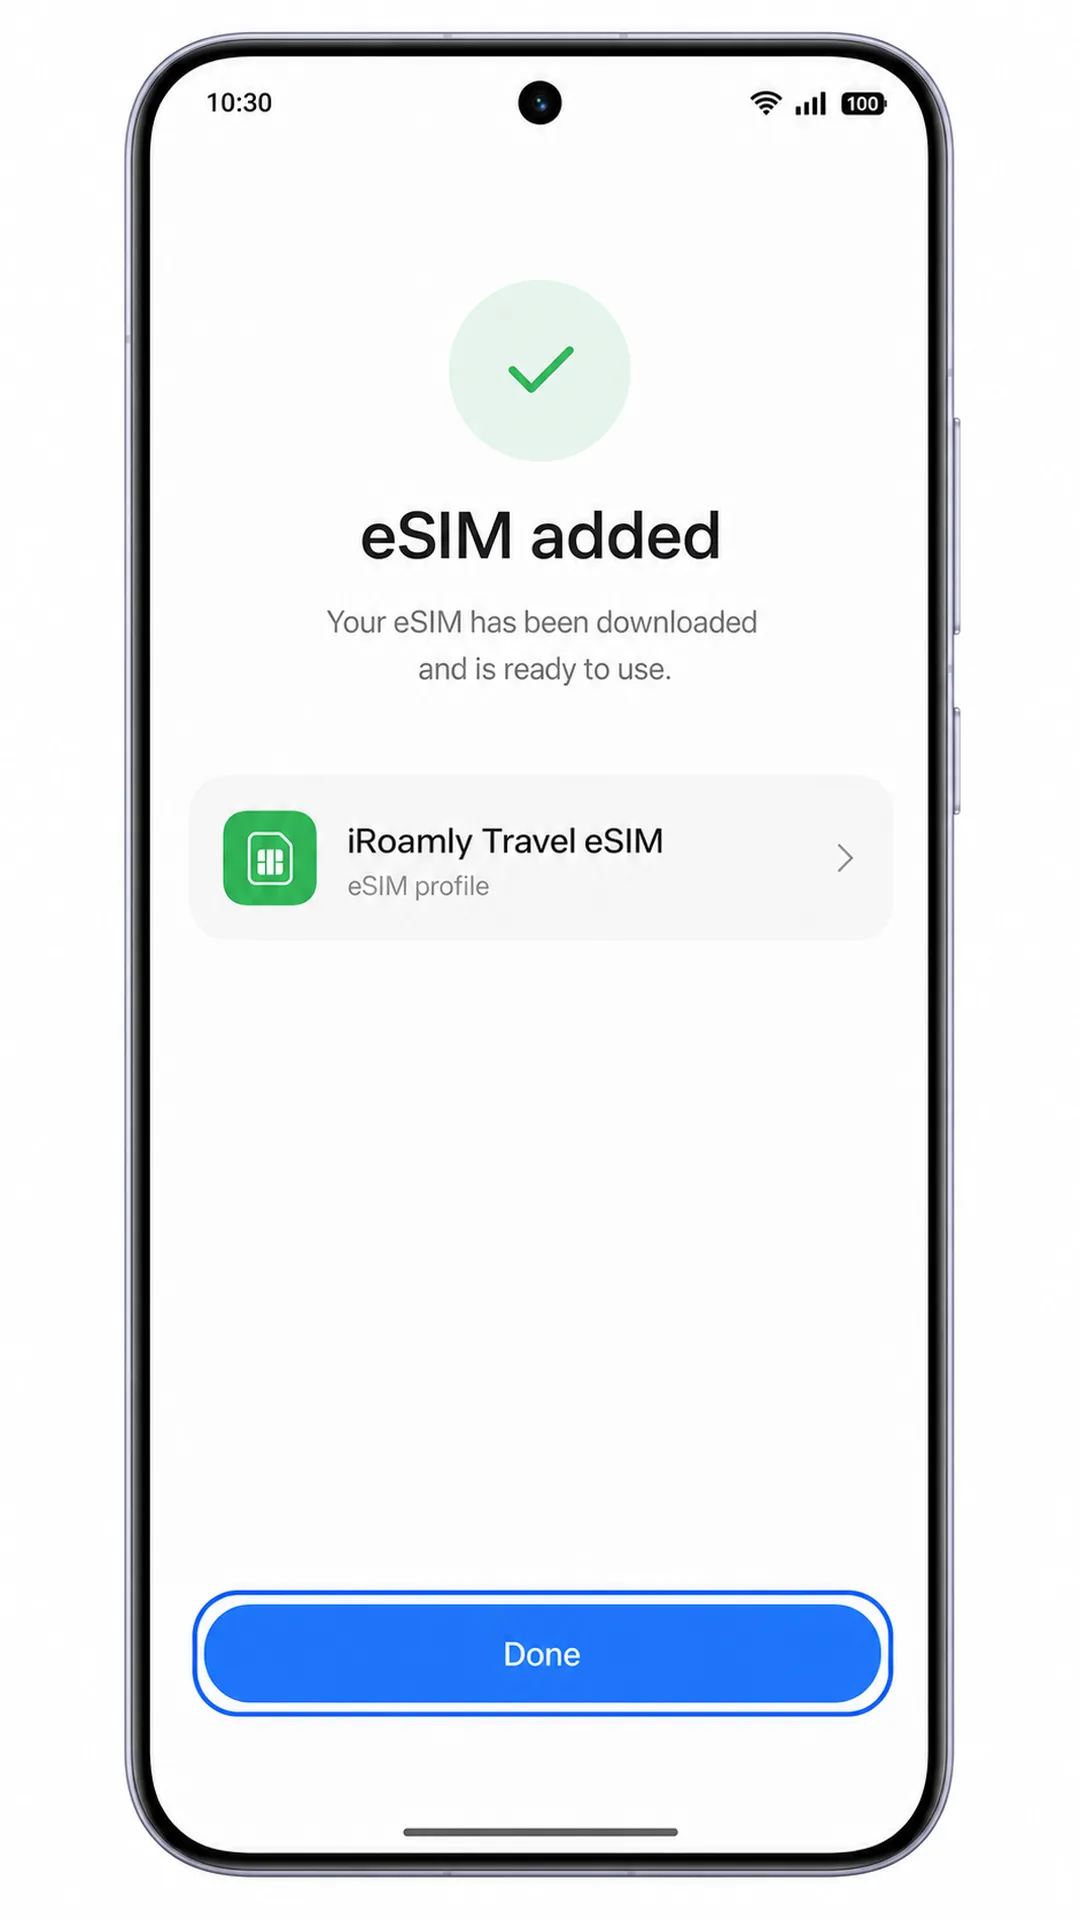
6. Tap Done after ColorOS confirms that the eSIM was added. If the phone asks whether to turn on the new eSIM now, leave it available but wait to use roaming data until you are ready.
Method 2: Install eSIM Manually
1. Open Settings on the Oppo Reno 15, then tap Mobile network. This is the same starting point used for QR setup.
2. Tap eSIM on the Mobile network page. You should return to the eSIM management screen.
3. Tap Add eSIM. ColorOS should open the new eSIM setup flow.
4. On the QR-code setup screen, tap Need help? or Enter details manually. ColorOS should show the manual activation option.
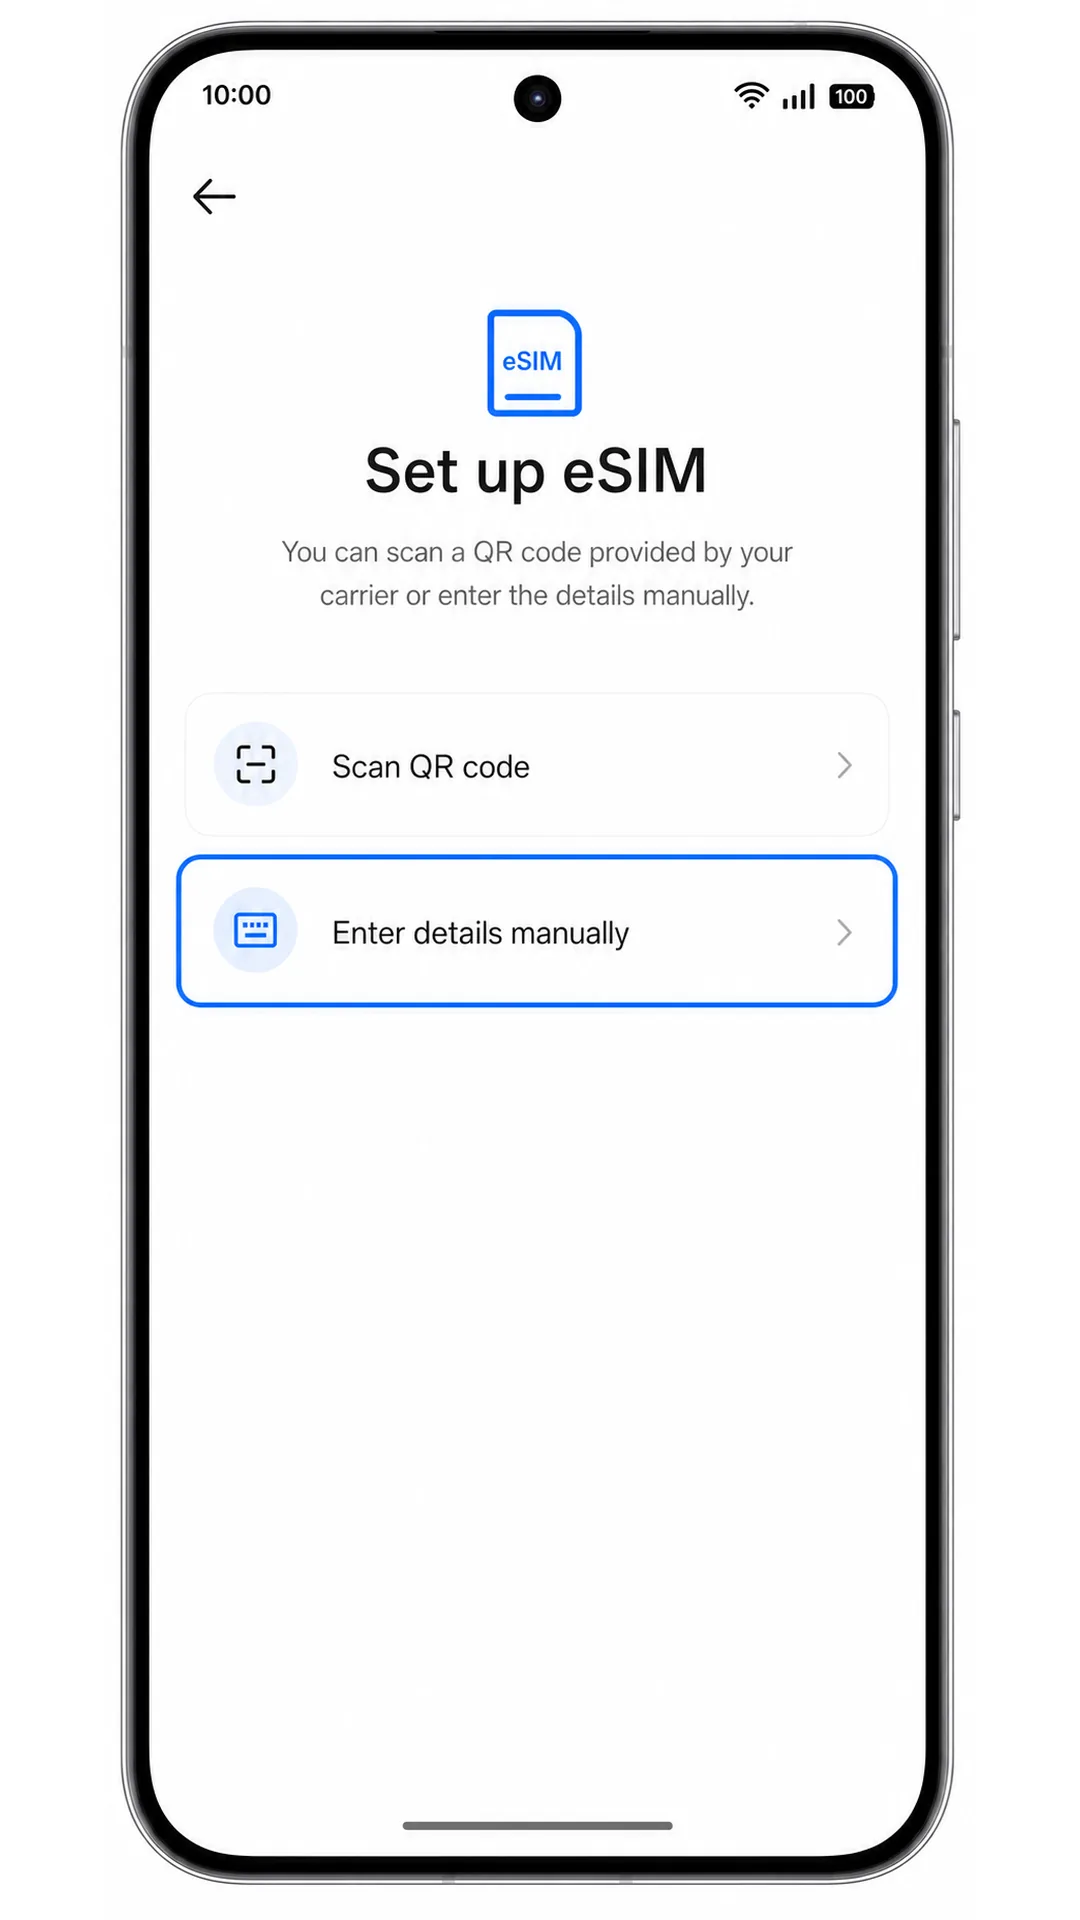
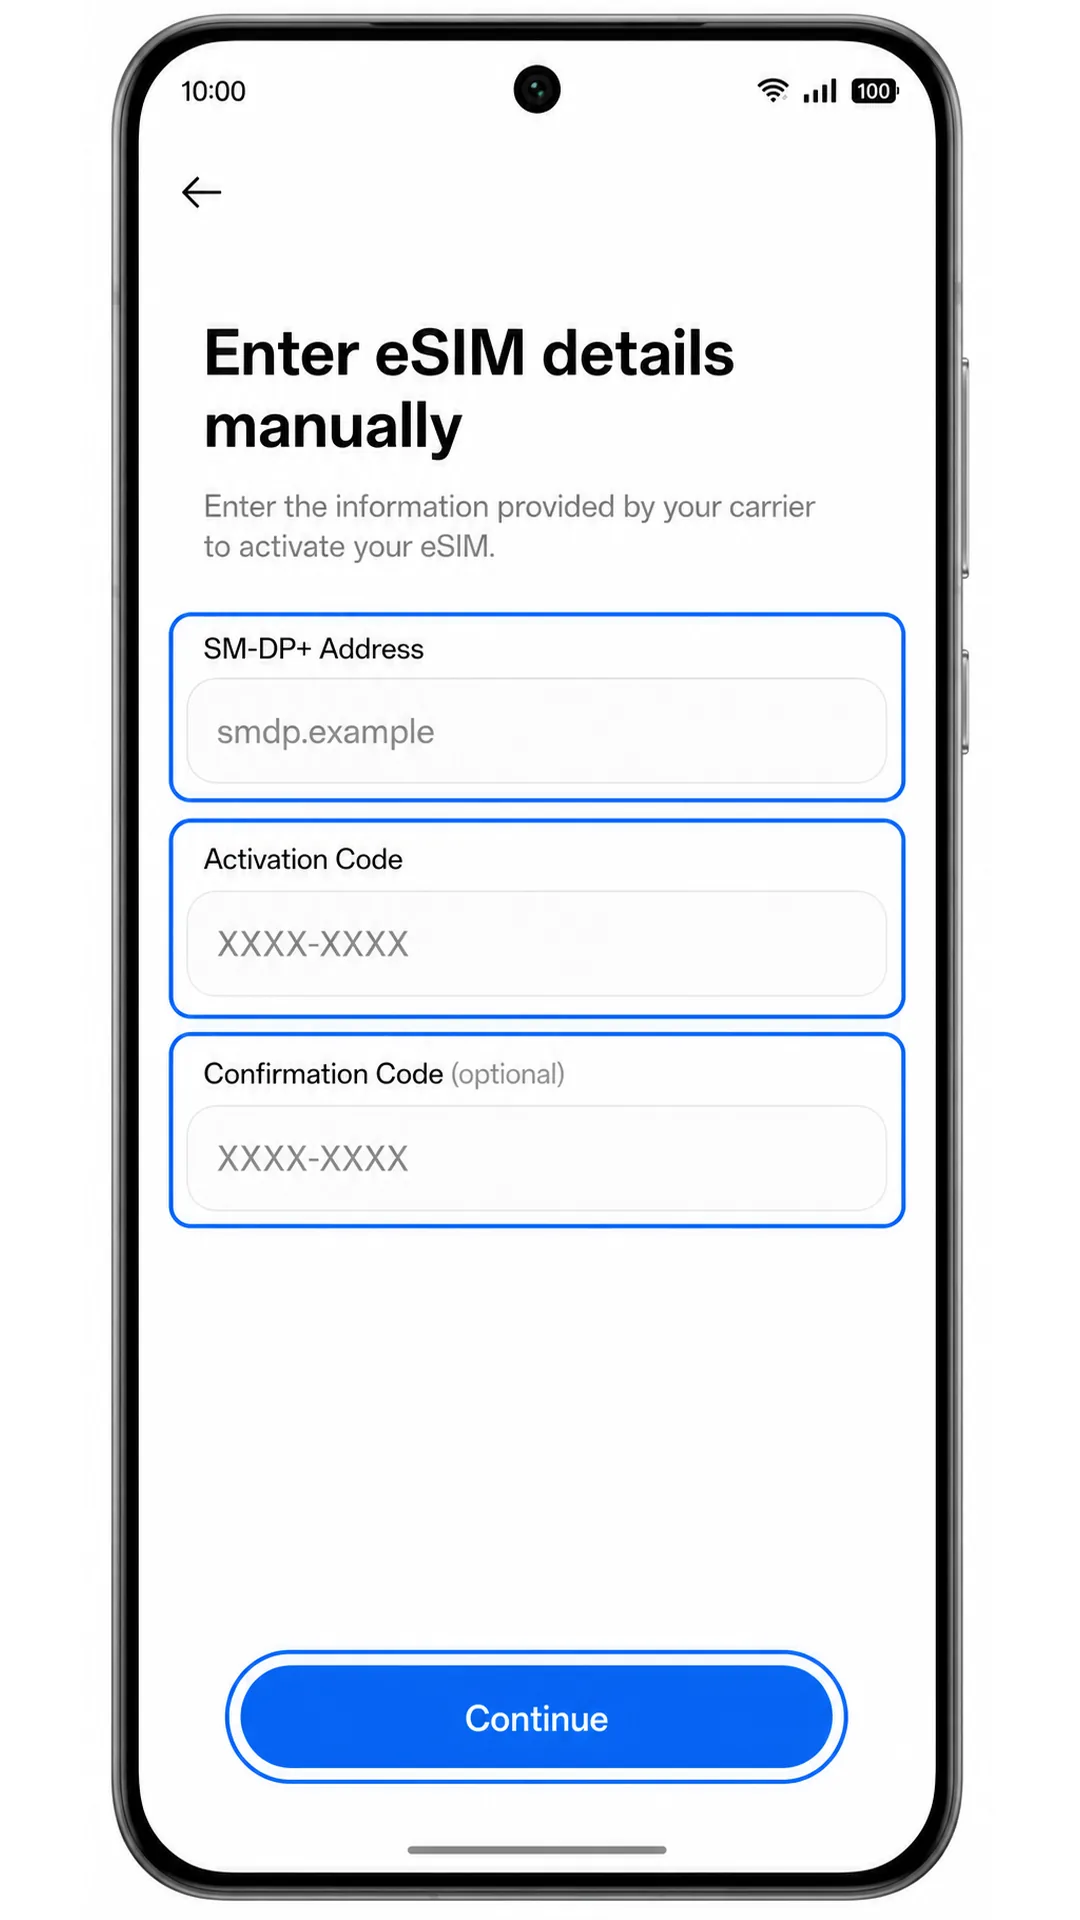
5. Enter the iRoamly SM-DP+ Address and Activation Code exactly as provided. If a Confirmation Code field appears, leave it blank unless iRoamly gave you one, then tap Continue.
6. Review the iRoamly eSIM profile, then tap Download or Add. Keep the Reno 15 connected to Wi-Fi until the profile download finishes.
7. Tap Done after ColorOS confirms that the eSIM was added. The profile should now be stored on the phone even if you do not use it for data yet.
How to Confirm Your iRoamly eSIM Is Installed
1. Go to Settings > Mobile network > eSIM. Look for a new eSIM profile, which may appear as iRoamly, a destination name, or a carrier profile name.
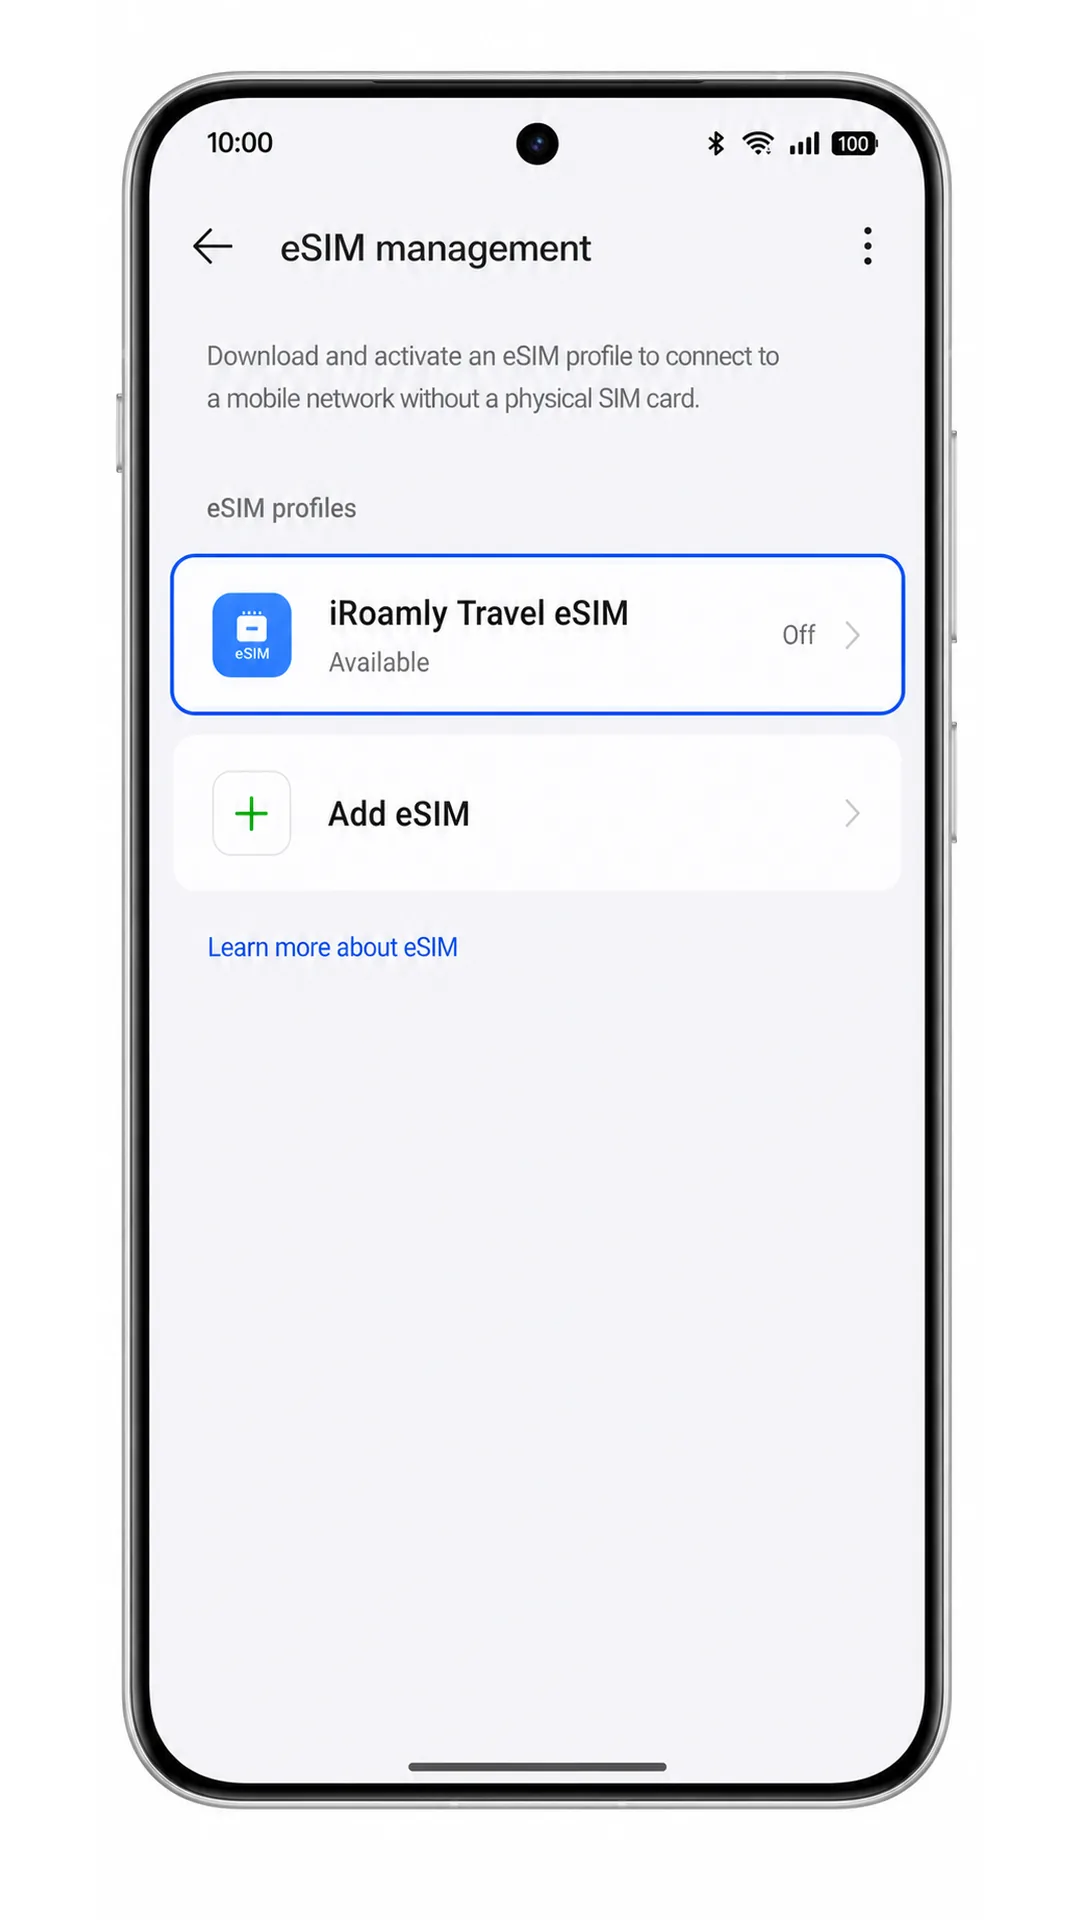
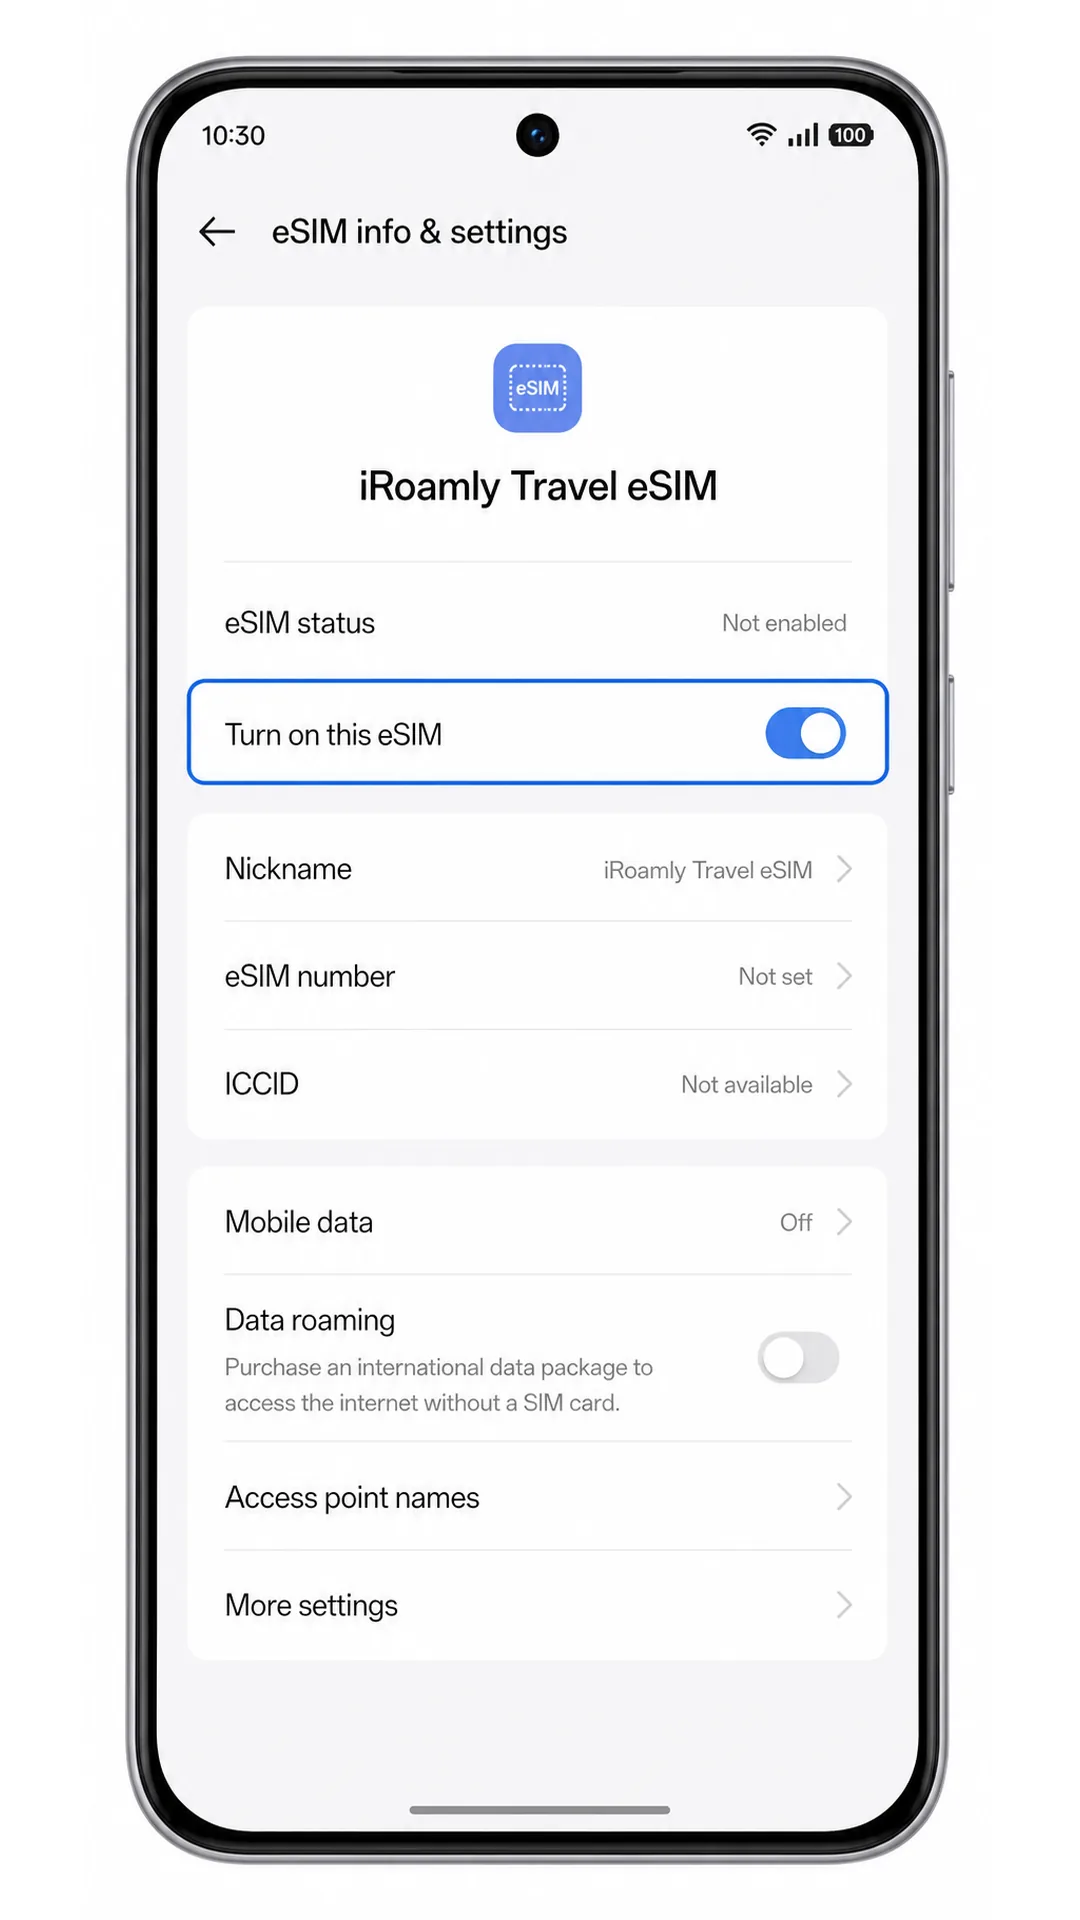
2. Tap the new iRoamly eSIM profile and check that the eSIM switch is available. If the plan is data-only, do not use SMS or calling as the confirmation test.
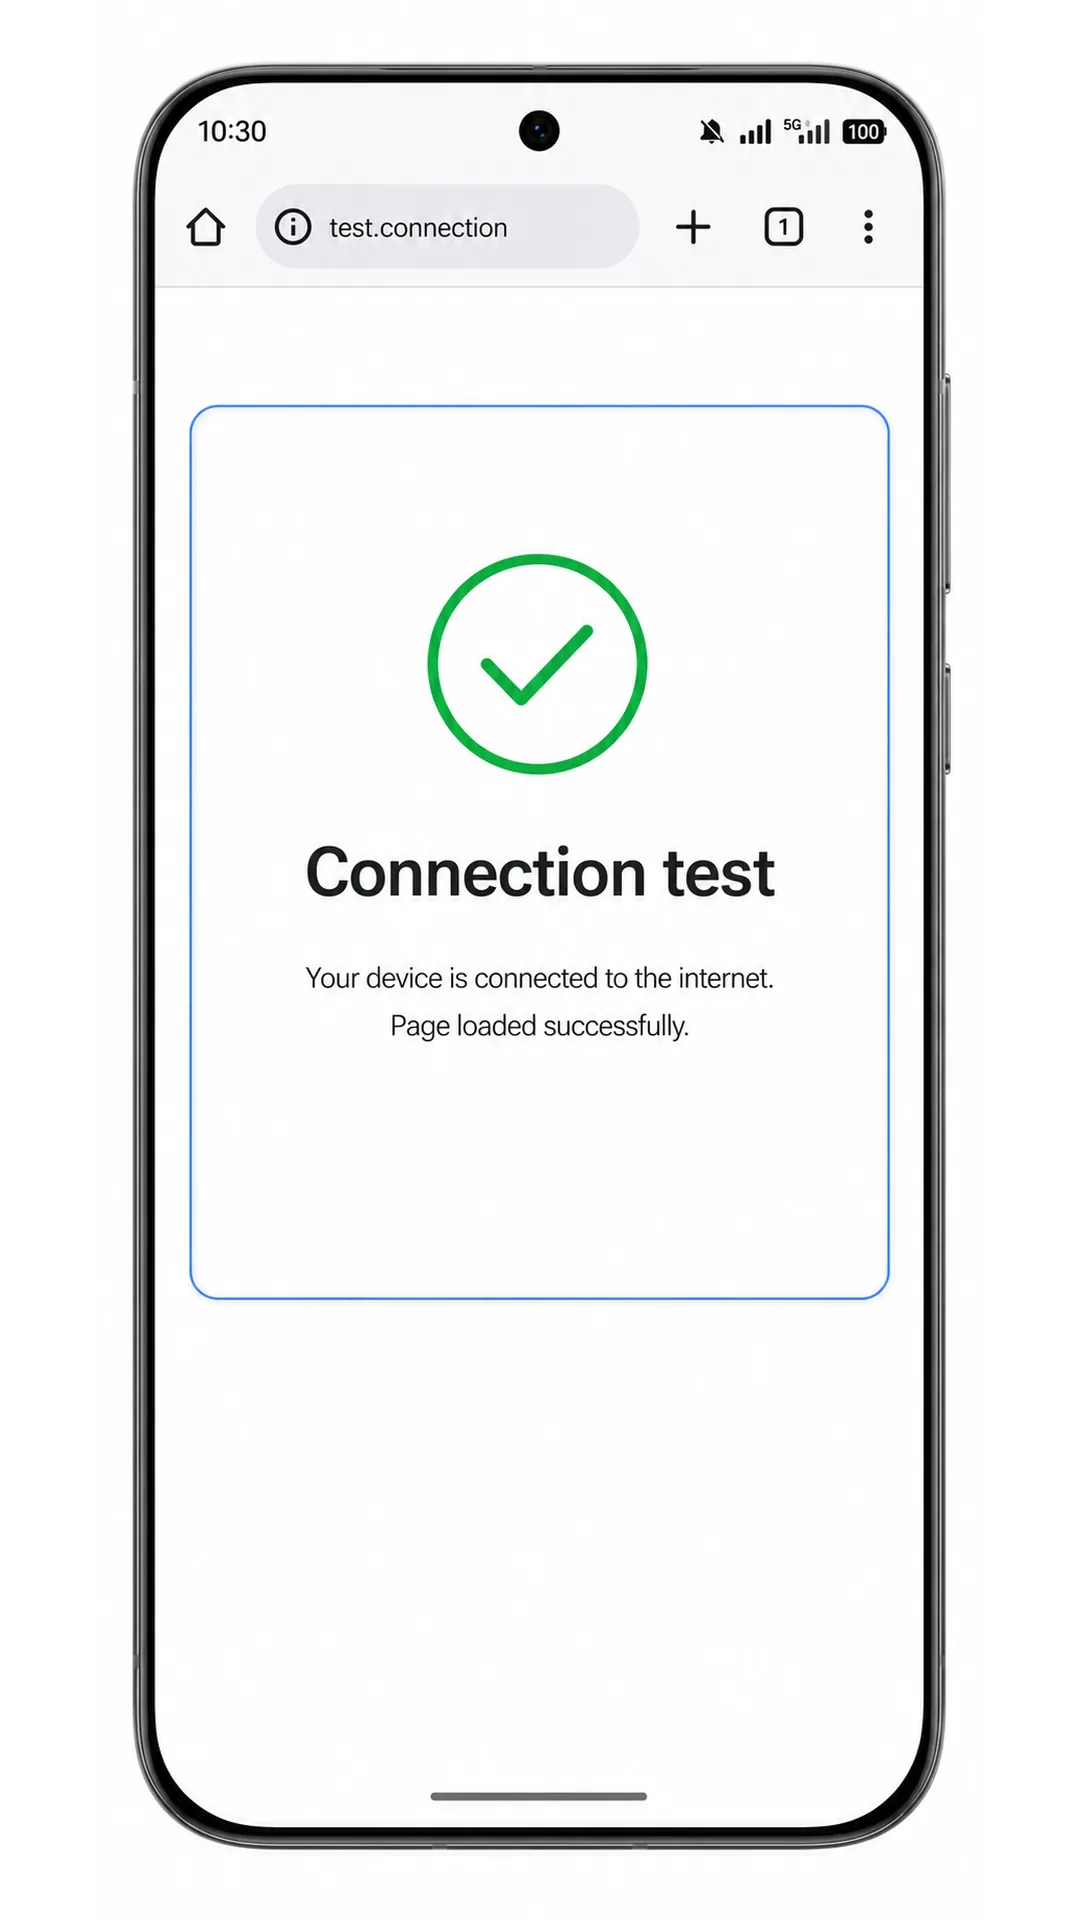
3. If you are already at your destination and the plan is active, turn off Wi-Fi briefly and open a lightweight webpage. A successful page load confirms that mobile data is working.
Configure eSIM for Mobile Data
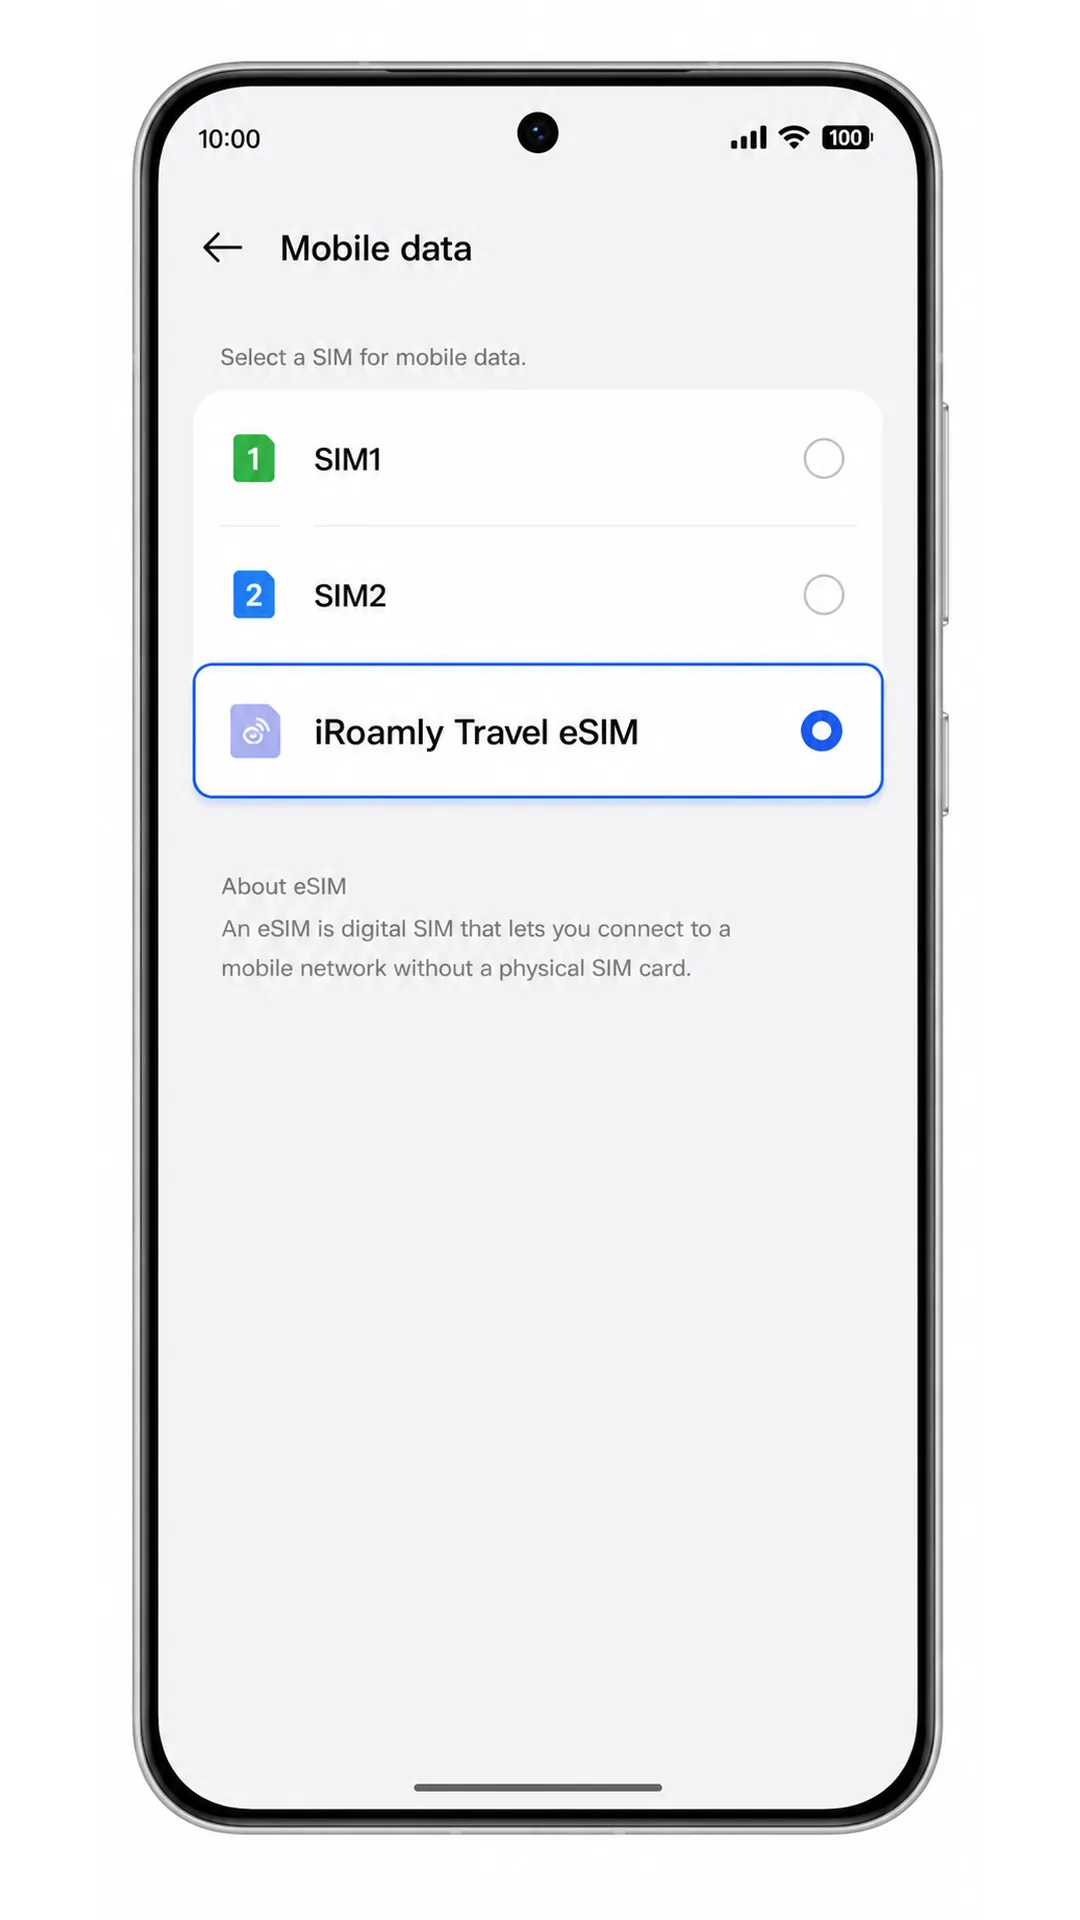
1. Open Settings > Mobile network, then tap Mobile data. The Reno 15 should show the available SIM and eSIM choices for data.
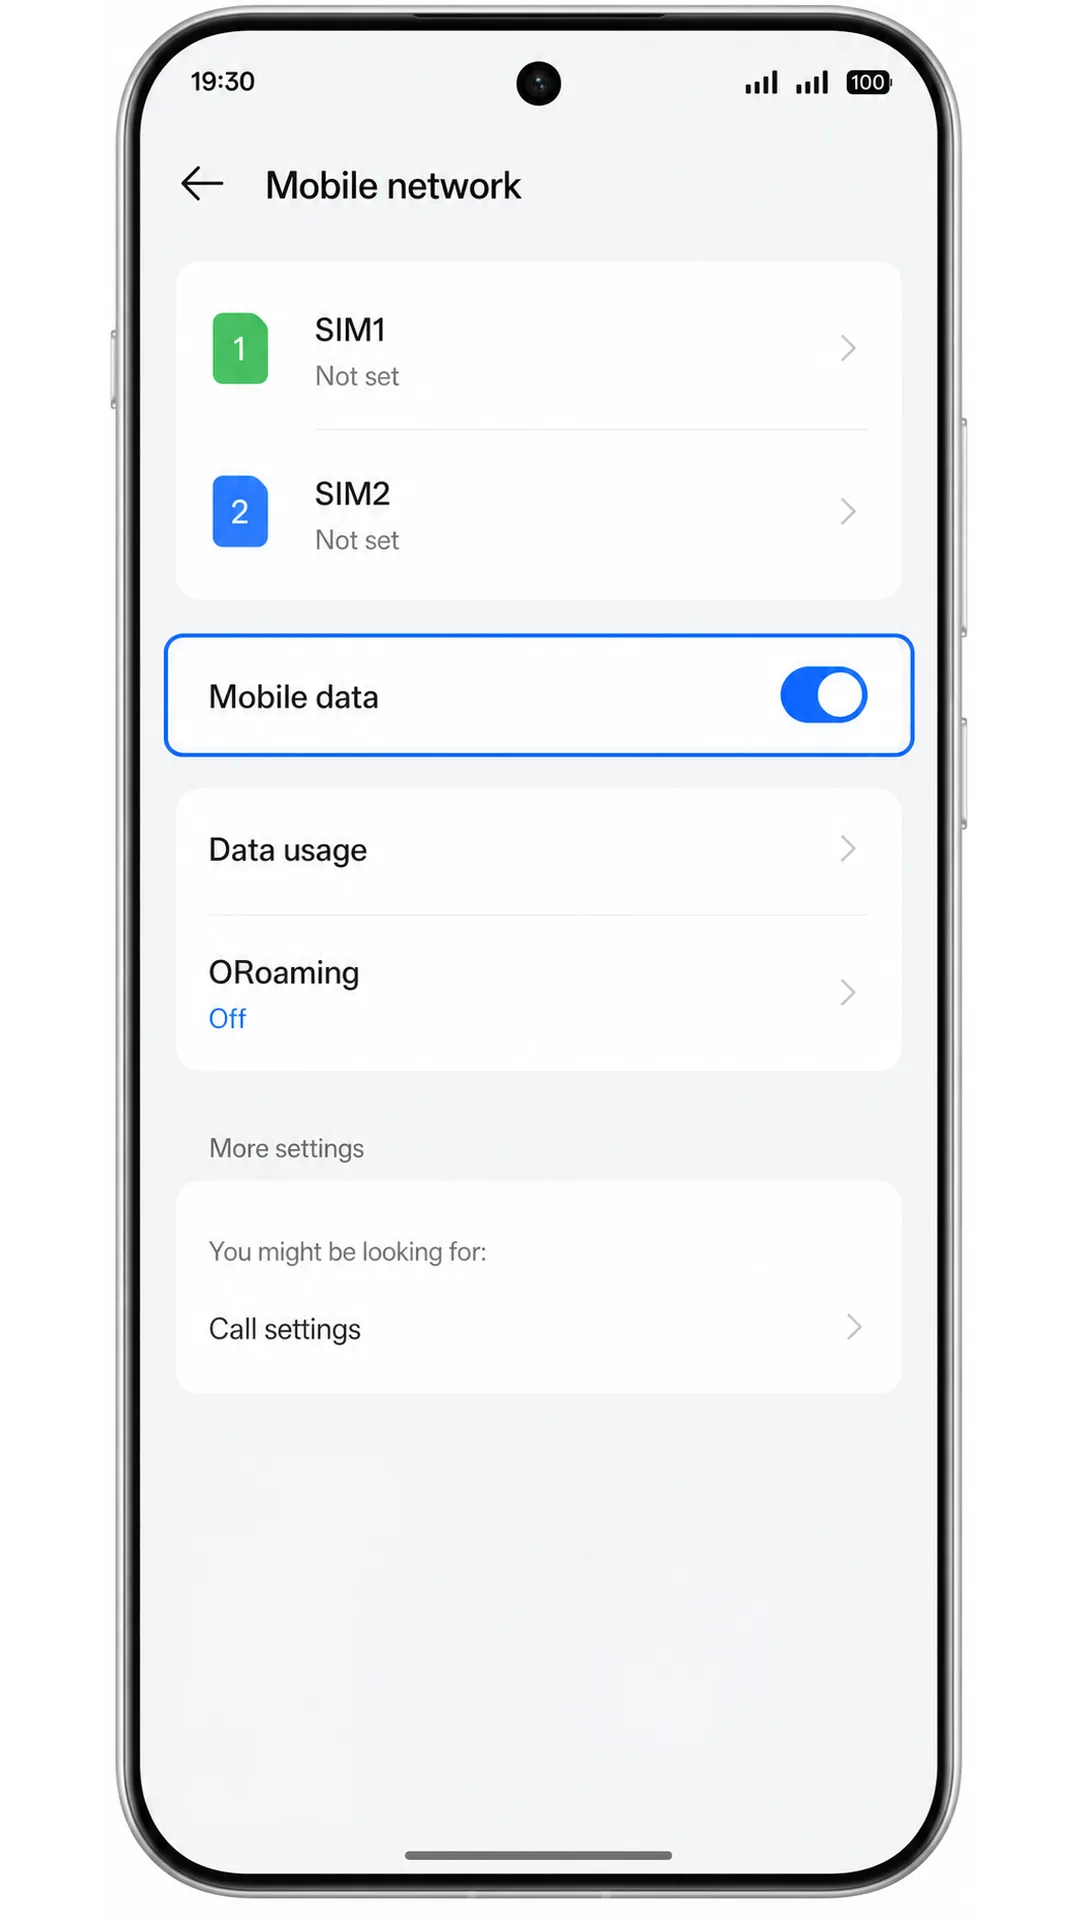
2. Select the iRoamly eSIM as the mobile data line. This keeps travel data on the iRoamly plan instead of your primary SIM.
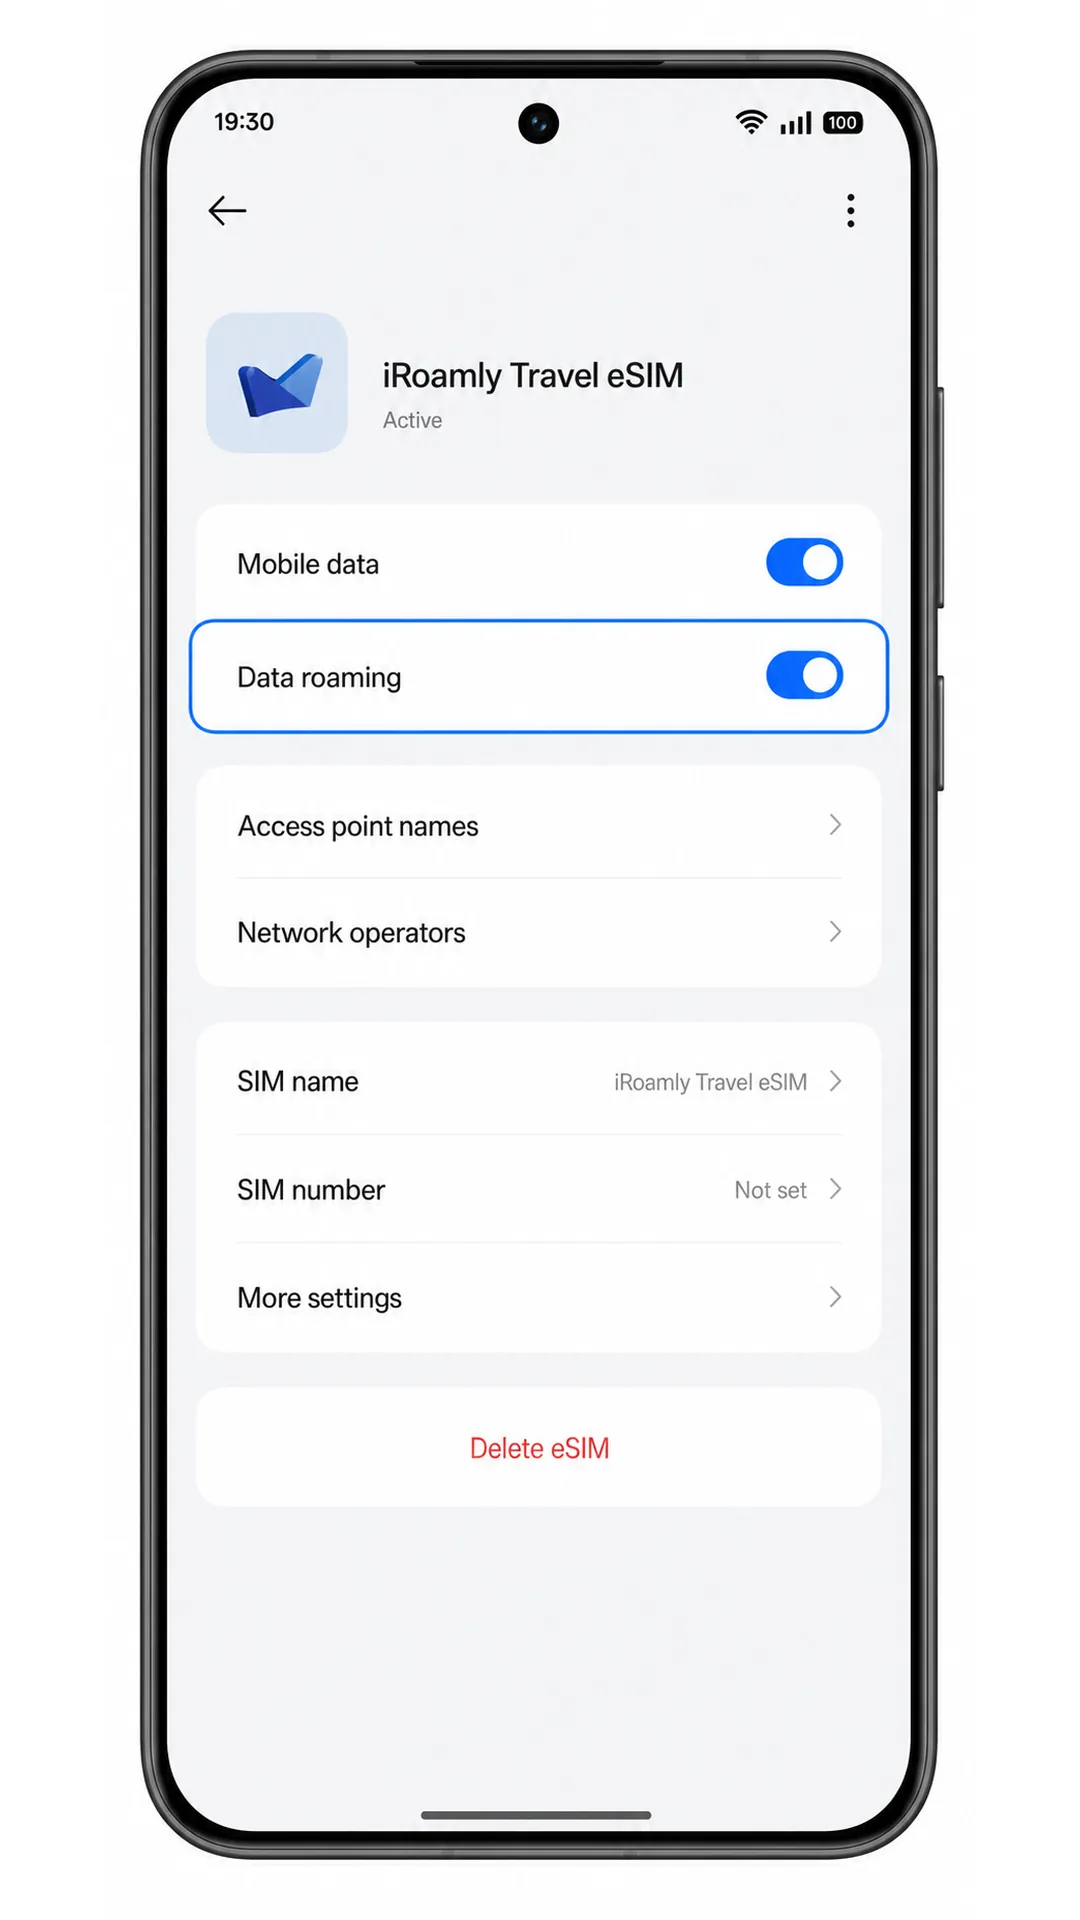
3. Open the iRoamly eSIM profile and turn on Data roaming if your iRoamly plan or destination instructions require it. Leave roaming off for your primary SIM if you want to avoid accidental charges.
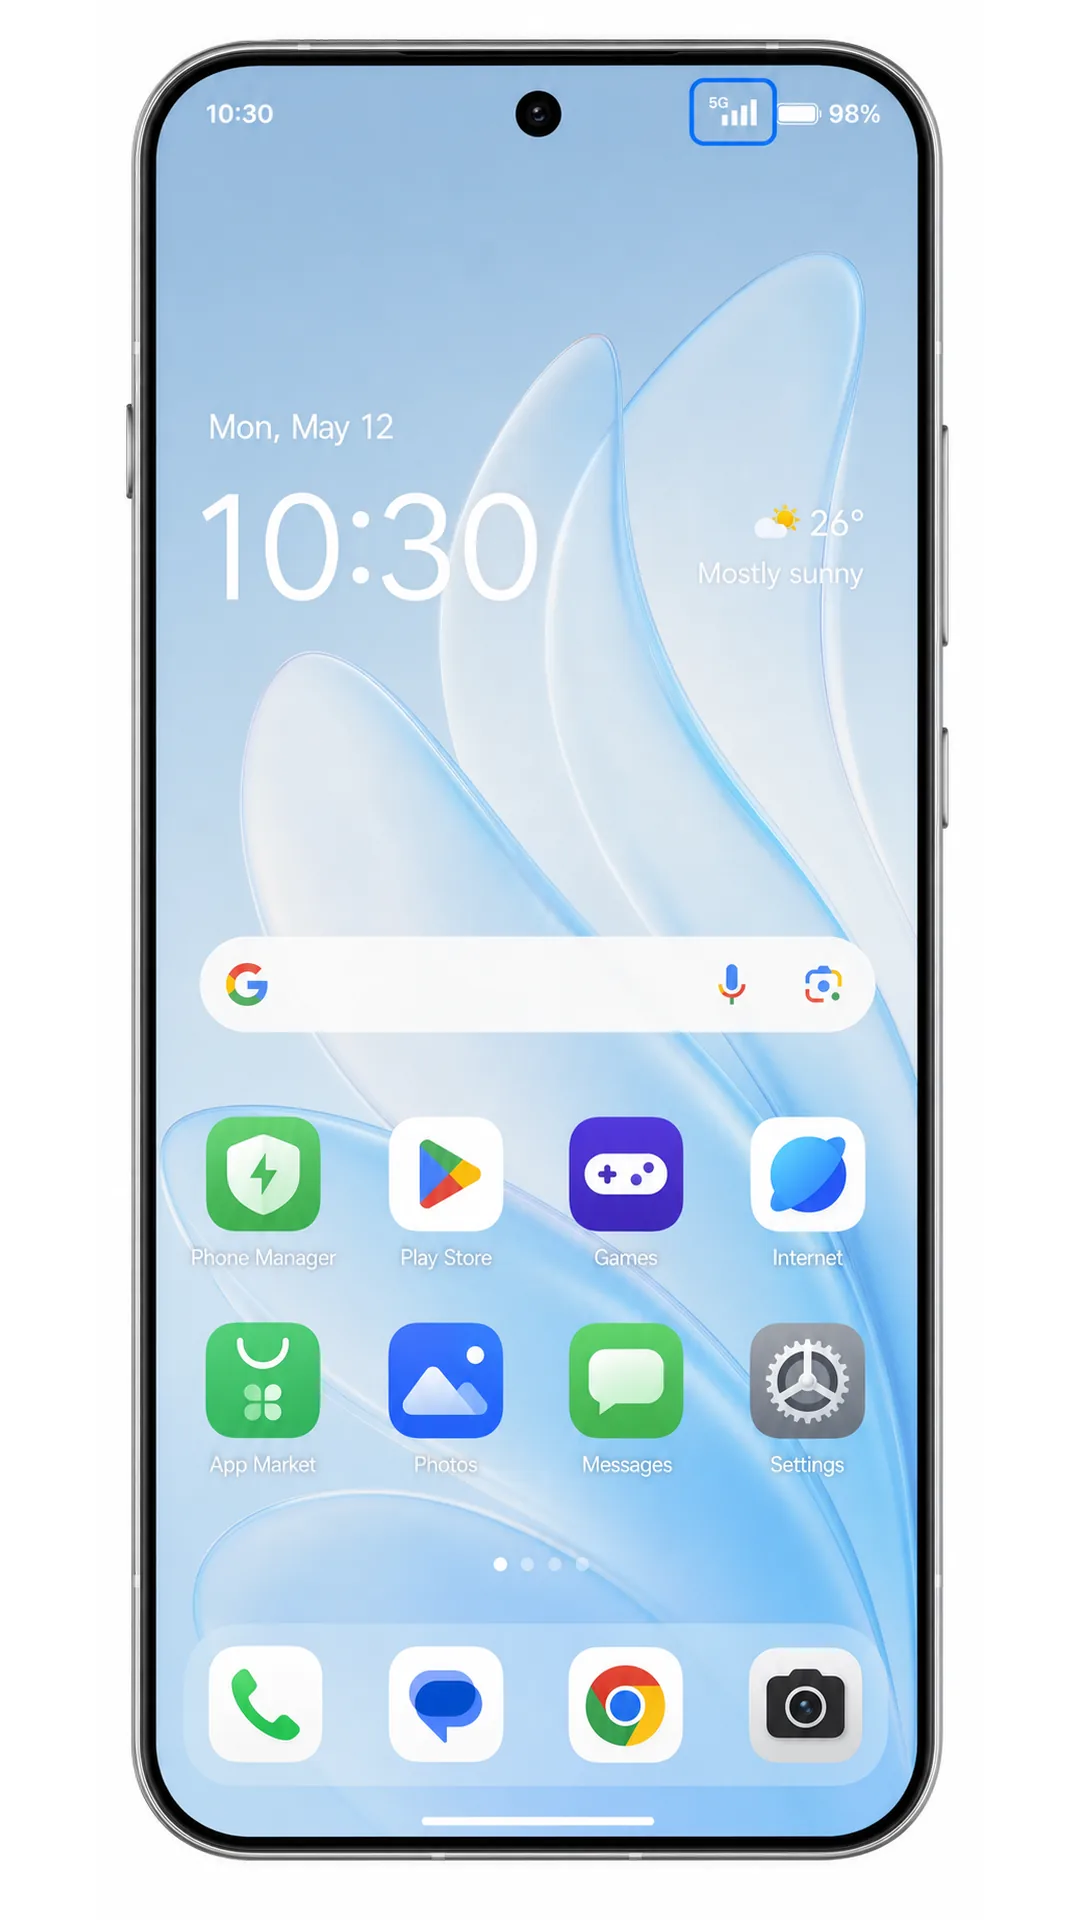
4. Check the status bar after leaving Wi-Fi. The Reno 15 should show mobile signal for the active eSIM, and apps should load through mobile data.
Troubleshooting
If Add eSIM is missing, confirm that your Reno 15 variant supports eSIM, update ColorOS, restart the phone, and check whether your region or carrier firmware disables eSIM.
If the QR code will not scan, raise the brightness on the device showing the code, clean the camera lens, avoid reflections, or use manual entry with the SM-DP+ Address and Activation Code.
If ColorOS says the QR code was already used, do not delete and retry repeatedly. Many eSIM profiles are single-install, so contact iRoamly support.
If activation is pending, keep Wi-Fi on, wait a few minutes, and restart the phone if the setup screen recommends it.
If the eSIM appears but mobile data does not work, select the iRoamly eSIM for Mobile data, turn on Data roaming when required, and confirm that your destination is covered by the plan.
If calls or SMS do not work, check the plan details. Many travel eSIMs are data-only and will not provide a phone number, voice service, or text messaging.
If manual entry fails, check every character in the SM-DP+ Address and Activation Code. Do not add spaces unless iRoamly includes them.
More Oppo eSIM Setup Guides
Setting up another Oppo phone? These eSIM activation guides may help.
Conclusion
Once your iRoamly eSIM has been installed, your Oppo Reno 15 5G is ready to use mobile data whenever your travel plan becomes active. Since the profile is already stored on your device, you can connect in supported destinations without replacing your physical SIM or spending time looking for a local mobile service.
With your travel connection prepared before departure, you'll have quick access to maps, messaging, travel bookings, and other essential online services from the moment you arrive. Your primary SIM can remain in the phone, giving you the flexibility to keep using your regular number whenever needed.