
The Samsung Galaxy Tab S9 is a travel-friendly tablet for maps, bookings, video calls, and work on the move, but eSIM setup only applies to the cellular/5G version. Wi-Fi-only Tab S9 models will not show the same SIM options.
On current Samsung One UI, the eSIM setup path is usually Settings > Connections > SIM manager > Add eSIM. This guide covers both ways to install an iRoamly travel eSIM: scanning the QR code and entering the activation code manually.
The QR method is faster when you can display the code on another screen, while manual entry is useful if the QR code will not scan or you are setting up from the same device.

Stay Connected Abroad with iRoamly
iRoamly is a travel eSIM service that provides mobile data plans for destinations around the world. Available options may include local destination plans, regional coverage, and broader global plans, with allowances, validity periods, and plan features varying by destination.
Once installed on a compatible device, travel data can support maps, bookings, messaging, video calls, and other online tasks while you are away.
For the cellular Galaxy Tab S9 5G, an iRoamly eSIM can be added through Samsung One UI and selected for mobile data during a trip.
The guide below keeps the QR-code and manual activation-code methods in order so you can install the profile and confirm the tablet is ready for travel data.
Preparations Before Setting Up iRoamly eSIM
Connect the Galaxy Tab S9 to stable Wi-Fi. If you are taking the tablet to Japan or the United States, preparing the travel eSIM before departure can leave less to configure after arrival.
Confirm your tablet is the Galaxy Tab S9 5G/cellular model and is unlocked for eSIM use.
Keep your iRoamly QR code or manual activation details ready.
Install the eSIM 1-2 days before travel when appropriate, but check the plan details first.
iRoamly eSIM validity starts from activation. For travel use, confirm the exact activation trigger shown on your iRoamly plan.
iRoamly travel eSIM plans may not include voice calls or SMS. Voice/SMS availability varies by plan, so check the specific plan details.
Do not delete the eSIM casually after installation. If you are not using it yet, turn the line off instead of removing it.
Shared Setup Steps
Open Settings, then tap Connections. You should see the network and SIM settings area.
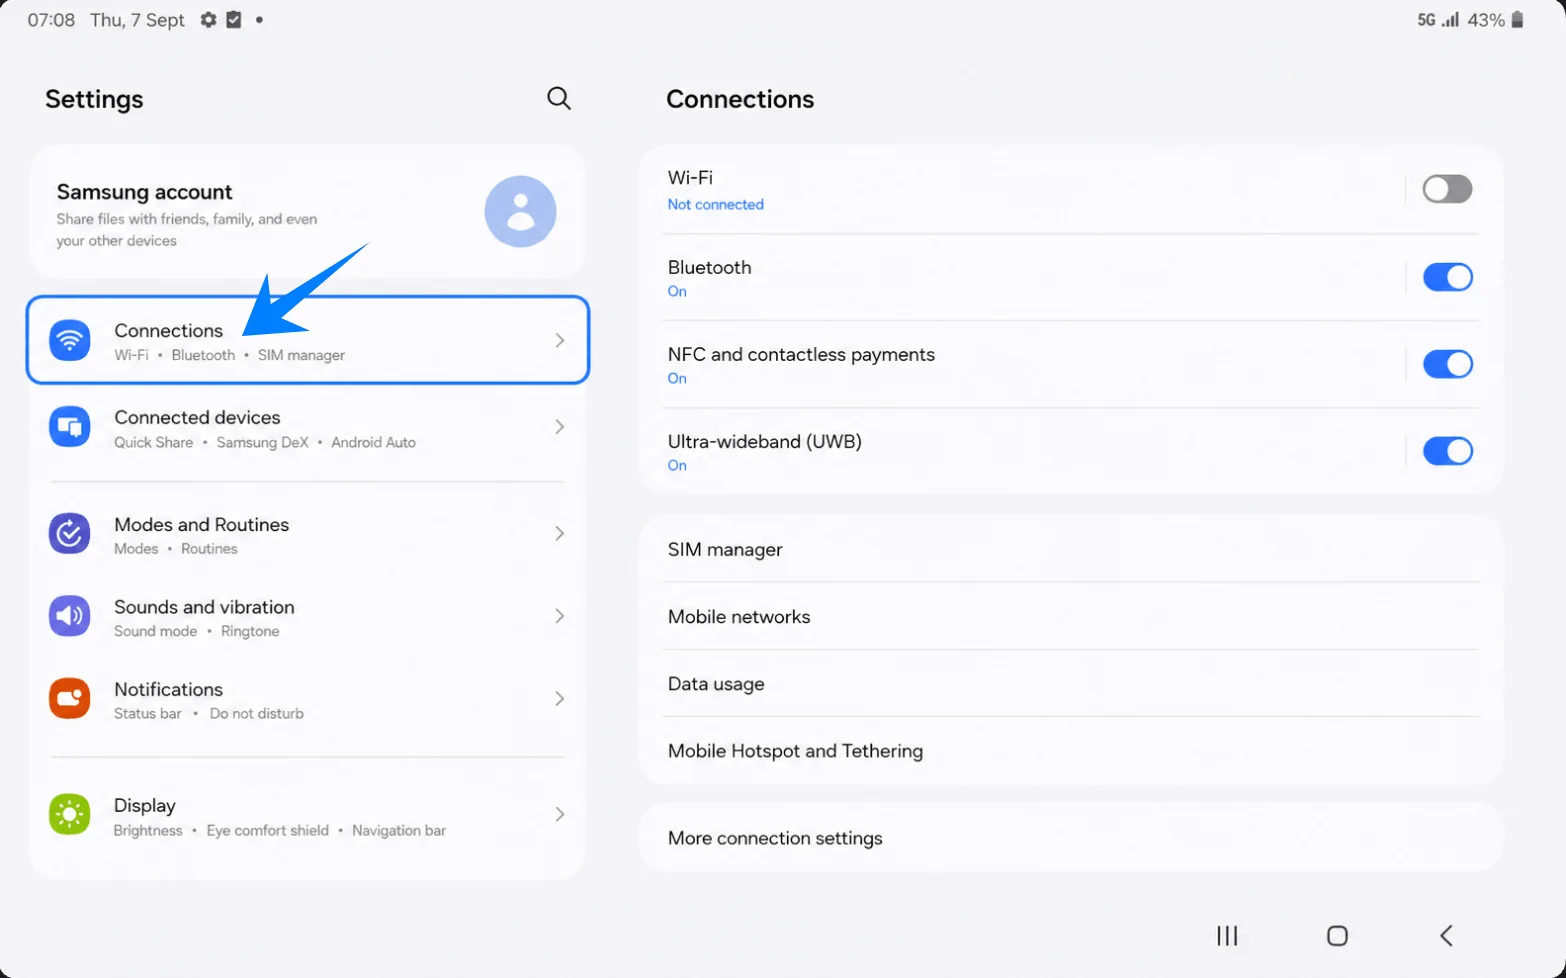
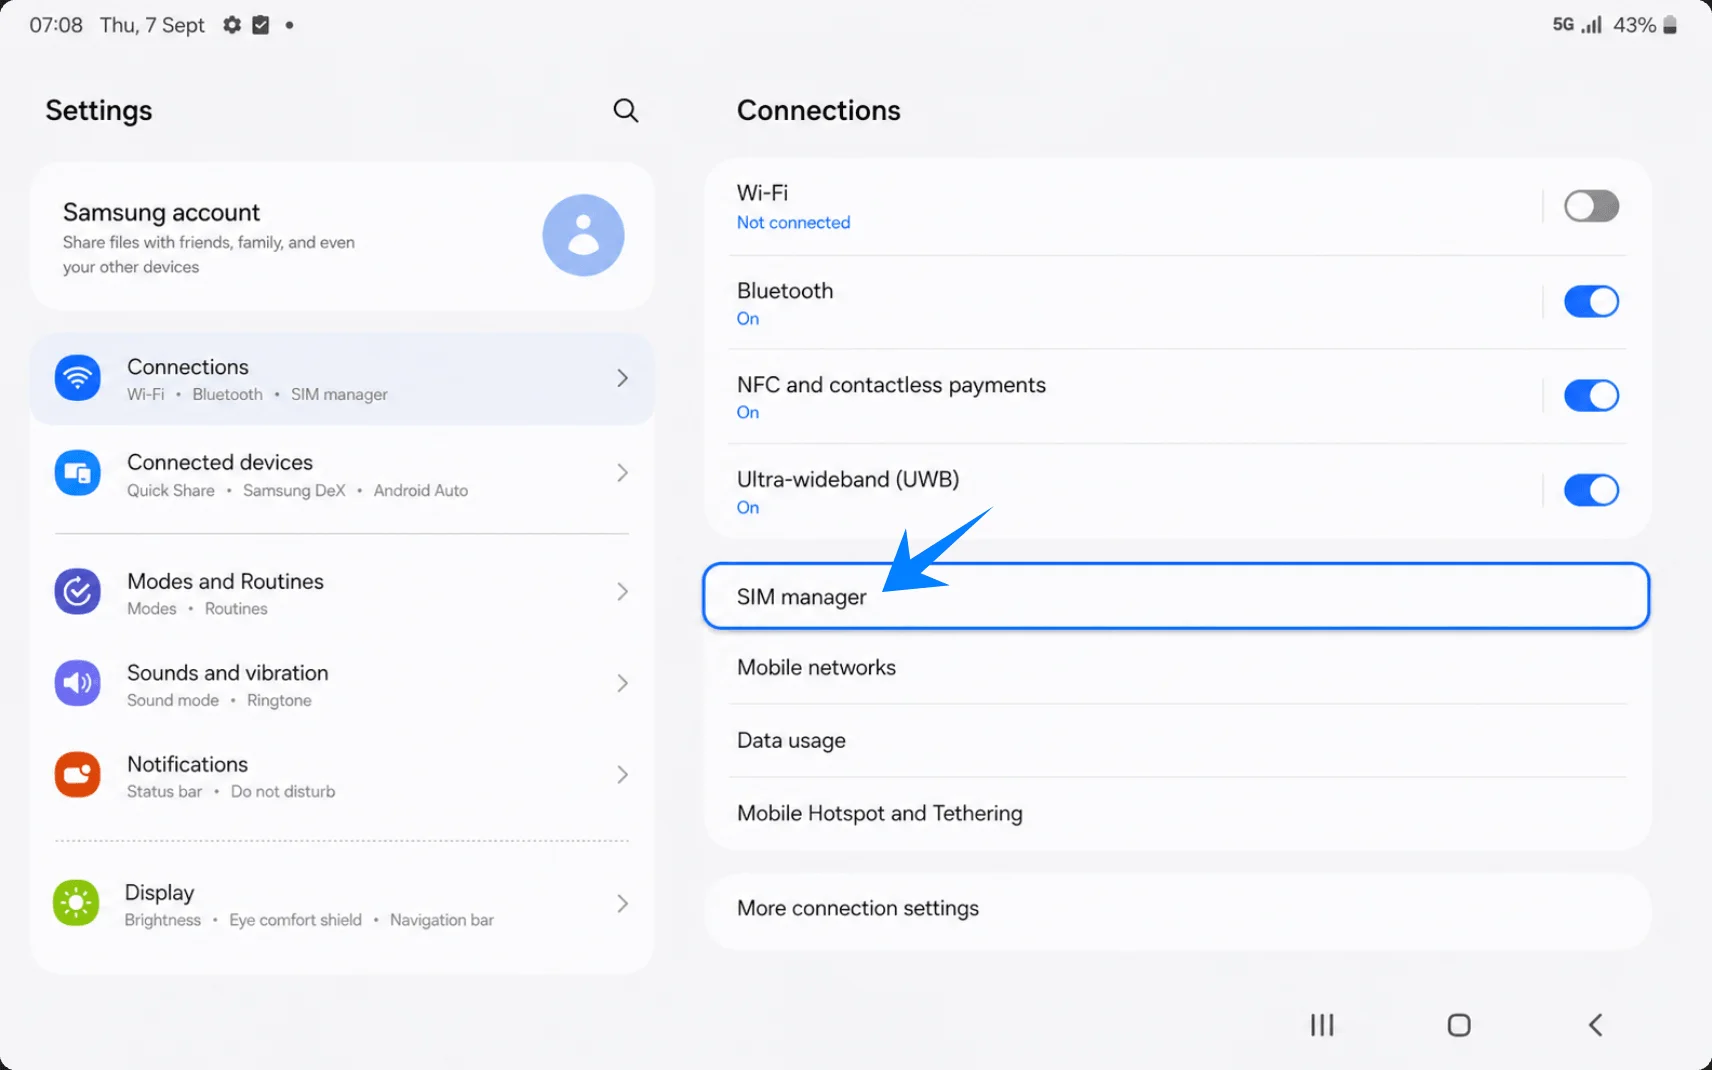
Tap SIM manager. This opens the page where Samsung lists physical SIMs, eSIMs, and mobile data choices.
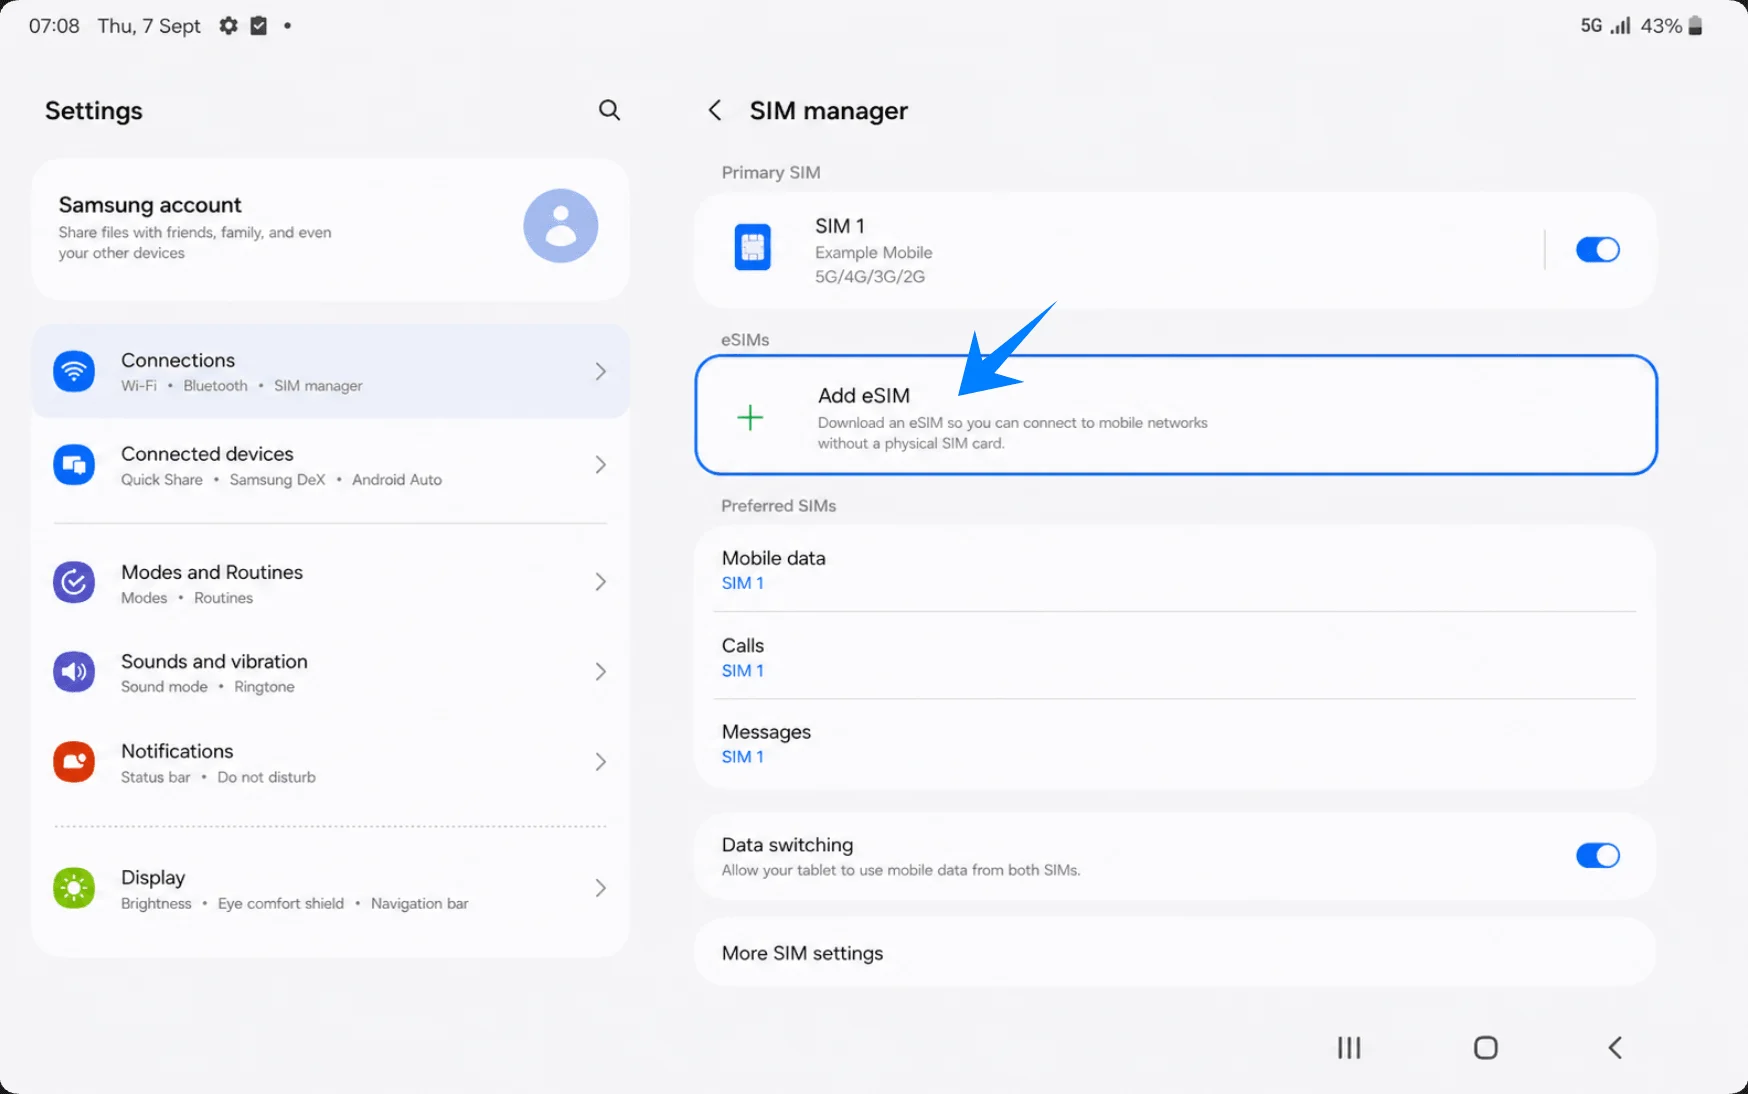
Tap Add eSIM. The tablet will open the Samsung eSIM setup screen.
Method 1: Install the iRoamly eSIM by Scanning a QR Code
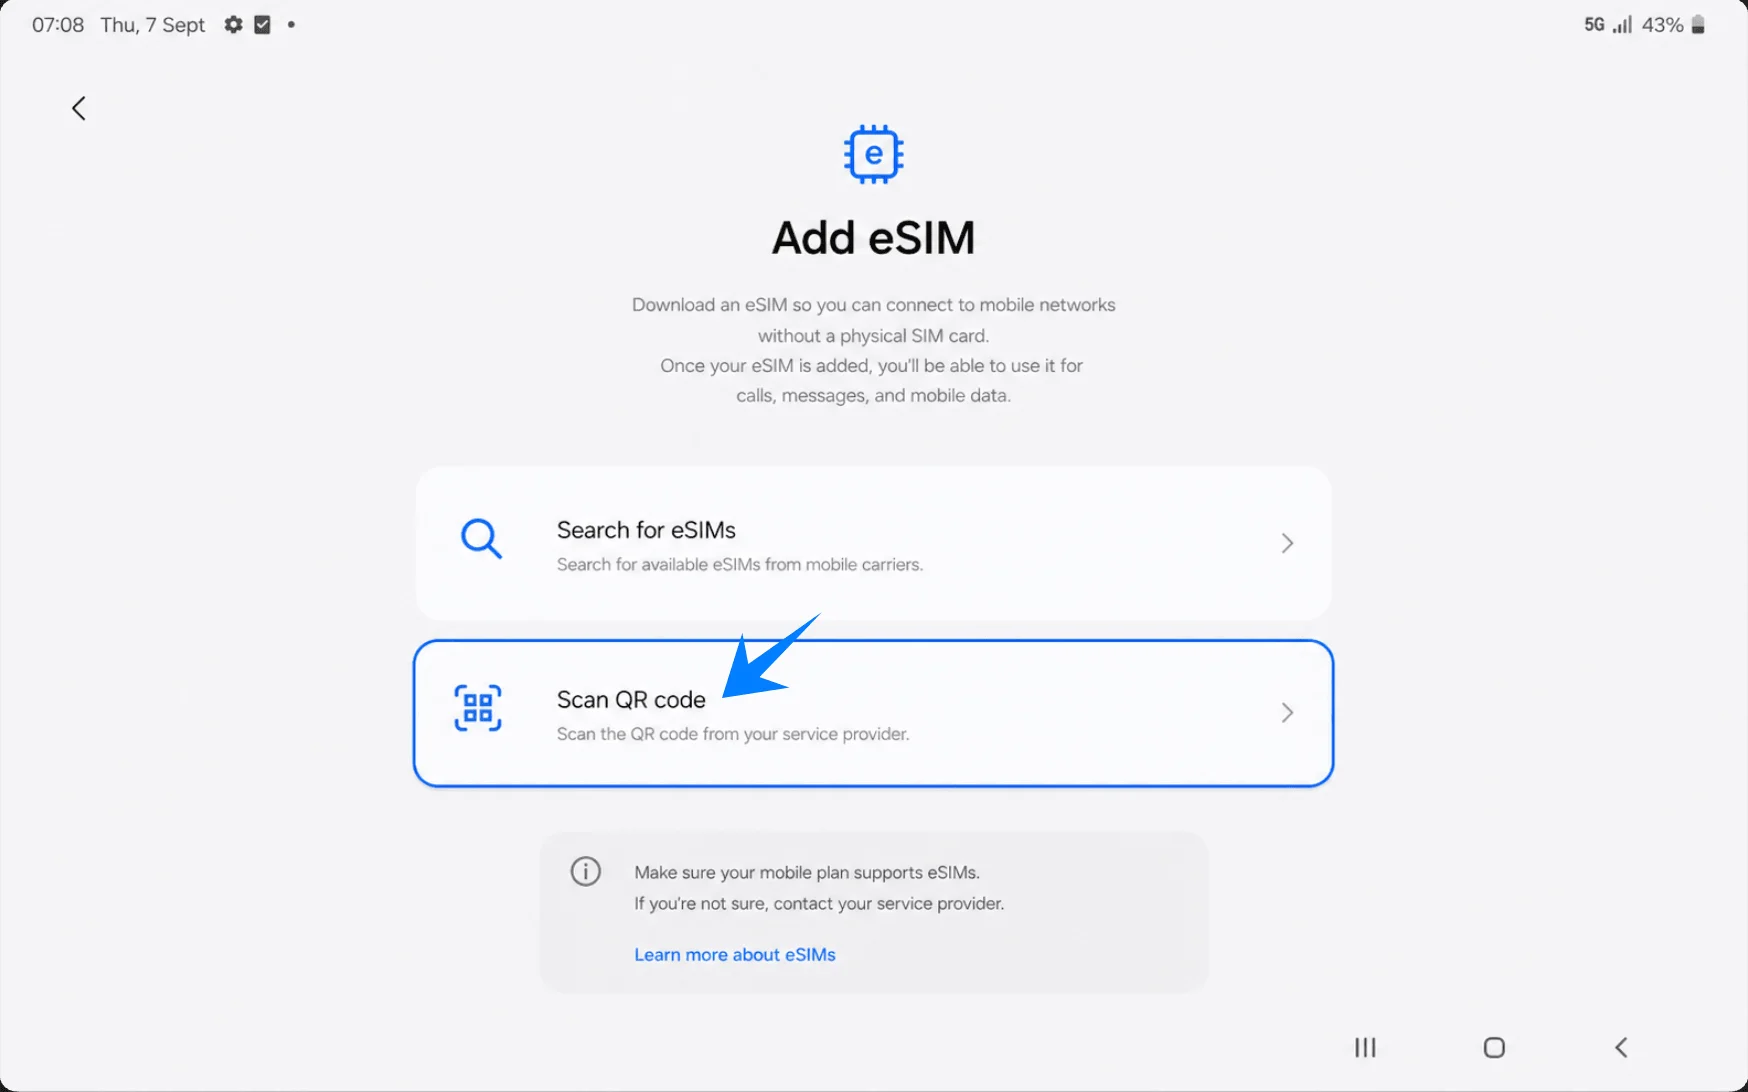
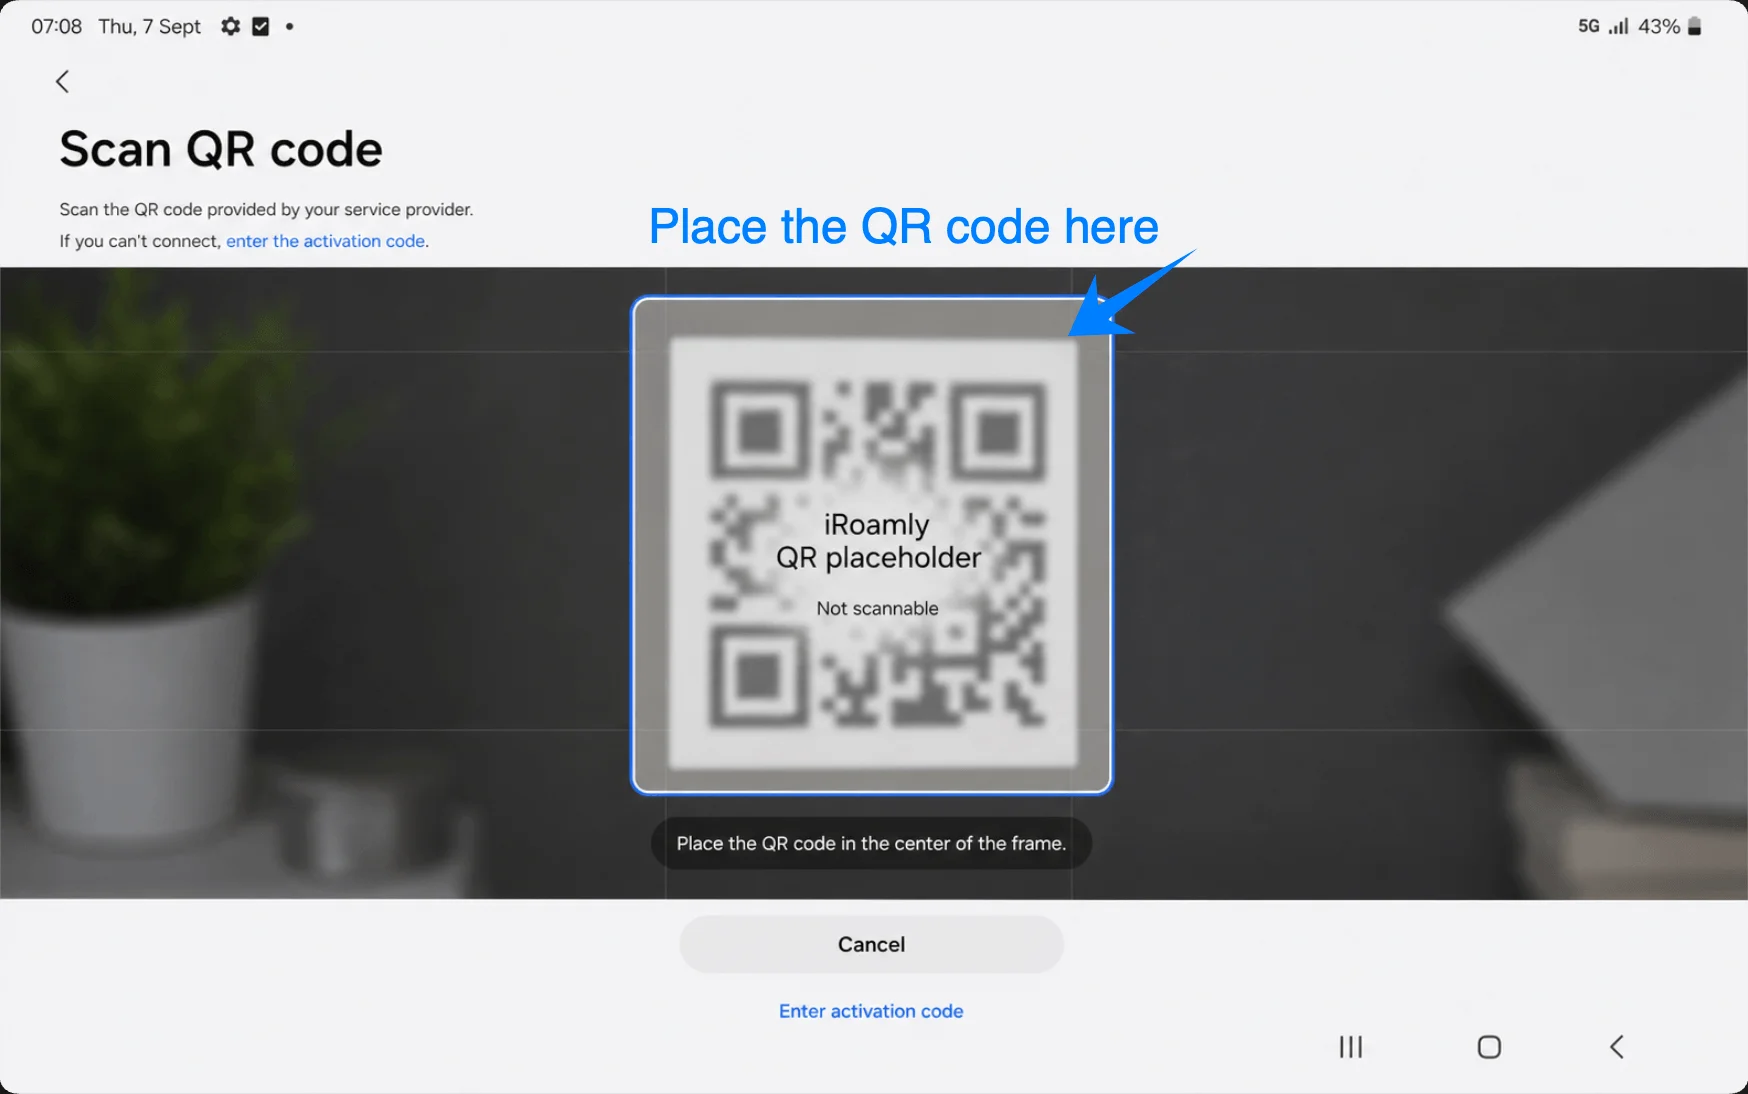
On the Add eSIM screen, tap Scan QR code. Samsung will open the QR scanner.
Point the tablet camera at the iRoamly QR code. Keep the code inside the scanning area until the eSIM profile is recognized.
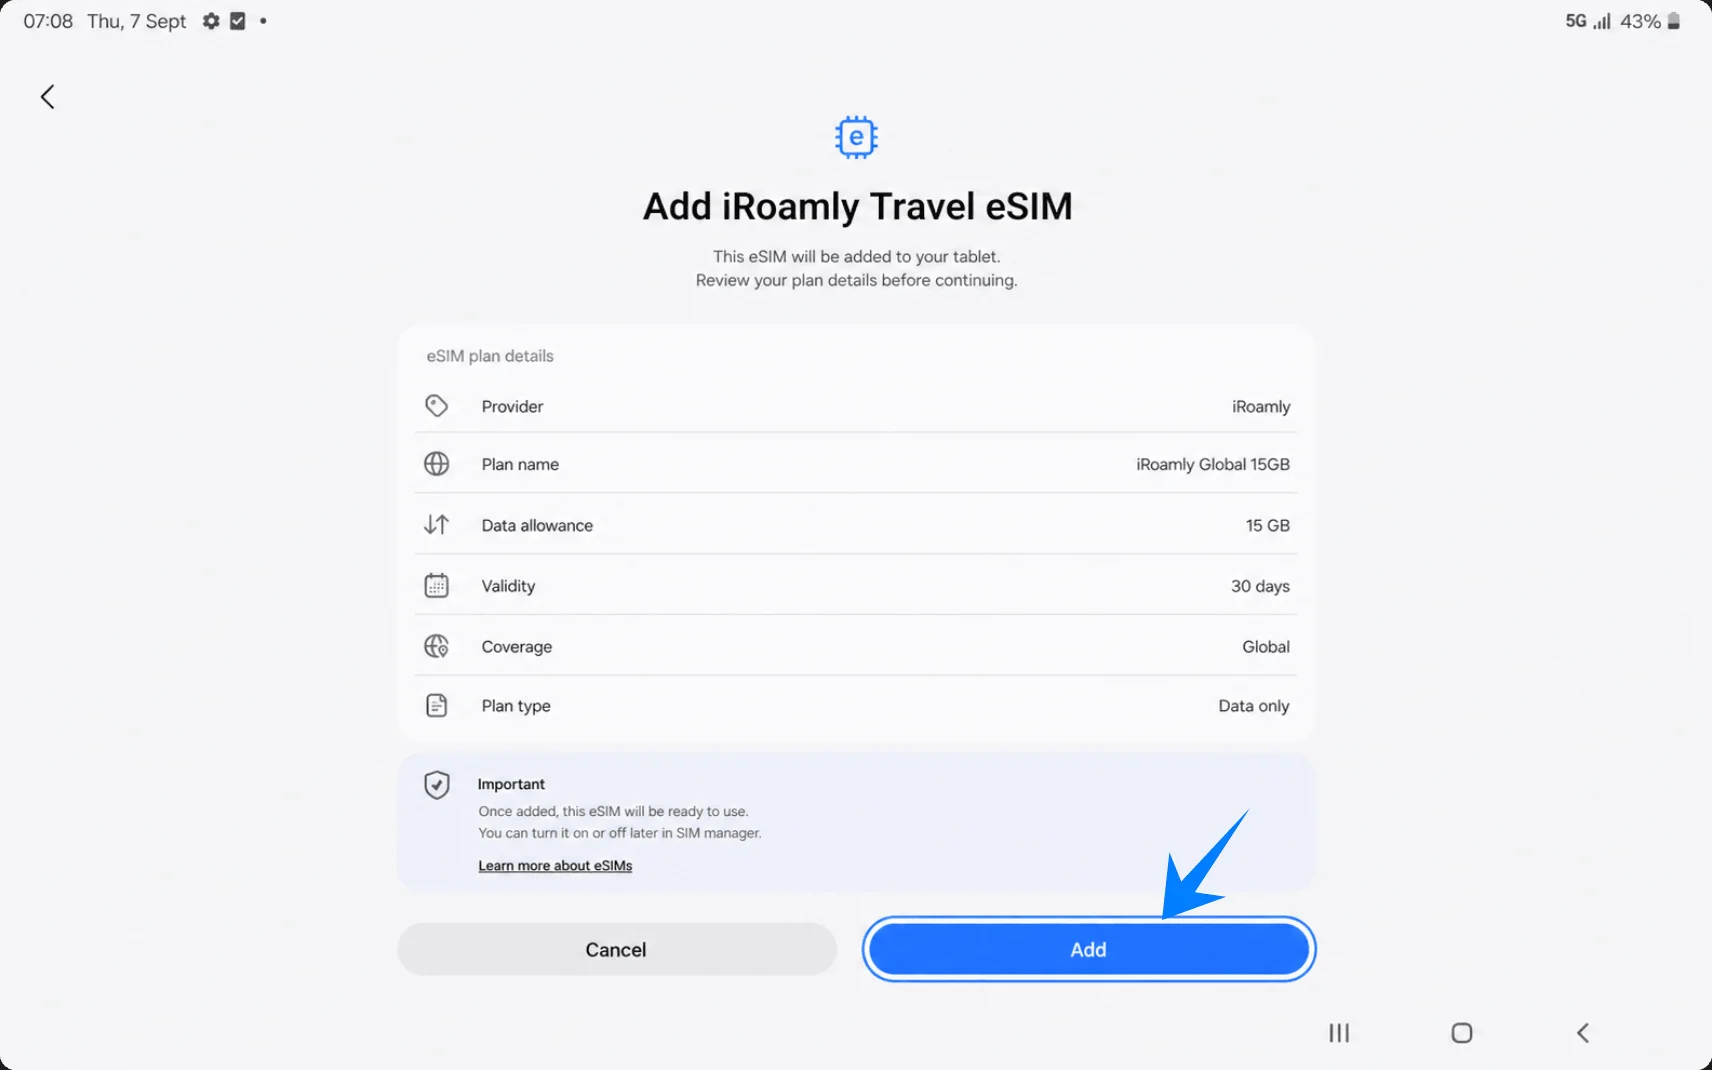
When Add iRoamly Travel eSIM appears, tap Add. Stay connected to Wi-Fi while the eSIM profile downloads.
Method 2: Install the iRoamly eSIM by Manual Entry
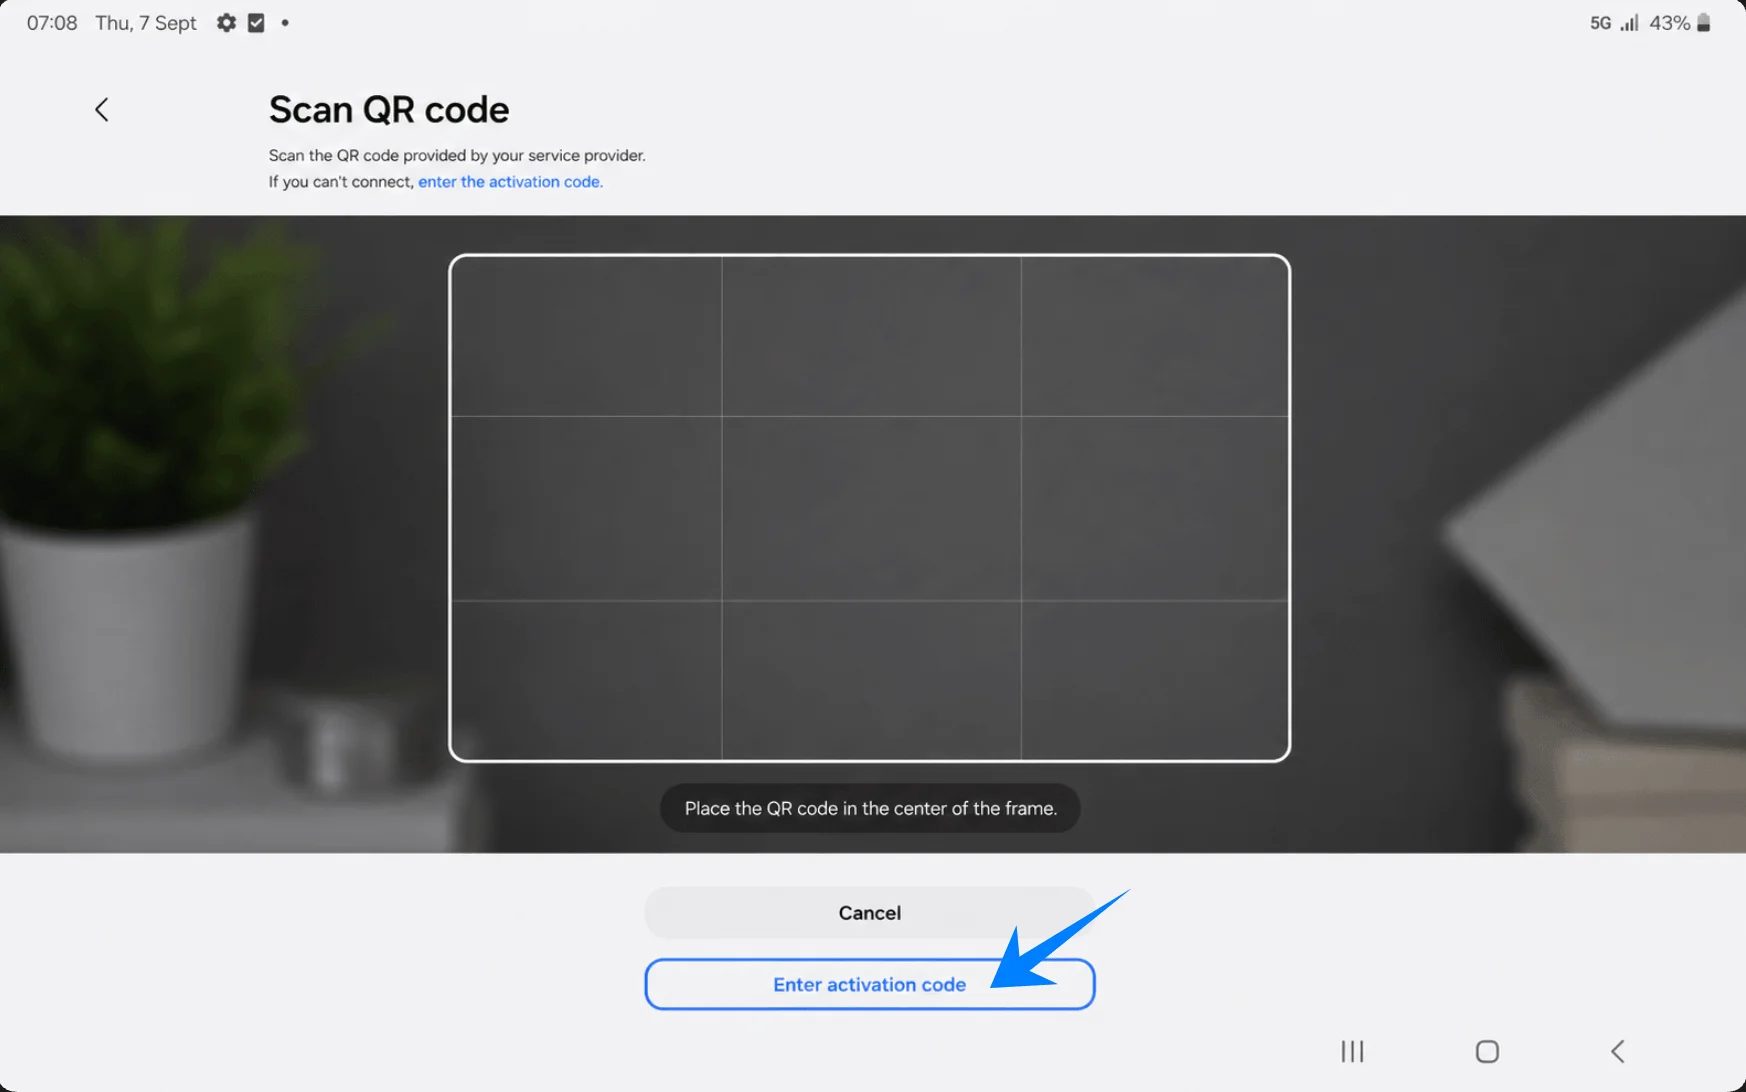
Open Settings, tap Connections, tap SIM manager, tap Add eSIM, then tap Scan QR code. On the scanner screen, tap Enter activation code.
Tap the Activation code field, then enter the full activation code string from iRoamly. On Samsung One UI, this manual method uses one complete activation code field, not separate SM-DP+ Address and Activation Code boxes.
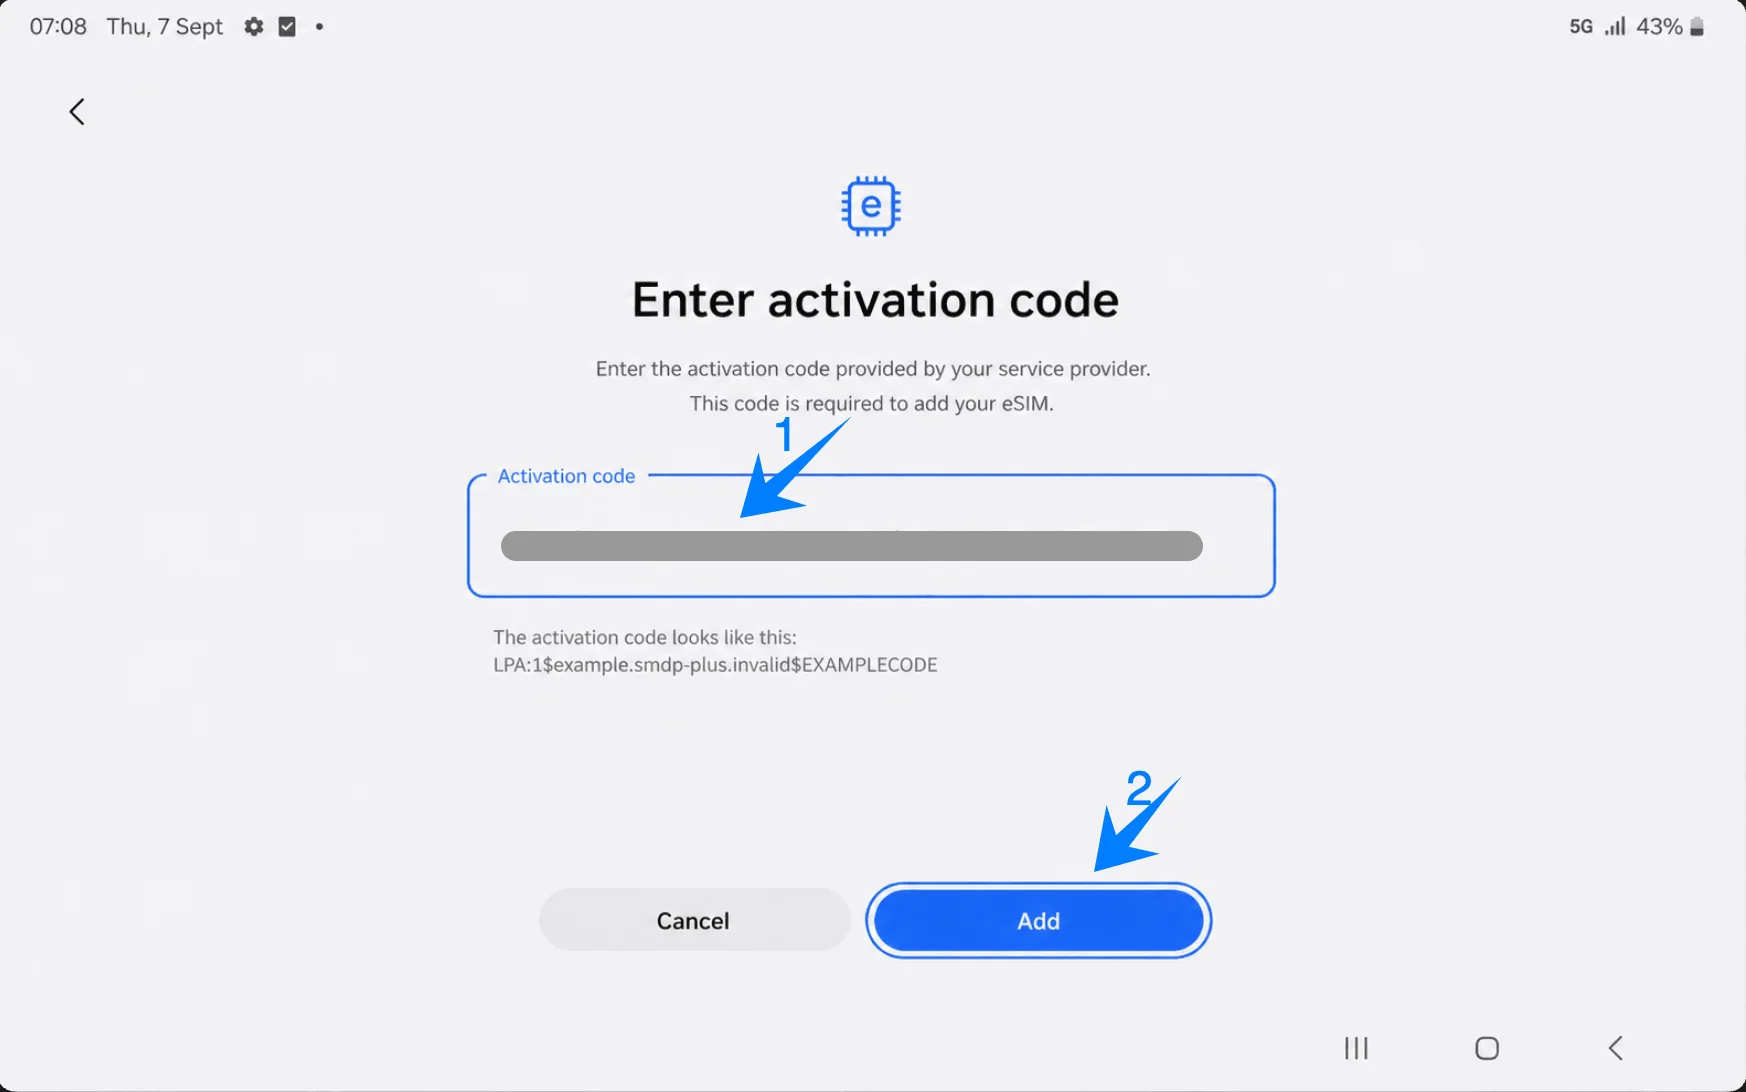
Tap Add. Keep the tablet on Wi-Fi until Samsung finishes downloading the iRoamly eSIM profile.
How to Confirm the iRoamly eSIM Was Installed
Go back to Settings > Connections > SIM manager. Confirm that iRoamly Travel eSIM appears under the eSIM section and that its switch is turned on.
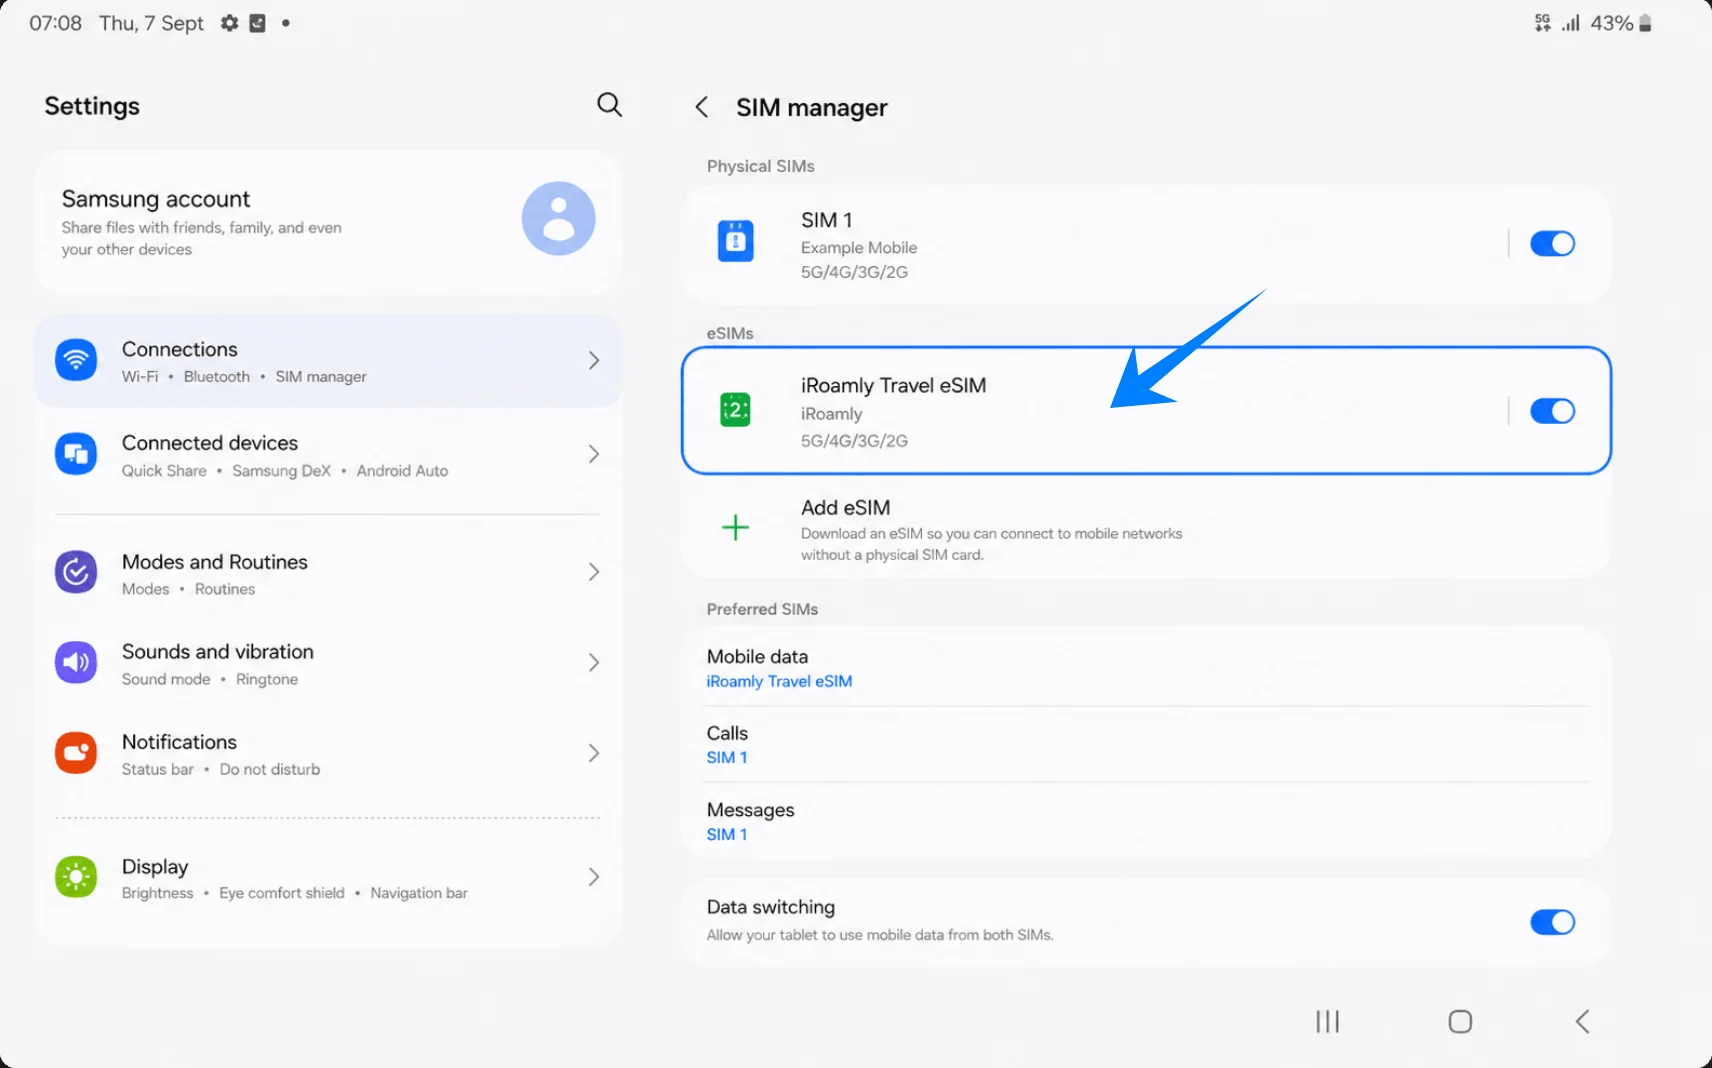
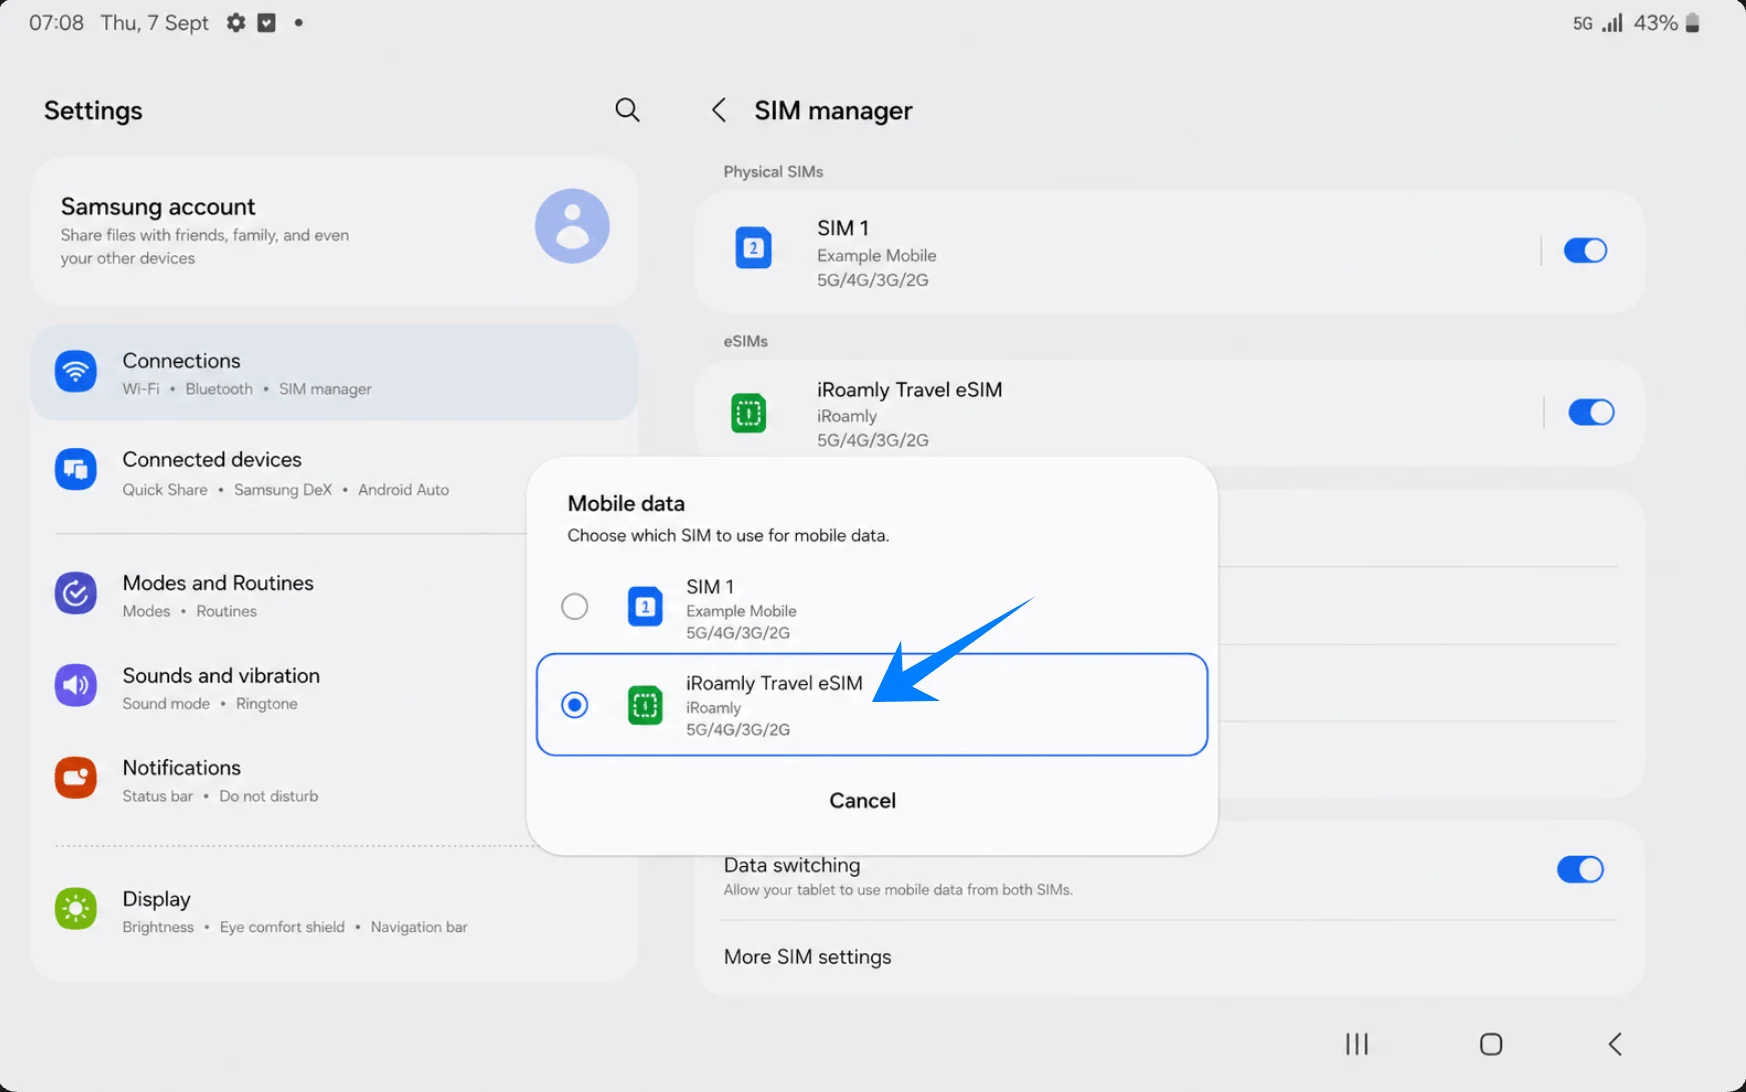
Set Up the iRoamly eSIM for Travel Data
In SIM manager, tap Mobile data, then choose iRoamly Travel eSIM. This makes the travel eSIM the data line.
Open the iRoamly Travel eSIM entry in SIM manager, then keep the line turned on. If your destination or plan requires roaming, enable Data roaming for the iRoamly eSIM.
Check Data switching in SIM manager. If you want to avoid the tablet switching away from iRoamly while traveling, keep automatic switching off unless you intentionally need it.
Troubleshooting
No Add eSIM: confirm the tablet is the Galaxy Tab S9 5G/cellular model, update One UI, check that the device is unlocked, and look for an EID in device information.
QR code will not scan: use Enter activation code, keep Wi-Fi on, increase screen brightness on the device showing the QR code, and make sure the QR code has not already been used.
eSIM installed but no data: select iRoamly Travel eSIM under Mobile data, enable data roaming if required, restart the tablet, and confirm the plan covers your destination.
Activation still pending: wait on Wi-Fi, restart the tablet, and try again after arriving in the supported destination if the plan activates on network connection.
Accidentally deleted the eSIM: do not assume the same QR code can be reused. Contact iRoamly support before trying to reinstall.
Voice or SMS does not work: check your iRoamly plan details. Many travel eSIM plans are data-focused, and voice/SMS support varies by plan.
Region or carrier variant issue: some Samsung tablets and carrier firmware builds may hide eSIM features. If SIM manager does not show eSIM options, the exact device variant may not support eSIM activation.
More Samsung Galaxy Tablet eSIM Setup Guides
Setting up another Samsung tablet or phone? These eSIM activation guides may help.
Conclusion
For the Galaxy Tab S9 5G, the QR code route is the simplest way to install an iRoamly travel eSIM: Settings > Connections > SIM manager > Add eSIM > Scan QR code.
Manual setup is the fallback when scanning is inconvenient, and on Samsung One UI it uses a single full Activation code field.
After installation, confirm that iRoamly Travel eSIM appears in SIM manager, choose it for Mobile data, enable roaming if your plan or destination requires it, and avoid deleting the eSIM unless iRoamly support tells you to.