
The Vivo V40 is a Funtouch OS Android phone with a 6.78-inch AMOLED display and a 2800 x 1260 portrait screen resolution.
Many Vivo V40 regional specification pages describe dual physical SIM behavior, and current public eSIM compatibility references do not consistently list the Vivo V40 as an eSIM-ready phone.
For that reason, travelers should confirm the exact regional Vivo V40 model before buying or installing an iRoamly travel eSIM. The most important check is whether the phone itself shows an eSIM, Add eSIM, or Download a SIM option inside its SIM settings.
This guide explains how to check compatibility on a Vivo V40, what to do if an eSIM option appears, how QR-code and manual-entry activation normally work on Android, and what to use instead if your Vivo V40 does not support eSIM. Menu names may vary slightly by Funtouch OS version, region, and carrier firmware.
Meet iRoamly for Easier Travel Connectivity
iRoamly is a travel eSIM service that provides mobile data plans for destinations around the world. Available plans may include destination, regional, and global options, with validity periods, data allowances, and supported features depending on the selected destination.
On compatible phones, installed travel data can help with maps, messaging, bookings, translations, ride-hailing, and travel updates.
Because Vivo V40 eSIM support depends on the exact regional model, confirm the phone shows an eSIM option before relying on an iRoamly setup.
The guide below keeps the compatibility checks first, then explains the QR-code and manual-entry paths that apply when the phone supports eSIM.
Before You Set Up Your iRoamly eSIM
Connect the Vivo V40 to stable Wi-Fi before checking or installing any mobile plan. If France is your next destination, you can prepare the travel eSIM in advance after confirming this Vivo V40 variant supports eSIM.
Open the iRoamly order page or email and keep the QR code, SM-DP+ address, and activation code available.
Confirm that your Vivo V40 is unlocked and that the exact regional model supports eSIM. If the phone only shows physical SIM slots and no Add eSIM option, do not try to force installation.
Do not delete an installed iRoamly eSIM casually. Many travel eSIM profiles cannot be reinstalled after removal.
Install the travel eSIM 1-2 days before travel when your plan allows it, but check the plan details first. iRoamly plan validity starts from activation, and the activation trigger can vary by plan or destination.
iRoamly plans may be data-only. Voice calls and SMS are not guaranteed, so check the specific plan details before relying on calling or texting.
Method 1: Install eSIM by Scanning a QR Code
Use this method only if your Vivo V40 shows an eSIM installation option. If the option is missing, skip to the troubleshooting and alternatives sections.
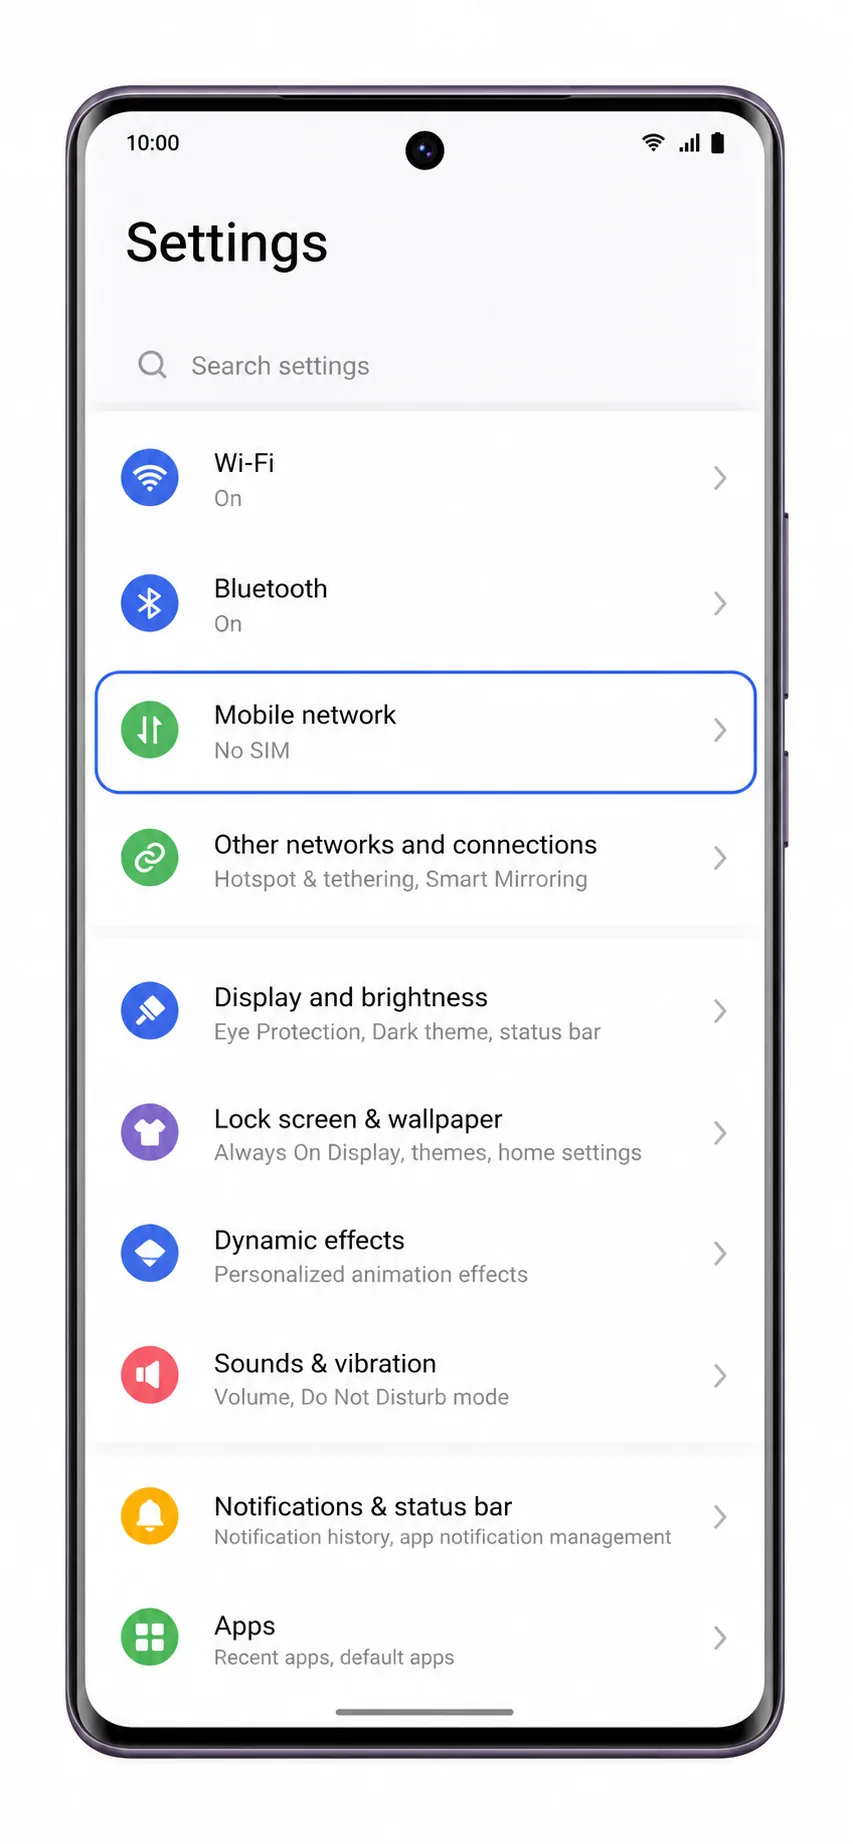
Open Settings on the Vivo V40 and tap Mobile network.
You should see the Funtouch OS mobile network settings where SIM and data options are managed.
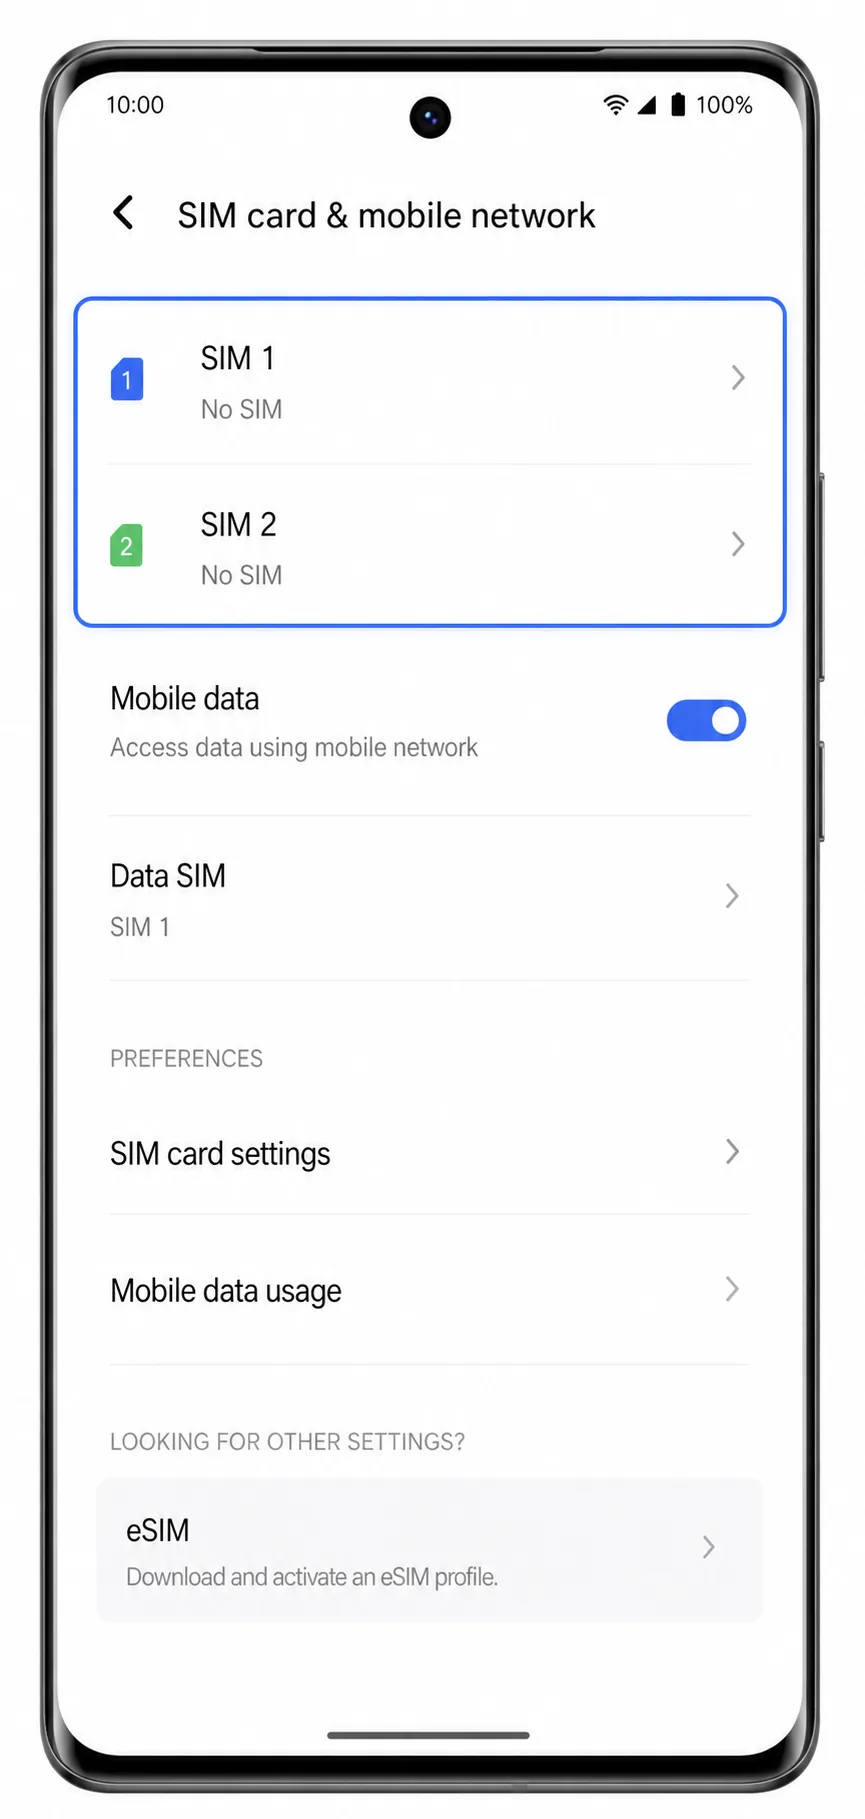
Tap SIM card & mobile network or the closest SIM-management label shown on your Vivo V40.
The next screen should list installed SIM cards and available mobile plan options. If there is no eSIM-related option here, this Vivo V40 variant is probably physical-SIM only.
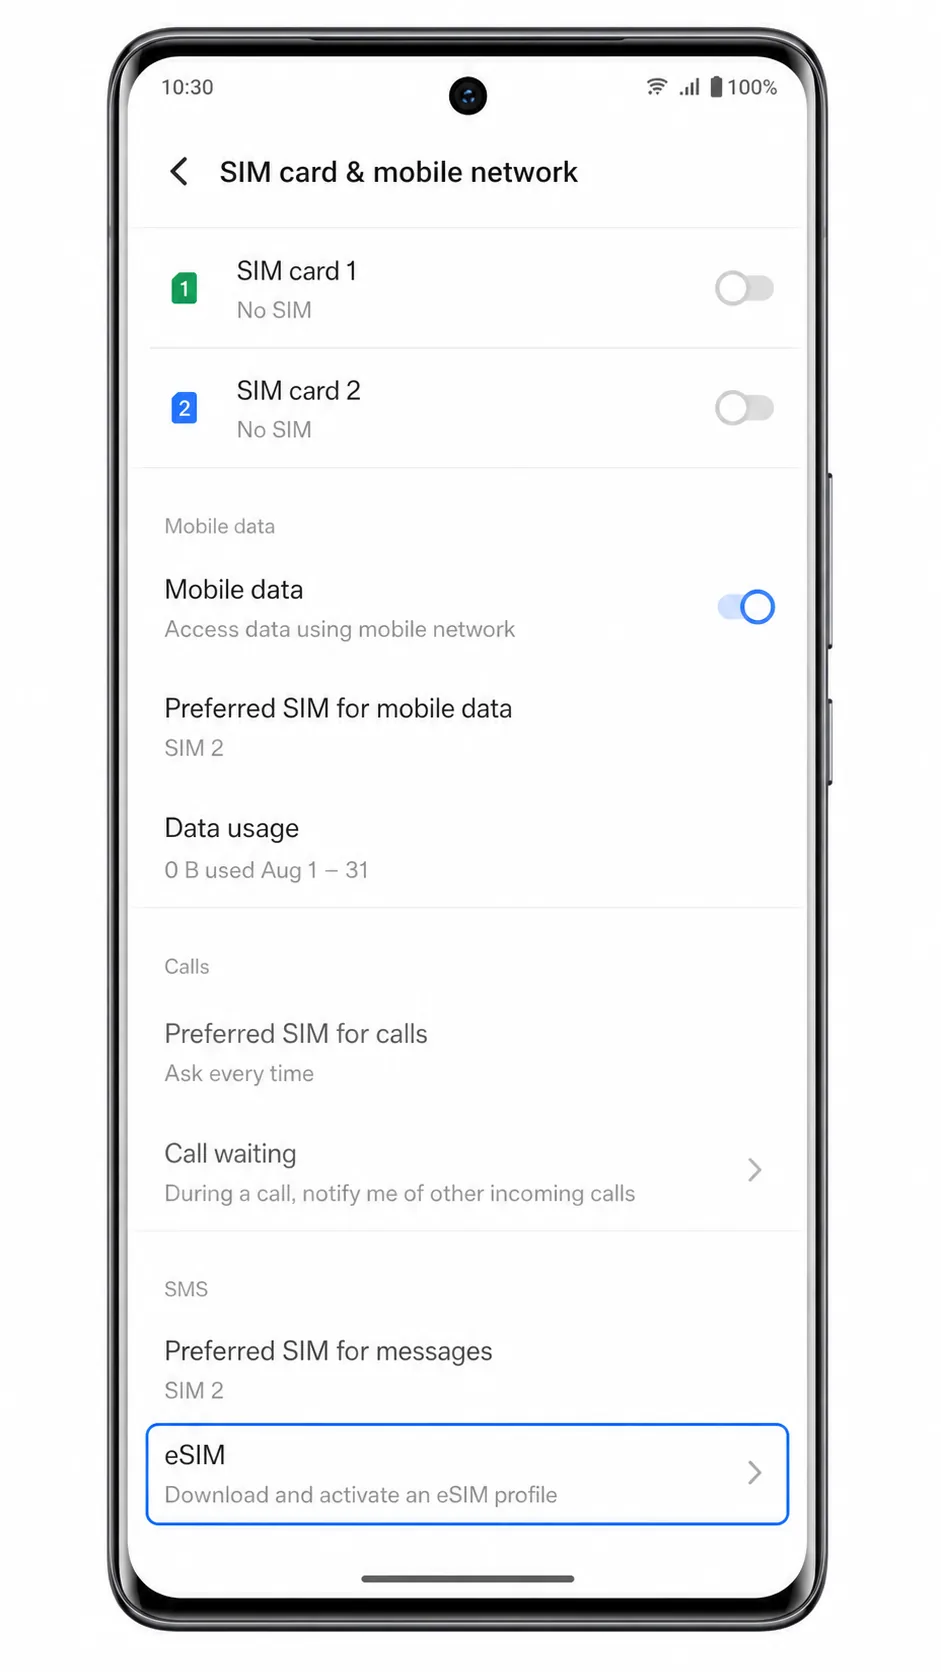
Tap Add eSIM, eSIM, or Download a SIM if that option appears.
The phone should open an Android eSIM setup screen. If the phone only shows physical SIM 1 and SIM 2 settings, stop here and use a physical SIM or another eSIM-capable phone.
Choose Scan QR code and scan the iRoamly QR code from another screen or printed copy.
Keep the QR code flat and readable. The phone should detect the eSIM profile and show a download or confirmation screen.
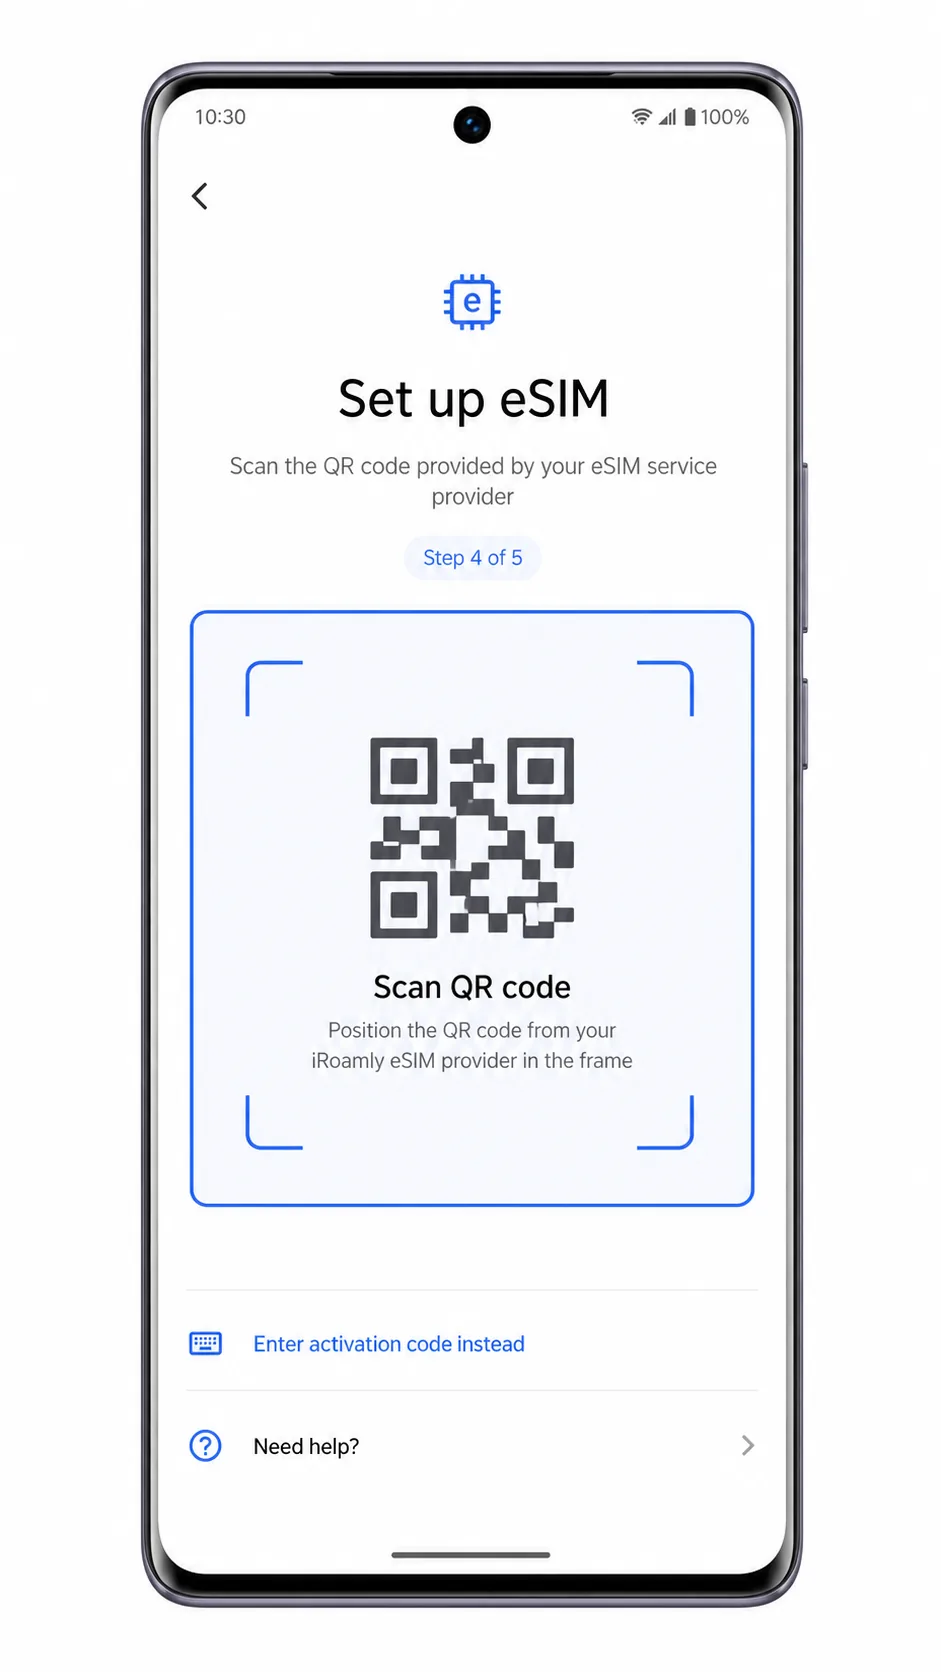
Tap Download, Add, or Activate when the Vivo V40 asks you to confirm the iRoamly eSIM profile.
Wait on Wi-Fi until the download finishes. Do not close Settings, remove the QR code, or restart the phone while the profile is downloading.
Method 2: Install eSIM Manually
Manual setup is useful if the QR code will not scan, but it still requires an eSIM-capable Vivo V40 variant. iRoamly usually provides the required manual details in the order page or email. On Android, the manual entry screen may ask for an SM-DP+ address and activation code, or it may ask for a single full activation-code string.
Open Settings and tap Mobile network.
Use the same entry point as the QR-code method so you start from the Vivo V40 network settings.
Tap SIM card & mobile network, then tap Add eSIM, eSIM, or Download a SIM if your phone shows one of those labels.
If these labels are not available, your Vivo V40 variant cannot install the iRoamly eSIM directly.
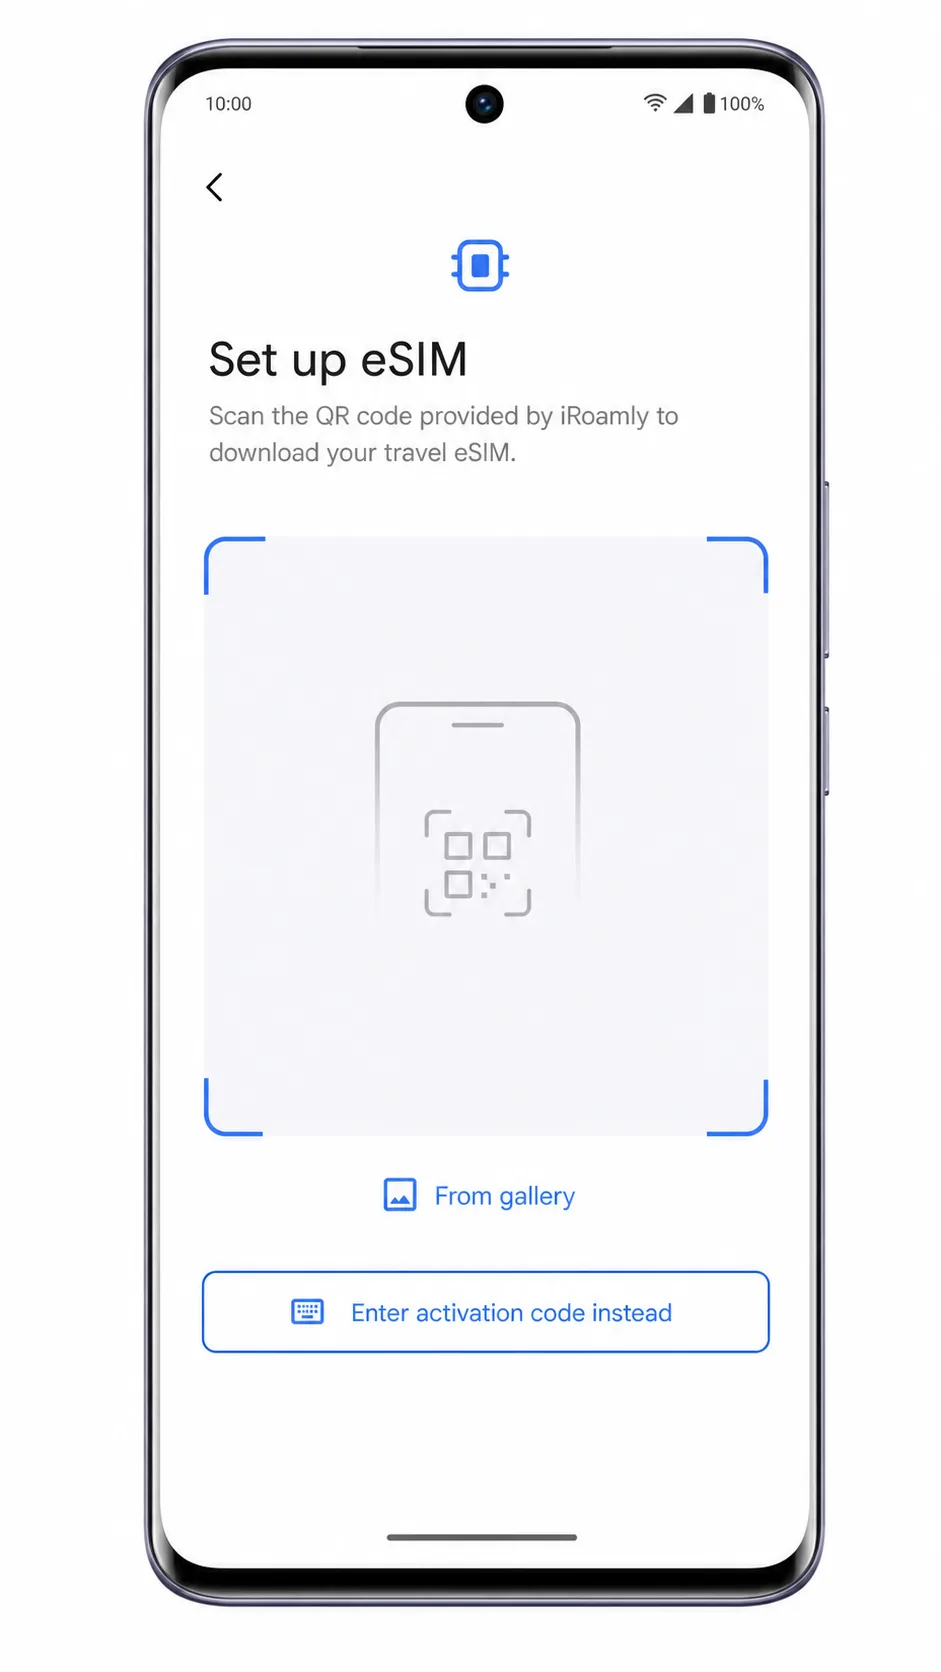
Tap Enter details manually, Enter activation code, or the manual-entry link shown below the QR scanner.
The manual screen should open with fields for the iRoamly activation details. Use the exact field format shown on your phone rather than splitting or combining codes yourself.
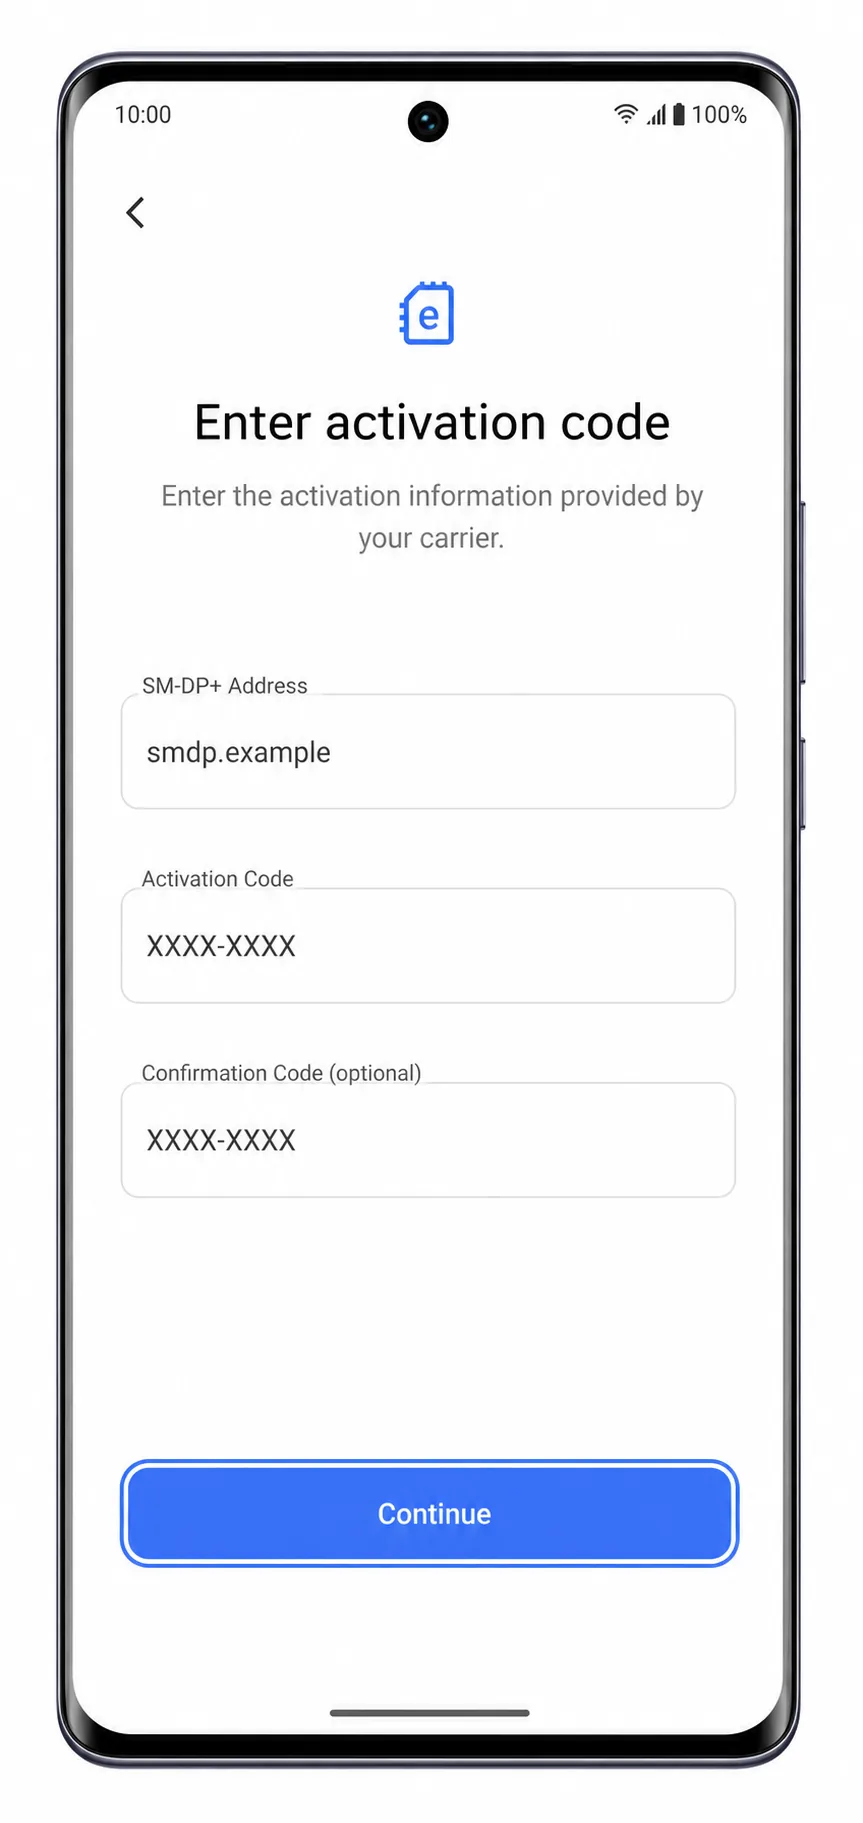
Enter the iRoamly manual activation details exactly as provided, then tap Continue.
If your screen has separate fields, place the SM-DP+ address in SM-DP+ Address, the code in Activation Code, and leave Confirmation Code blank unless iRoamly gave you one. If your screen has one activation-code field, paste the complete iRoamly activation string.
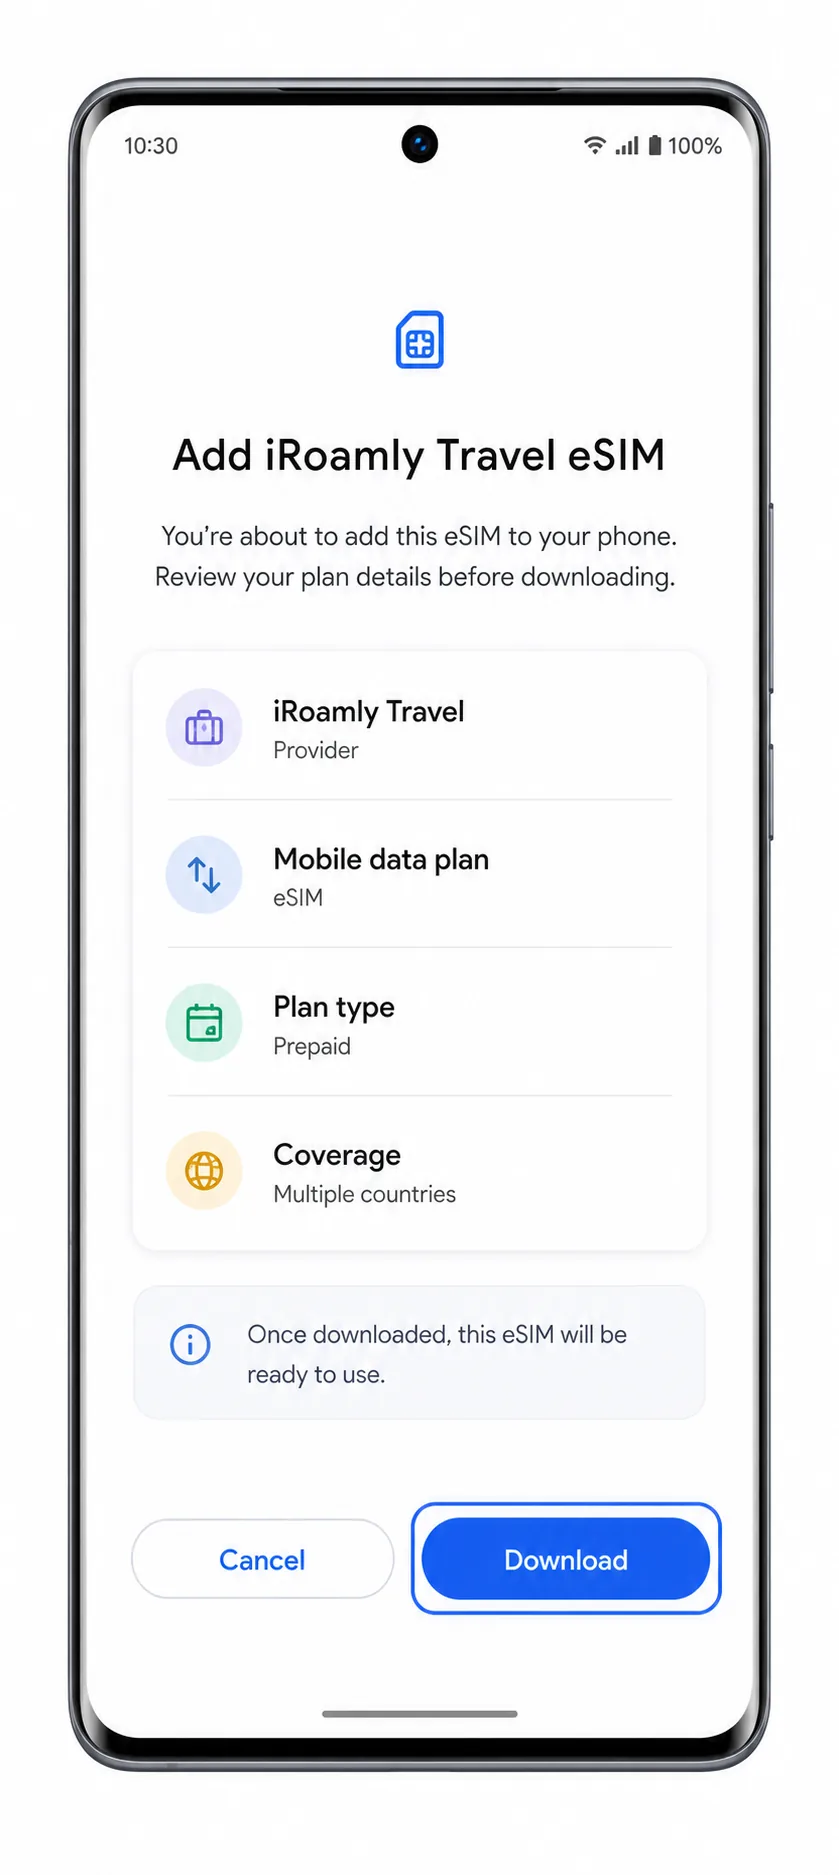
Review the detected iRoamly eSIM profile and tap Download, Add, or Activate.
Keep Wi-Fi connected until the installation completes. If the phone reports that the activation code is invalid or already used, contact iRoamly support before trying repeated installs.
How to Confirm Your iRoamly eSIM Is Installed
Open Settings and tap Mobile network, then return to the Vivo V40 SIM-management screen.
The installed iRoamly profile should appear as an eSIM or mobile plan if your Vivo V40 supports eSIM and the download completed.
Tap the installed iRoamly eSIM profile and confirm that the line is switched on.
You should see a line toggle, plan label, or mobile network status for the iRoamly profile. Rename the line to iRoamly Travel if the phone allows labels.
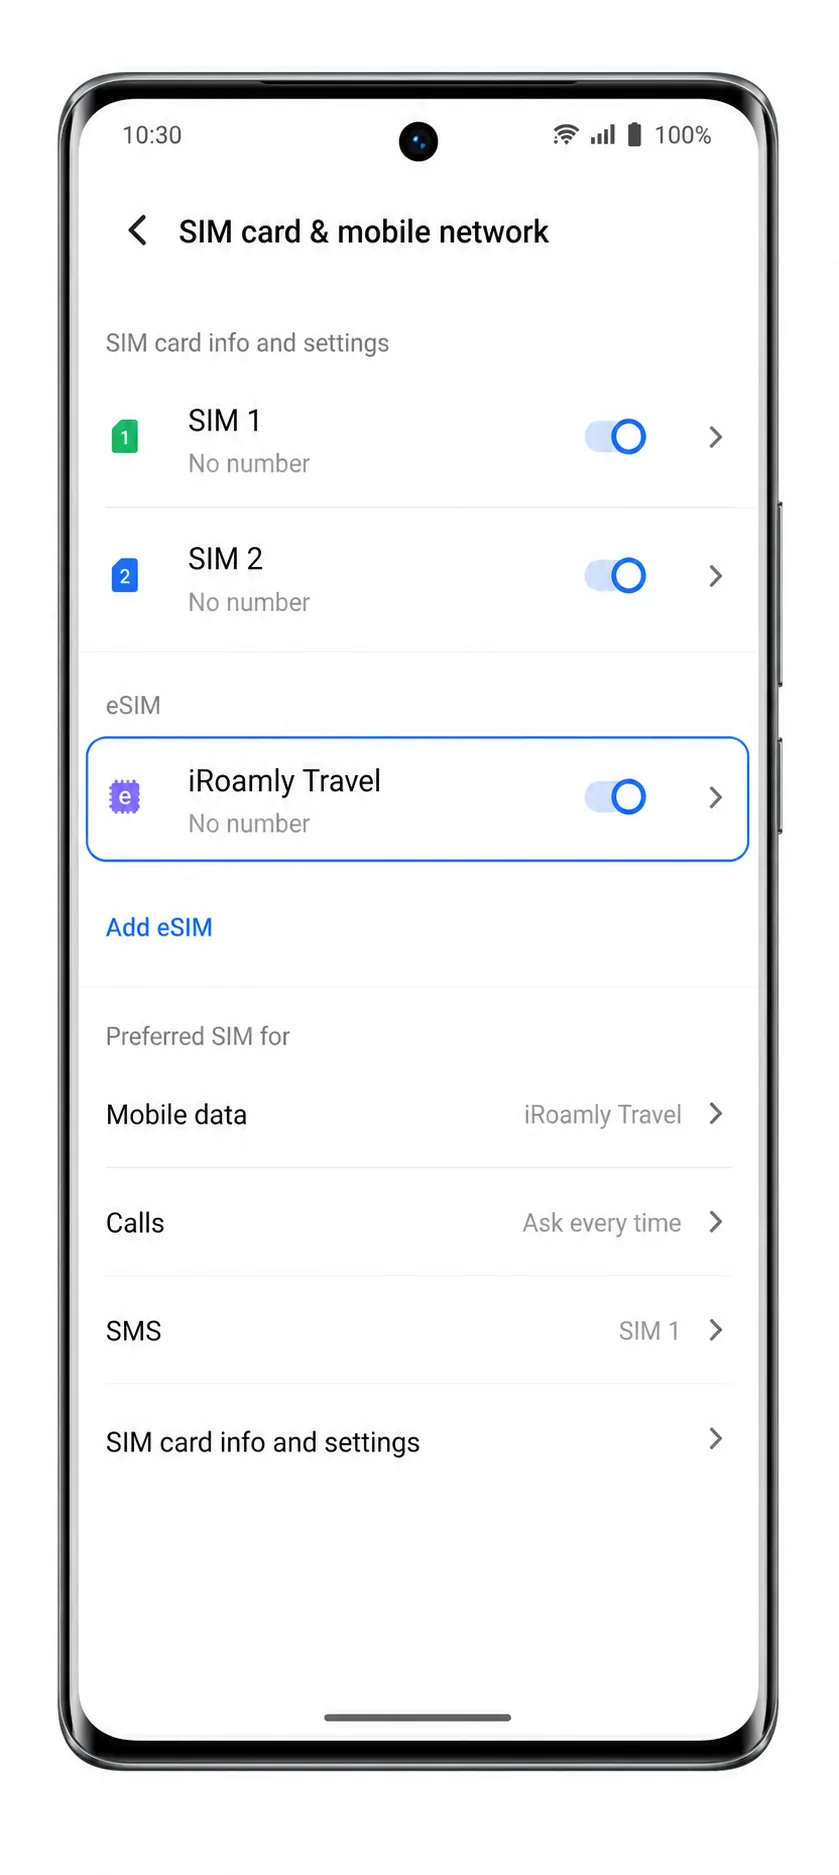
Check the status bar or mobile network page for signal after you arrive in the destination country.
Signal may not appear before travel if the plan only connects in its supported destination. If the plan is data-only, do not use SMS or voice-call tests as proof of failure.
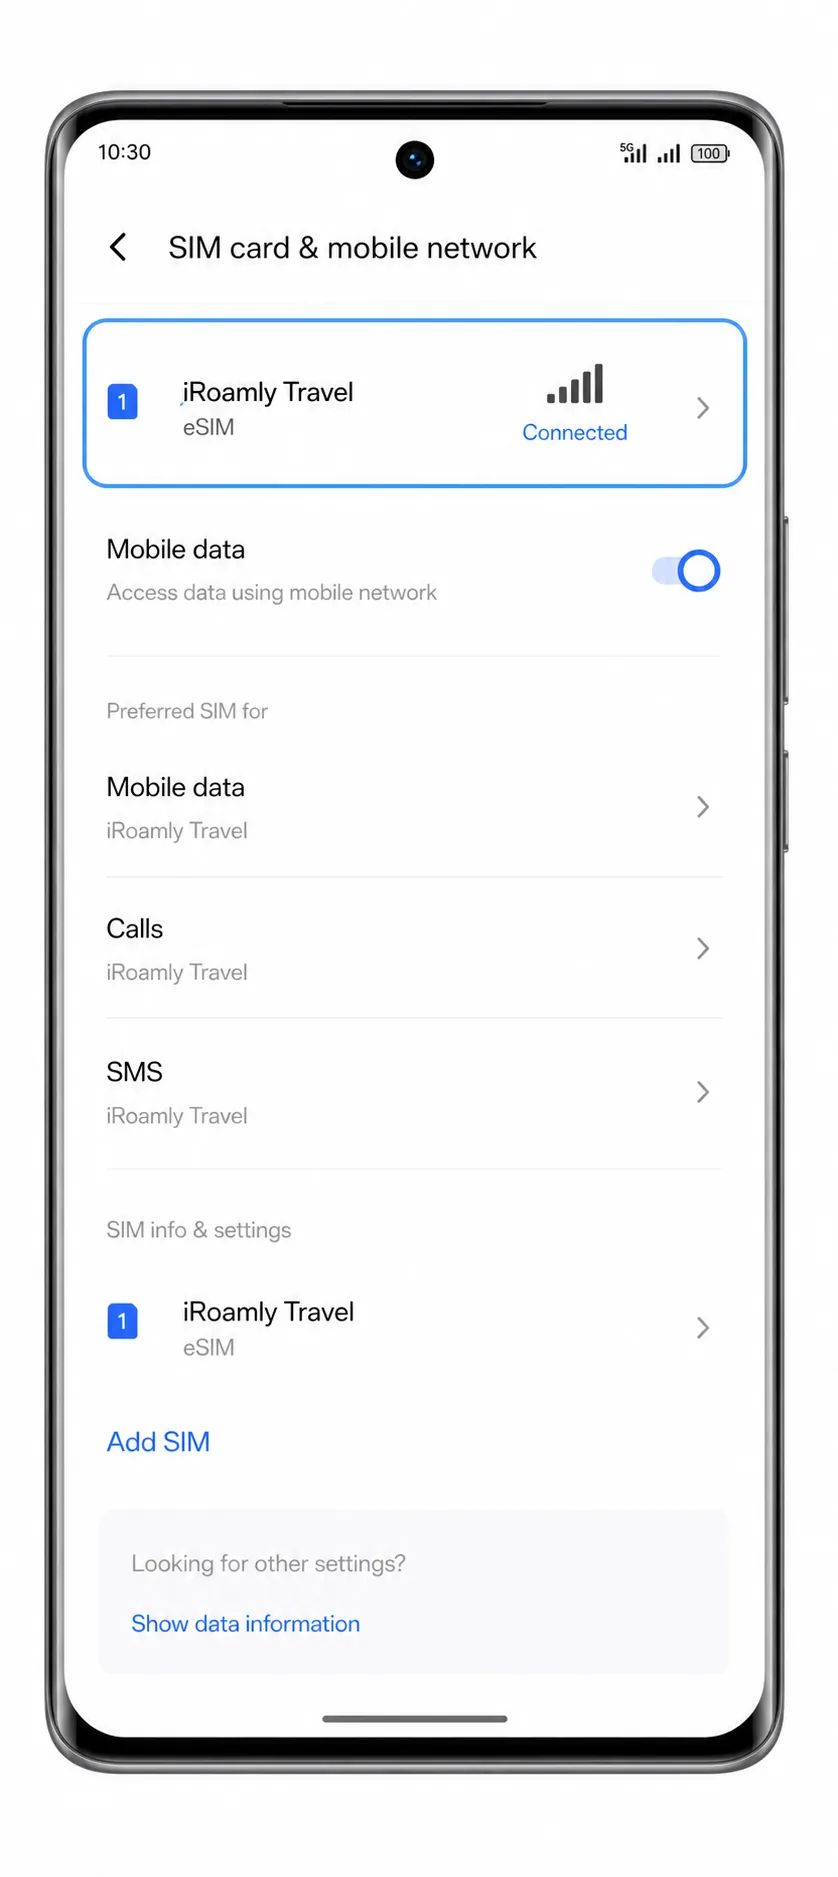
Configure eSIM for Mobile Data
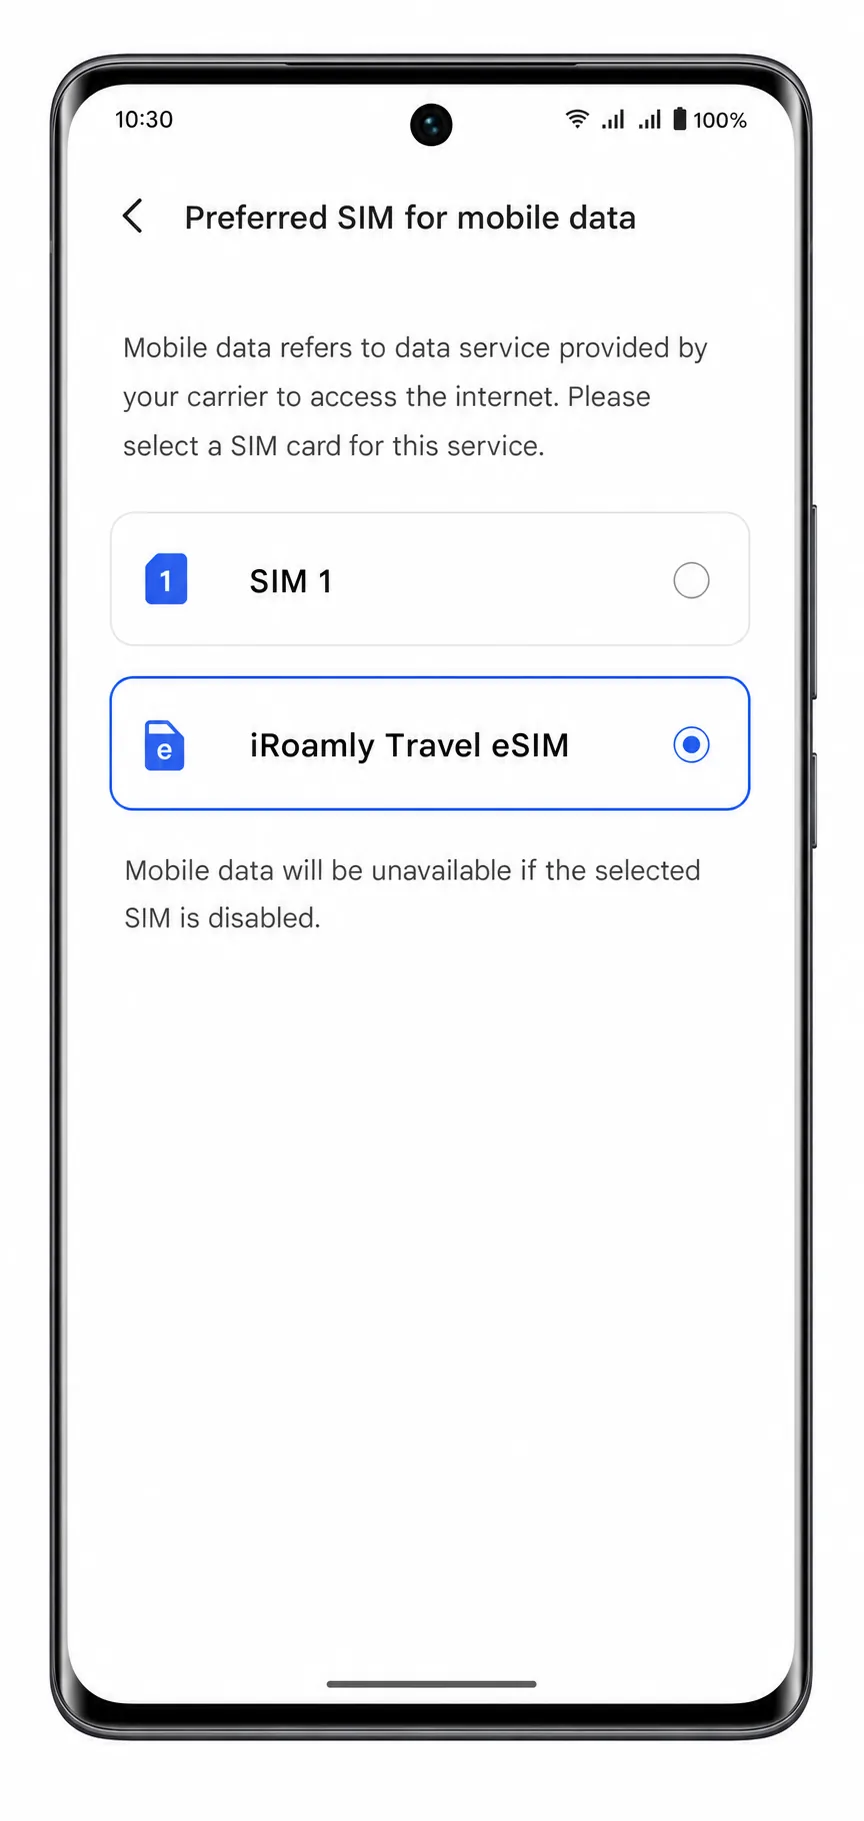
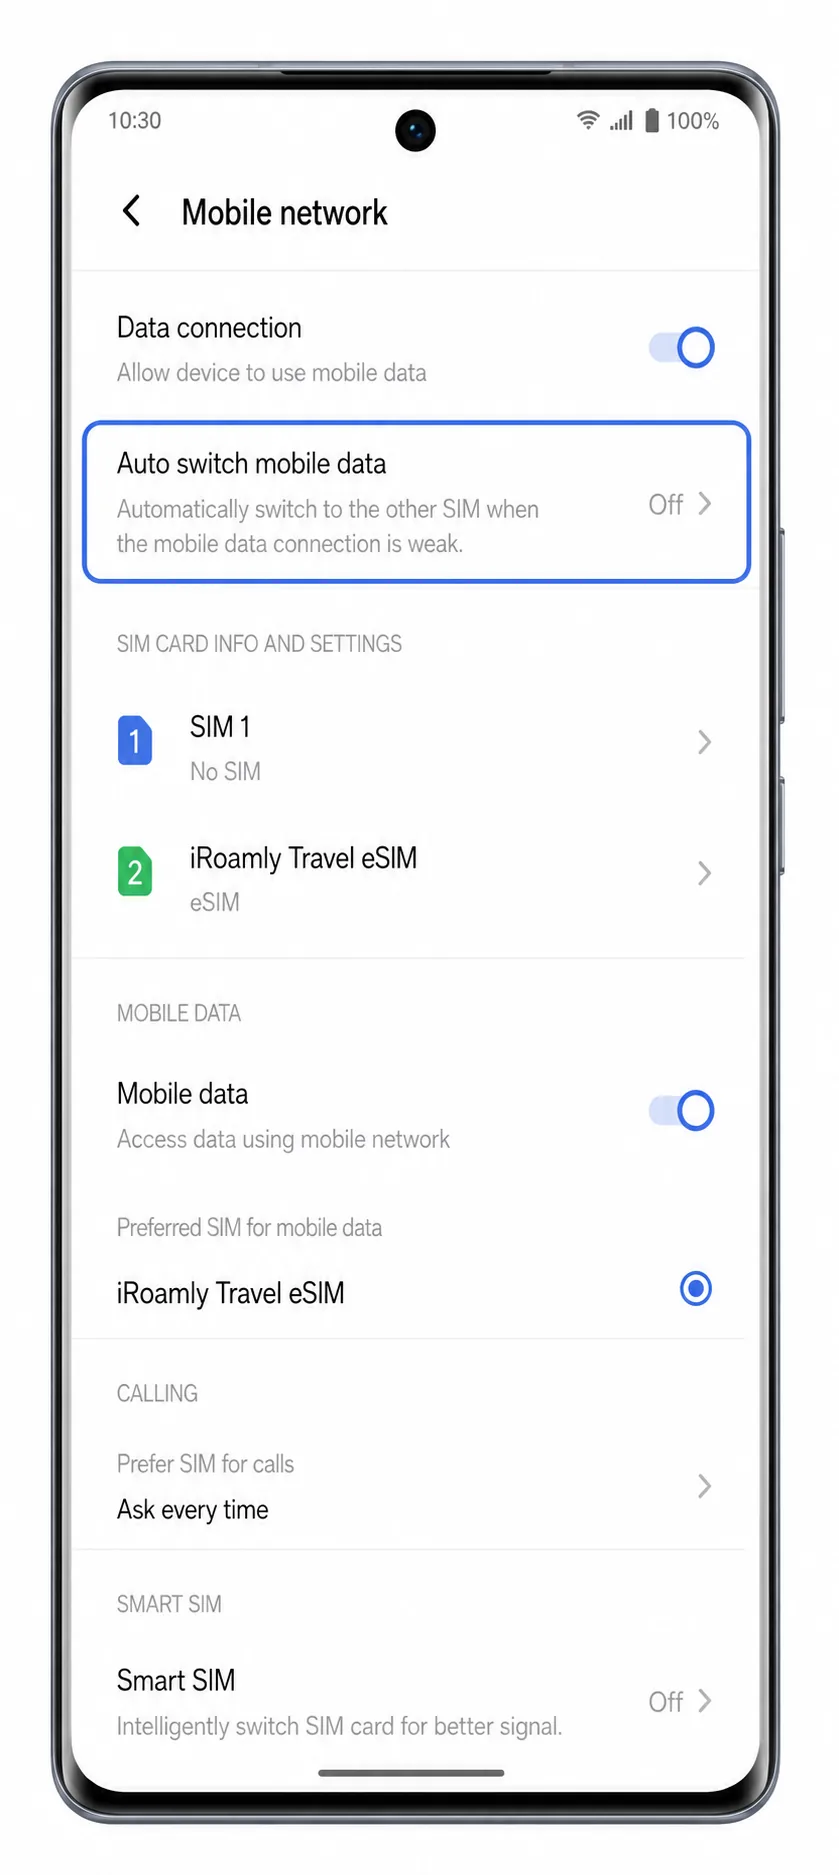
Open Settings, tap Mobile network, and choose the iRoamly eSIM under mobile data or data SIM settings.
The Vivo V40 should show which SIM or eSIM is used for mobile data. Select the iRoamly line for travel data when you are ready to use the plan.
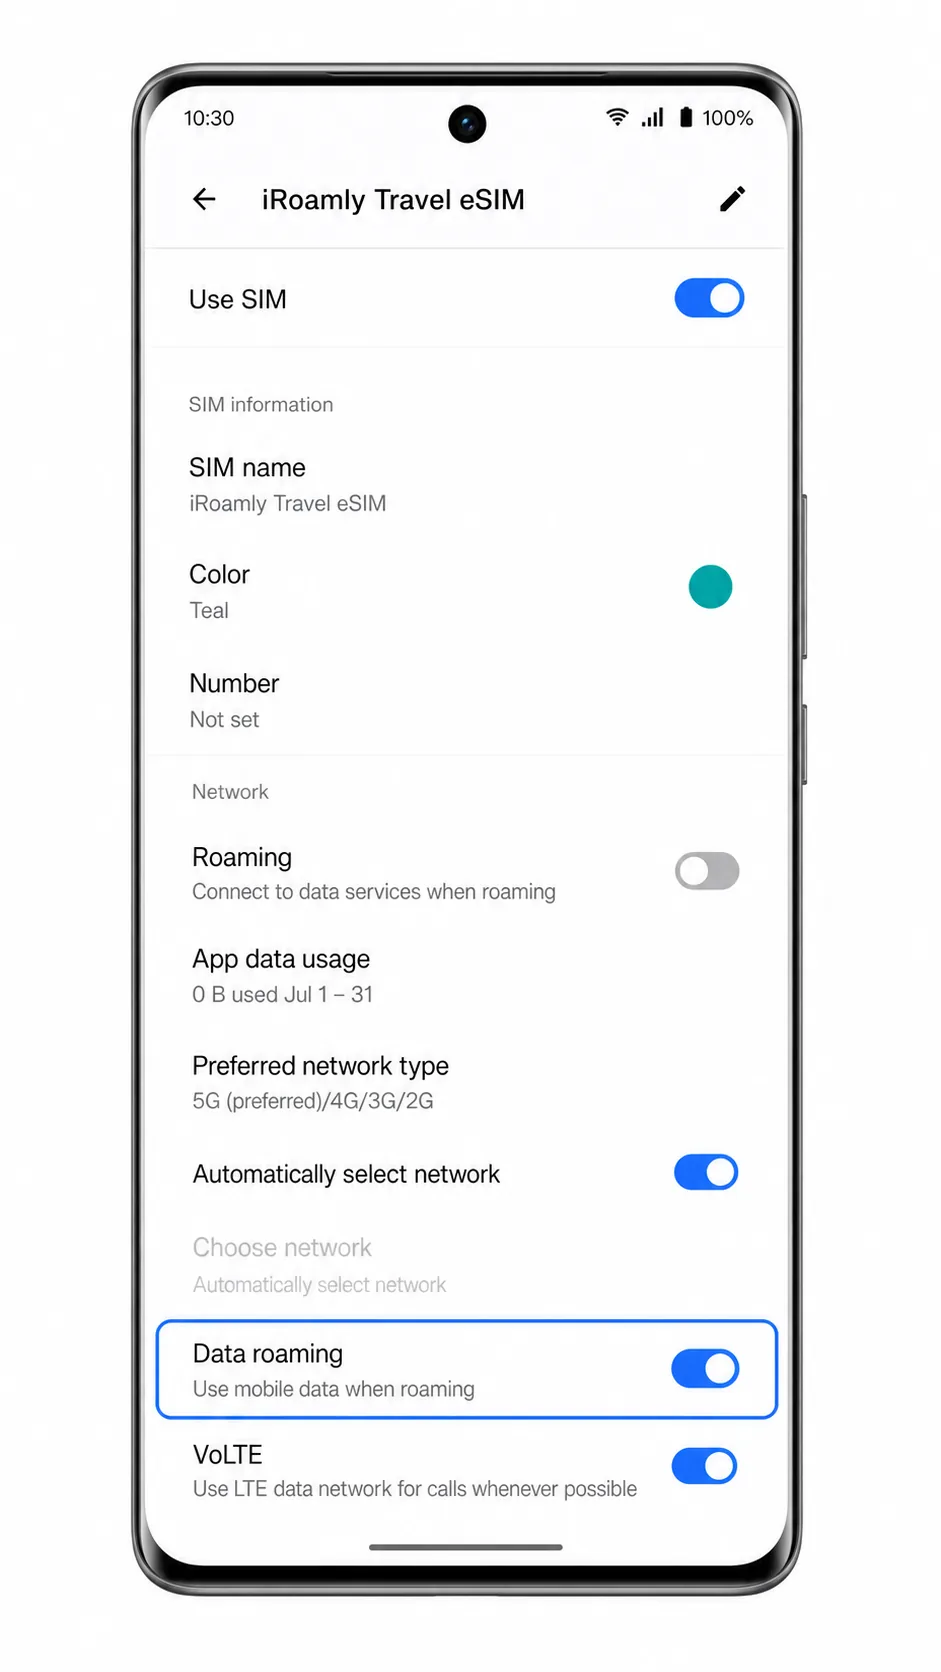
Open the iRoamly eSIM profile and turn on Data roaming if the iRoamly plan or destination instructions require it.
Travel eSIMs often need roaming enabled to connect to partner networks. Leave roaming off on your primary SIM if you want to avoid roaming charges from your home carrier.
Turn off automatic mobile-data switching if your Vivo V40 offers that option.
This helps keep travel data on iRoamly instead of falling back to your primary SIM when signal changes.
Troubleshooting
Add eSIM is missing: The Vivo V40 is not consistently documented as an eSIM-compatible model across regions. If your phone does not show Add eSIM, eSIM, or Download a SIM, use a physical SIM, another eSIM-capable device, or contact Vivo support with your exact model number.
QR code was already used: Do not delete and reinstall the profile. Many travel eSIM QR codes are single-use. Ask iRoamly support to check the order status.
Manual details do not work: Confirm that you copied the SM-DP+ address and activation code exactly. Do not add spaces or line breaks unless the phone asks for them.
eSIM installed but no data: Make sure the iRoamly line is selected for mobile data, Data roaming is enabled when required, airplane mode is off, and the plan is active in the destination country.
Activation is pending: Stay on Wi-Fi and wait several minutes. Some travel eSIMs finish activation only after reaching a supported network.
Voice or SMS does not work: Many iRoamly travel eSIM plans are data-only. Check the plan page before treating missing calls or texts as a setup failure.
Regional variant limitation: A Vivo V40 sold in one market may not expose the same SIM settings as a model sold elsewhere. The phone’s own Settings app is the final check.
More Vivo eSIM Setup Guides
Using another Vivo phone? These eSIM setup and activation guides may help.
Conclusion
For the Vivo V40, the first job is not scanning the iRoamly QR code; it is confirming that Funtouch OS actually shows an eSIM entry under Mobile network and SIM card & mobile network.
If your phone has Add eSIM or Download a SIM, the QR-code path is the easiest way to install iRoamly, while manual entry is the backup for scanner problems using the SM-DP+ address and activation code format shown on the phone.
After installation, confirm that the iRoamly profile appears in the SIM settings, select it for mobile data, and enable data roaming when the plan requires it. If your Vivo V40 does not show any eSIM option, use a physical travel SIM or install the iRoamly eSIM on another compatible phone instead.