
Some regional Vivo V50 models, including certain Middle Eastern variants, list eSIM support on the local vivo specifications page. This guide applies only to Vivo V50 units that show eSIM support in the official local specs or display an Add eSIM option in Funtouch OS 15.
For travelers, an iRoamly travel eSIM can be installed before departure and used for mobile data after arrival. The QR-code method is usually fastest, while manual entry is useful if the QR code cannot be scanned or you are setting up from the same phone.
This guide covers both setup paths on the Vivo V50, how to confirm that the iRoamly eSIM was added, and which mobile data and roaming settings to check before using the plan abroad.
Prepare Your Travel Data with iRoamly
iRoamly eSIM is a travel eSIM service that provides mobile data for destinations around the world. Travelers can choose from available local, regional, or global plan options, with data amounts, validity periods, and supported features varying by destination.
After installation on a compatible phone, the travel data line can support navigation, messaging, translations, bookings, and trip updates abroad.
On a Vivo V50 model that supports eSIM in its region, an iRoamly plan can be installed digitally and then selected for mobile data in Funtouch OS.
Continue with the existing QR-code or manual-entry instructions below to add the profile and check the data settings before travel.
Before You Set Up Your iRoamly eSIM
Connect the Vivo V50 to stable Wi-Fi before downloading the eSIM.
Confirm that your Vivo V50 model supports eSIM. Some regional versions may support physical SIM only.
Update to the latest Funtouch OS 15 version if Add eSIM is missing.
Keep your QR code and activation details ready.
Do not delete an installed eSIM unless iRoamly confirms it can be reinstalled.
Install the eSIM 1–2 days before travel when possible. If you're planning to visit Italy, you can choose an Italy eSIM and have it ready on your Vivo V50 before departure.
Check when your plan becomes active. Activation rules can vary by plan.
Some iRoamly plans are data-only. Voice and SMS availability varies by plan.
Method 1: Install eSIM by Scanning a QR Code
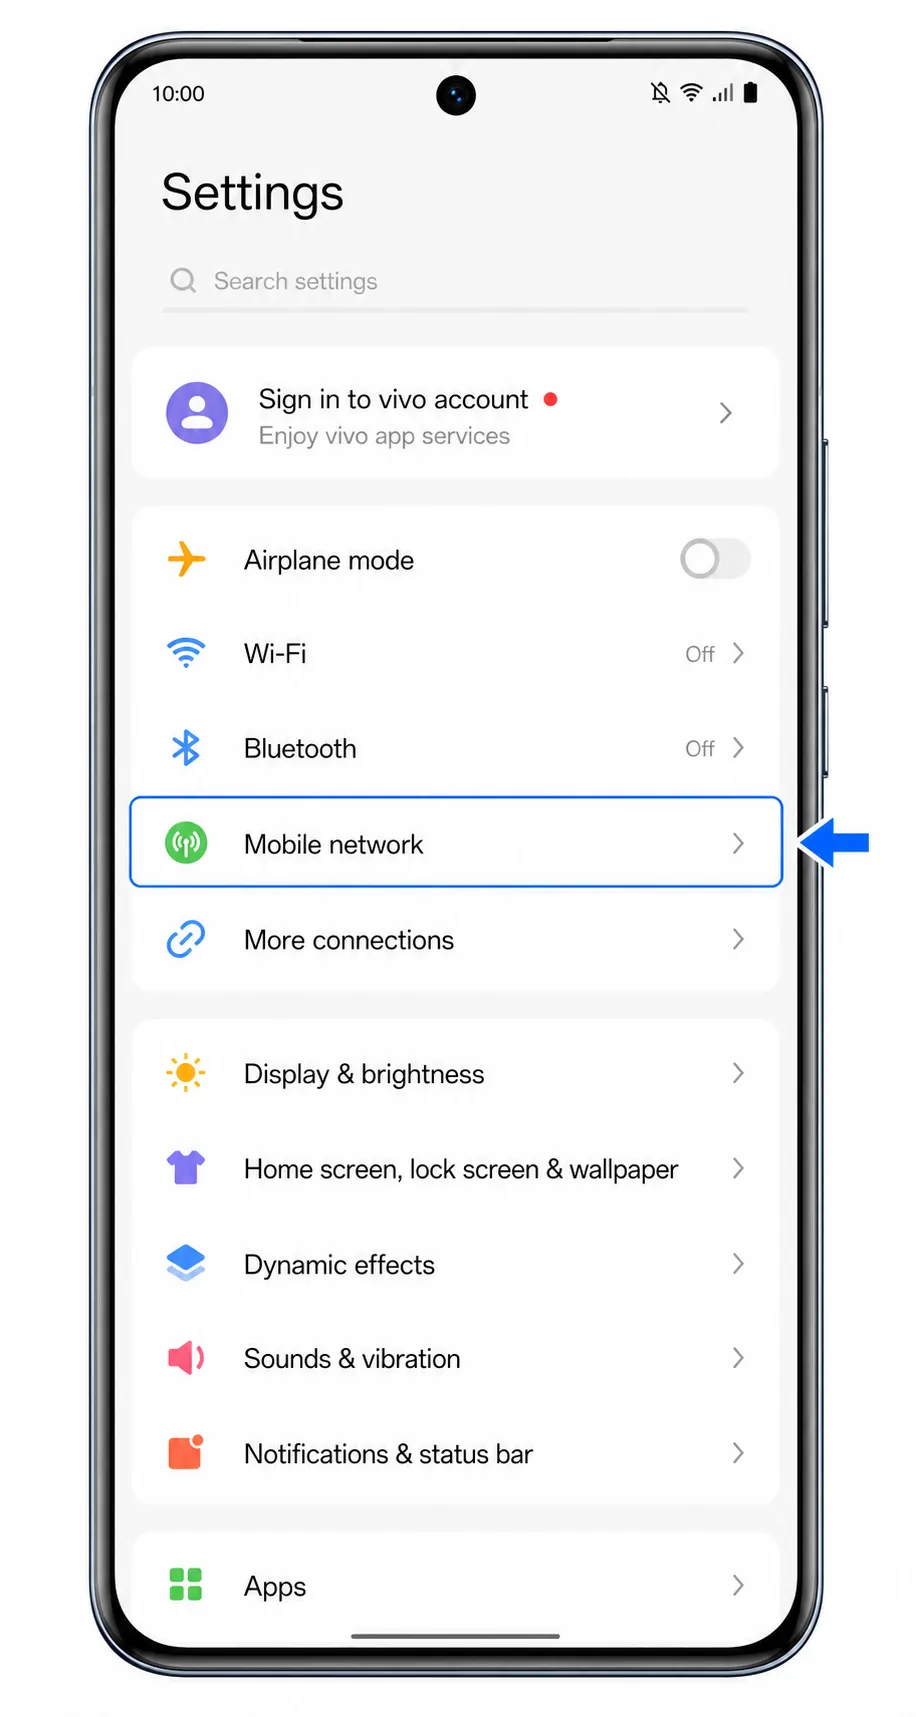
Open Settings on the Vivo V50 and tap Mobile network.
You should see the Funtouch OS mobile network settings area.
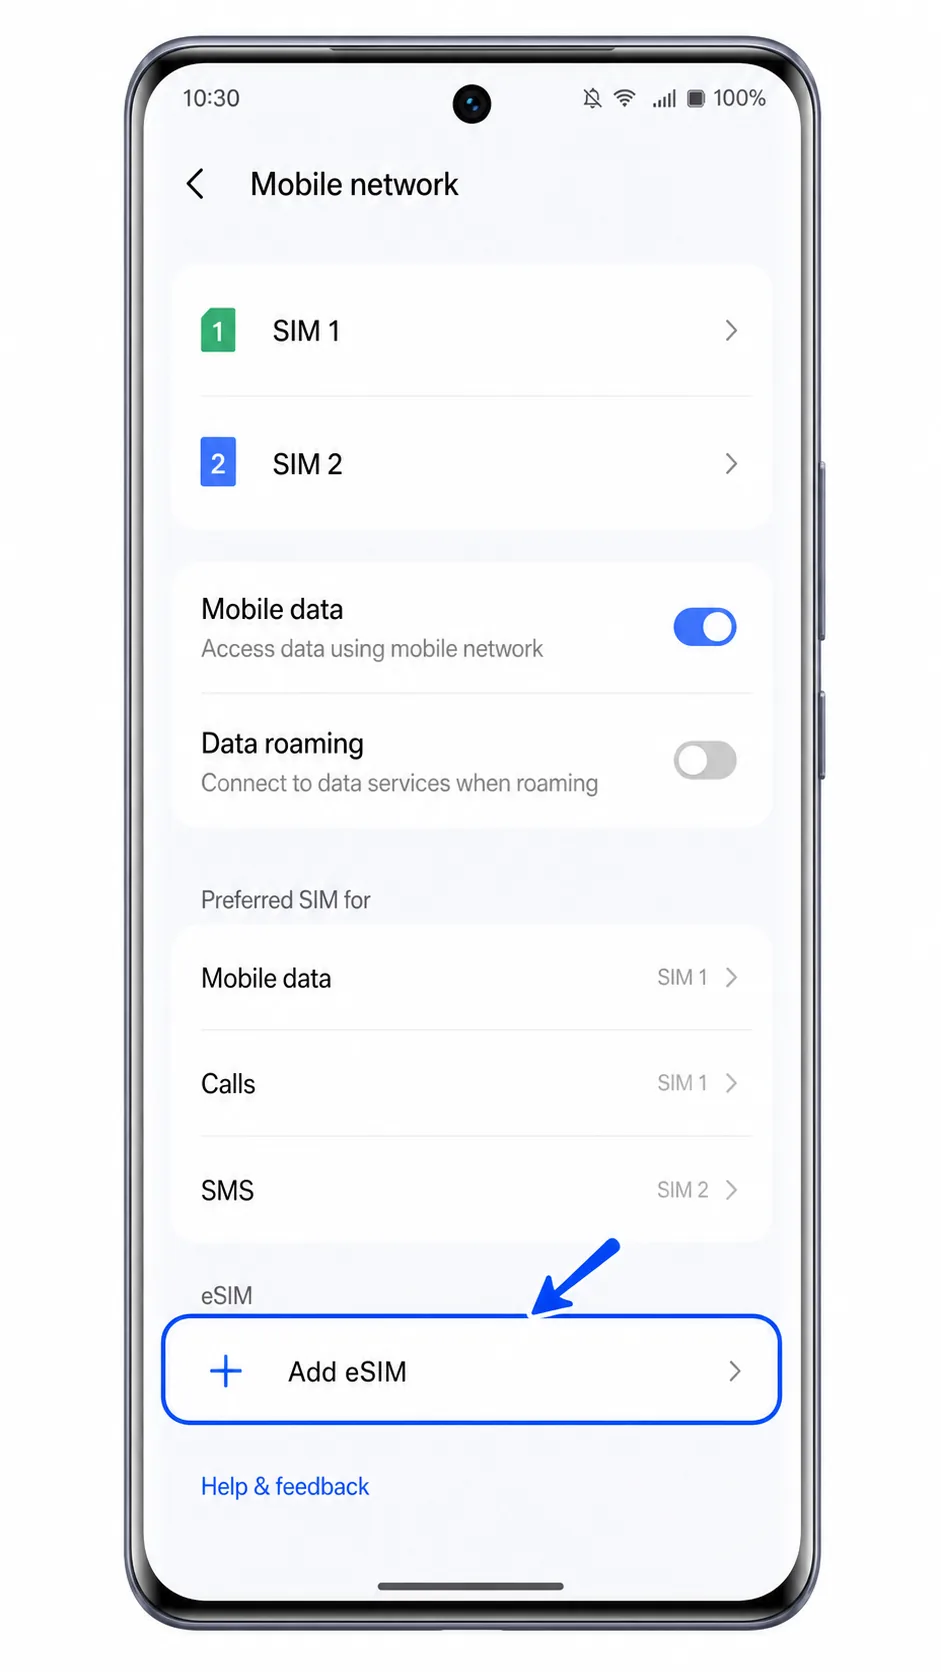
Tap Add eSIM in the Mobile network page.
The phone opens the eSIM setup area for adding a new profile.
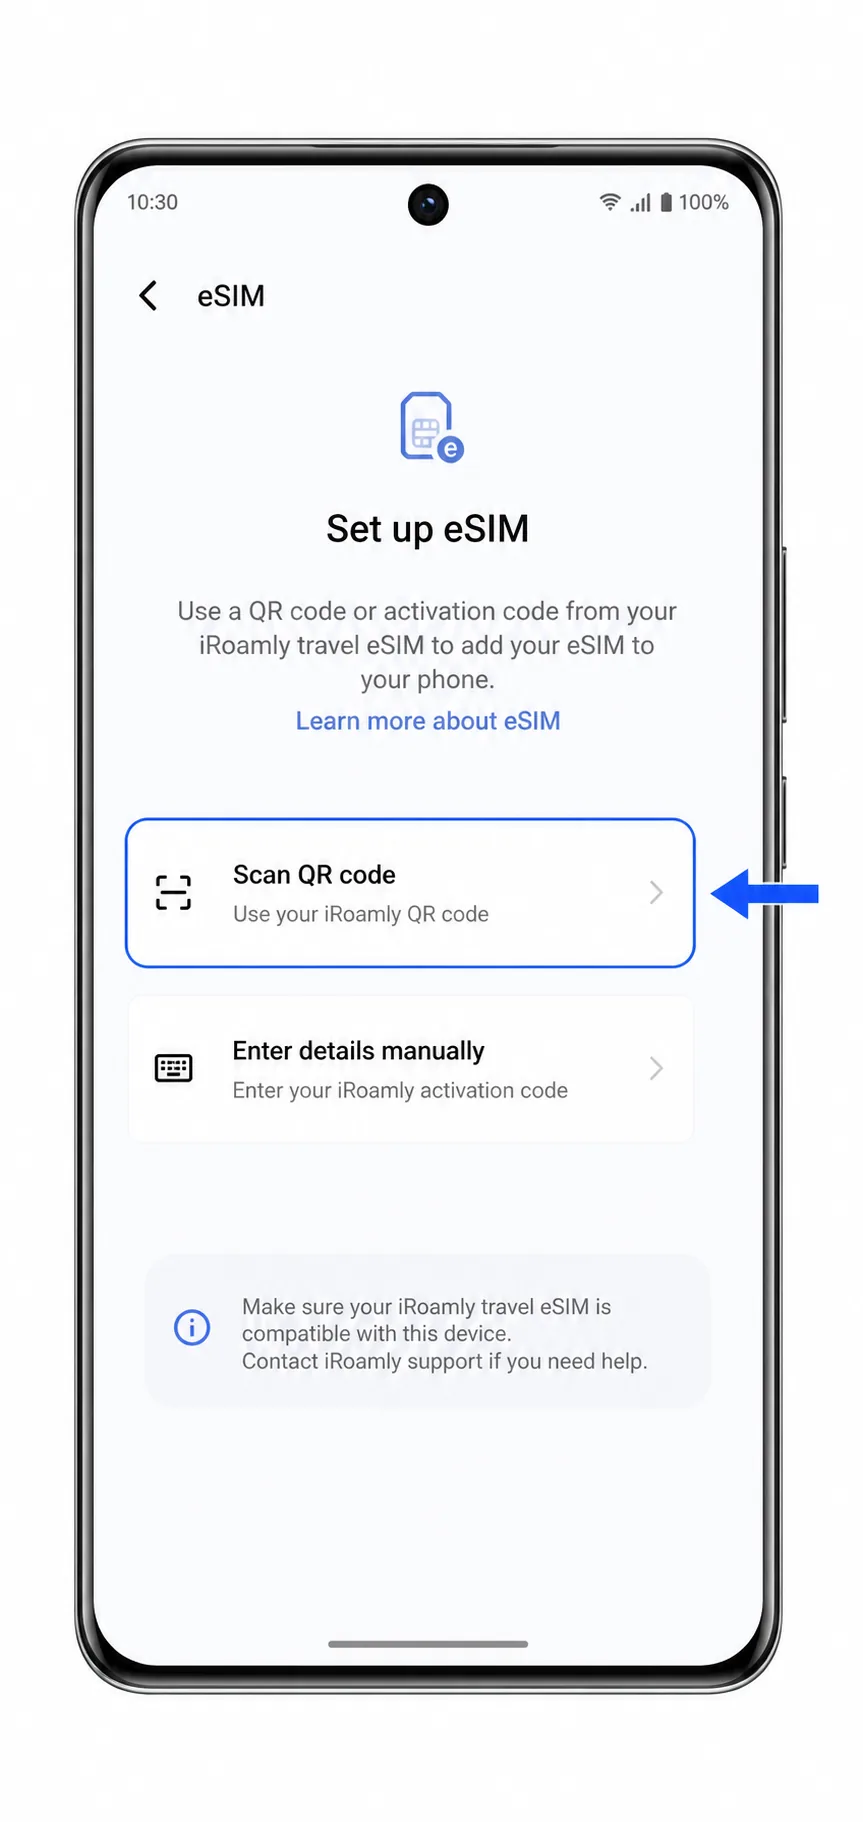
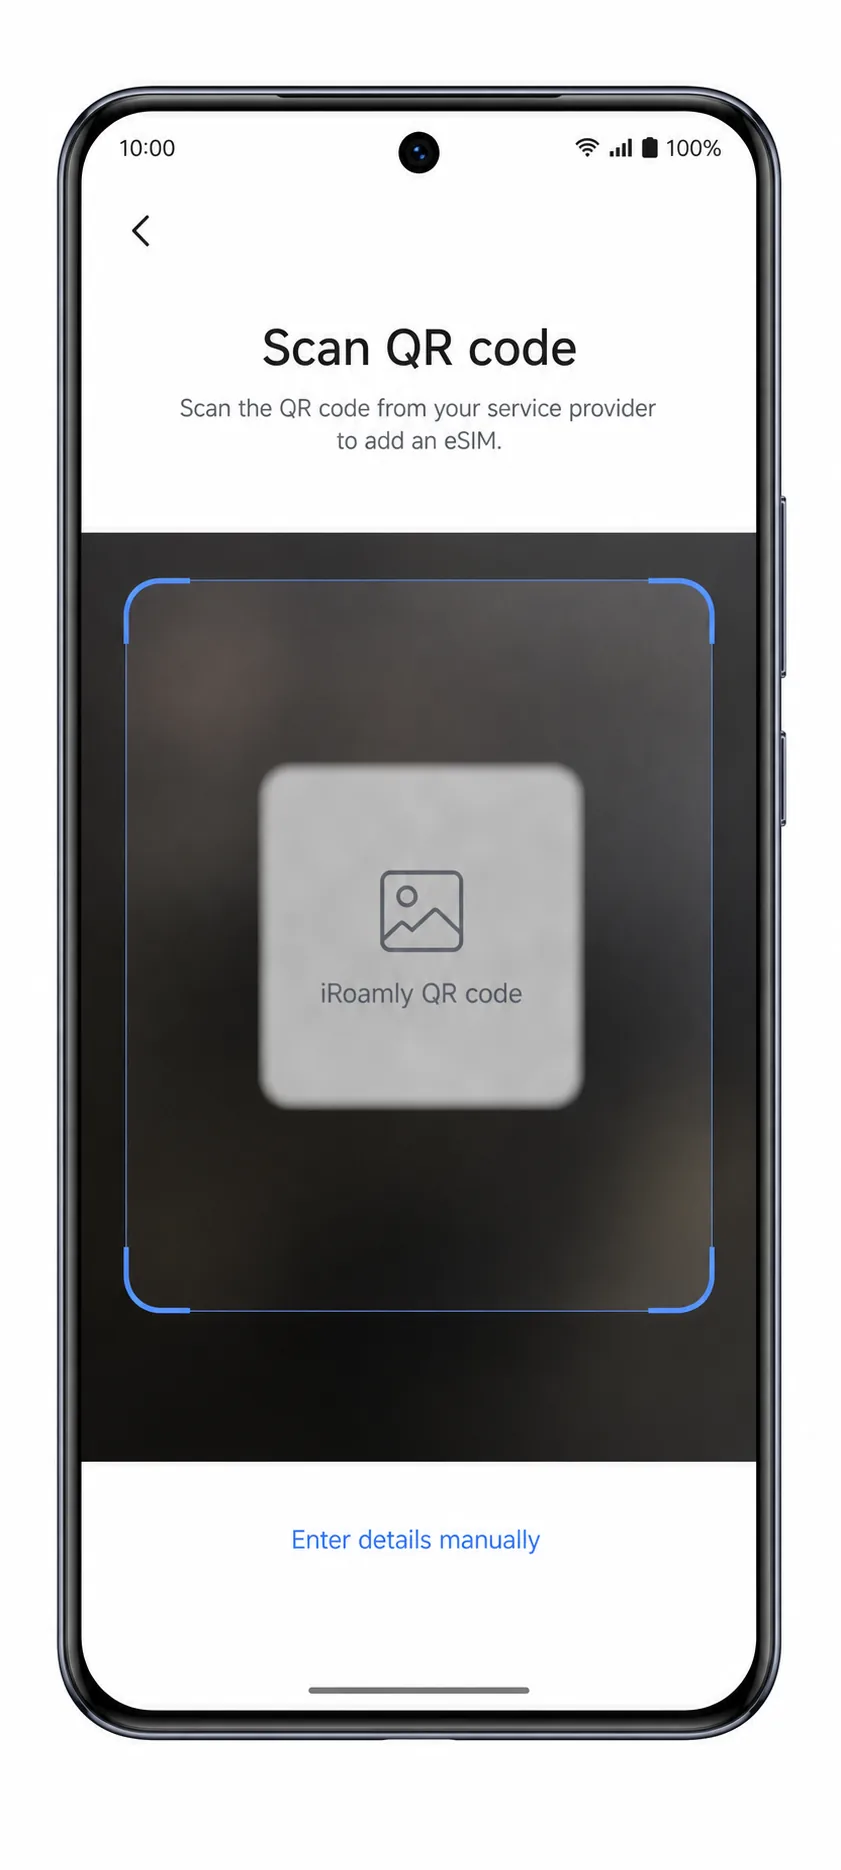
Tap Scan QR code.
Use this option when your iRoamly QR code is displayed on another screen or printed.
Point the scanner at the iRoamly QR code and wait for the phone to read it.
Keep the QR code flat and bright. Do not share the QR code publicly because it is tied to your eSIM profile.
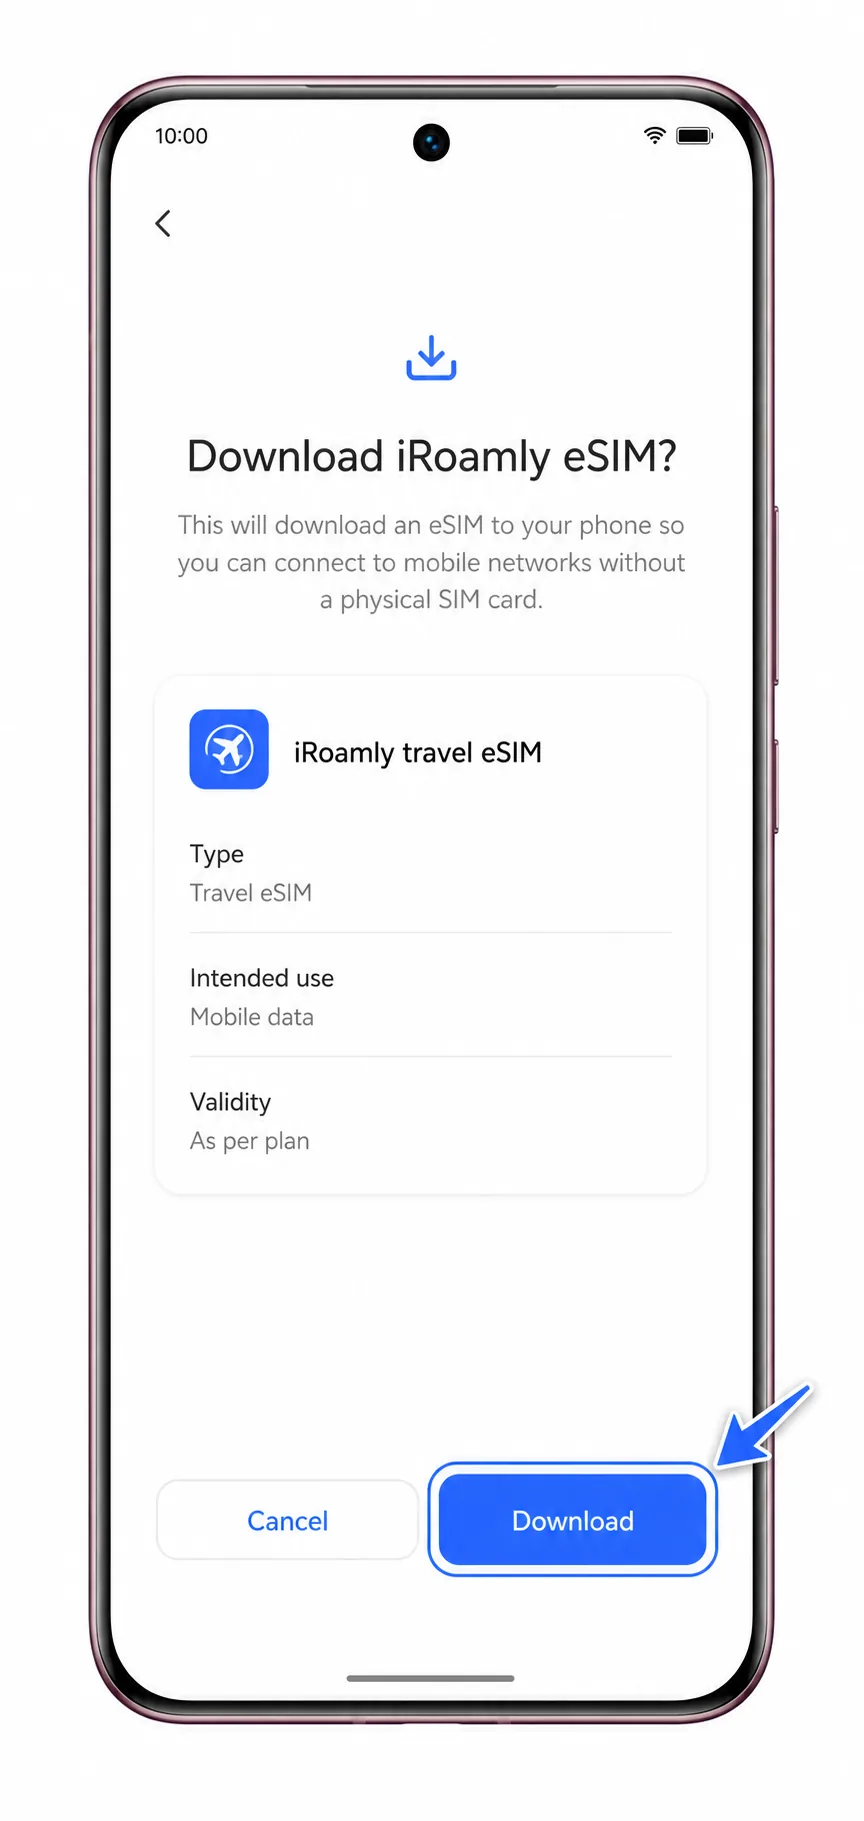
Review the eSIM details and tap Download.
Keep the phone connected to Wi-Fi until the download finishes.
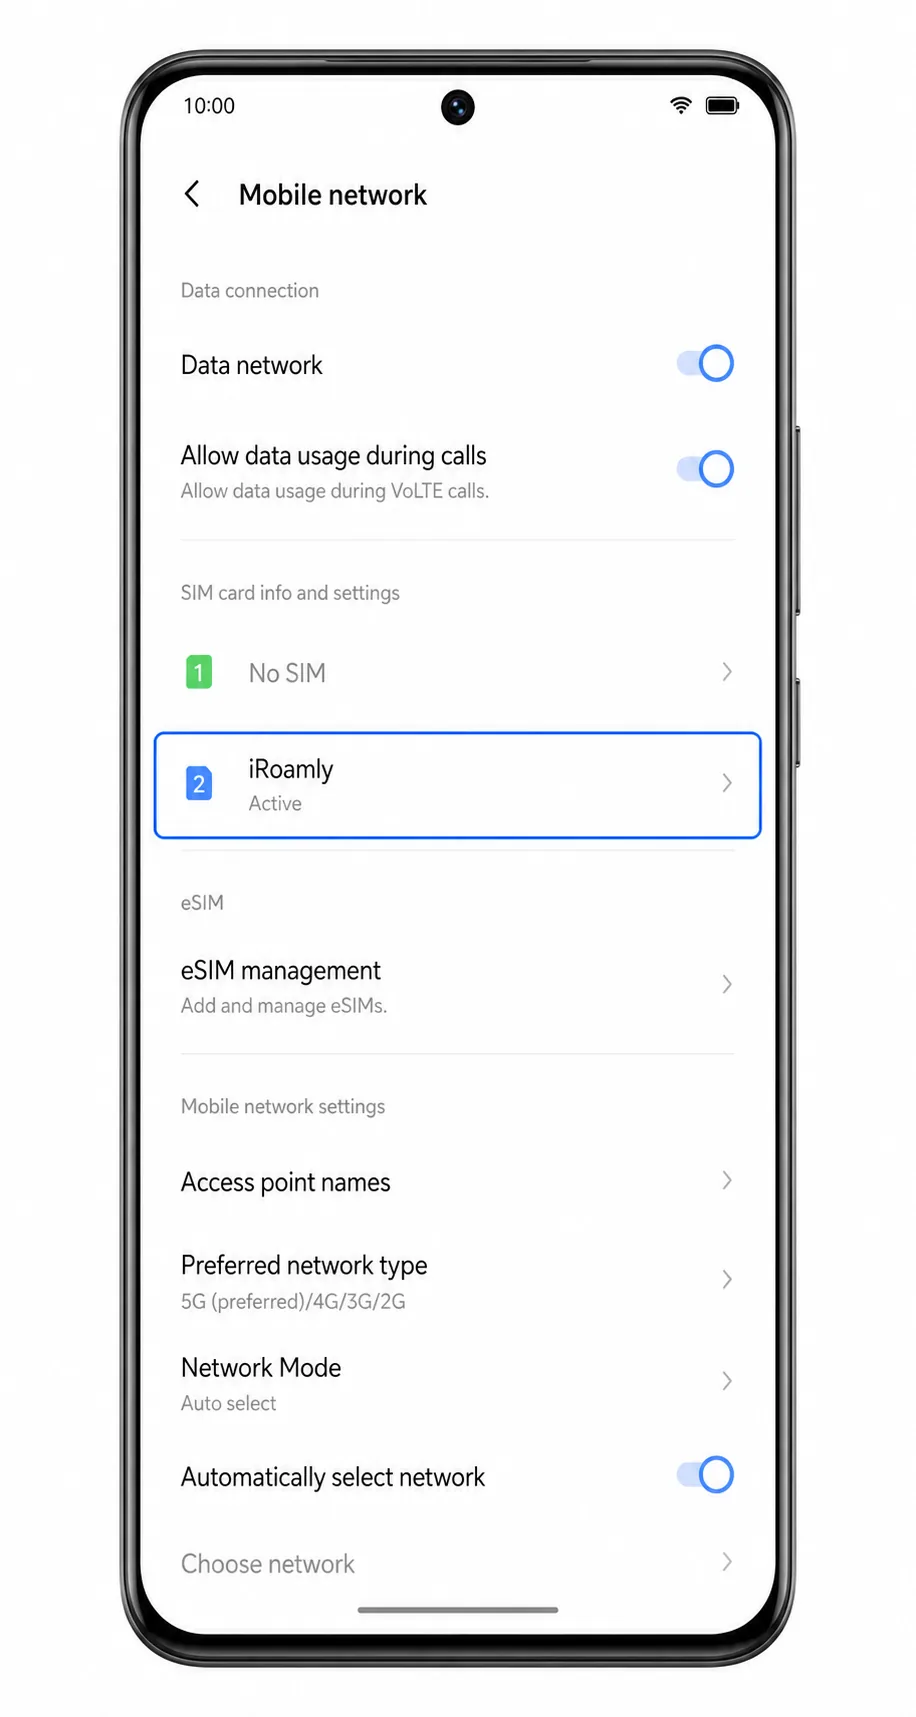
Return to Settings > Mobile network and confirm that iRoamly appears as an active eSIM.
If prompted, keep the iRoamly eSIM enabled so it is ready for mobile data setup.
Method 2: Install eSIM Manually
Open Settings on the Vivo V50 and tap Mobile network.
This is the same starting point used for QR-code setup.
Tap Add eSIM.
The Vivo V50 opens the eSIM setup screen.
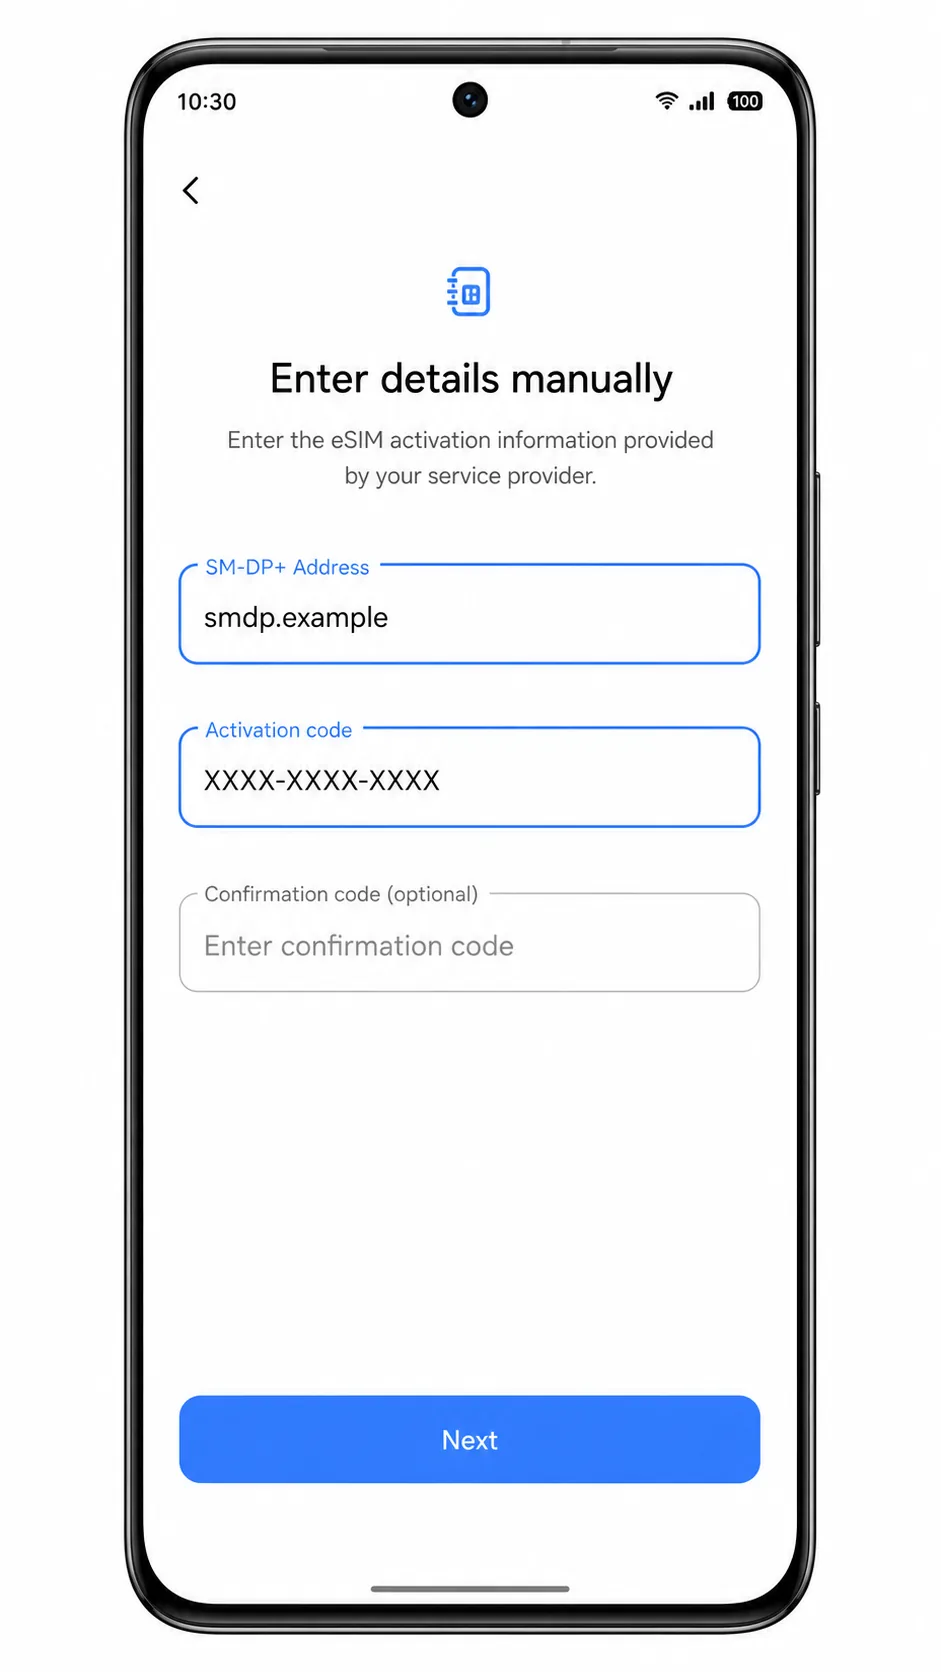
Tap Enter details manually.
Use this option if the QR code is on the Vivo V50 itself or if scanning fails.
Enter the SM-DP+ Address and Activation code exactly as iRoamly provides them.
If iRoamly gives a Confirmation code, enter it in the optional field. Then tap Next.
Review the eSIM details and tap Download.
Wait for the Vivo V50 to finish downloading the iRoamly profile before leaving the screen.
Go back to Settings > Mobile network and check that iRoamly appears as active.
The profile must appear in this page before you can use it for travel data.
How to Confirm Your iRoamly eSIM Is Installed
Open Settings > Mobile network.
Look for iRoamly in the SIM or eSIM list, with the profile marked as active or enabled.
Tap the iRoamly eSIM entry.
Confirm that the eSIM is enabled. If your iRoamly plan is data-only, do not use SMS or calling as the installation test.
Configure eSIM for Mobile Data
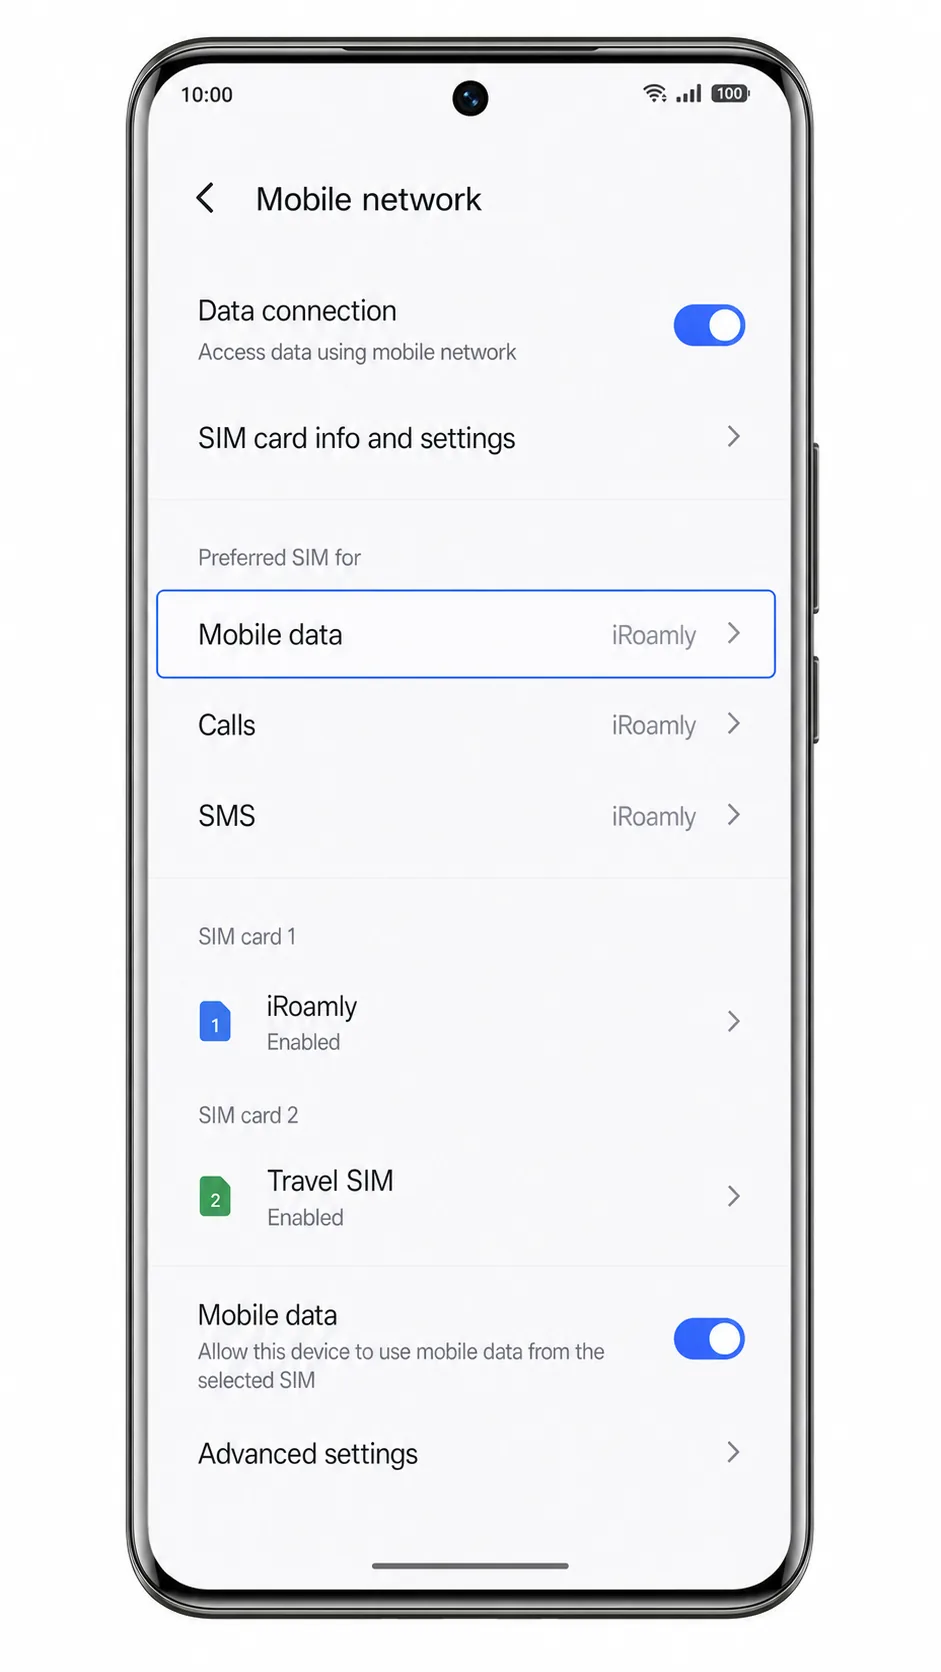
In Settings > Mobile network, tap Mobile data under Preferred SIM for.
Select iRoamly as the mobile data line.
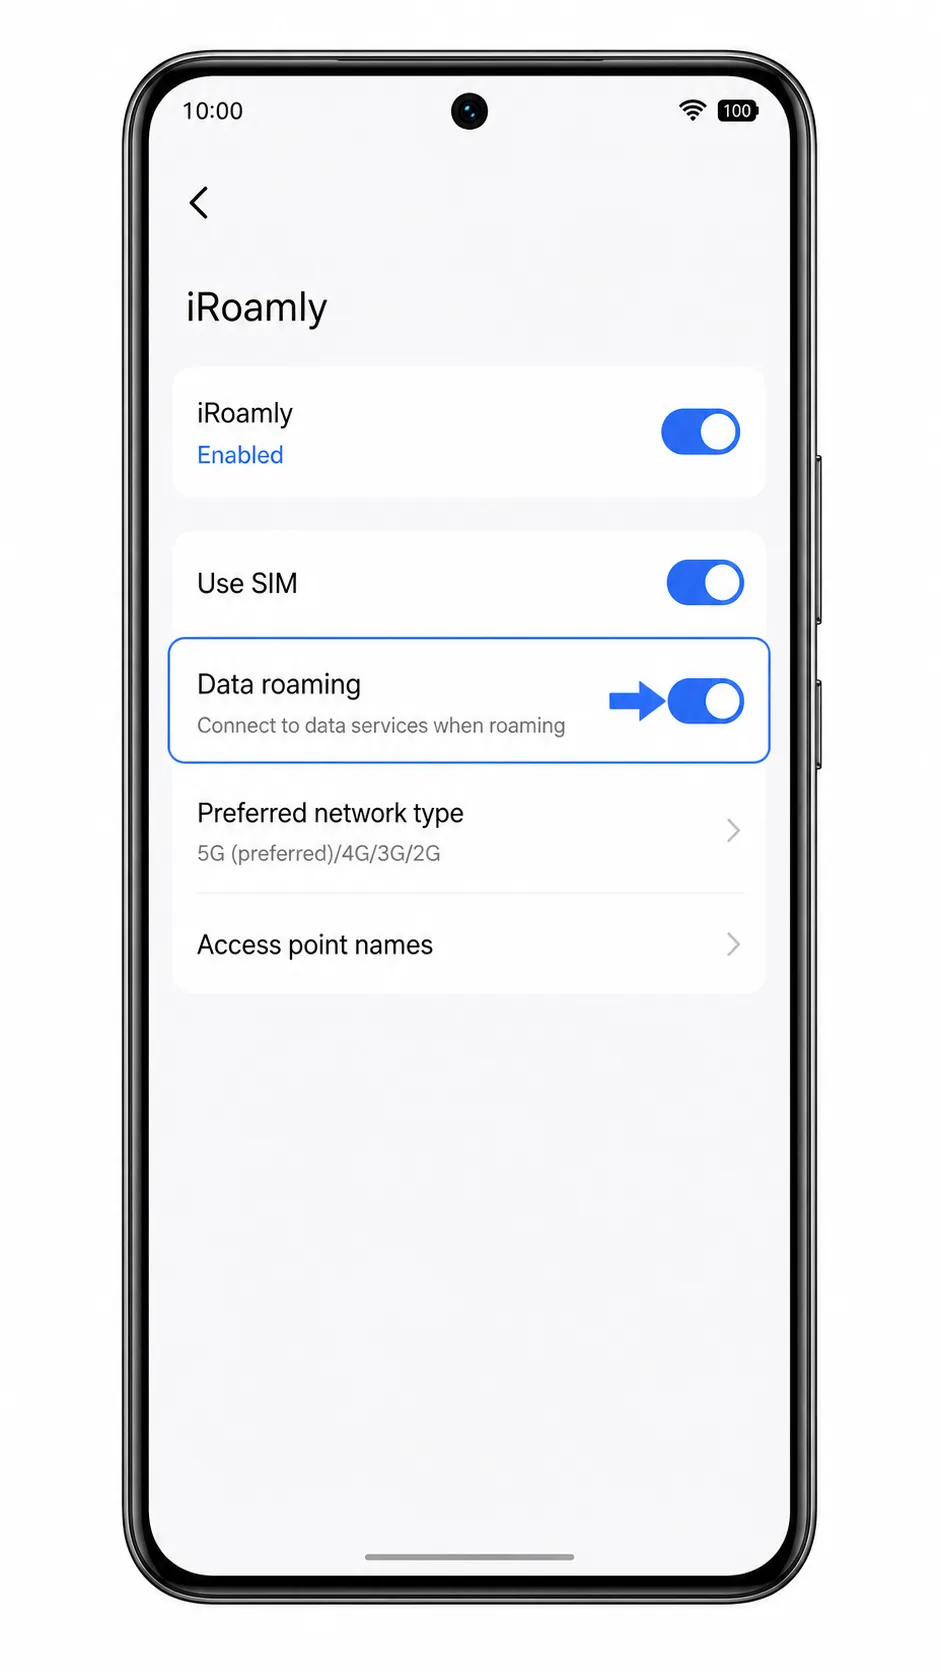
Open the iRoamly eSIM details page and turn on Data roaming if your destination or plan requires it.
Many travel eSIM plans need roaming enabled to connect through partner networks abroad.
Test mobile data after arrival.
Turn off Wi-Fi briefly and open a website or map app. If data does not work, restart the phone and recheck that iRoamly is selected for mobile data.
Troubleshooting
Add eSIM is missing: confirm that your exact Vivo V50 regional model supports eSIM, update Funtouch OS, and restart the phone.
QR code will not scan: increase screen brightness, clean the camera lens, or use manual entry instead.
Manual entry fails: check the SM-DP+ address and activation code character by character, including hyphens.
QR code already used: contact iRoamly support before trying again. Many eSIM QR codes are single-use after profile download.
eSIM stays pending: keep Wi-Fi connected, restart the Vivo V50, then reopen Settings > Mobile network.
No mobile data: select iRoamly for Mobile data, enable Data roaming, and check that the destination is covered by your plan.
Calls or SMS do not work: many iRoamly travel eSIM plans are data-only. Check the plan details before relying on voice or SMS.
More Vivo eSIM Setup Guides
Using another Vivo phone? These eSIM setup and activation guides may help.
Conclusion
Your iRoamly eSIM is now installed on your Vivo V50 and ready to use whenever your travel plan becomes active in a supported destination. With your connectivity prepared in advance, you'll be able to get online quickly for navigation, travel information, messaging, and other essential online services as your trip begins.
Taking care of your mobile setup before departure also means one less thing to think about after landing. Instead of spending time looking for internet access, you can focus on settling in and making the most of your journey.