
The Oppo Reno 5A is a Japan-market Android phone that supports eSIM on compatible unlocked variants.
This guide assumes ColorOS 11 based on Android 11, where the eSIM controls are usually found under Settings > SIM card & mobile data. Menu names can vary slightly by carrier build, software update, or region.
Travelers often install an iRoamly travel eSIM before departure so mobile data is ready when they land. For the Reno 5A, the most common setup route is scanning the iRoamly QR code from another screen, but manual entry is useful if the QR code cannot be scanned or if the activation details are being copied from the iRoamly order page.
This guide covers both setup methods from the Settings app, then shows how to confirm the iRoamly eSIM appears on the phone and how to select it for mobile data. iRoamly plan validity starts from activation, and the exact trigger can vary by plan, so check your iRoamly plan details before installing.

Stay Connected Abroad with iRoamly
iRoamly provides mobile data through digital travel eSIM plans. Its options include local country plans and regional or global coverage, with data allowances, validity periods, and included features depending on the plan. Travel data keeps everyday apps such as maps, messaging, and online bookings accessible away from Wi-Fi.
On a compatible, unlocked Oppo Reno 5A, an iRoamly profile can serve as your travel data line. The instructions below take you through QR-code or manual installation in ColorOS, followed by the checks for mobile data use.
Before You Set Up Your iRoamly eSIM
Connect the Oppo Reno 5A to stable Wi-Fi before downloading the eSIM profile.
Confirm the phone is unlocked and that your Reno 5A variant supports eSIM. Some carrier or regional variants may hide eSIM options.
Keep the iRoamly QR code open on another device, or have the SM-DP+ Address, Activation Code, and optional Confirmation Code ready for manual entry.
Install the iRoamly eSIM 1 to 2 days before travel when the plan terms allow it, but do not activate travel data too early if your plan starts counting from activation.
If you're traveling to France or Spain, you can install your travel eSIM before departure so it's ready when you need it.
Do not delete the iRoamly eSIM after installation unless iRoamly support tells you to. Many eSIM profiles cannot be downloaded again after removal.
iRoamly travel eSIM plans may be data-only. Voice calls and SMS vary by plan, so check the product page or order details before relying on them.
Method 1: Install eSIM by Scanning a QR Code
Open Settings on the Oppo Reno 5A and tap SIM card & mobile data.
You should see the SIM management page with physical SIM and eSIM options.
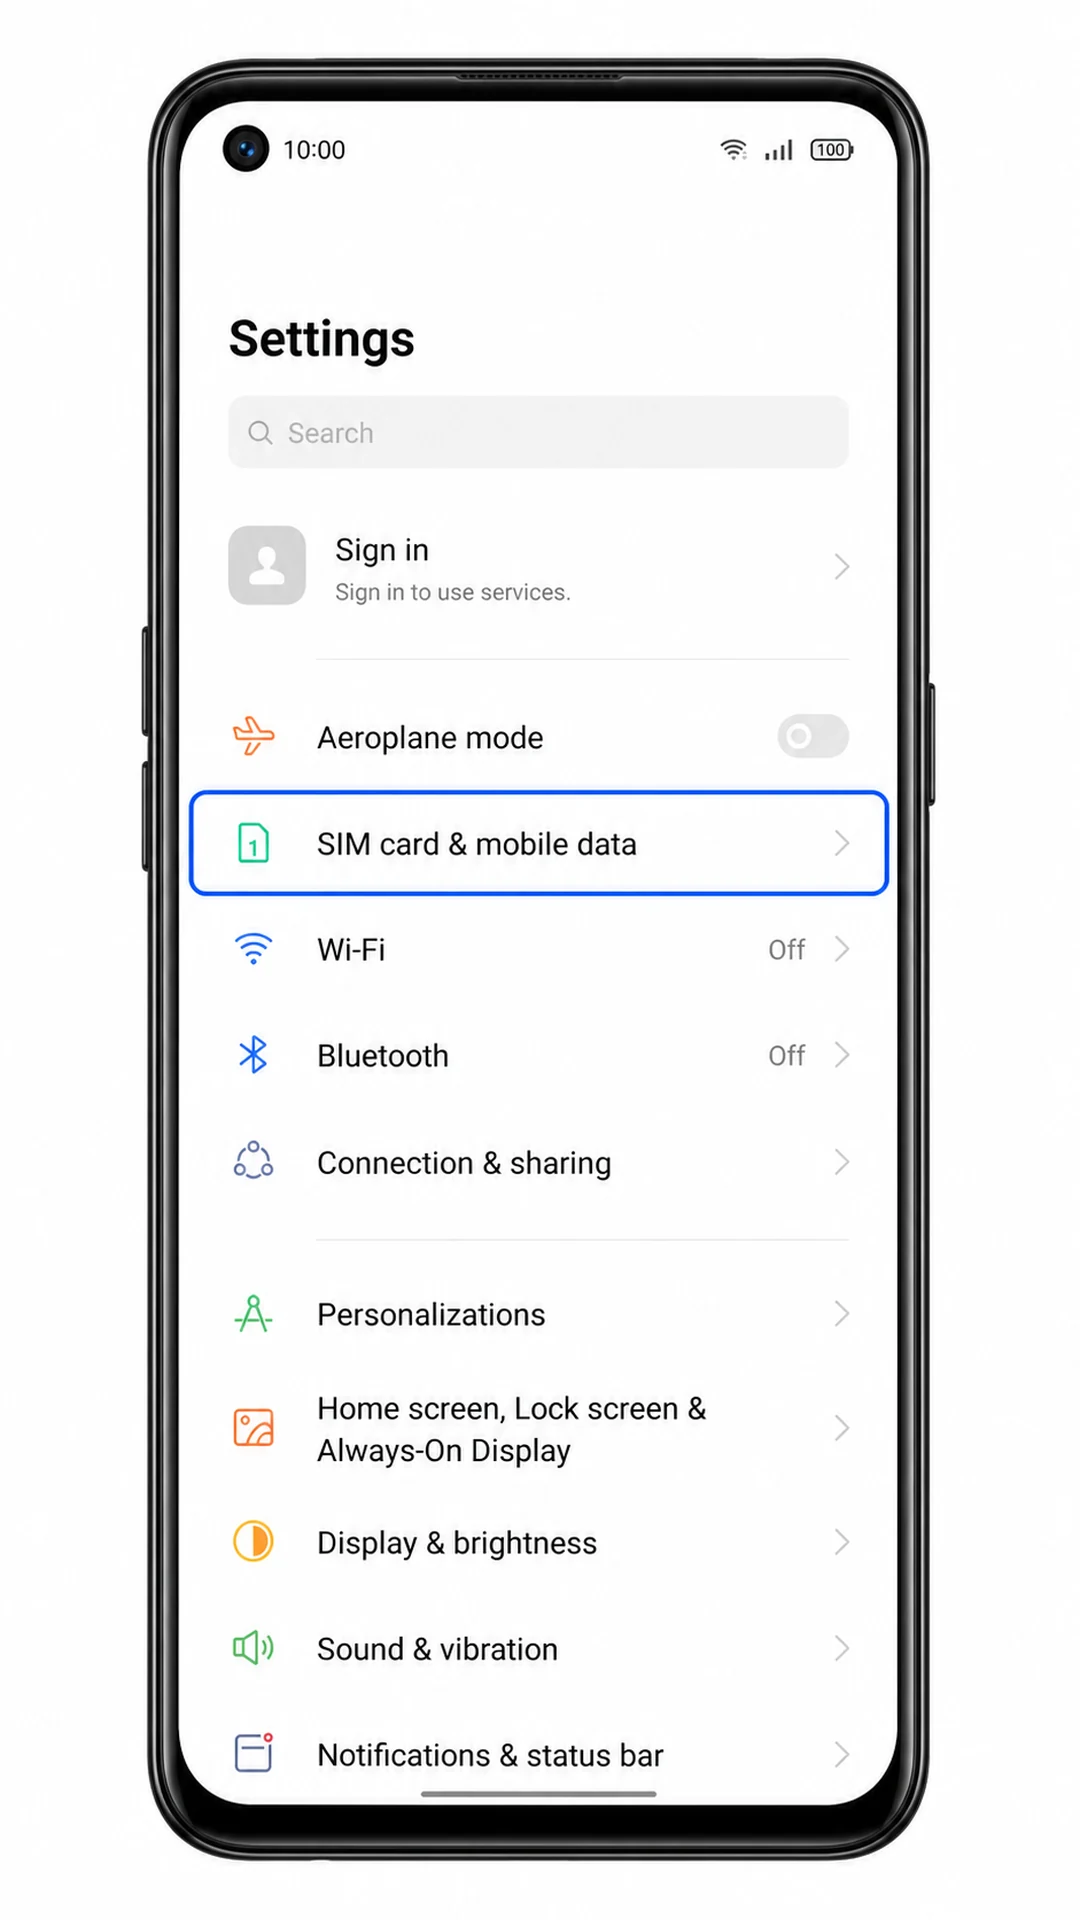
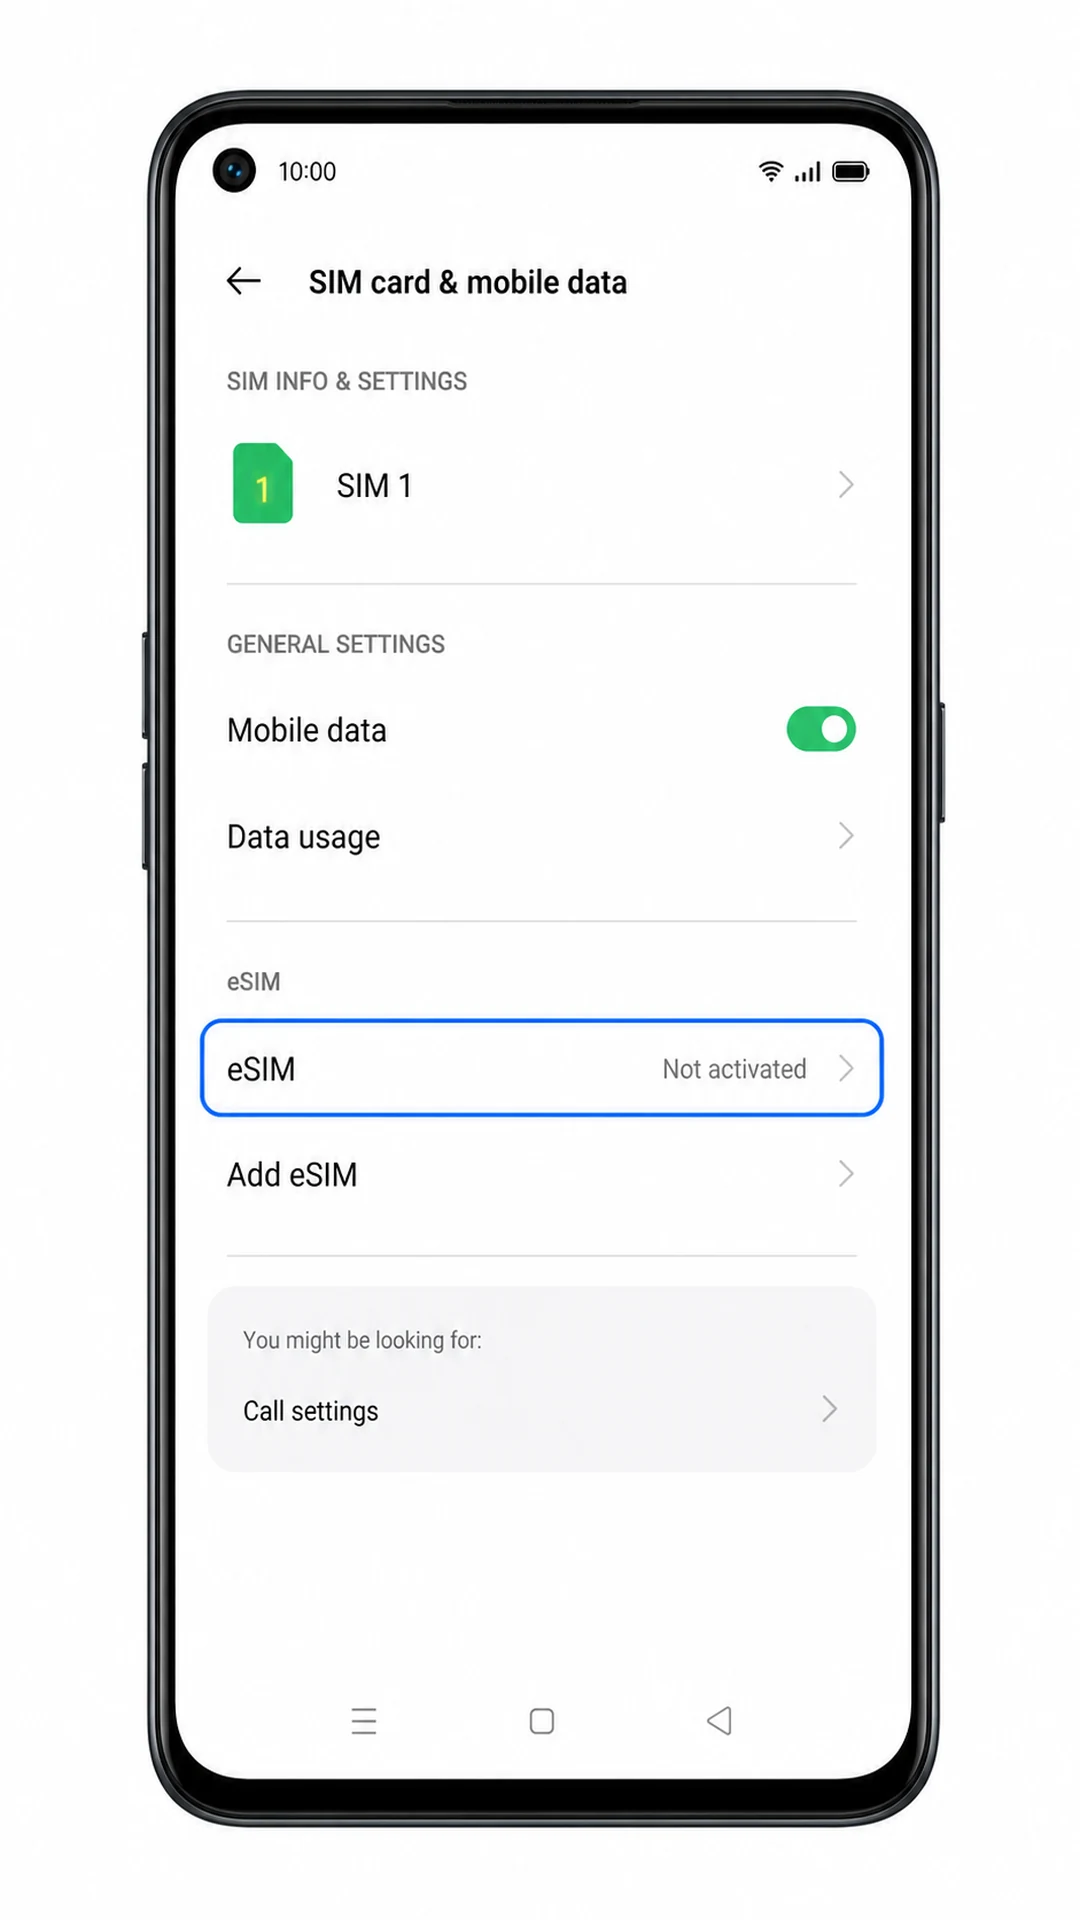
Tap eSIM on the SIM card & mobile data screen.
The phone should open the eSIM management page. If the eSIM option is missing, see the troubleshooting section before continuing.
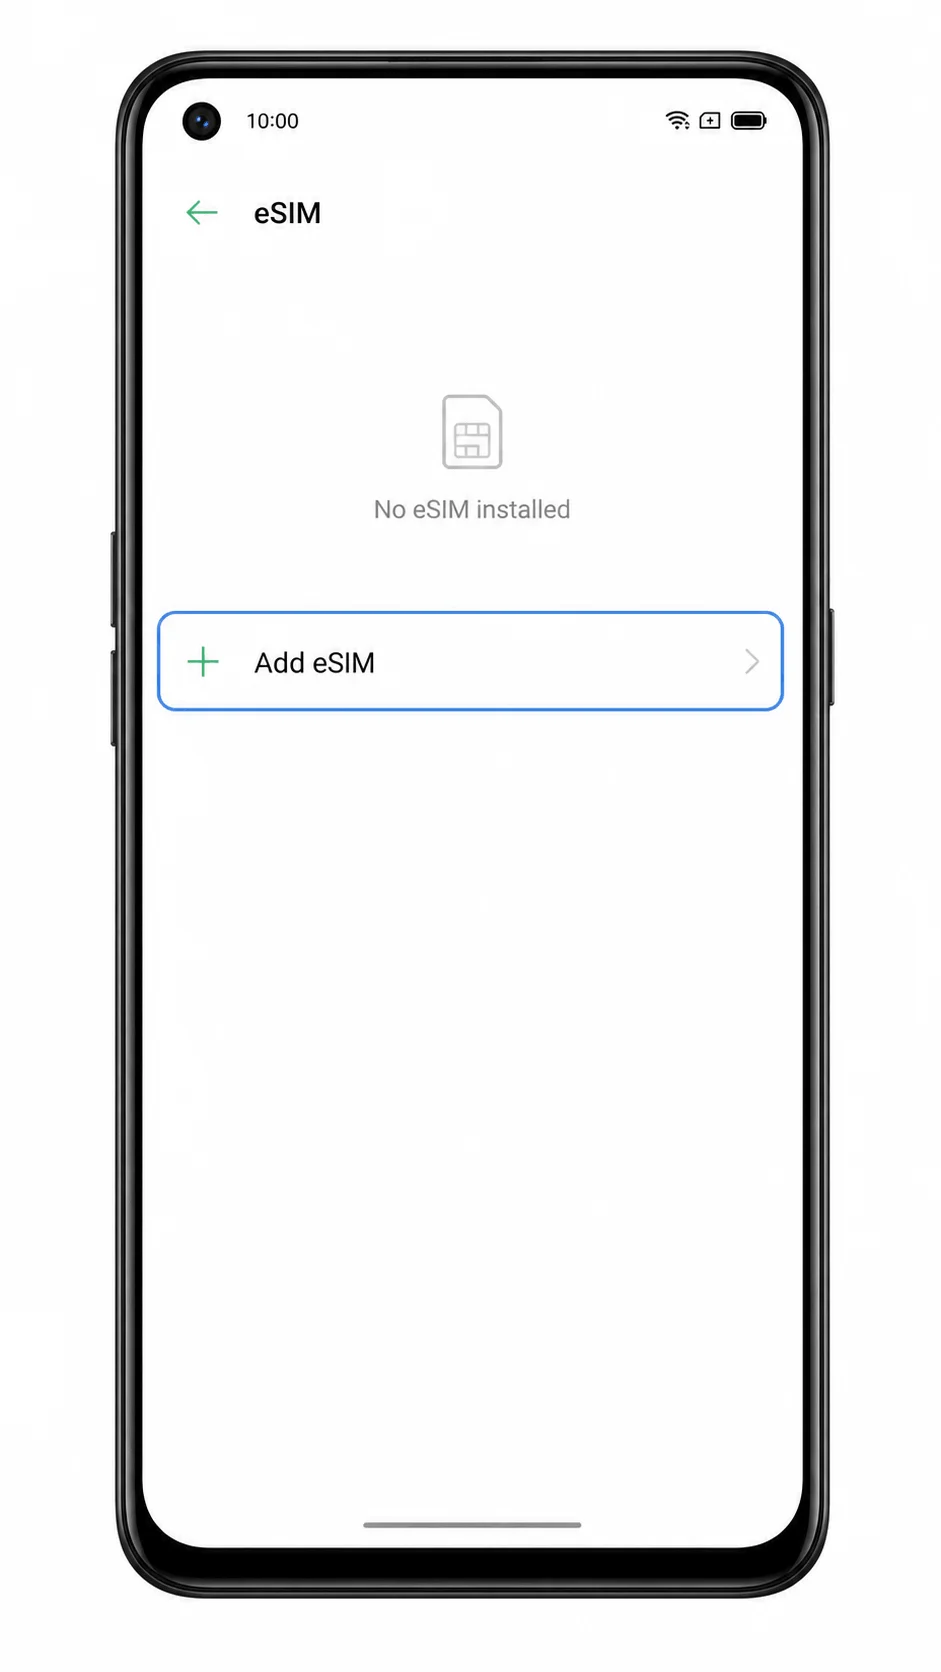
Tap Add eSIM.
The Reno 5A should open the eSIM setup flow and prepare to add a mobile plan.
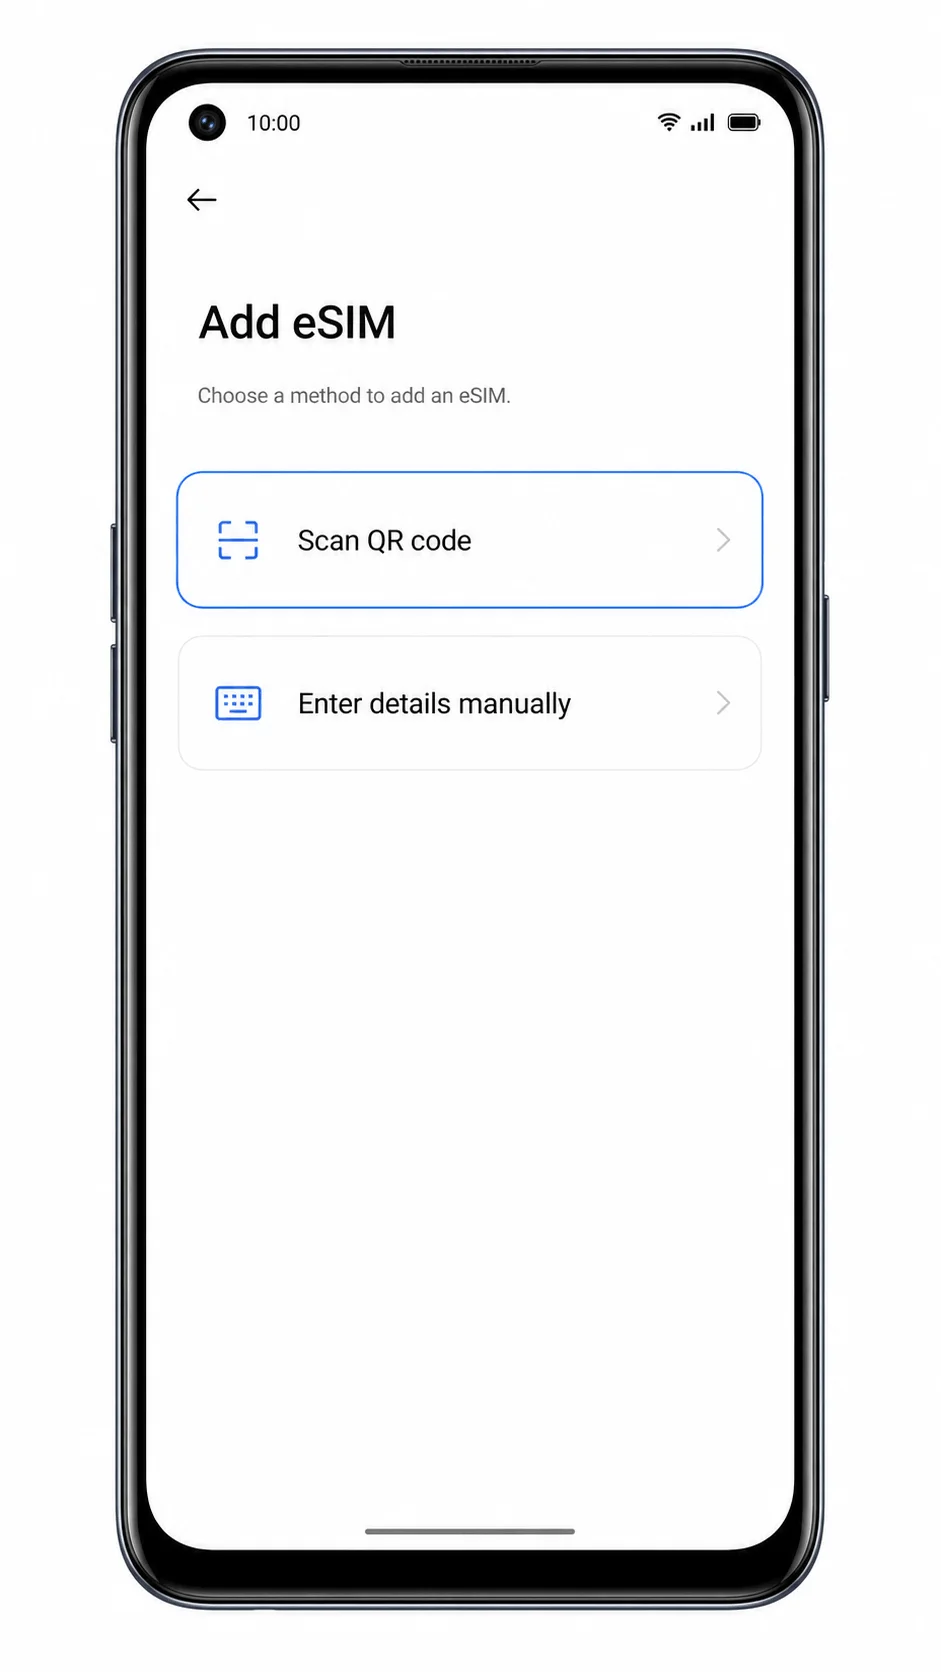
Choose Scan QR code when the setup screen asks how you want to add the eSIM.
The QR scanner should appear. Keep the iRoamly QR code visible on another phone, tablet, or computer.
Point the camera at the iRoamly QR code and keep the full code inside the scanning frame.
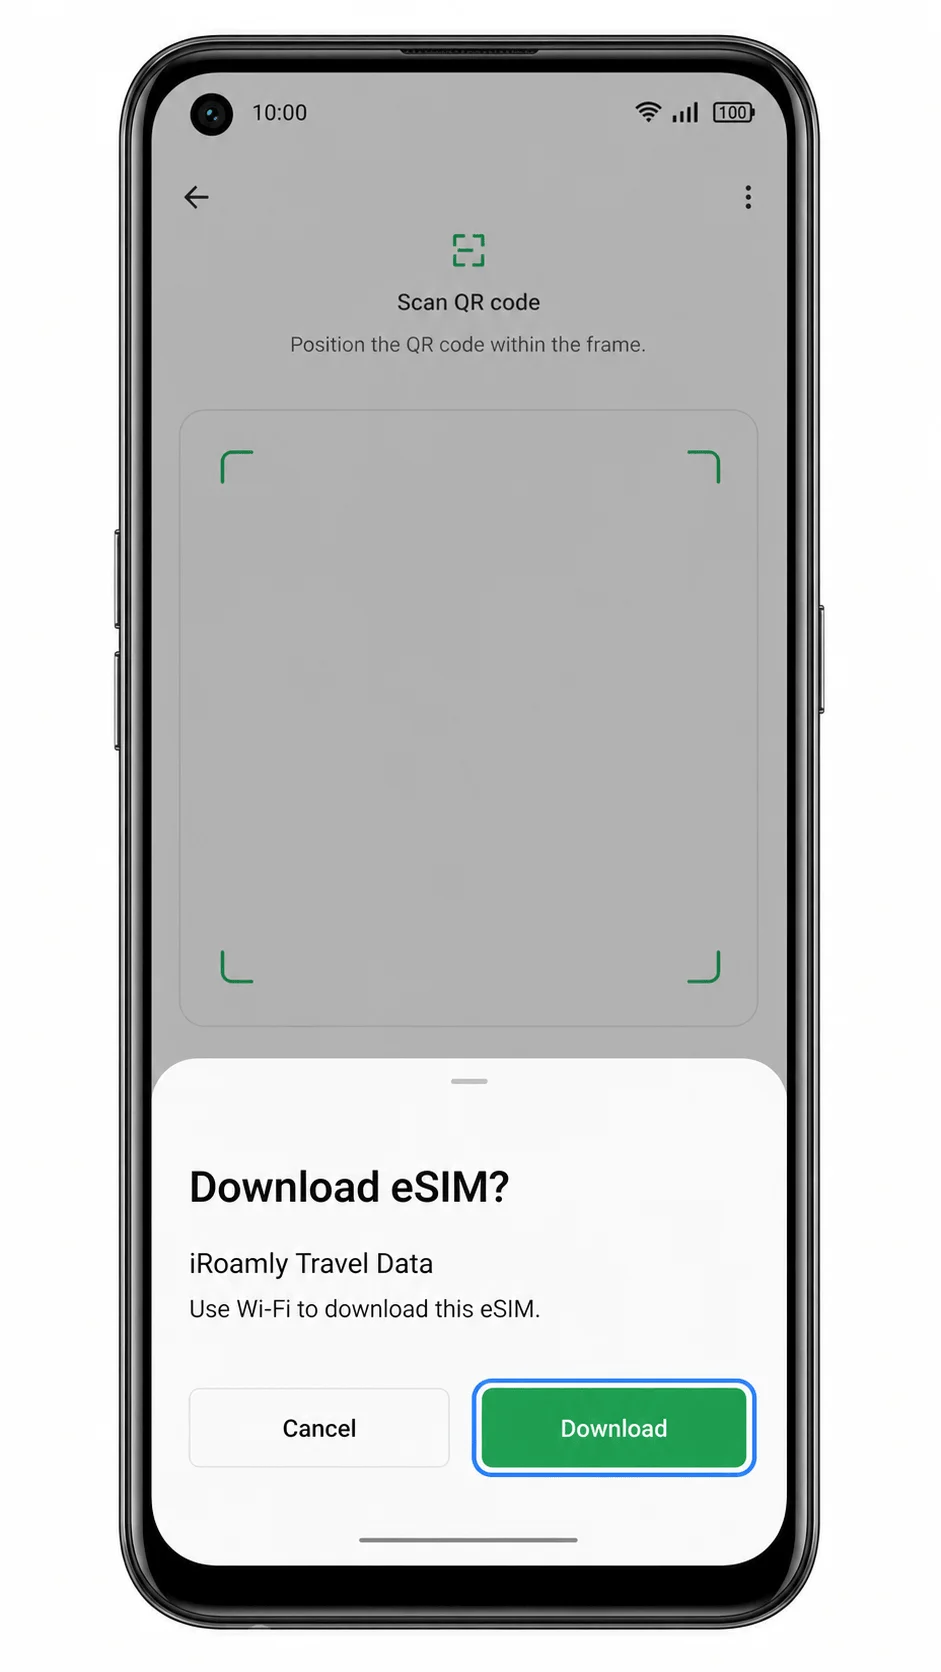
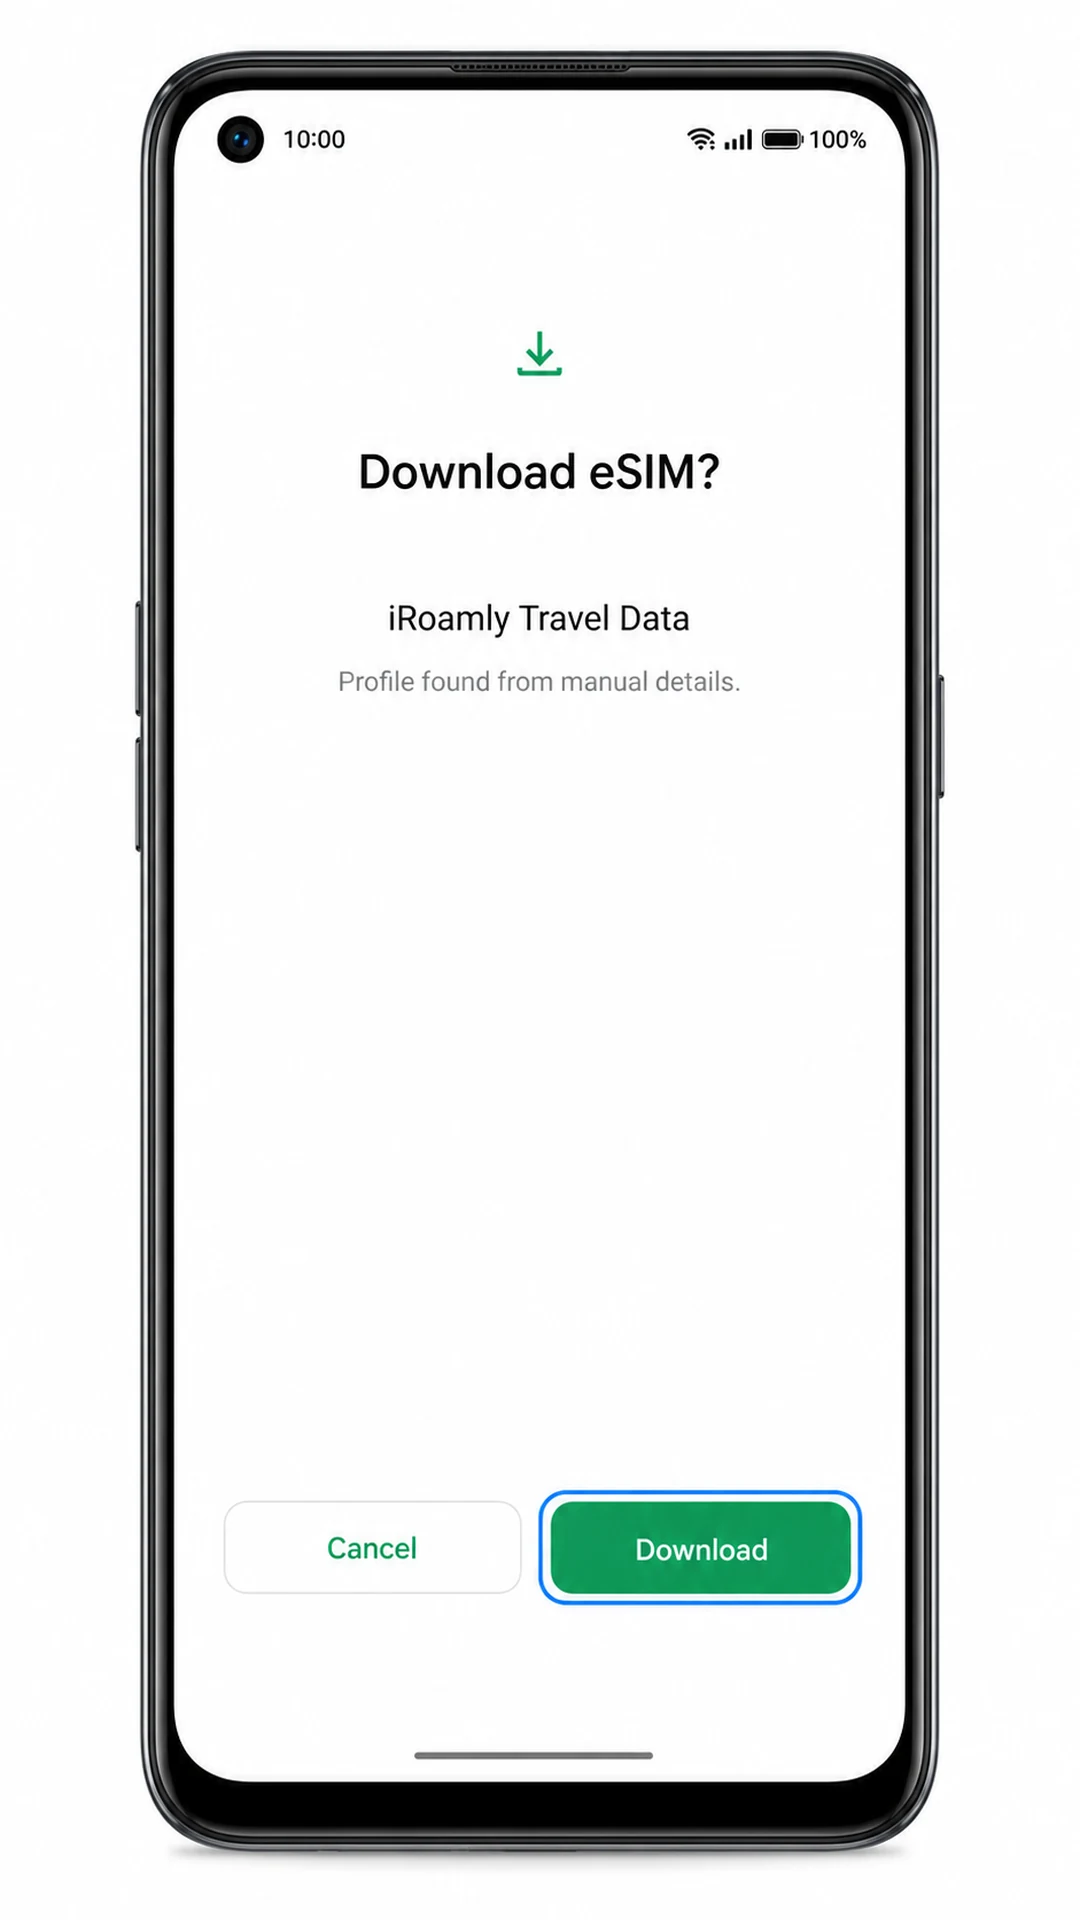
After the QR code is recognized, the phone should show a download or confirmation screen for the iRoamly eSIM profile. Do not use a QR code that has already been installed on another device.
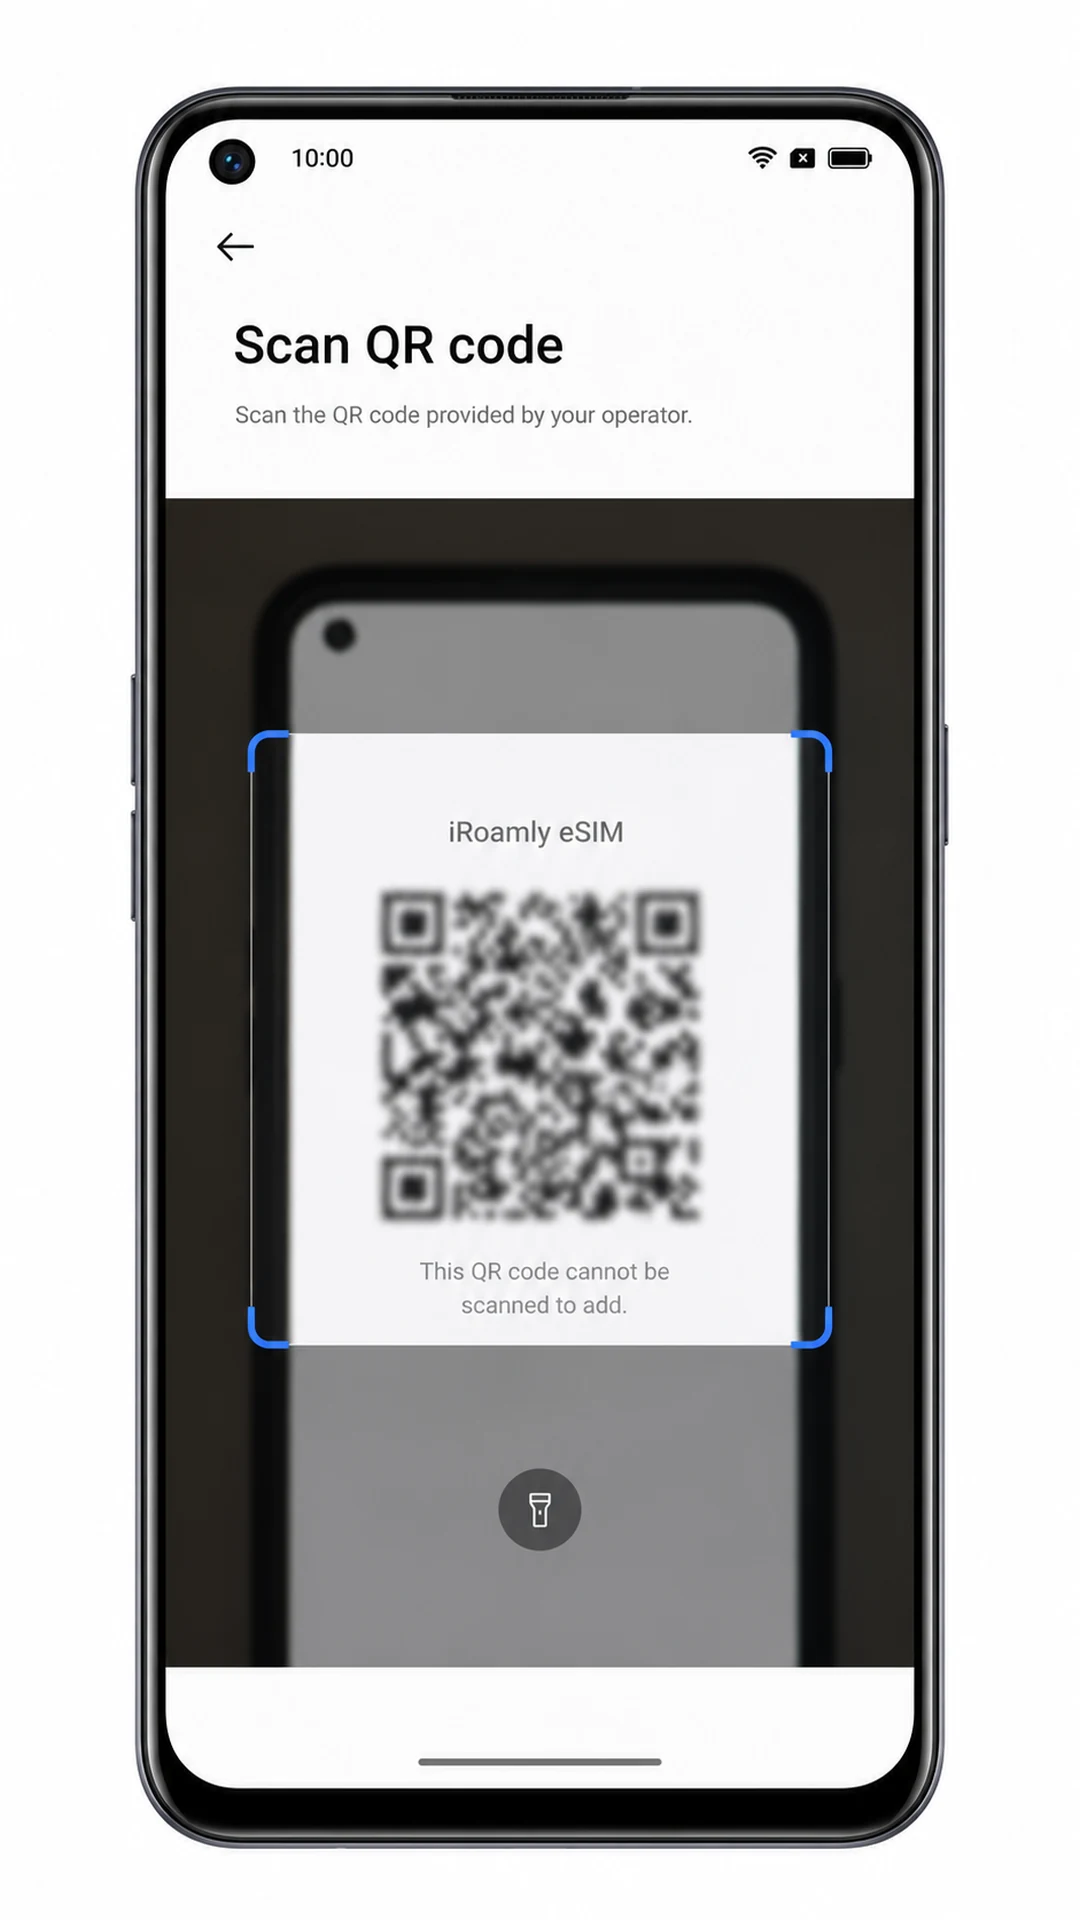
Tap Download or Add when the phone asks to download the iRoamly eSIM.
Wait on Wi-Fi until the download completes. The Reno 5A may ask you to name the eSIM or choose whether it should be turned on now.
Method 2: Install eSIM Manually
Open Settings and tap SIM card & mobile data.
This is the same entry point used for QR-code setup, and it should show the Reno 5A SIM controls.
Tap eSIM.
The phone should open the eSIM management page for adding or managing downloaded eSIM profiles.
Tap Add eSIM.
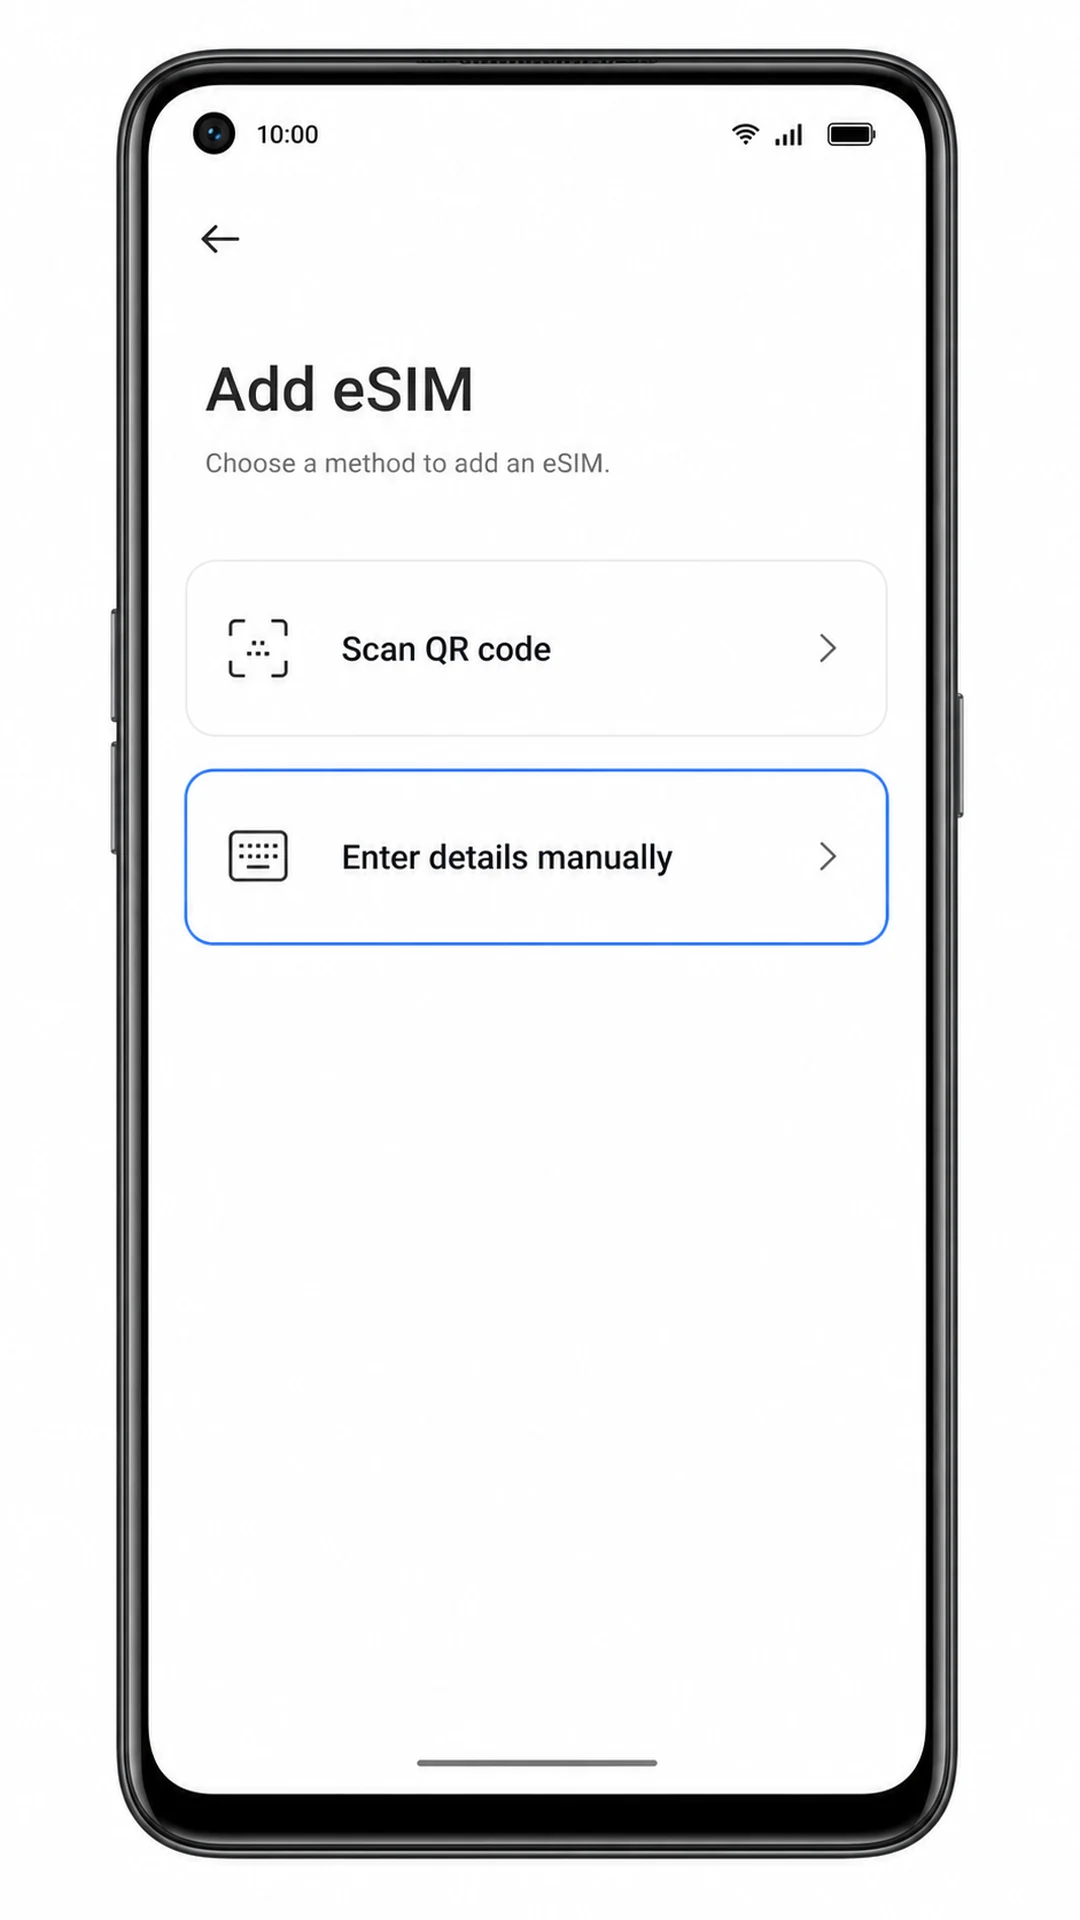
The setup flow should open and let you choose how to add the eSIM details.
Tap Enter details manually or Need help? > Enter it manually, depending on the exact ColorOS build.
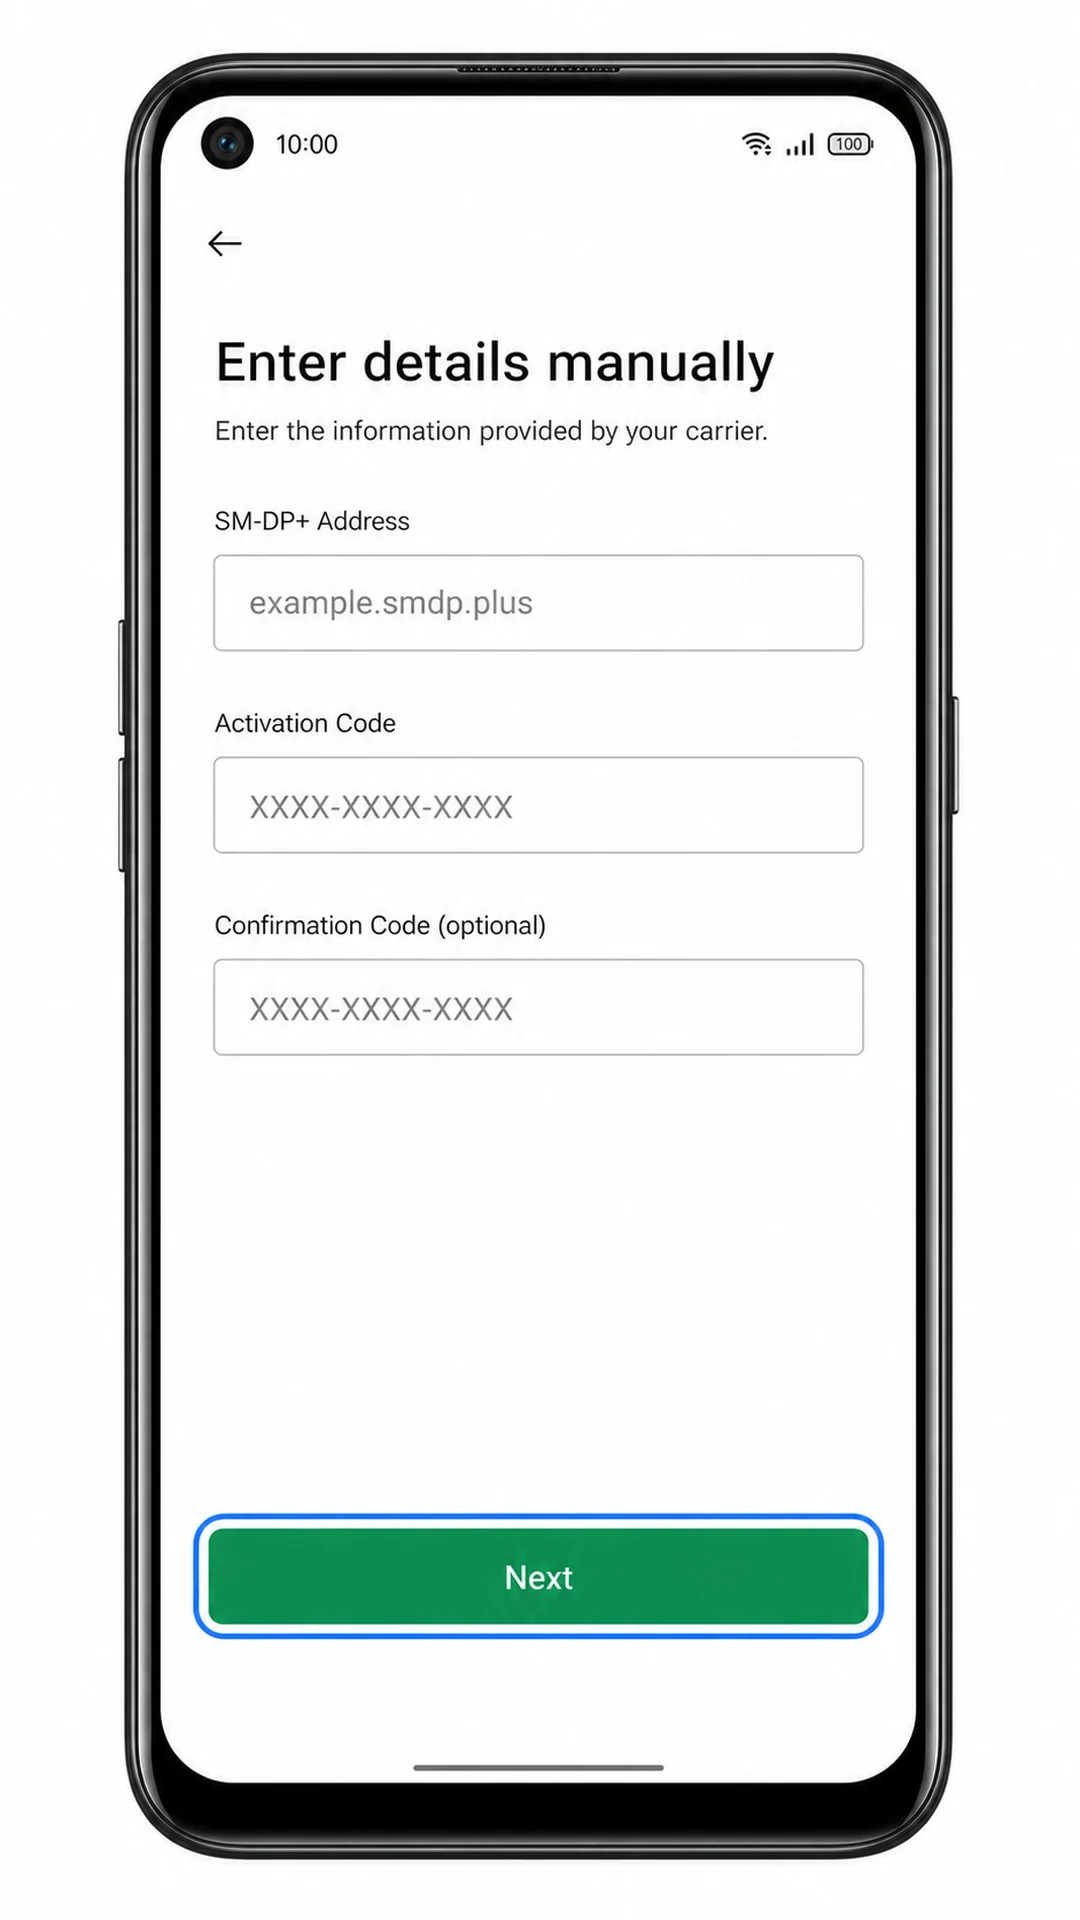
The manual activation screen should appear. iRoamly provides the required details in the order page or confirmation email.
Enter the iRoamly SM-DP+ Address, Activation Code, and Confirmation Code if iRoamly provides one, then tap Next.
Use placeholder-free details from your own iRoamly order only. Do not add spaces before or after the activation values.
Tap Download or Add when the Reno 5A finds the iRoamly eSIM profile.
Keep the phone connected to Wi-Fi while the profile downloads. If the phone reports that the activation information is invalid, recheck each character in the manual details.
How to Confirm Your iRoamly eSIM Is Installed
Go to Settings > SIM card & mobile data > eSIM.
The installed iRoamly eSIM should appear in the eSIM list. It may show as a travel data profile, a carrier profile name, or a label you set during installation.
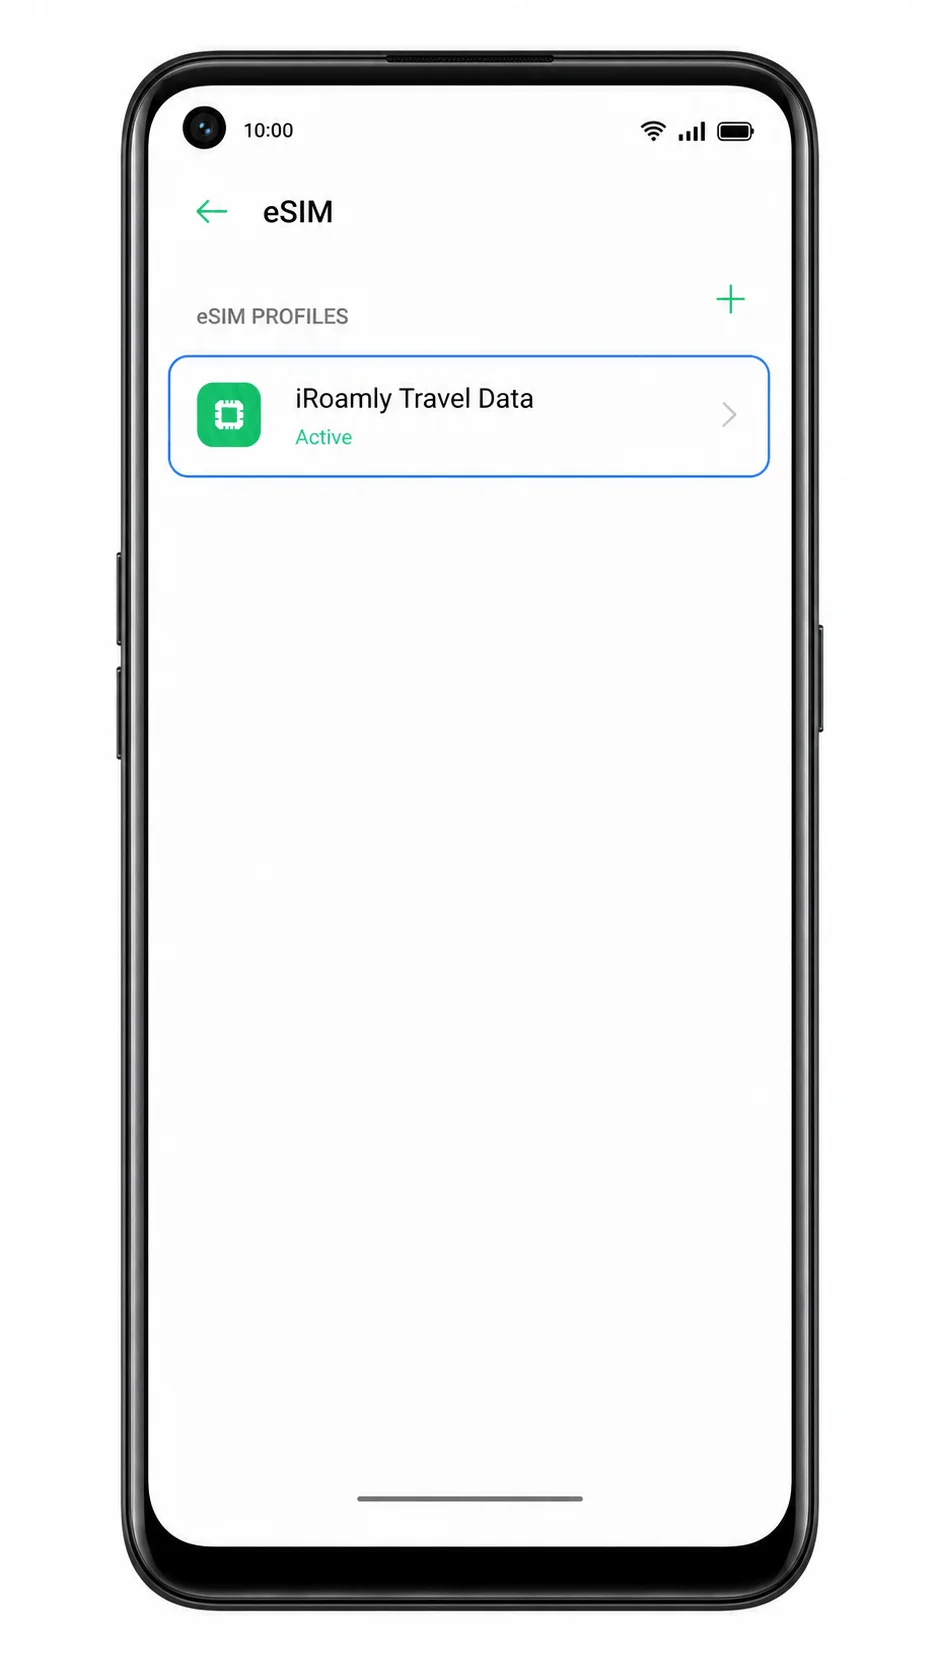
Tap the iRoamly eSIM profile and confirm the line is switched on.
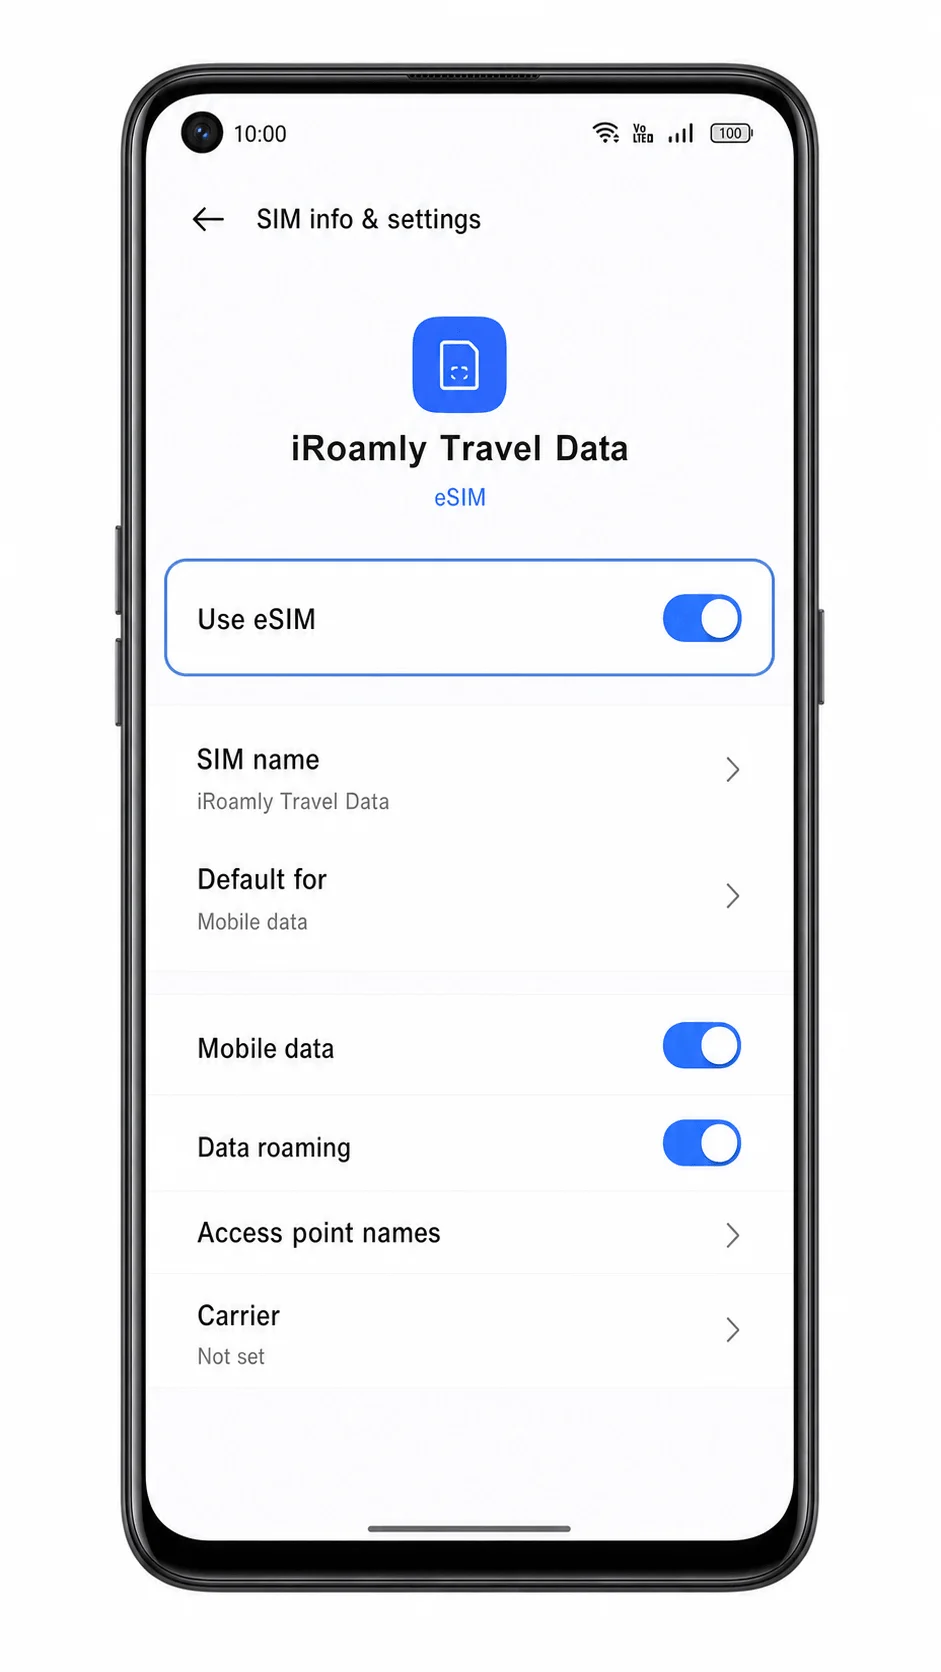
The profile screen should show an enabled toggle. If it is off, turn it on before selecting it for travel data
Configure eSIM for Mobile Data
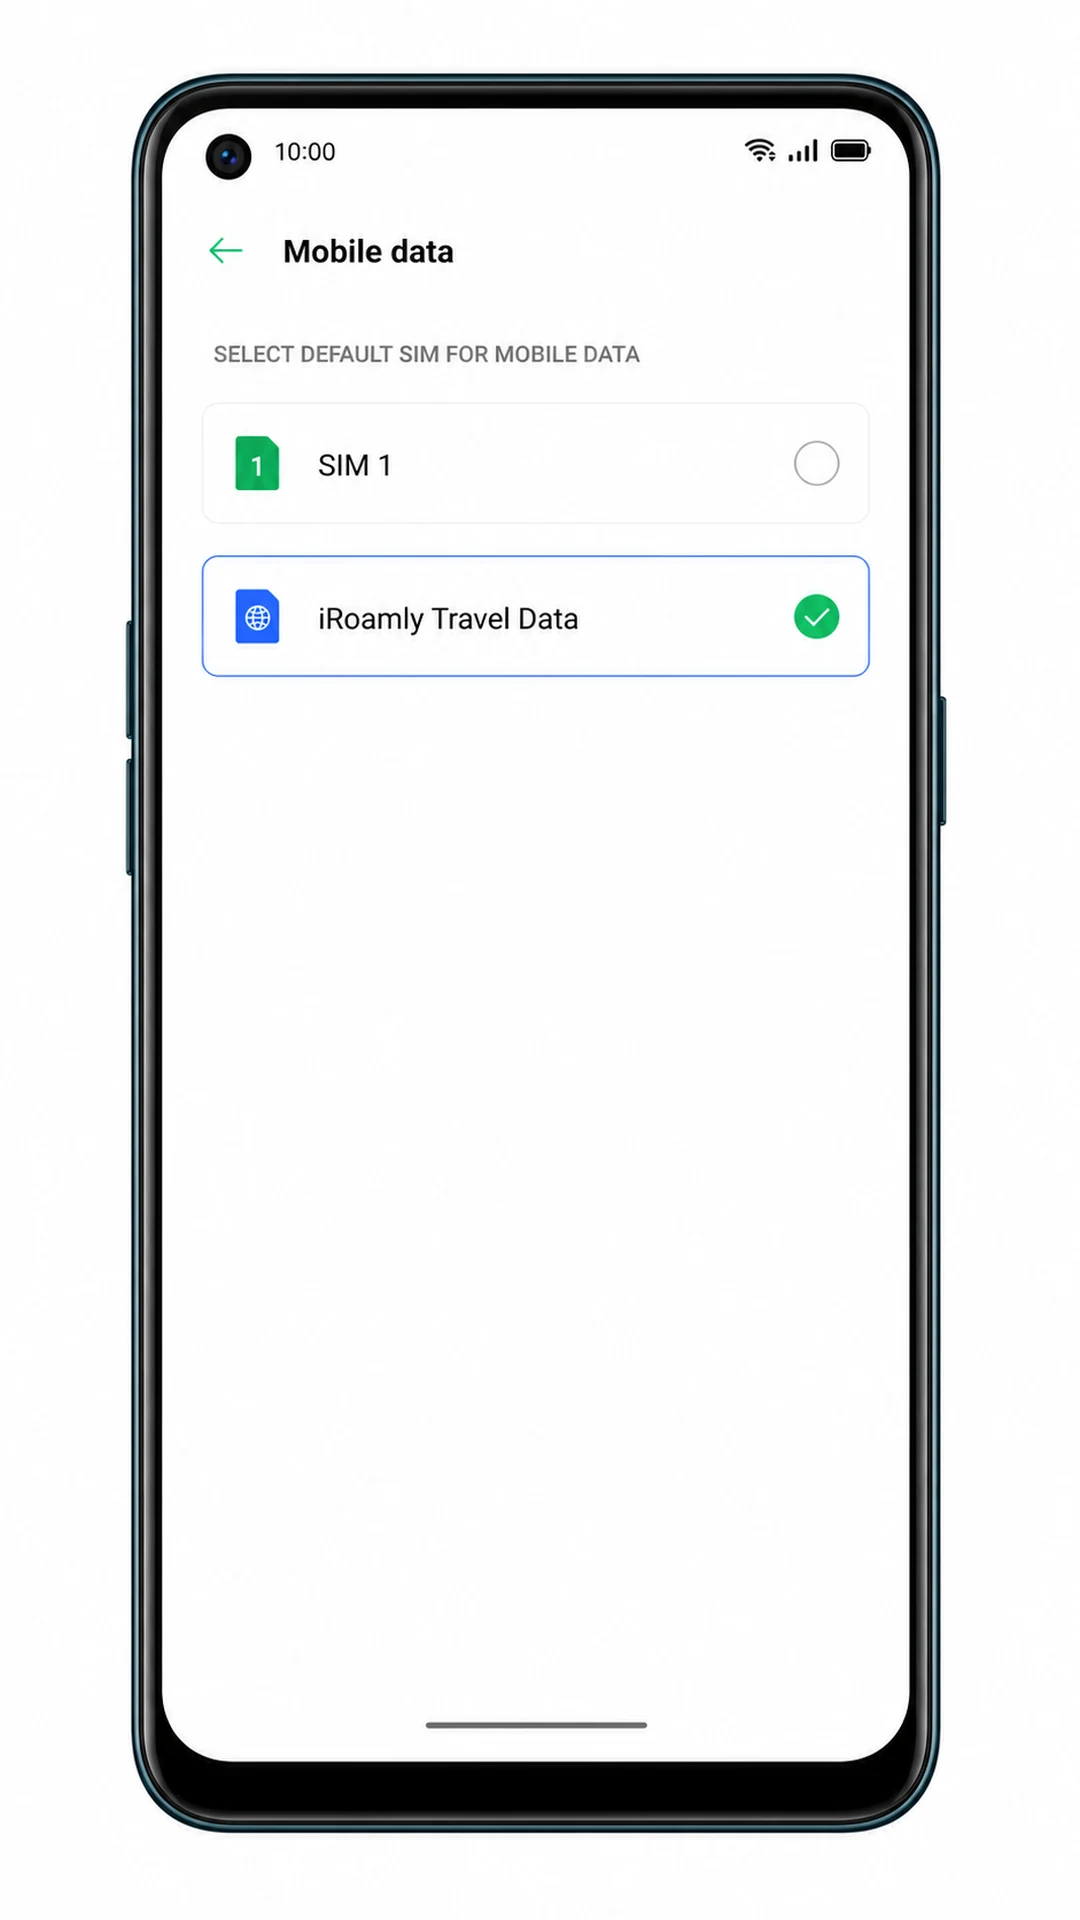
Open Settings > SIM card & mobile data and tap Mobile data.
The data preference screen should show available SIM and eSIM lines.
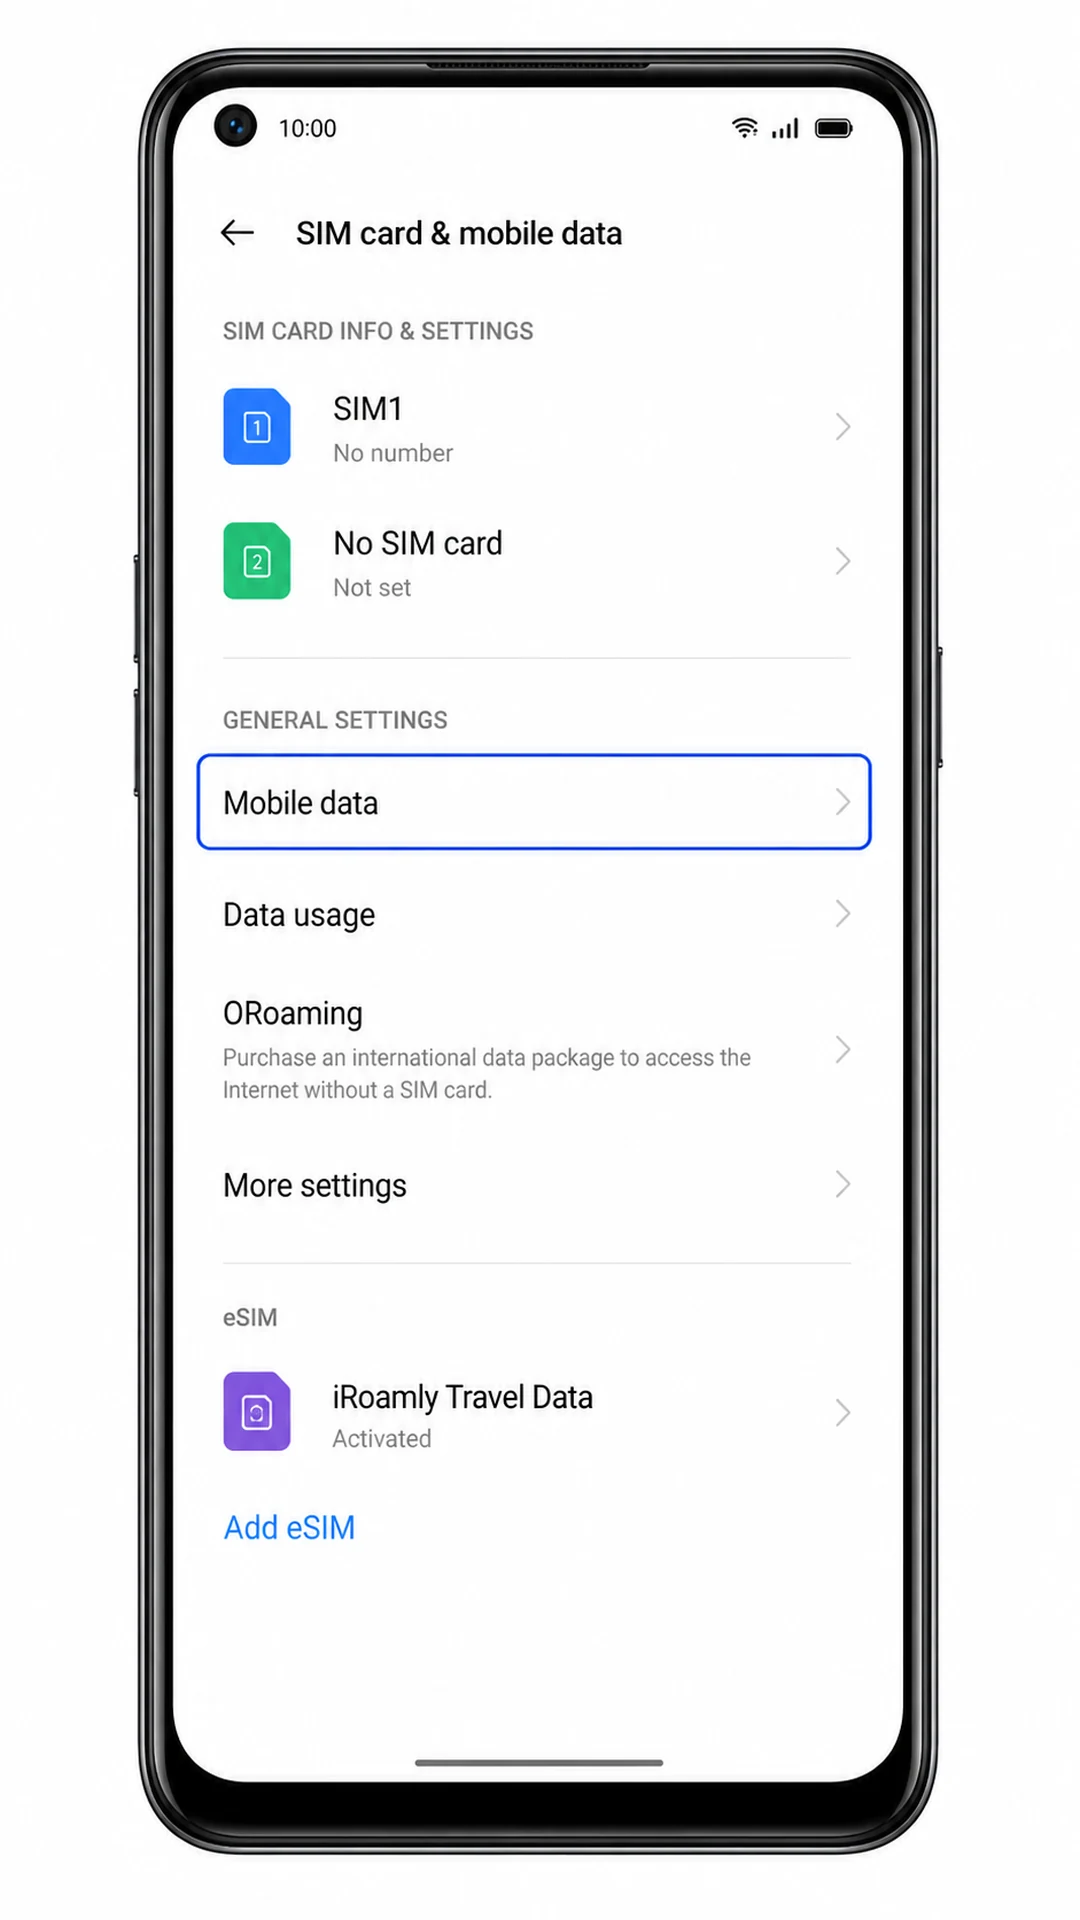
Select the iRoamly eSIM as the line for Mobile data.
This tells the Reno 5A to use the iRoamly travel eSIM for cellular data instead of your primary SIM.
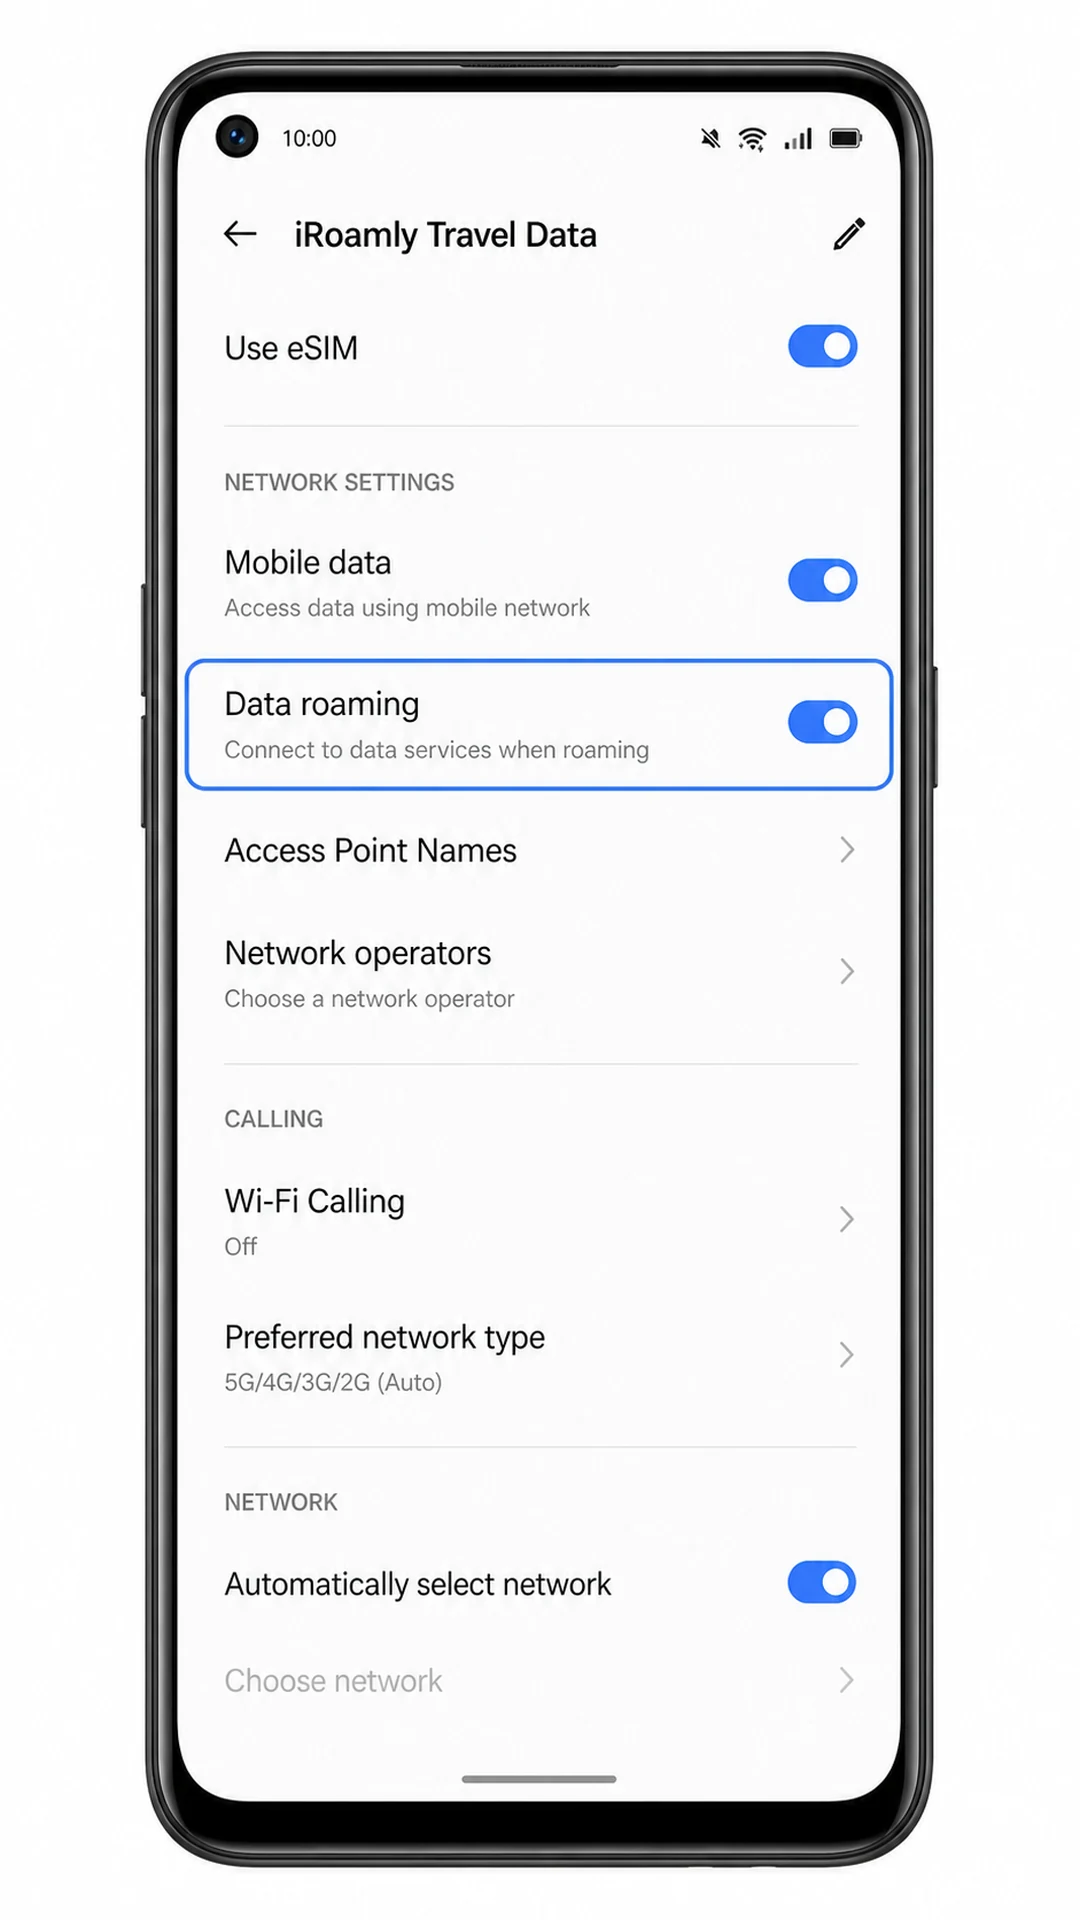
Open the iRoamly eSIM profile and turn on Data roaming if your destination plan requires roaming.
Most travel eSIM data plans need roaming enabled on the travel line. Keep roaming off on your primary SIM if you want to avoid home-carrier roaming charges.
Troubleshooting
Add eSIM is missing: confirm the Reno 5A is an eSIM-capable variant, update ColorOS, restart the phone, and check whether your carrier firmware disables eSIM.
QR code will not scan: increase screen brightness on the device showing the QR code, clean the camera lens, keep the whole code inside the frame, or switch to manual entry.
QR code was already used: contact iRoamly support. Many eSIM QR codes can be installed only once.
Manual entry fails: check the SM-DP+ Address, Activation Code, and optional Confirmation Code exactly as shown in your iRoamly order.
eSIM is installed but no data works: select the iRoamly eSIM for Mobile data, turn on Data roaming for that eSIM, then restart the phone.
Activation stays pending: connect to Wi-Fi, wait a few minutes, and try again at your destination if the plan activates only when it reaches a supported network.
Calls or SMS do not work: many iRoamly travel eSIM plans are data-only. Use internet calling apps unless your specific plan includes voice or SMS.
More Oppo eSIM Setup Guides
Setting up another Oppo phone? These guides may help.
Conclusion
For the Oppo Reno 5A, QR-code installation is the quickest route because the ColorOS path leads from SIM card & mobile data to eSIM and then Add eSIM with only a few taps.
Manual entry is the backup to use when scanning is not possible, and it should use the separate SM-DP+ Address, Activation Code, and optional Confirmation Code fields from your iRoamly order.
After the profile appears in the eSIM list, turn it on, select it for Mobile data, and enable Data roaming on the iRoamly line when your travel plan requires it.
To pick up a draggable item, press the space bar. While dragging, use the arrow keys to move the item. Press space again to drop the item in its new position, or press escape to cancel.