
The Motorola Razr Ultra (2025) supports eSIM on compatible regional and carrier variants, making it a strong travel phone when you want mobile data without swapping a physical SIM. This guide assumes the phone is unfolded and running Motorola Hello UX on Android 15, where the setup flow uses the stock-Android-style Settings menu.
Travelers often install an iRoamly travel eSIM before departure so the profile is ready when they land. The Razr Ultra (2025) may show slightly different wording by software version or carrier firmware, but the expected path is Settings > Network & internet > SIMs > Add eSIM.
This guide covers both installation methods: scanning the iRoamly QR code and entering the eSIM details manually. Manual entry is useful when the QR code is on the same phone, the camera cannot scan it, or the purchase email provides the SM-DP+ Address and Activation Code separately.
Prepare Your Travel Data with iRoamly
iRoamly Travel eSIM provides mobile data service through digital travel plans for destinations around the world.
Travelers can select destination-specific, regional, or global options when available, and each plan can differ in data allowance, validity, activation behavior, and supported features. That gives a compatible phone a separate data line for travel use without needing to replace a physical SIM.
On a compatible Motorola Razr Ultra (2025), iRoamly can be installed digitally through the Android eSIM setup flow. Continue with the existing QR-code or manual-entry instructions below, then configure the travel eSIM for mobile data when you are ready to use it.
Before departure, keep Wi-Fi available and save the QR code or manual activation details until the phone confirms the eSIM profile has been added.
Before You Set Up Your iRoamly eSIM
Connect the Motorola Razr Ultra (2025) to stable Wi-Fi before downloading the eSIM profile.
Confirm your phone is unlocked and that your regional/carrier variant supports eSIM. Motorola eSIM support can vary by region.
Keep your iRoamly QR code, SM-DP+ Address, Activation Code, and optional confirmation code ready.
Install the eSIM 1-2 days before travel when possible, but wait to activate mobile data until you are at or near the covered destination.
Planning travel to Turkey or Italy? Installing the travel eSIM before departure can make the profile ready before you need mobile data abroad.
Do not delete an installed iRoamly eSIM unless iRoamly support tells you to. Many eSIM profiles cannot be reinstalled after removal.
iRoamly eSIM validity starts from activation. For travel plans, activation is tied to turning on the eSIM for data and connecting in the covered country or region, so check your specific plan details before switching data on.
iRoamly plans may be data-only. Voice calls and SMS availability varies by plan, so do not assume calling or texting is included.
Method 1: Install eSIM by Scanning a QR Code
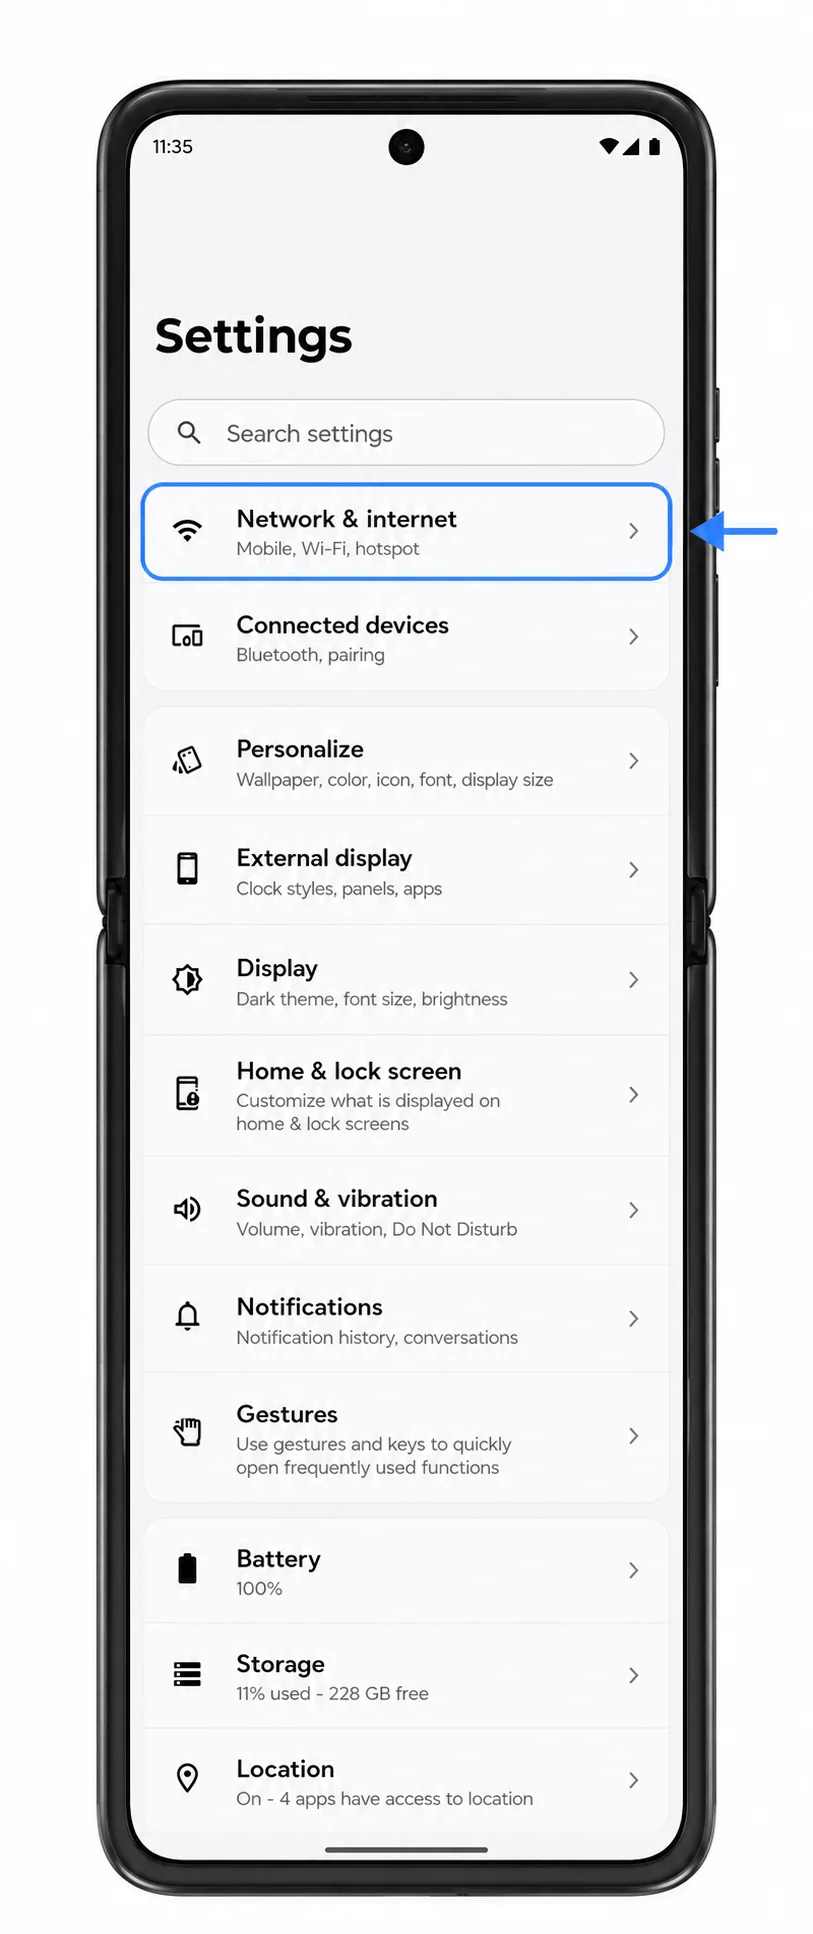
Open Settings on the unfolded Motorola Razr Ultra (2025), then tap Network & internet.
You should see the network settings page with options for internet, calls, SMS, and SIM settings.
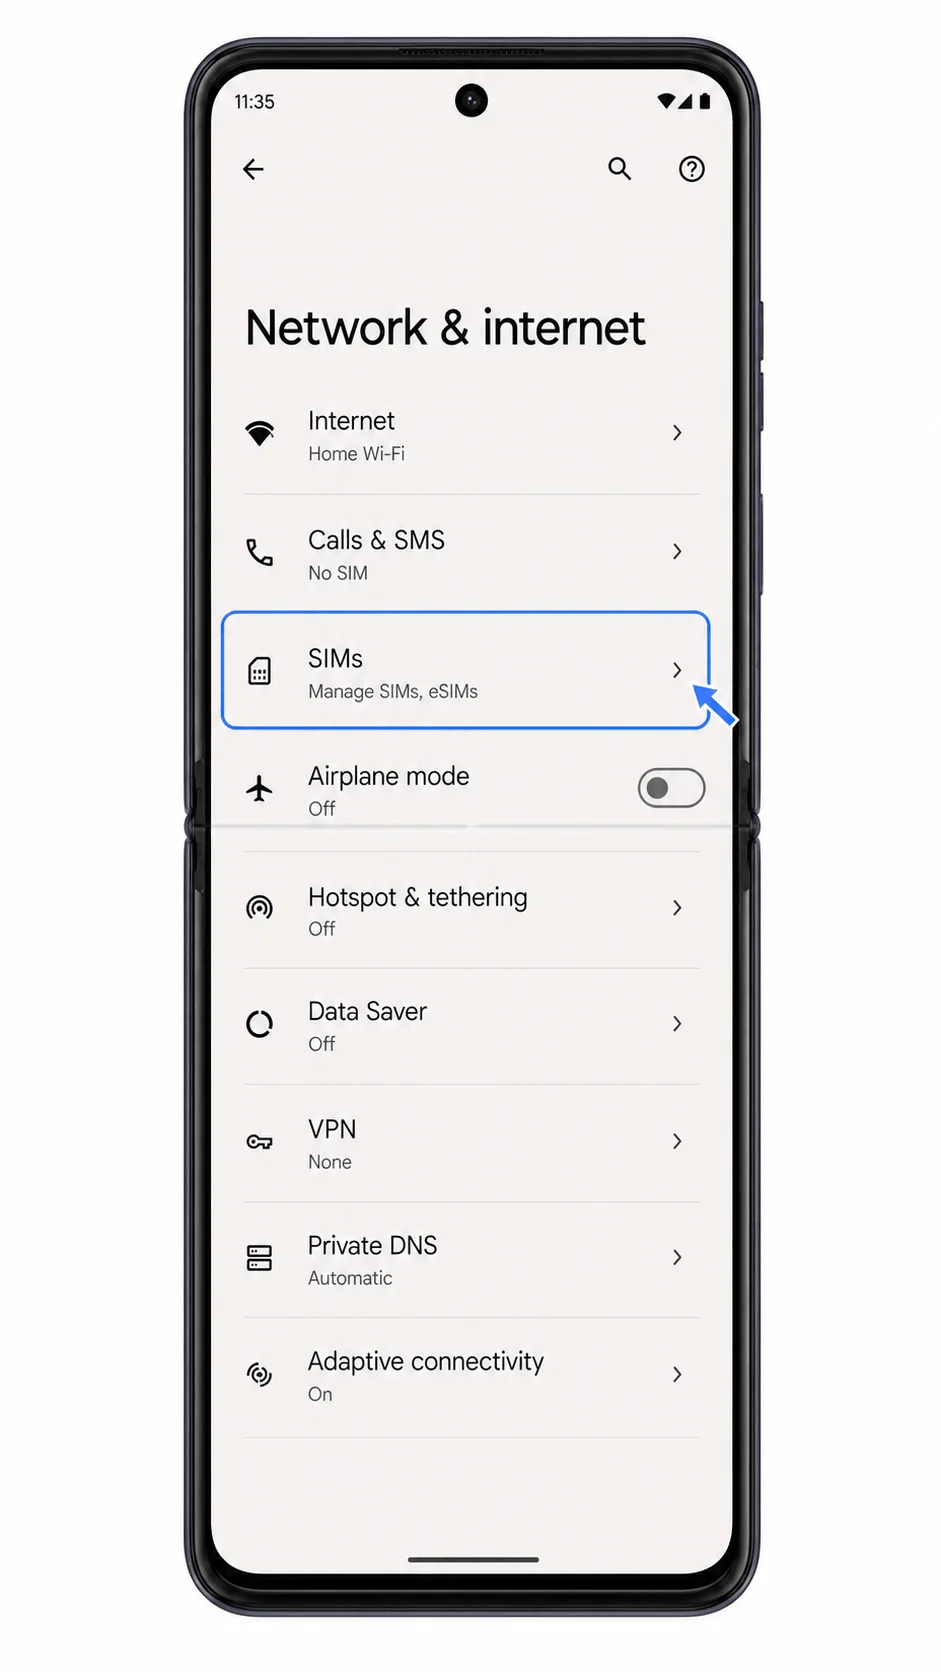
Tap SIMs.
The phone should open the SIM management page, where your current physical SIM or existing eSIM profiles appear.
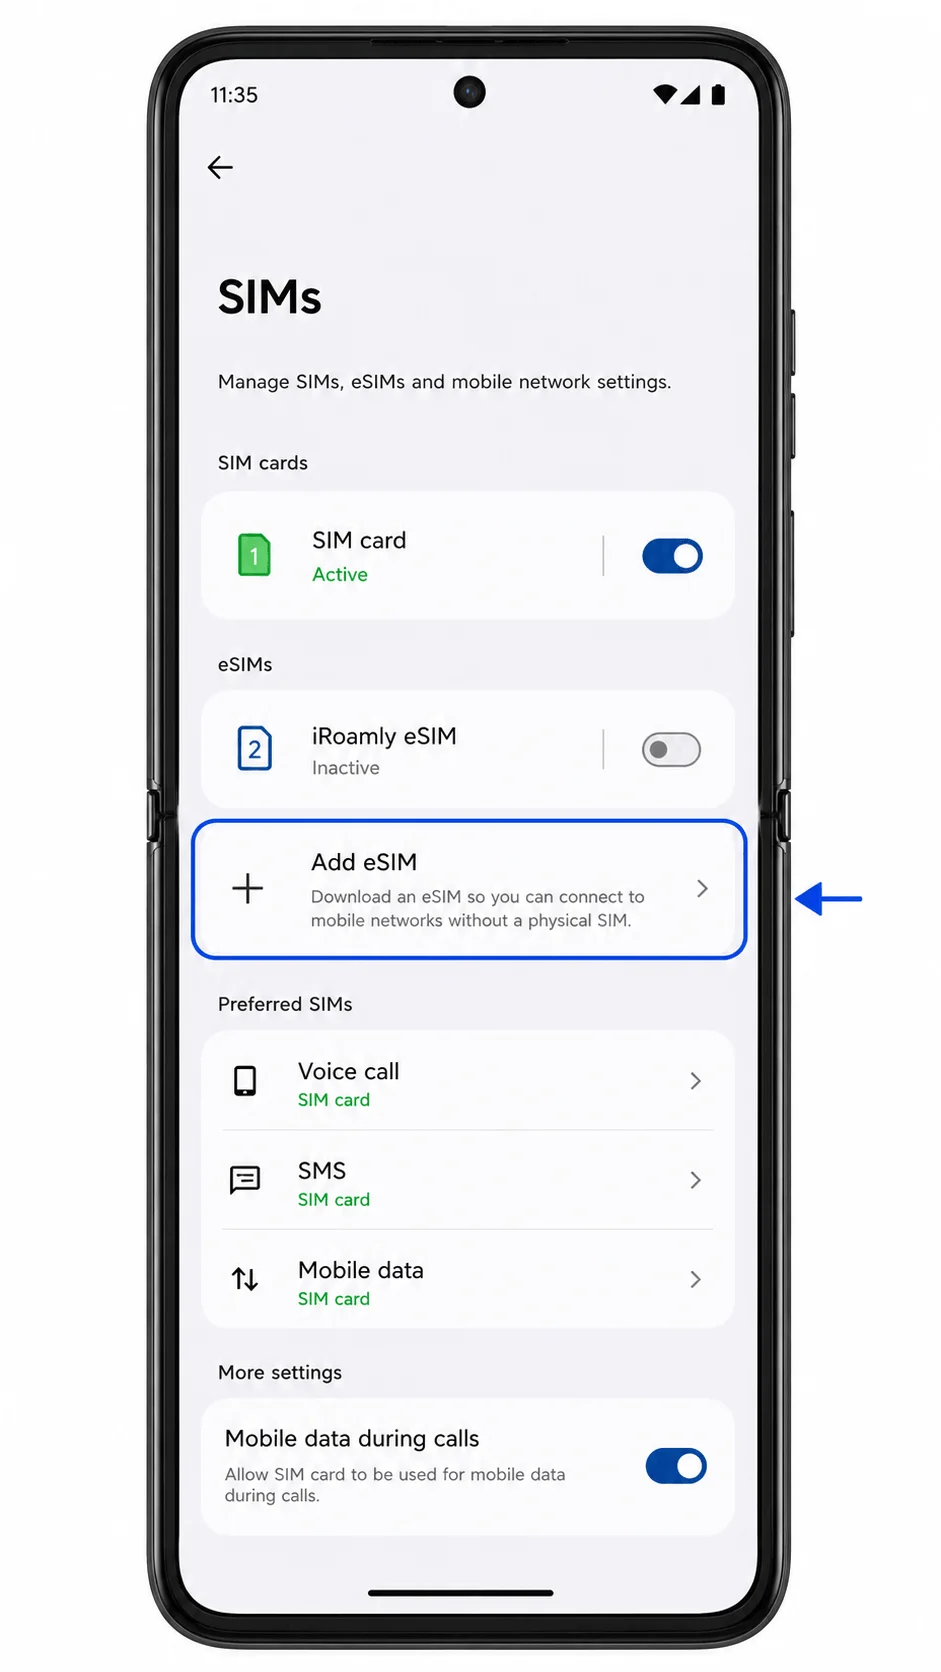
Tap Add eSIM.
The Razr Ultra should start the Android eSIM setup flow and prepare to download a new SIM profile.
Choose Scan QR code if the phone asks how you want to add the eSIM, then scan the iRoamly QR code from another screen or printed copy.
Keep the QR code inside the scanner frame until the phone recognizes it. Do not scan a code that has already been used on another device.
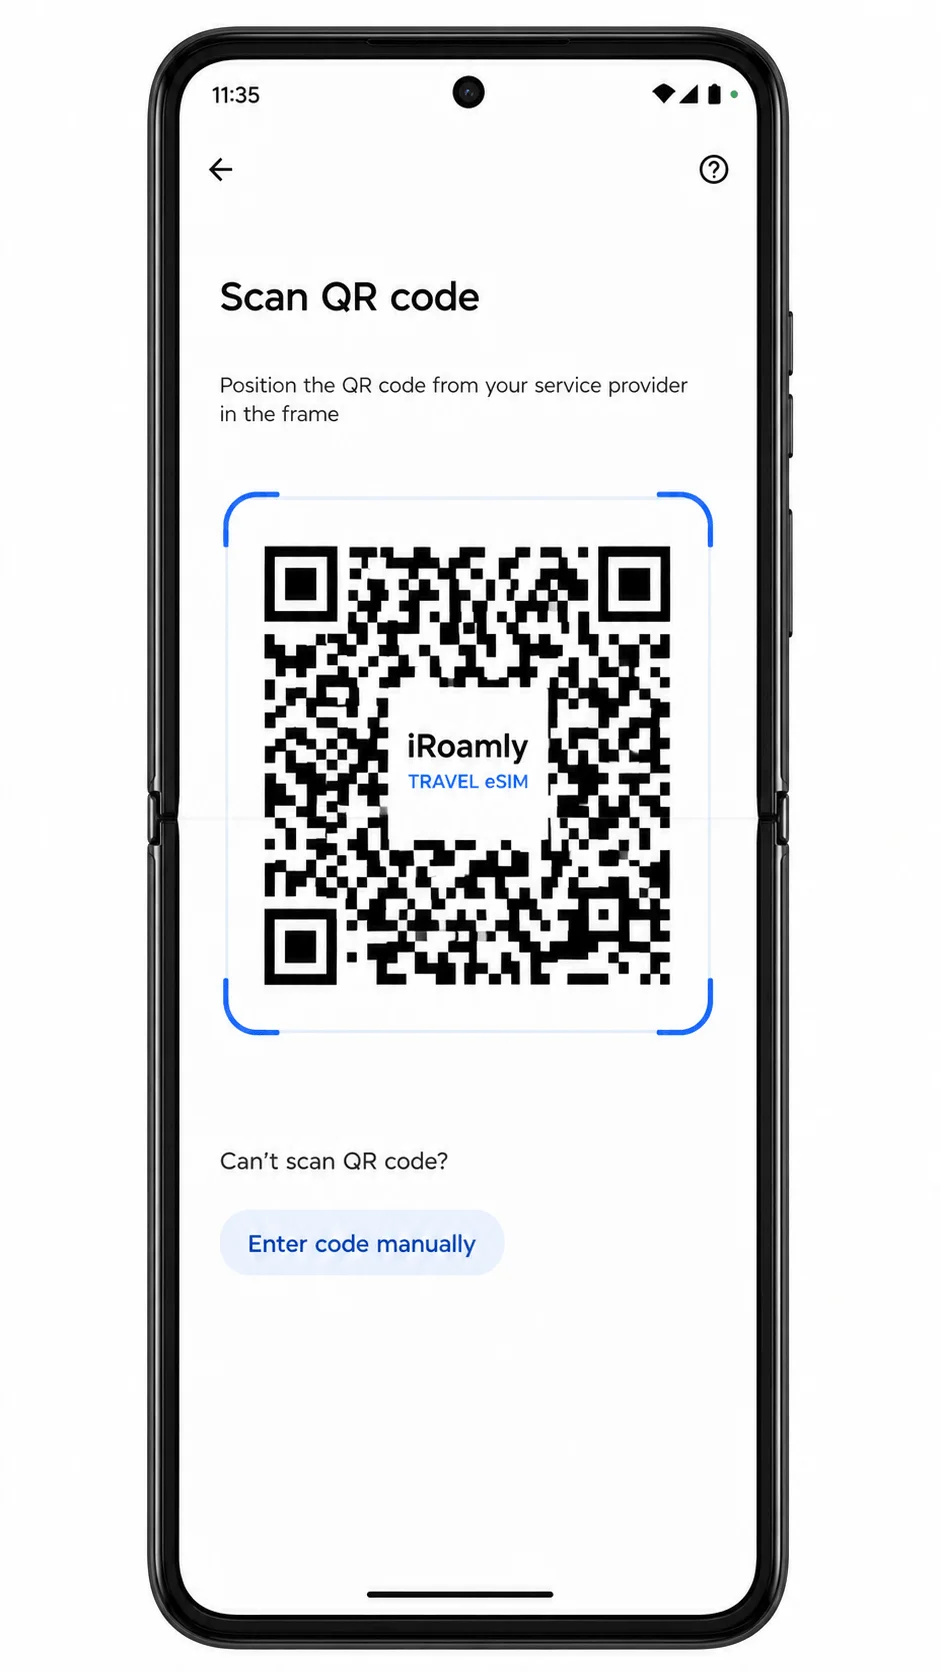
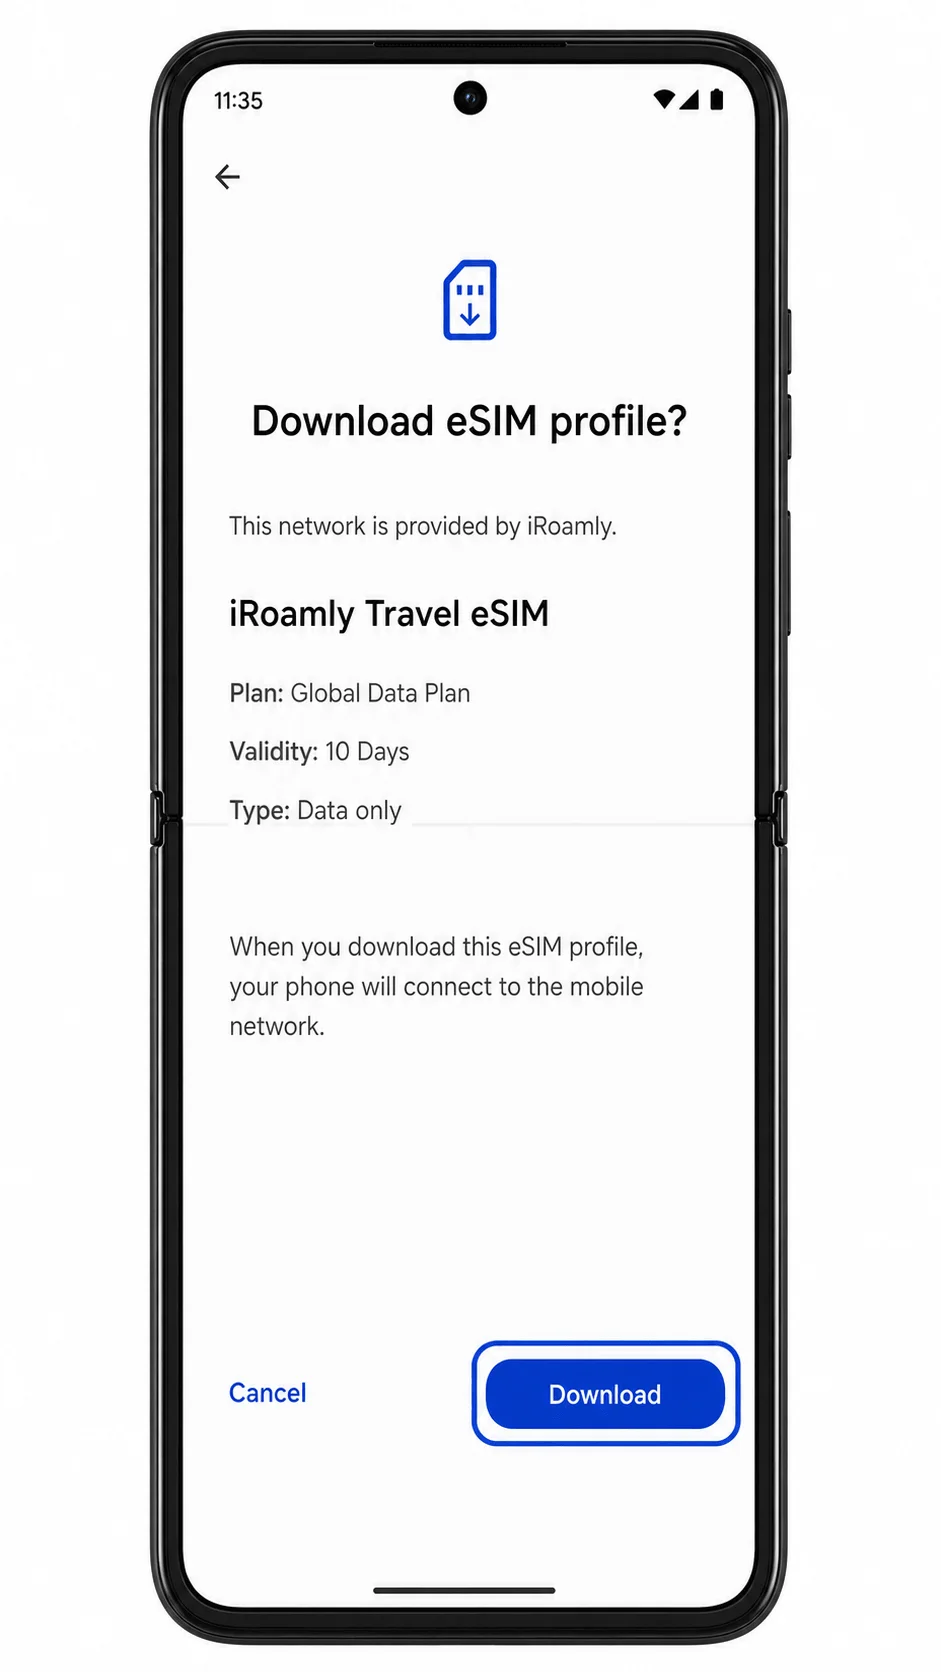
Review the detected iRoamly eSIM profile, then tap Download or Continue.
The phone should download the eSIM profile over Wi-Fi. Keep the screen open until the download finishes.
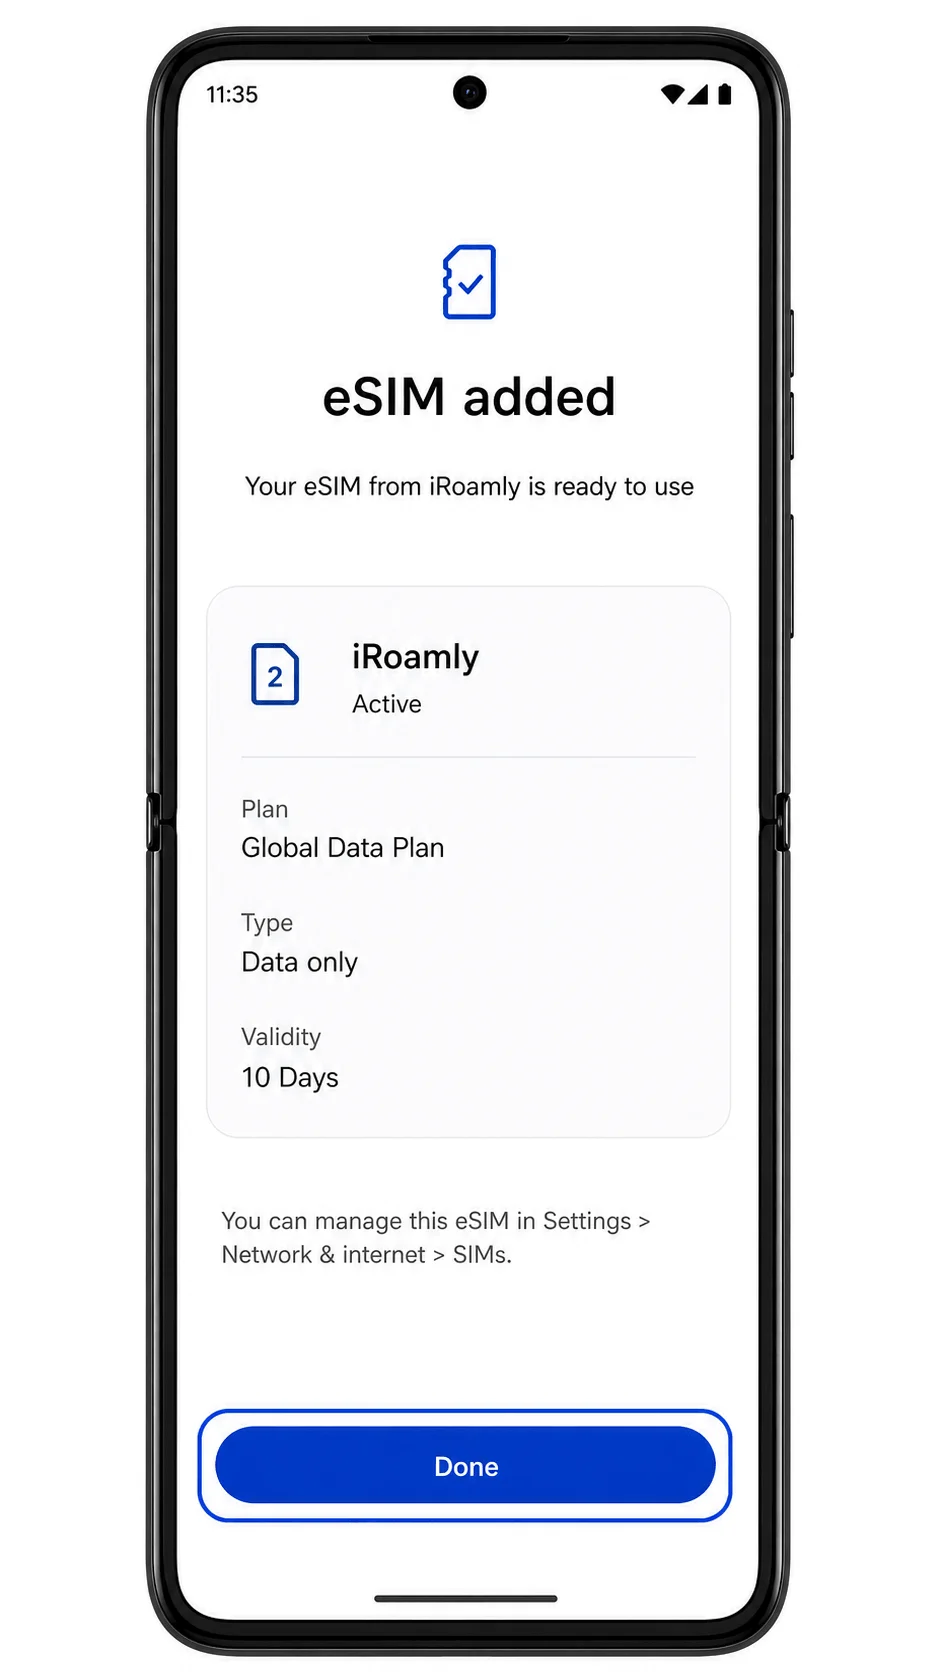
When the setup finishes, tap Done.
The new iRoamly eSIM should now appear in the Razr Ultra SIM list, ready to be named and configured.
Method 2: Install eSIM Manually
Open Settings, tap Network & internet, then tap SIMs.
This is the same SIM management path used for QR setup, and it brings you back to the page where Android can add a new eSIM.
Tap Add eSIM.
The phone should open the eSIM setup flow again.
On the QR scanner screen, tap Need help? or Enter code manually.
Motorola/Android wording can vary, but the manual option is normally reached from the QR scan page when you cannot scan the code.
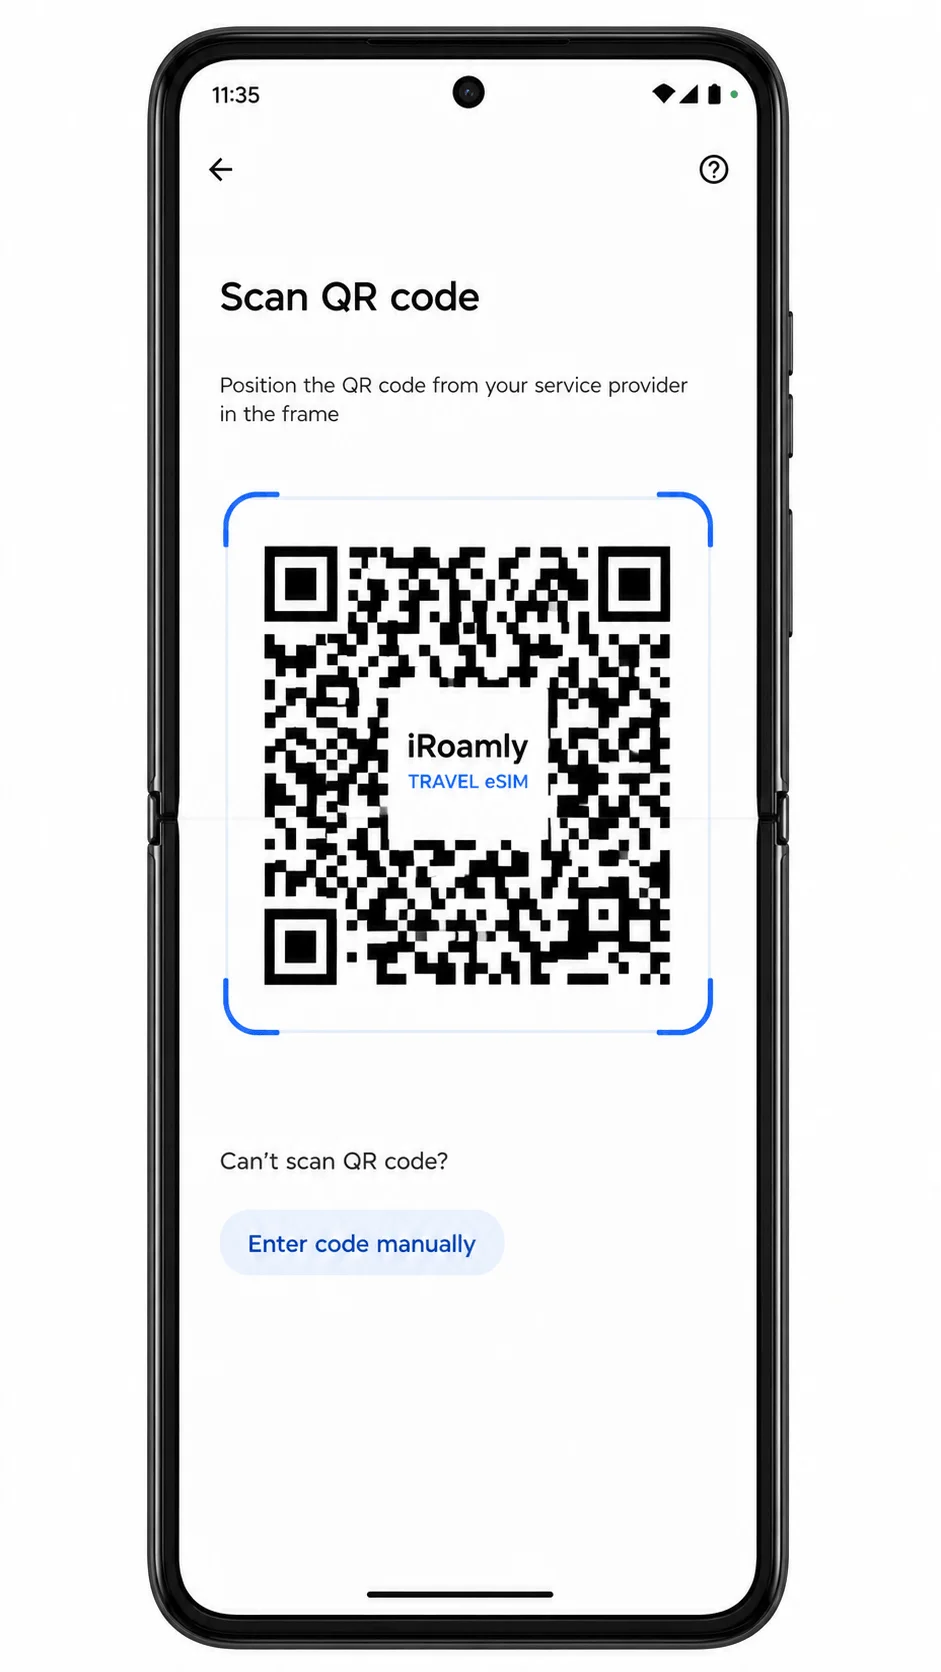
Enter the iRoamly SM-DP+ Address and Activation Code, then add the confirmation code only if iRoamly provided one. Tap Continue.
Use the exact details from your iRoamly order page or email. Do not add spaces or extra punctuation unless they are part of the provided activation code.
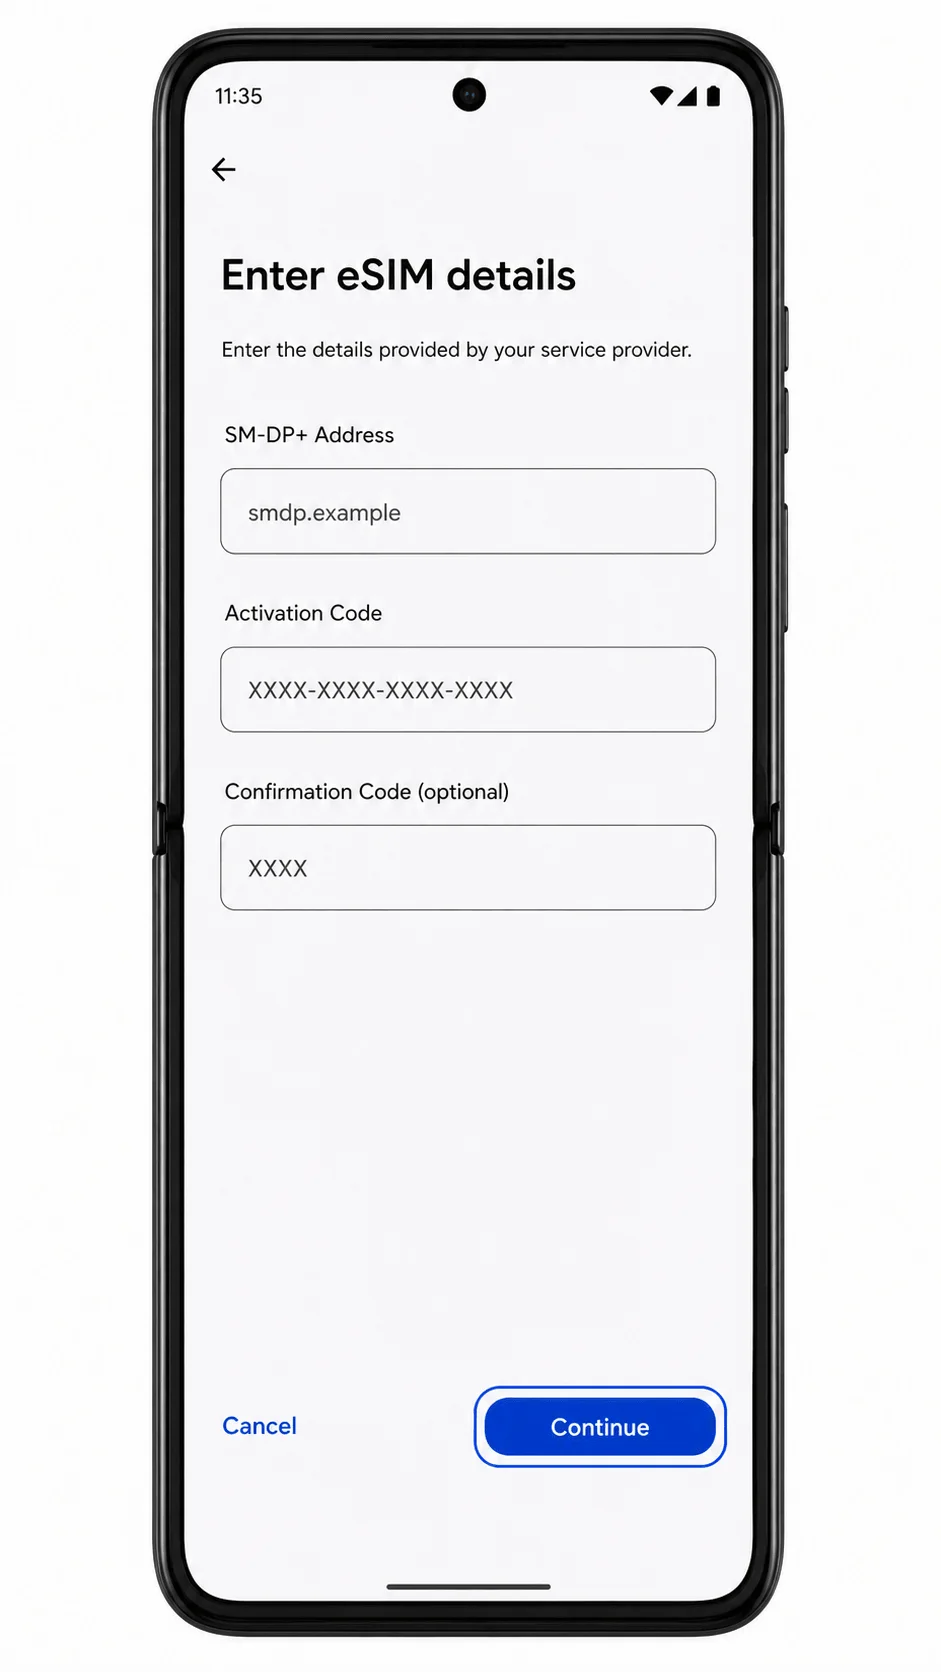
Review the profile details, then tap Download or Continue.
The Razr Ultra should download the iRoamly eSIM profile over Wi-Fi.
Tap Done after the eSIM is added.
The iRoamly eSIM should return to the SIMs page as an available mobile plan.
How to Confirm Your iRoamly eSIM Is Installed
Go to Settings > Network & internet > SIMs, then look for the new iRoamly eSIM profile in the SIM list.
If the eSIM appears here, the installation succeeded. You can rename it to iRoamly or a destination name if the phone offers a label option.
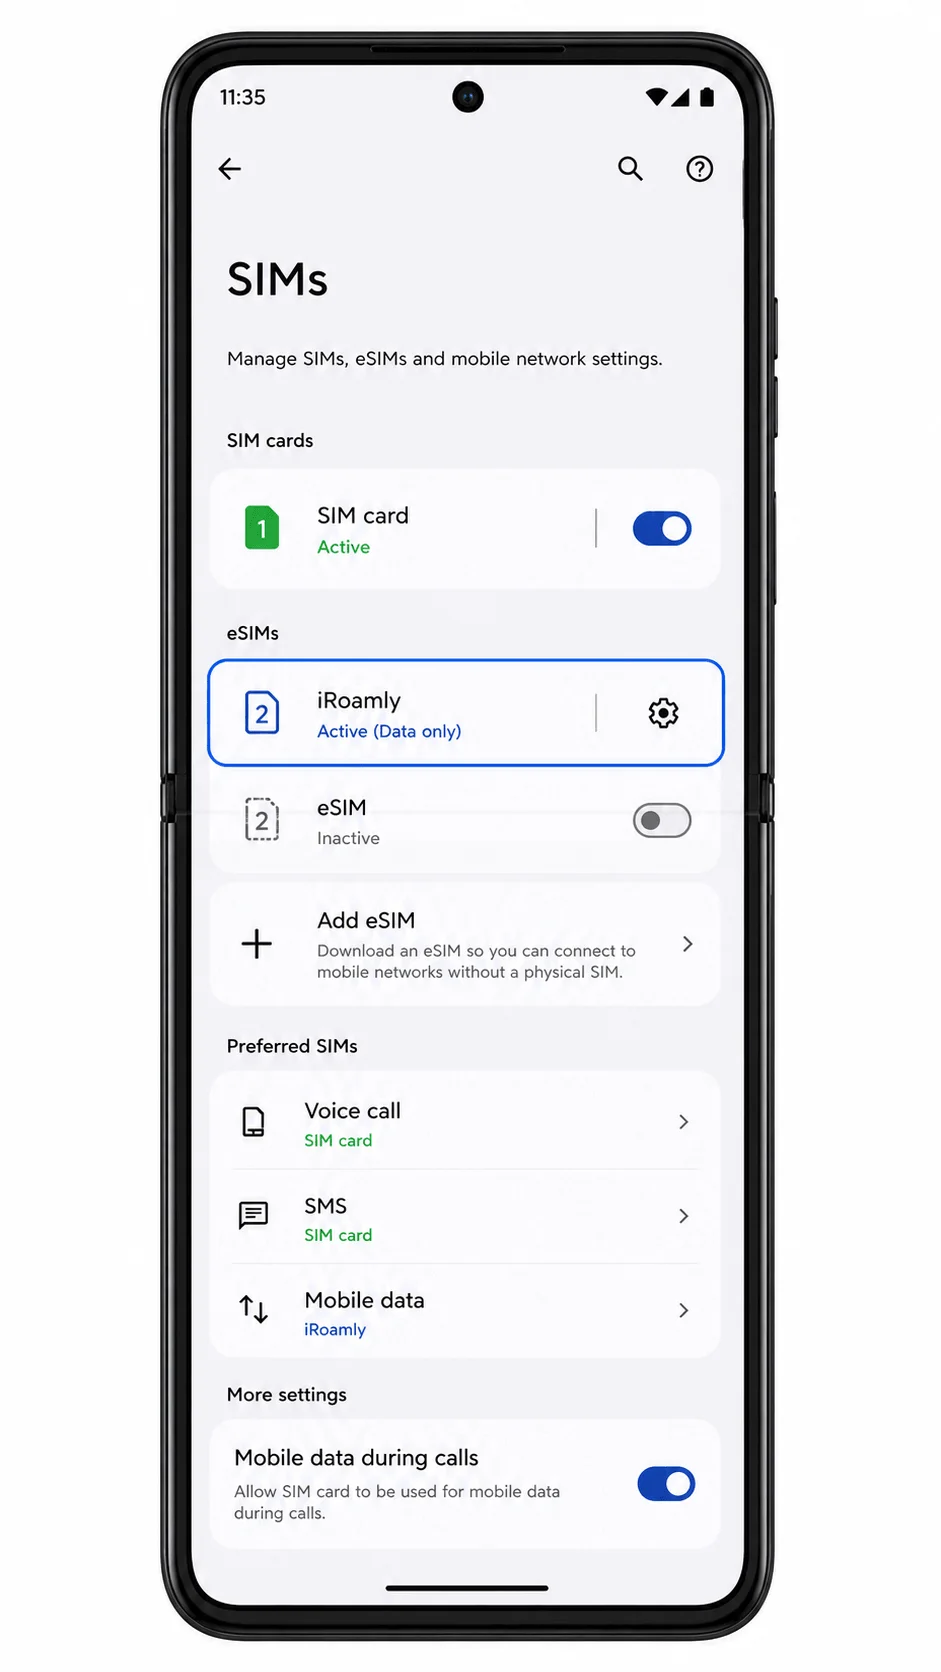
Tap the iRoamly eSIM profile and check that the line can be turned on.
Leave the line off if you are not ready to activate travel data yet. Turn it on only when you want the plan to start connecting in the covered destination.
Configure eSIM for Mobile Data
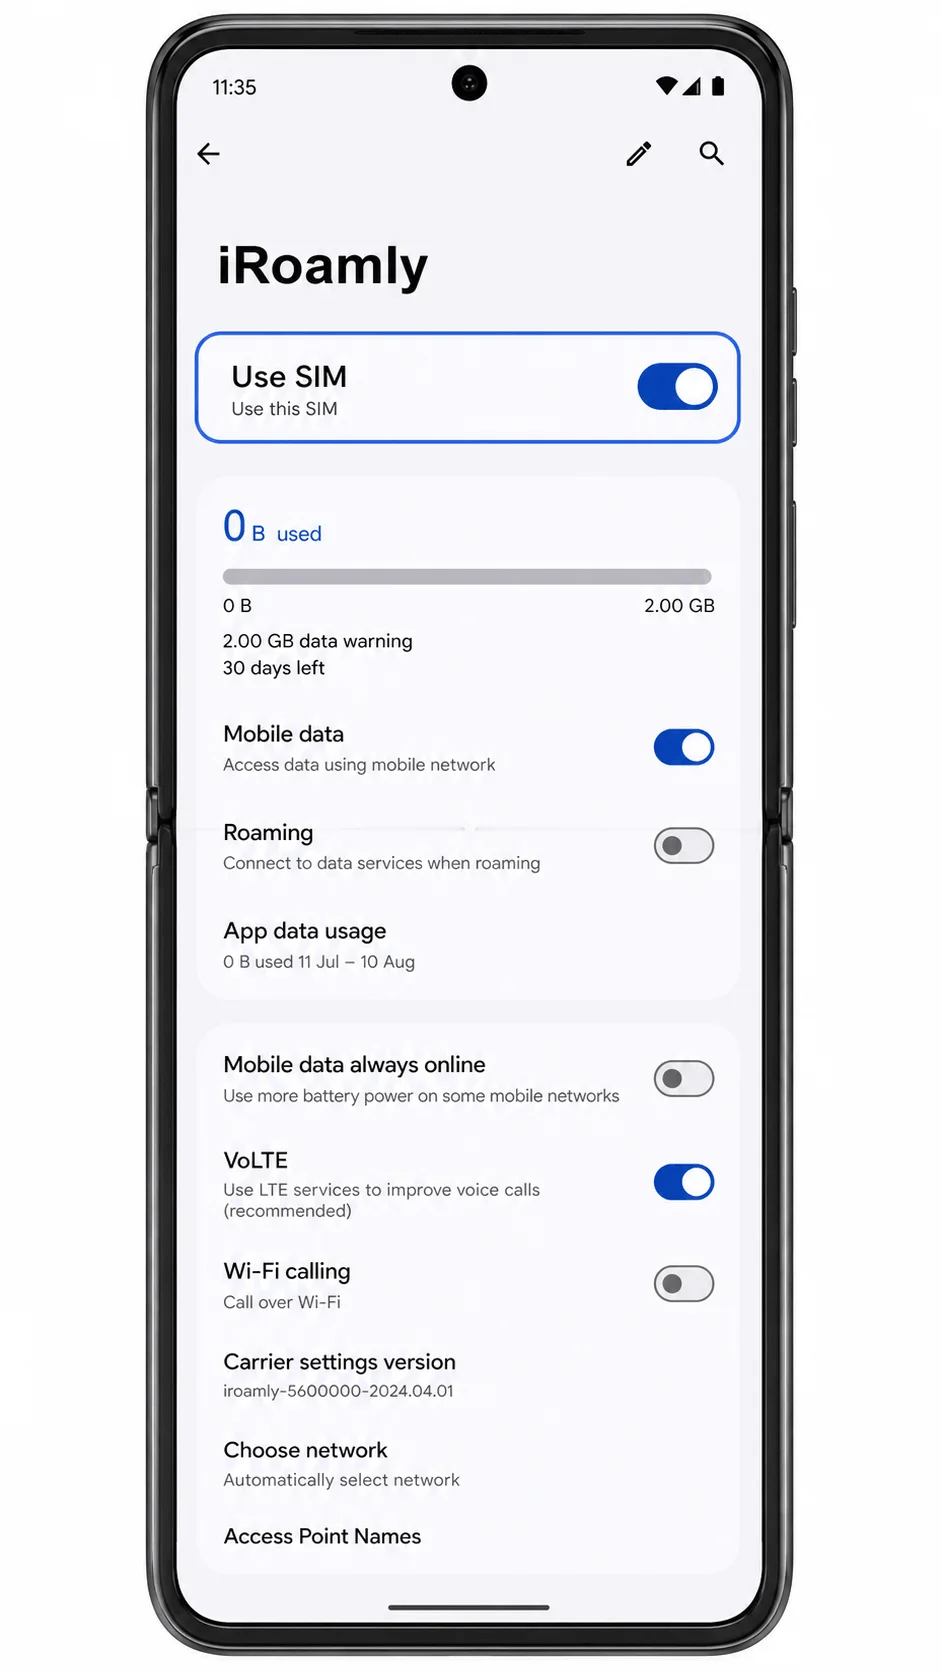
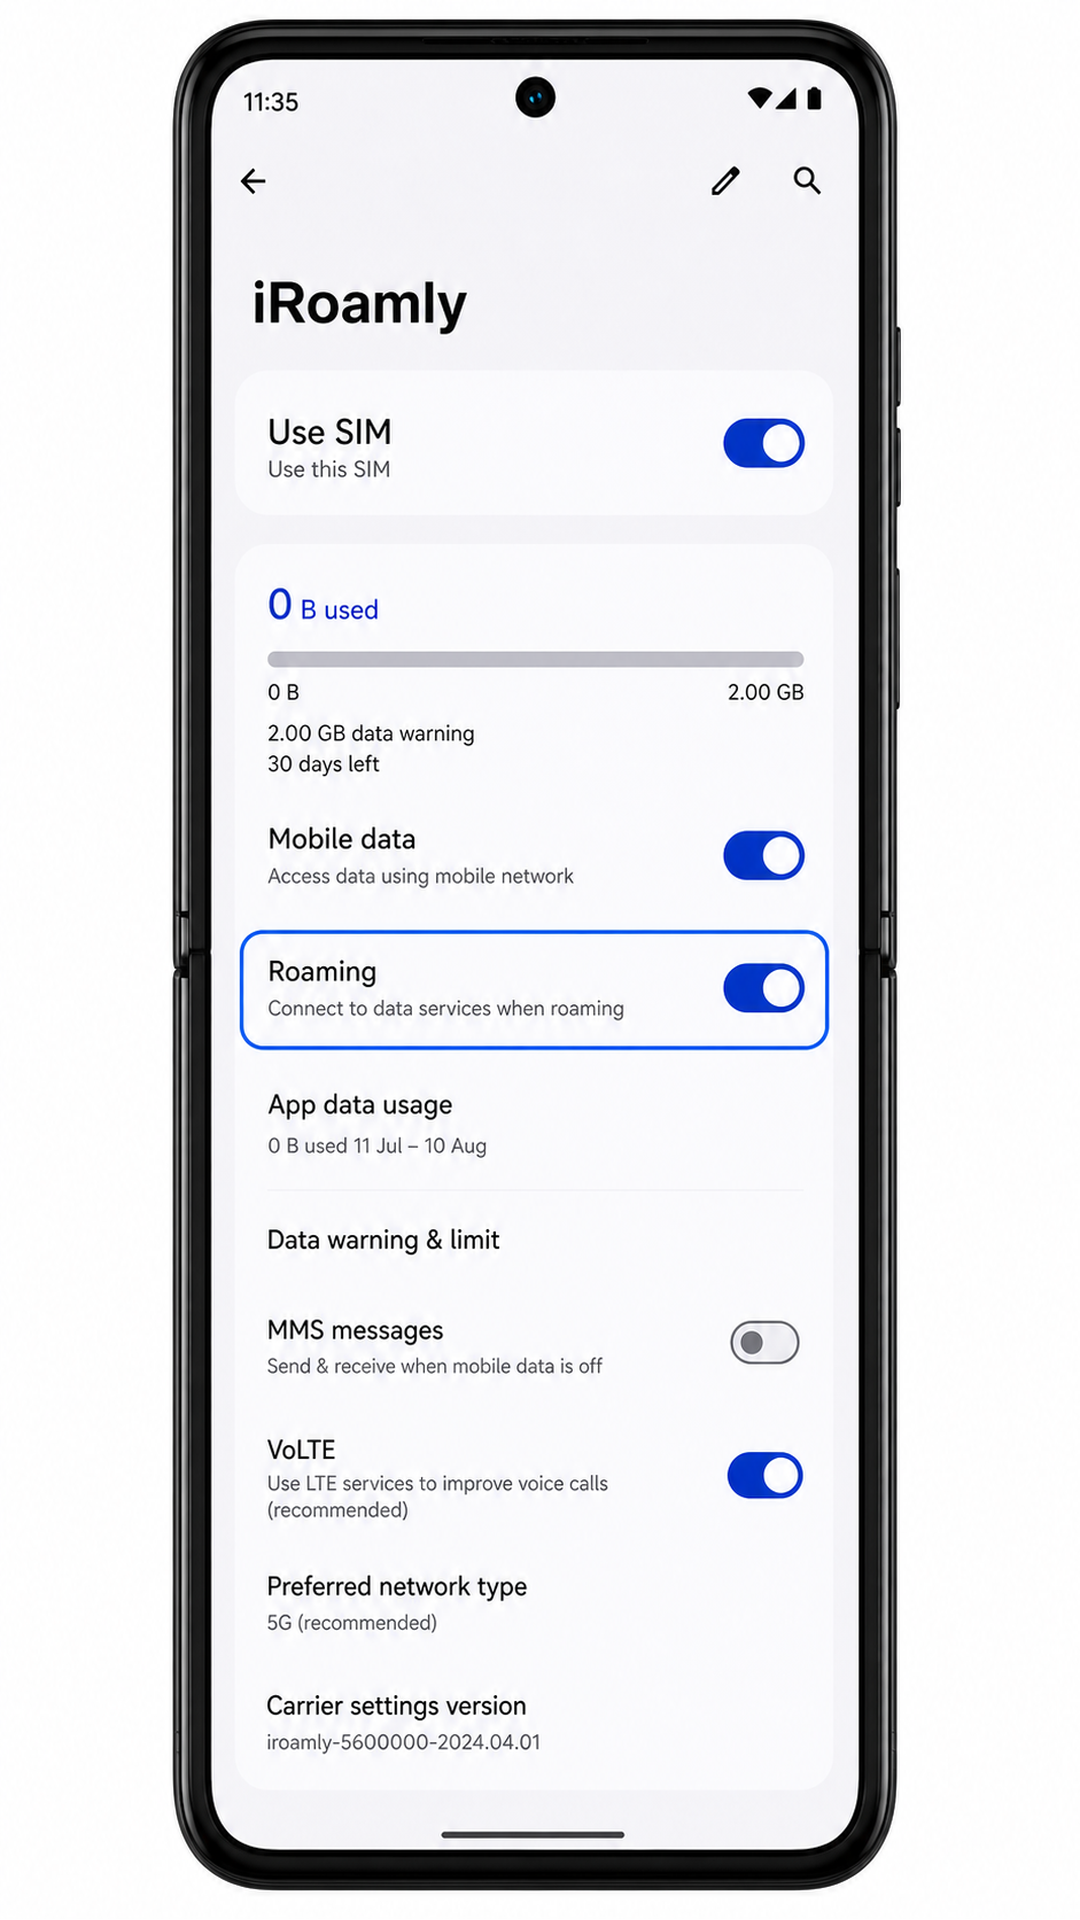
Open Settings > Network & internet > SIMs, then tap the iRoamly eSIM.
You should see settings for using the SIM, mobile data, roaming, and other line options.
Turn on Use SIM, then enable Mobile data.
The iRoamly line is now allowed to provide mobile data. If you are still at home, wait until you reach the covered destination before testing data.
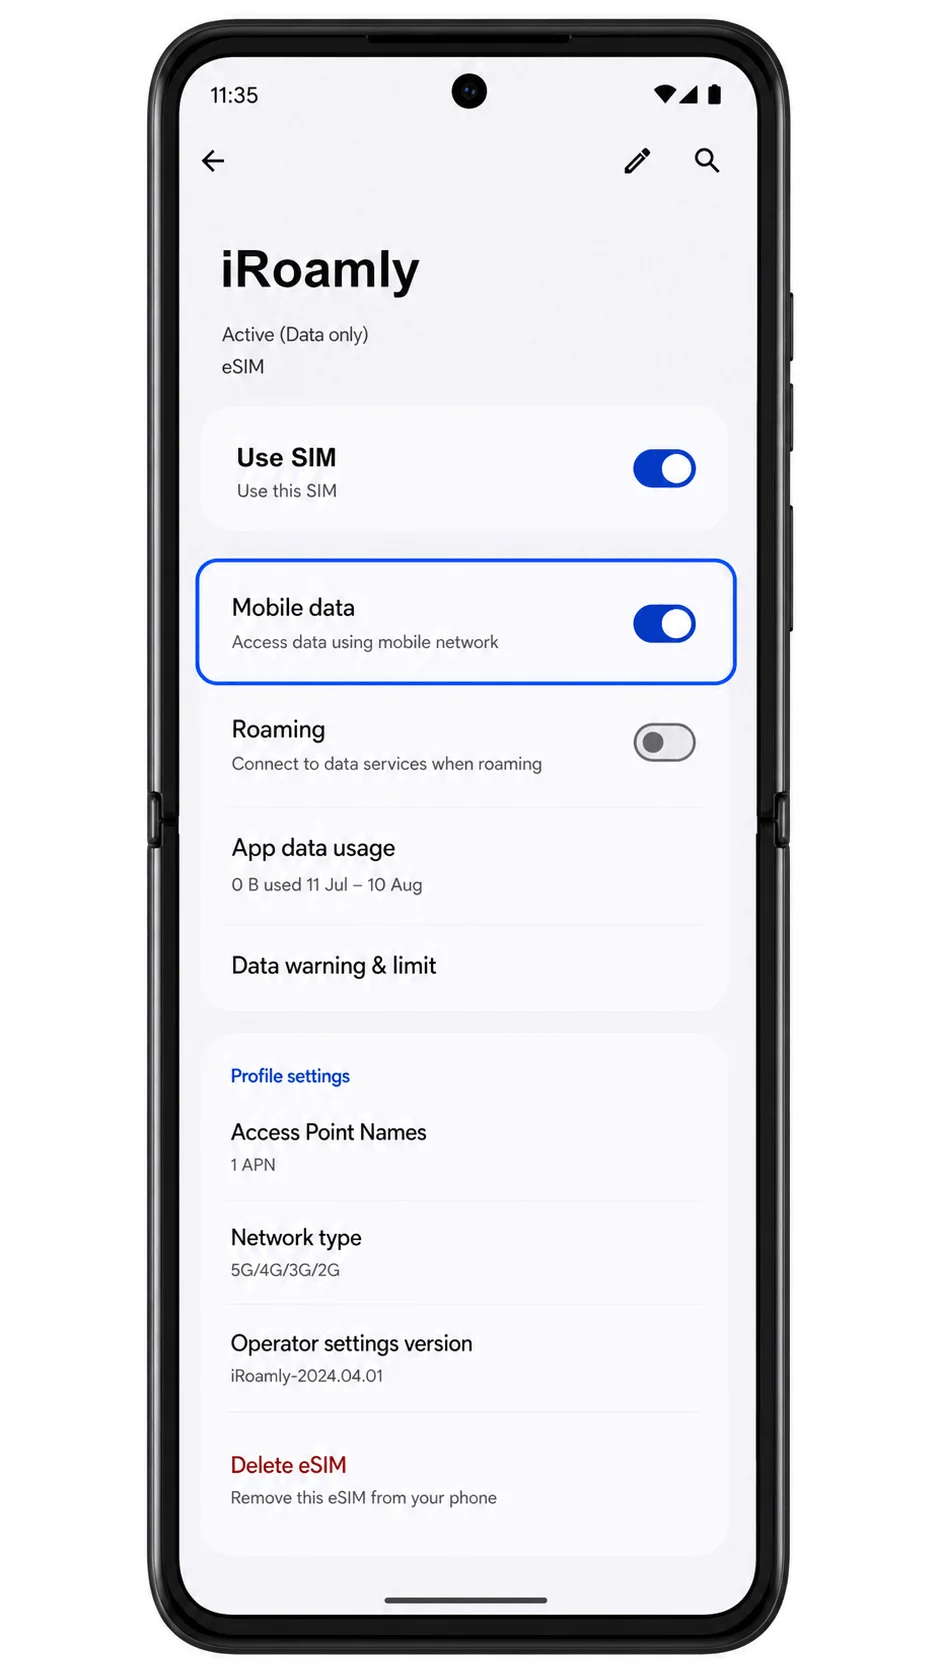
Turn on Roaming if your iRoamly plan or destination instructions require it.
Travel eSIMs often need roaming enabled because they connect through partner networks in the destination country or region.
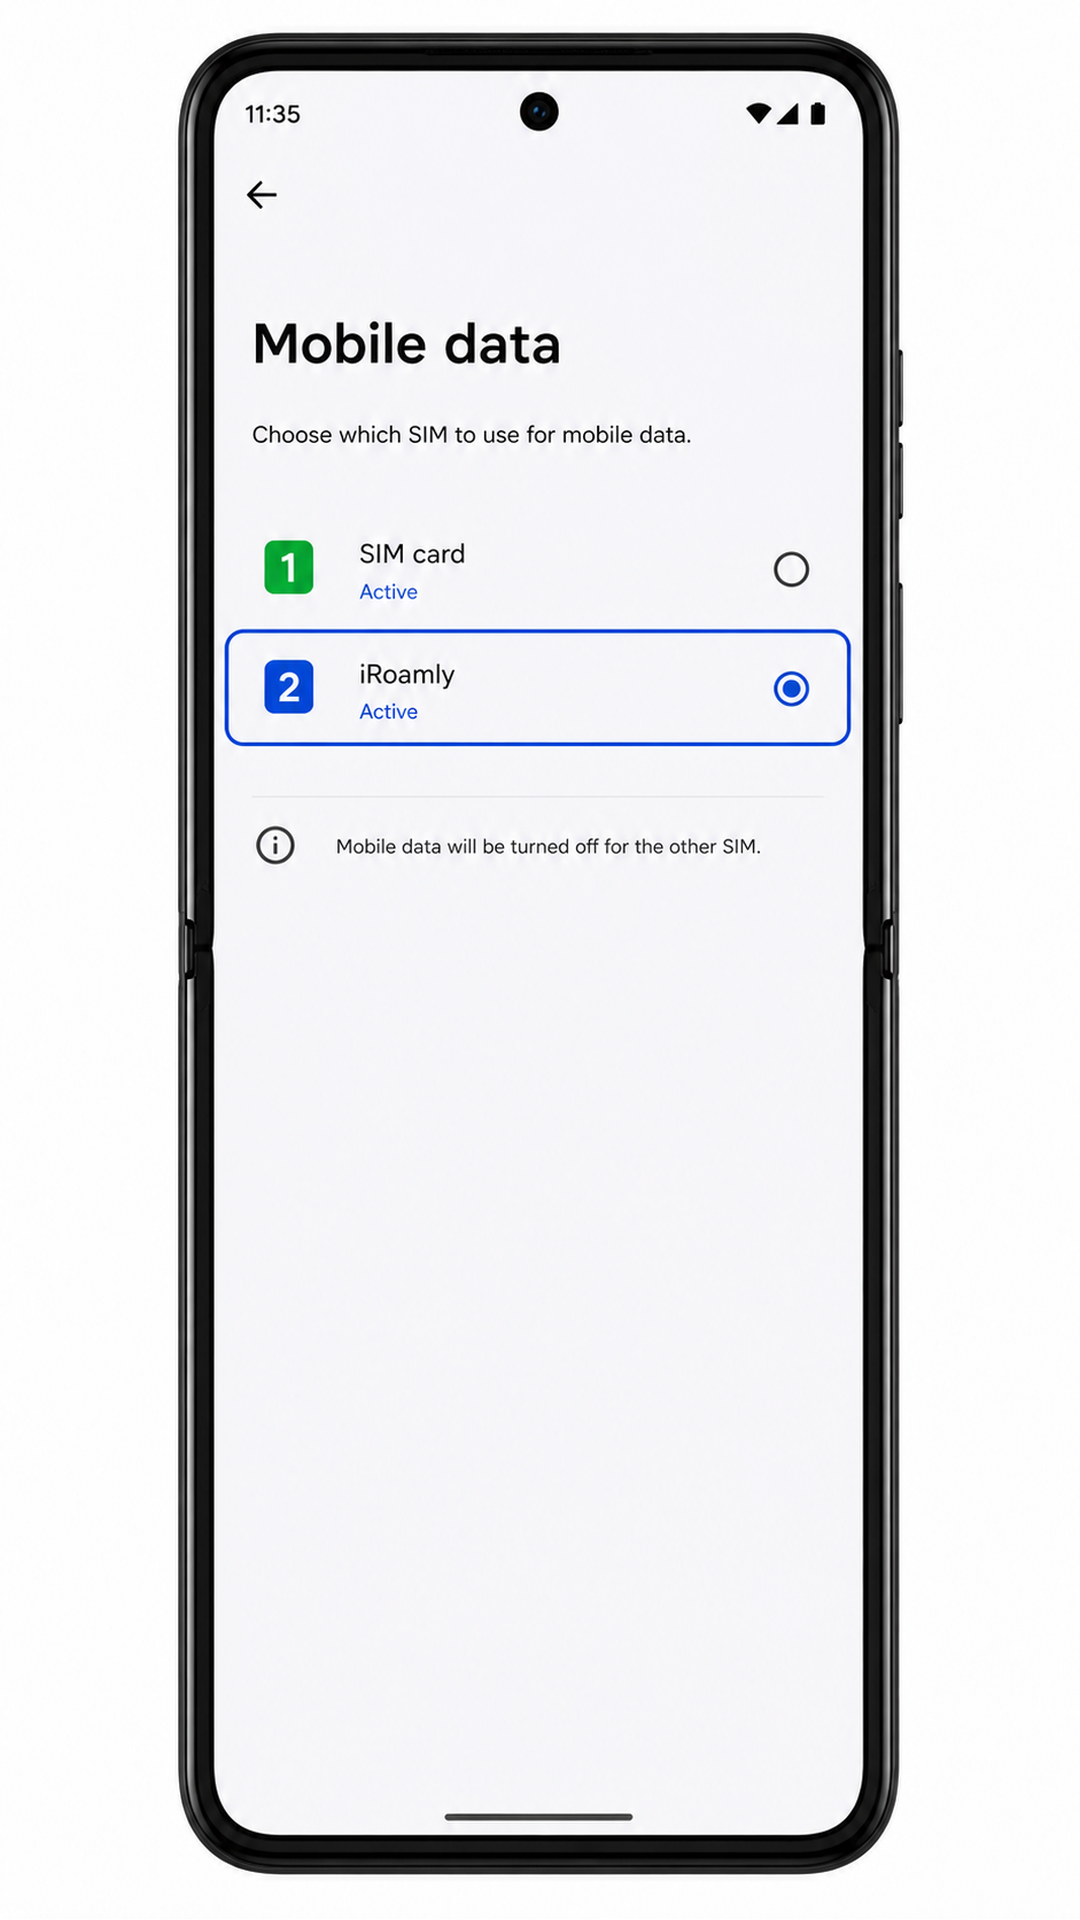
Return to SIMs, open the mobile data preference if shown, and select the iRoamly eSIM for data.
This helps prevent the Razr Ultra from using your primary SIM for travel data by mistake.
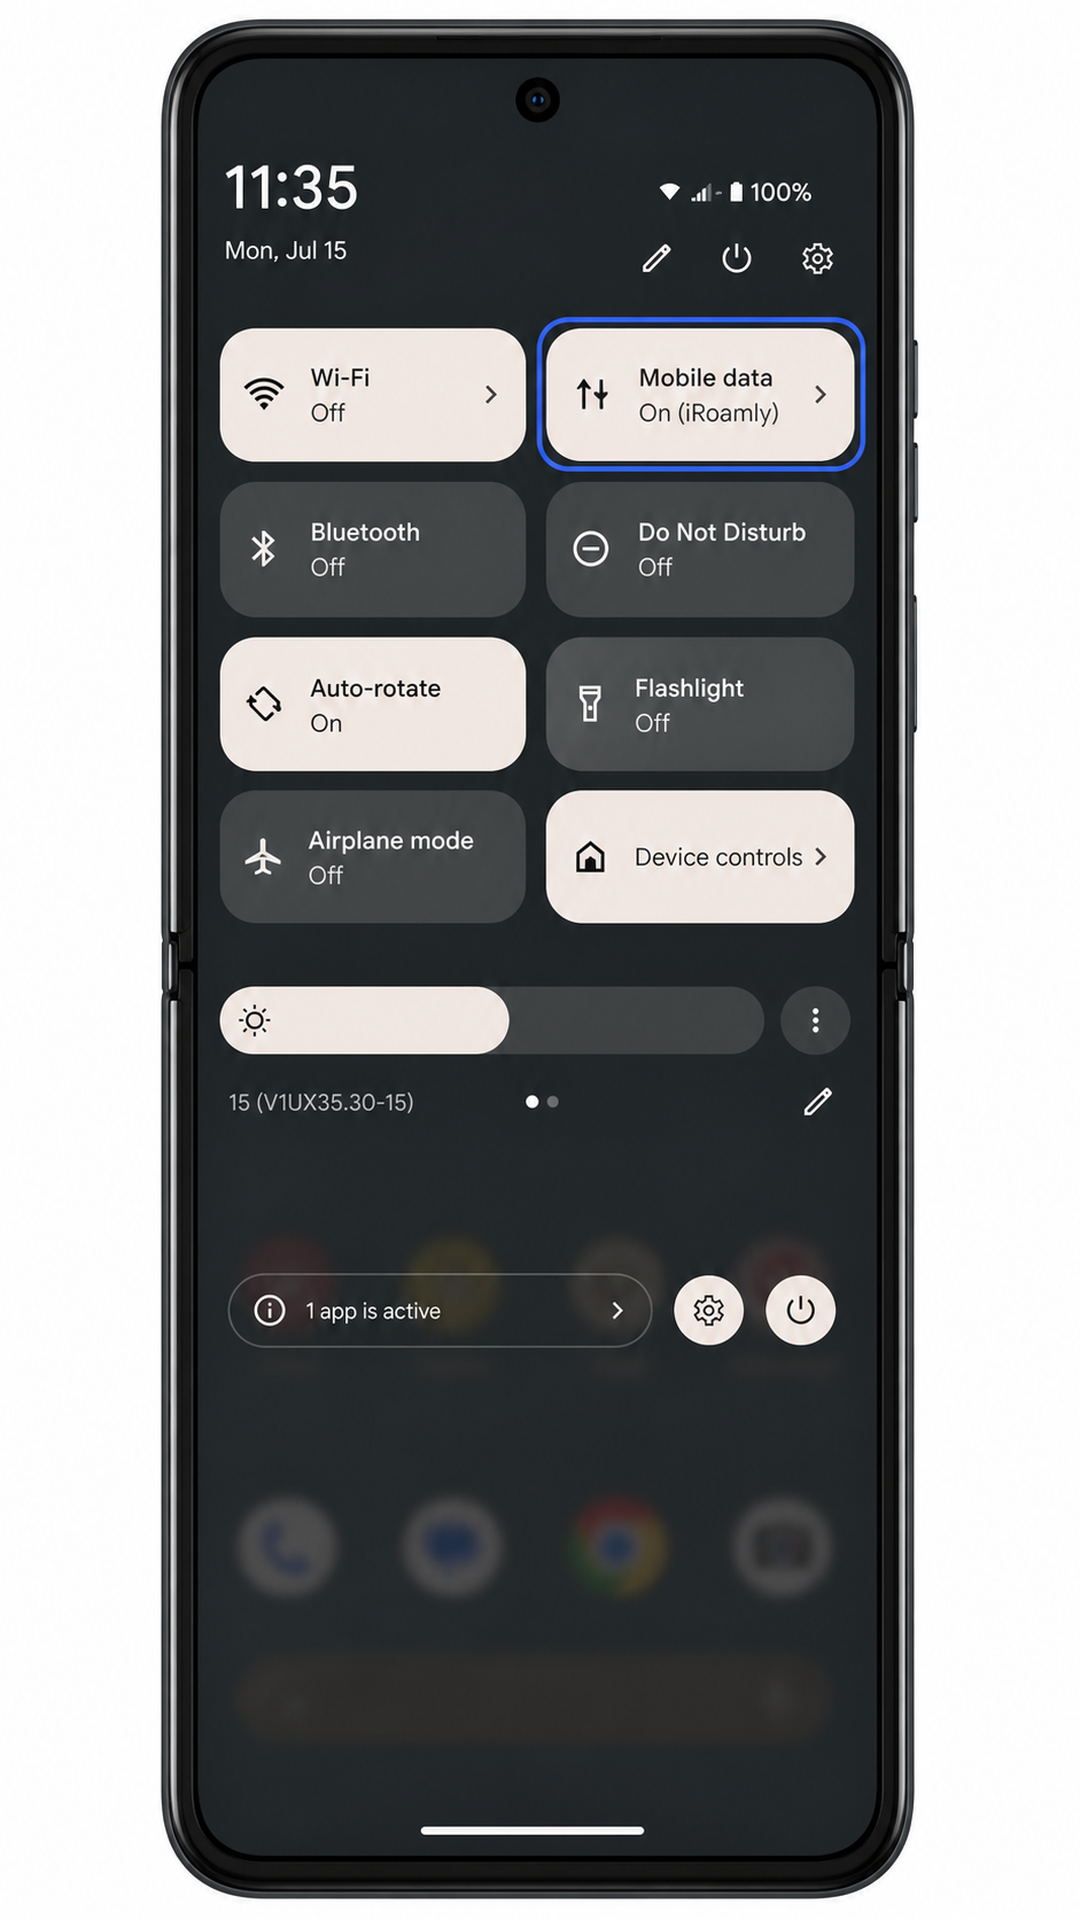
Turn off Wi-Fi and open a webpage or map app to test the connection.
If data works, keep iRoamly selected for mobile data during travel. If it does not connect, review the troubleshooting steps below.
Troubleshooting
If Add eSIM is missing, confirm your Motorola Razr Ultra (2025) variant supports eSIM in your region and that your carrier firmware has not disabled eSIM management.
If the QR code does not scan, increase screen brightness on the device showing the code, clean the Razr Ultra camera area, or use manual entry.
If the QR code says it was already used, do not delete the eSIM. Contact iRoamly support because many eSIM QR codes are single-use.
If manual entry fails, check the SM-DP+ Address and Activation Code exactly as shown by iRoamly. A missing character or extra space can stop activation.
If the eSIM installs but does not connect, make sure Use SIM, Mobile data, and required Roaming are enabled for the iRoamly profile.
If data still does not work after arrival, turn airplane mode on and off, restart the phone, and confirm you are in a country or region covered by the purchased iRoamly plan.
If your primary SIM keeps taking data, return to Settings > Network & internet > SIMs and set iRoamly as the preferred mobile data SIM.
If calls or SMS do not work, check your iRoamly plan details. Many travel eSIM plans are data-only.
More Motorola Razr eSIM Setup Guides
Using another Motorola Razr phone? These eSIM activation guides may help.
Conclusion
After installation, your iRoamly eSIM will be stored on your phone and ready whenever your travel plan is activated. Depending on your plan, mobile data may become available as soon as the eSIM connects to a supported network in your destination.
Once connected, you can continue using your favorite apps just as you would at home, whether for navigation, communication, travel bookings, or browsing. Having everything set up before departure means you can spend less time configuring your phone and more time enjoying your trip.