
eSIM technology is changing the way people connect to mobile networks by removing the need for physical SIM cards. Instead of inserting or swapping anything, you can set up a mobile plan directly on your device in just a few steps.
This makes the process faster, more organized, and easier to manage—especially if you switch networks or travel frequently.
With full eSIM support on iPhone 14, everything can be handled digitally within your settings. In this guide, you’ll learn how to install and activate your iRoamly eSIM step by step.
Meet iRoamly for Easier Travel Connectivity
iRoamly Travel eSIM is a travel eSIM service that provides mobile data plans for destinations around the world. Available choices can include destination-specific, regional, and global plans, with data allowances, validity periods, plan types, and features varying by location.
Once installed on a compatible phone, the travel data line can support maps, messaging, translations, ride-hailing, bookings, and travel updates.
On a compatible iPhone 14, iRoamly can be installed as a separate travel data profile while the regular SIM remains available. The existing guide below shows how to add the eSIM by QR code or manual entry and confirm it is ready for mobile data.
Preparations Before Setting Up iRoamly eSIM
Before starting, ensure you have the following:
A stable internet connection (Wi-Fi or cellular)
A valid eSIM QR code or manual activation details (SM-DP+ address and activation code) provided by your carrier
Your iPhone 14 powered on and unlocked
The device updated to the latest iOS version (recommended for compatibility)
Traveling to the United States or Spain? Installing the destination eSIM ahead of the trip can reduce what you need to configure after arrival.
Method 1: Install eSIM Using QR Code
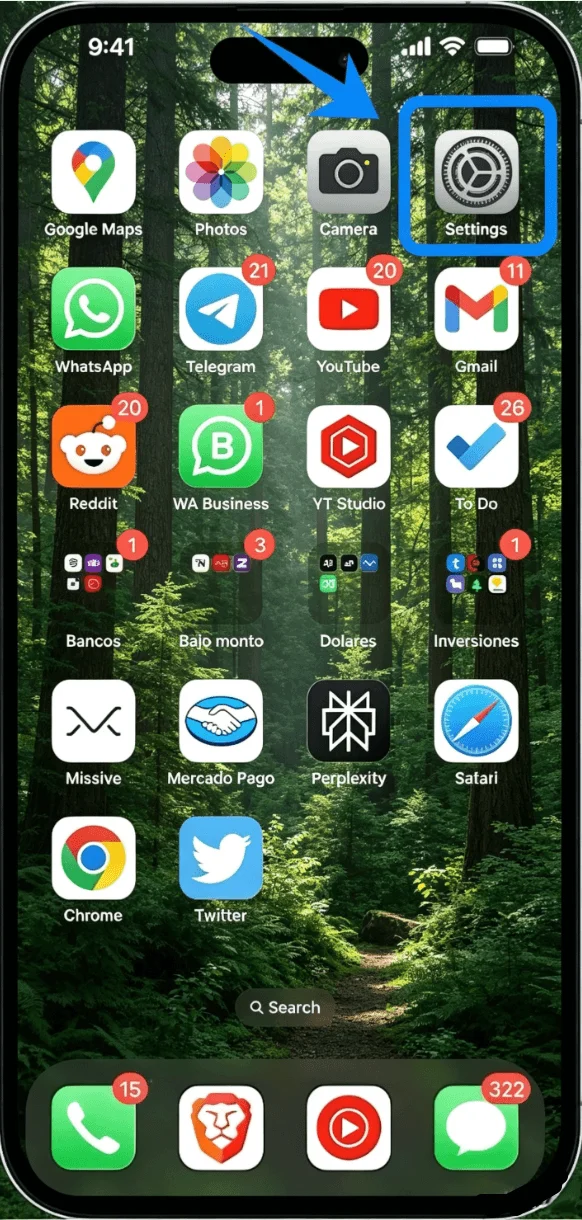
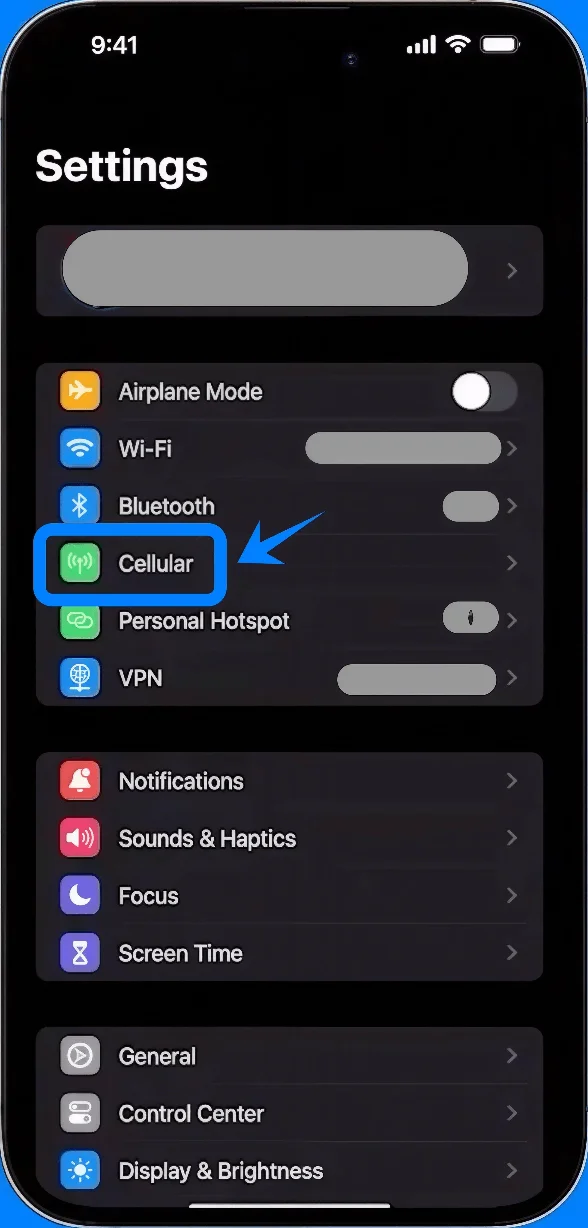
Step 1: Open Cellular Settings
Tap Settings
Scroll down and tap Cellular (On some devices, this may appear as “Mobile Service” or “Mobile Data”)
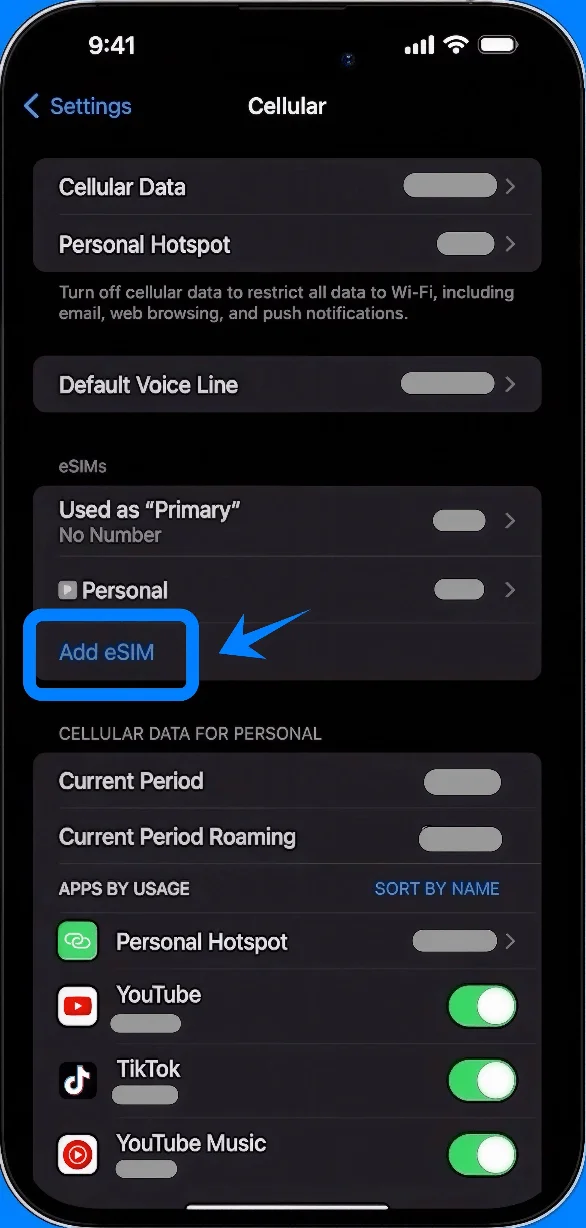
Step 2: Add eSIM
Tap Add eSIM
Step 3: Choose QR Code Option
Tap Use QR Code
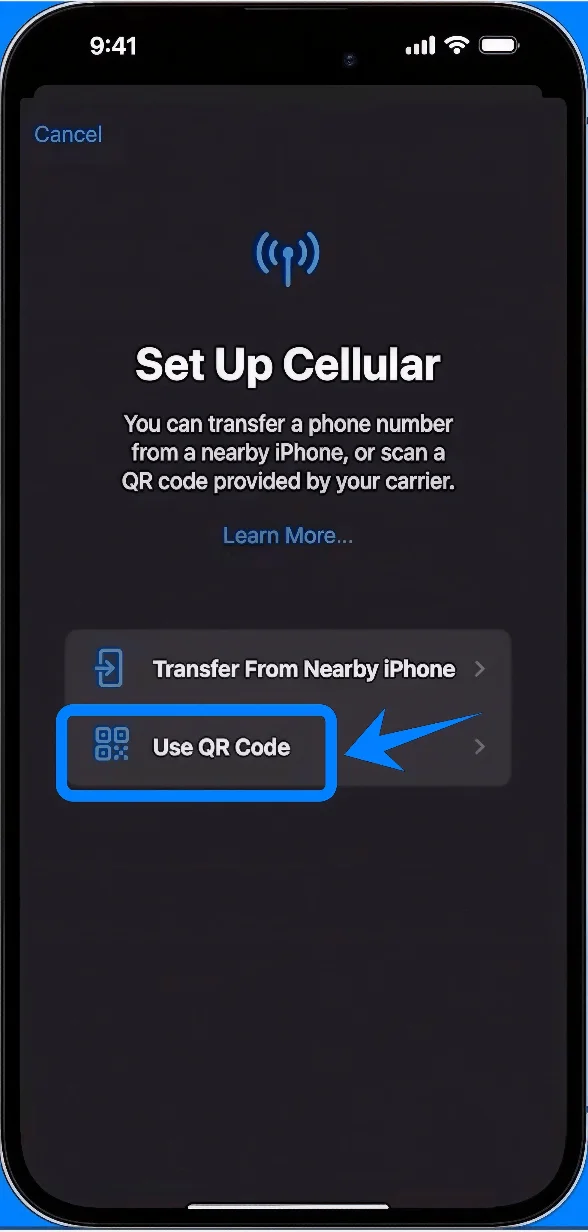
Step 4: Scan the QR Code
Position your iPhone so the QR code appears within the camera frame
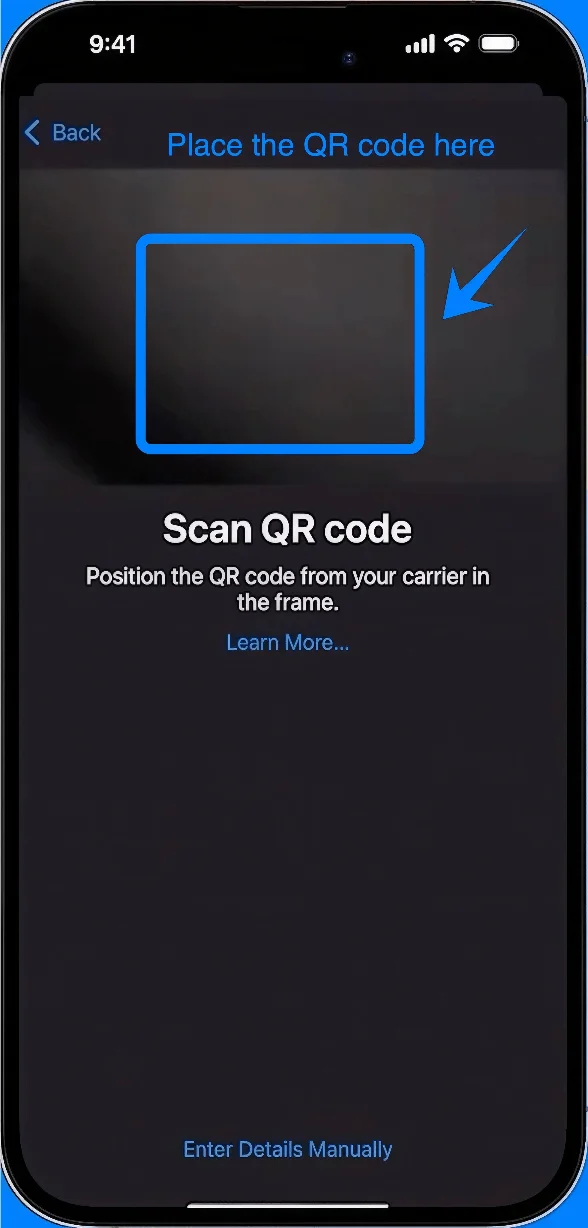
Wait for the device to recognize the code automatically
Step 5: Confirm Cellular Plan
When prompted, tap Add Cellular Plan
Step 6: Label the Plan (Optional but Recommended)
Choose a label (e.g., Primary, Secondary)
Tap Continue
Step 7: Set Default Line Preferences
Select which line to use for:
Default voice line → Tap preferred line → Tap Continue
iMessage & FaceTime → Select line → Tap Continue
Cellular data → Select line → Tap Continue
Step 8: Complete Setup
Wait for activation to complete
Tap Done if prompted
Method 2: Install eSIM Using Manual Input
Step 1: Open Cellular Settings
Tap Settings
Scroll down and tap Cellular (On some devices, this may appear as “Mobile Service” or “Mobile Data”)
Step 2: Add eSIM
Tap Add eSIM
Step 3: Choose Manual Entry Option
Tap Use QR Code
On the QR scanner screen, tap Enter Details Manually (located at the bottom)
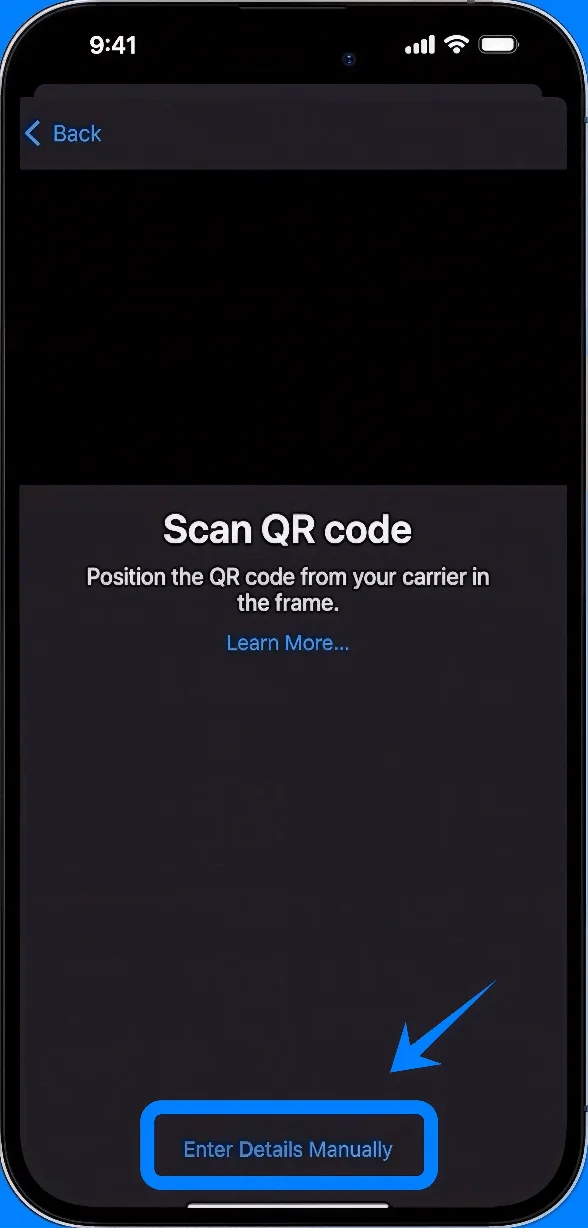
Step 4: Enter Activation Information
In the SM-DP+ Address field, type the address provided by your carrier
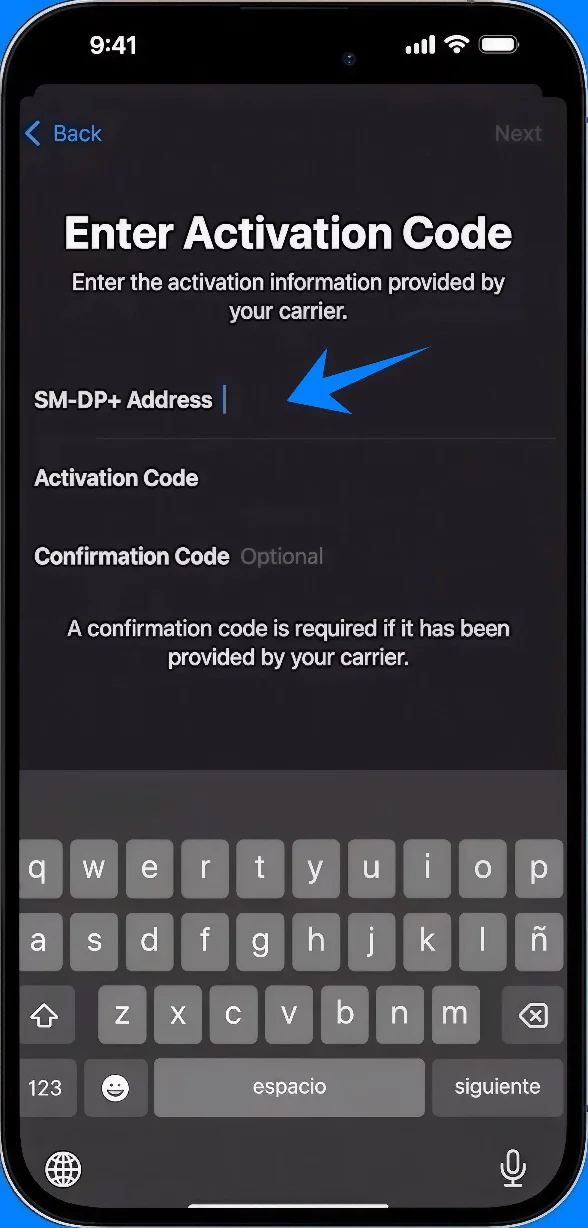
In the Activation Code field, type the code exactly as given
If required, enter the Confirmation Code
Step 5: Submit Activation
Tap Next
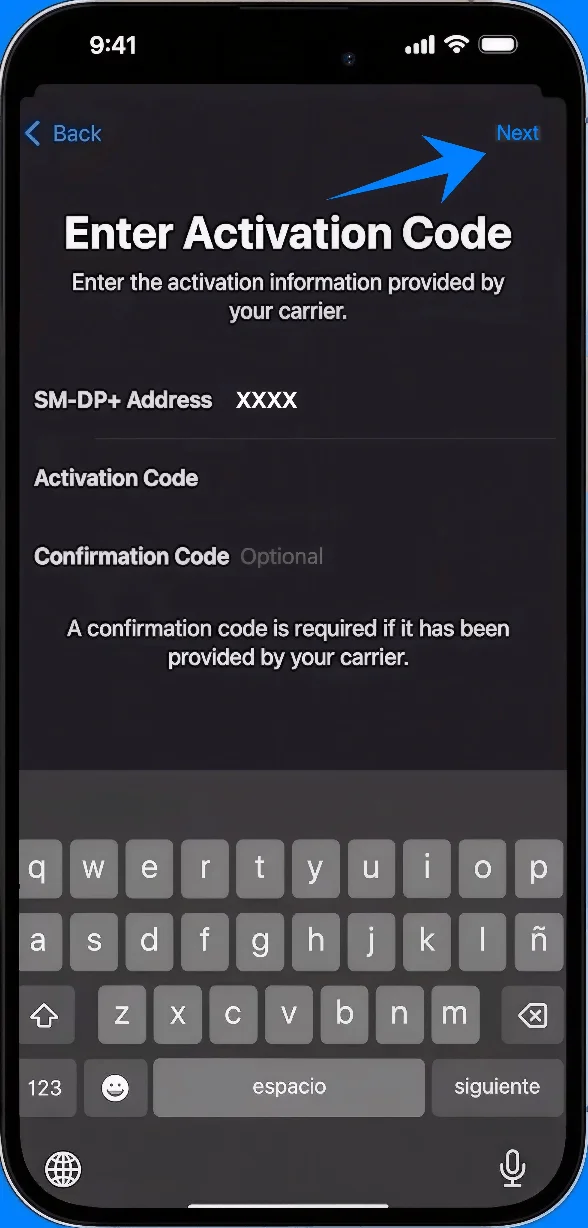
Step 6: Confirm Cellular Plan
When prompted, tap Add Cellular Plan
Step 7: Label the Plan
Choose a label (e.g., Primary, Secondary)
Tap Continue
Step 8: Configure Line Usage
Select default settings for:
Voice line → Tap selection → Tap Continue
iMessage & FaceTime → Tap selection → Tap Continue
Cellular data → Tap selection → Tap Continue
Step 9: Complete Setup
Wait for activation to finish
Tap Done if prompted
How to Confirm eSIM Installation
Check in Cellular Settings
Go to Settings → Cellular (On some devices, this may appear as “Mobile Service” or “Mobile Data”)
Confirm that a new plan appears under SIMs or Cellular Plans
Check Signal Indicator
Look at the top-right corner of the screen
Ensure signal bars appear for the newly added line
Verify Line Status
Tap the new plan under Settings → Cellular (On some devices, this may appear as “Mobile Service” or “Mobile Data”)
Confirm:
Turn On This Line is enabled (toggle is green)
Status shows Connected or similar
Test Connectivity
Make a test call:
Open Phone → Keypad → Dial number → Call
Test mobile data:
Turn off Wi-Fi → Open Safari → Load a webpage
More Device-Specific eSIM Setup Guides
Need to activate an eSIM on another device? You may find these guides helpful.
Conclusion
Now that your iRoamly eSIM is set up, your iPhone 14 is ready to support a more flexible way of staying connected. The ability to install and activate a plan digitally allows you to adapt quickly without extra steps or interruptions.
Whether you’re managing one line or multiple, everything can be handled directly from your device. With everything in place, staying connected becomes simpler, more intuitive, and easier to maintain wherever you go.